| | | |
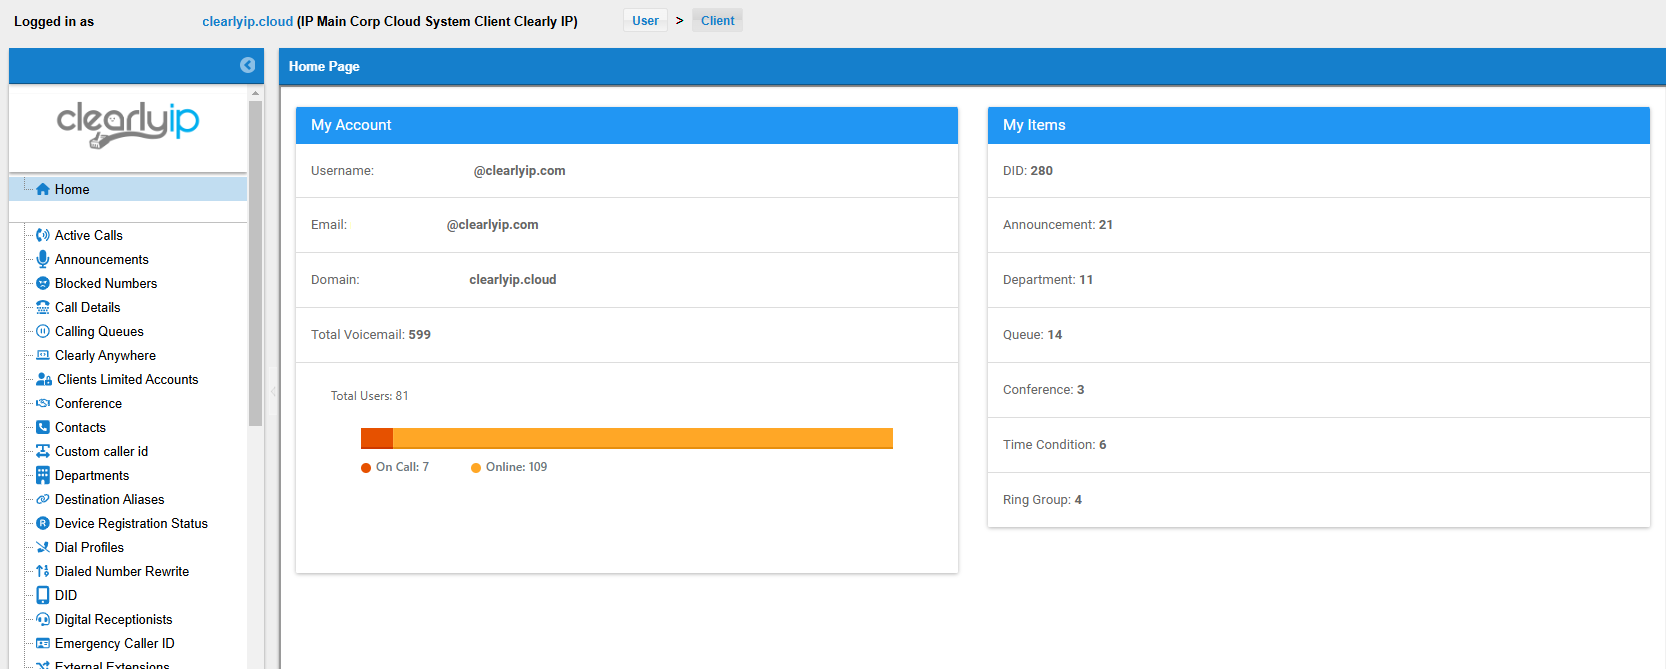
 Uploading .... Uploading .... Client level login is where most of the PBX related call flow settings are handled for Clearly Cloud. The Client Level is linked to a Customer or Entity and belongs under a Reseller. Underneath Client are the Users/Extensions for that Client, the user can log in at a User Level. Logging In - Navigate to your perspective URL on where your Client is hosted, for example, https://w.clearlyip.cloud. Login with your Username and Password. Your Cloud URL, Username and Password were emailed to you from our Portal when you signed up for this Client Location. You can retrieve the the Cloud URL and Username from the Clearly Portal at https://trunking.clearlyip.com under the Location and use the forgot password link on the Login URL if you are not sure of your Password.
- Once Logged in, you will see all the Client’s information that you logged in as.
My Account (Changing your Login Details) - Click on the My Account menu Option
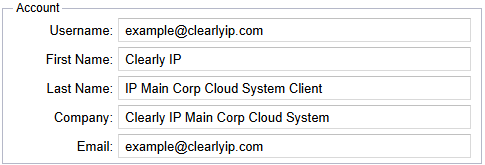
 - Account - From here, you can change your First and Last Name, Email Address, which is also your Login username.
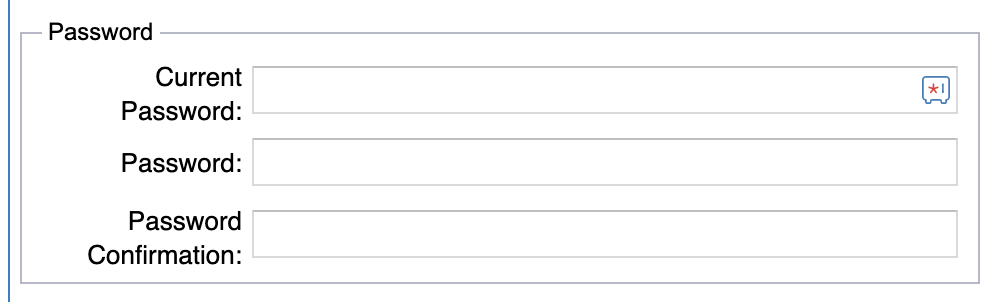
- Password - Here is where you can change your Client level password.
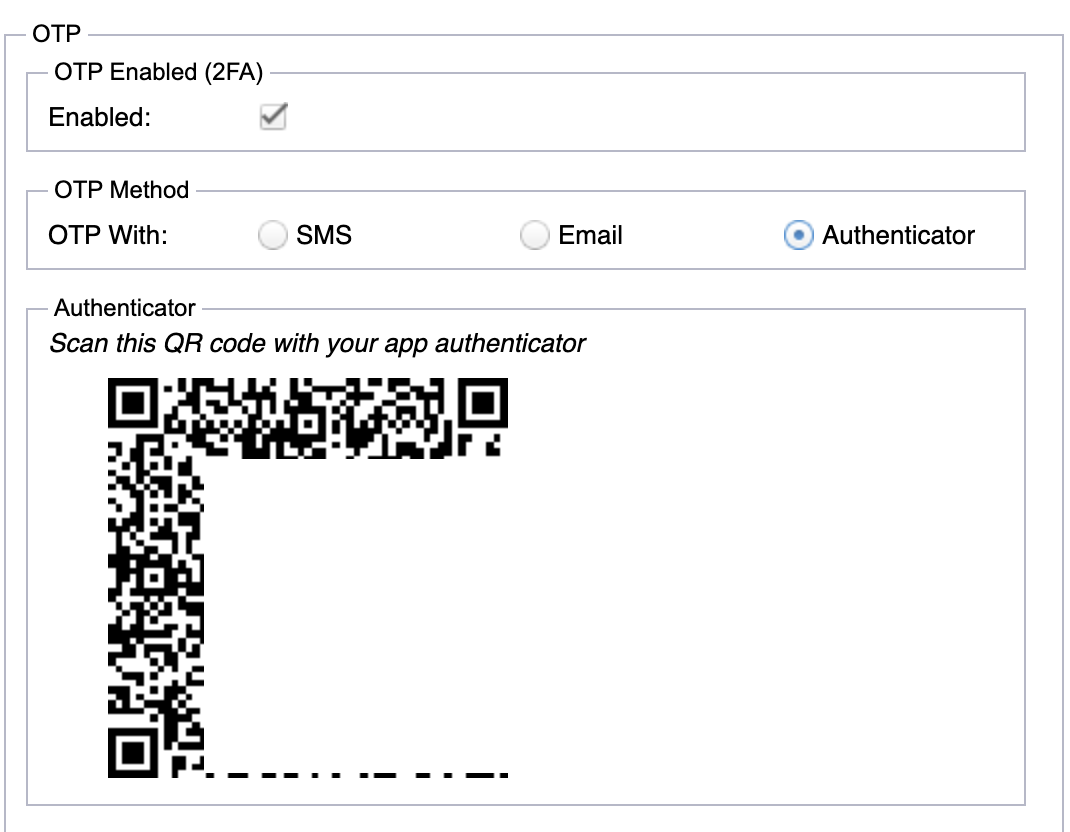
 - OTP - Here is where you can enable (One Time Password) or also know as (2 Factor Login) for a user. The supported ways for OTP is
- SMS - Provide a SMS capable number that after your login with your username and password we will send a SMS with your One Time Password as the additional login factor.
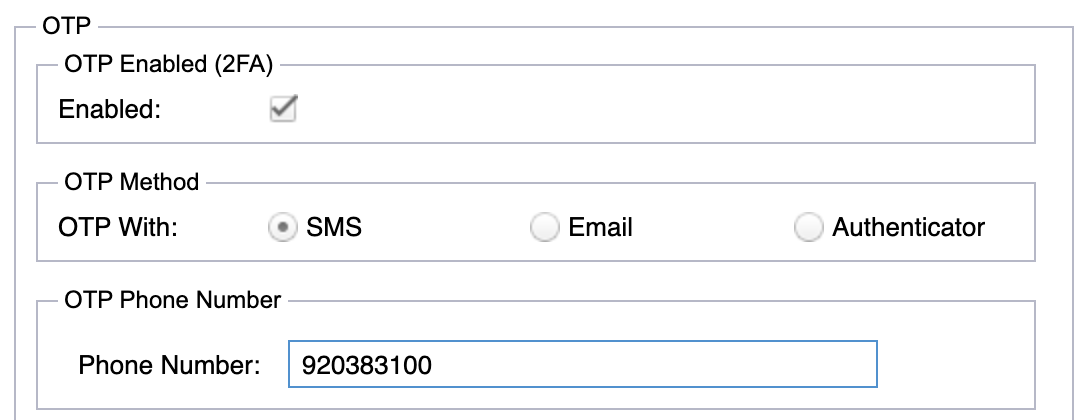 - Email - Provide a Email Address that after your login with your username and password we will send a Email with your One Time Password as the additional login factor.
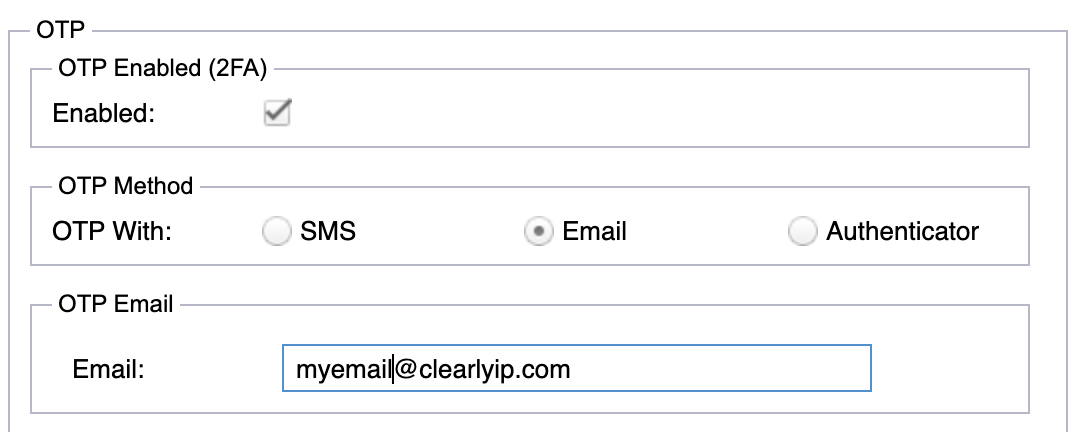 -
- Authenticator App - Download and install on your Mobile or Compute the Authenticator app which is a 3rd party 2 Factor Login app and scan the QR code generated here from your app.
-
- Backup Codes - Clicking this button will reveal backup codes that you can store somewhere safe to be used in the event that you are not able to use your 2 Factory option above such as loosing your Cell Phone if you are setup with SMS as your 2 Factor.

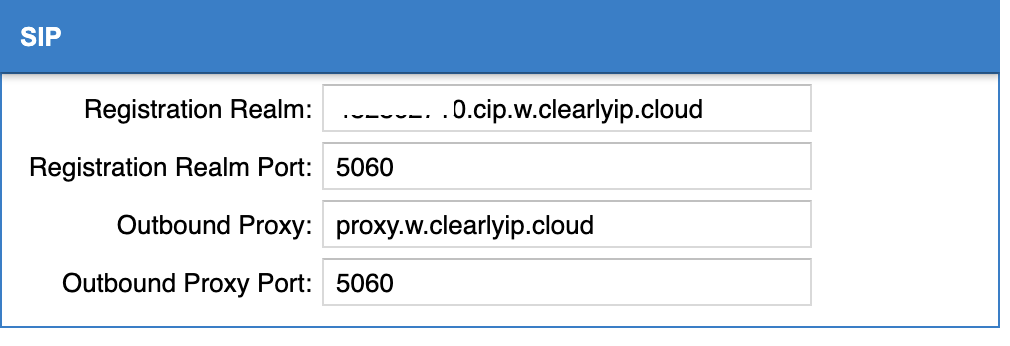
- SIP - Here is where we can see our Client Realm and Outbound Proxy for this client in the event you need to register a SIP device manually.
Active Calls - Click on the Active Calls menu Option
 - This page will show you all active calls on the system for this Client at that time. This page does auto-refresh every 5 seconds to get you the most current Active Calls at any time.The table can be sorted by source, destination, start time or duration.
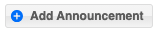
 Text To Speech (tab):
- Provide the following information:
- Voice Type - Pick from different male and female voices we have available.
- Text Type - Usually Plain Text, but if you want to handle special breaks and formatting, you can use Speech Synthesis Markup Language (SSML) as documented here.
- Speed - Normally left at the default speed, you can increase the speed to make it play the audio faster.
- Pitch - Here, you can change the audio pitch used on the voice if you want.
- Volume - here, you can increase or decrease the volume level you want to record the announcement.
- Text To Speech - Here is where you define the Text you want us to convert to Speech using all the settings above.
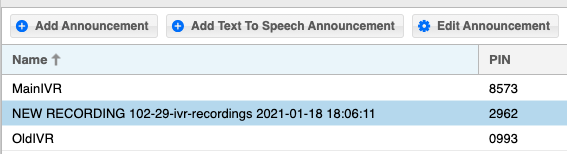
Upload An Announcement (tab):
You can upload your announcement audio files from here. Supported format are wav, mp3 and webm. You will then be able to use them in an IVR or as a destination. Files recorded by dialing *60 on a device will also appear on this page. Note that if you want to update an announcement by dialing *60, you will be asked for the announcement PIN. 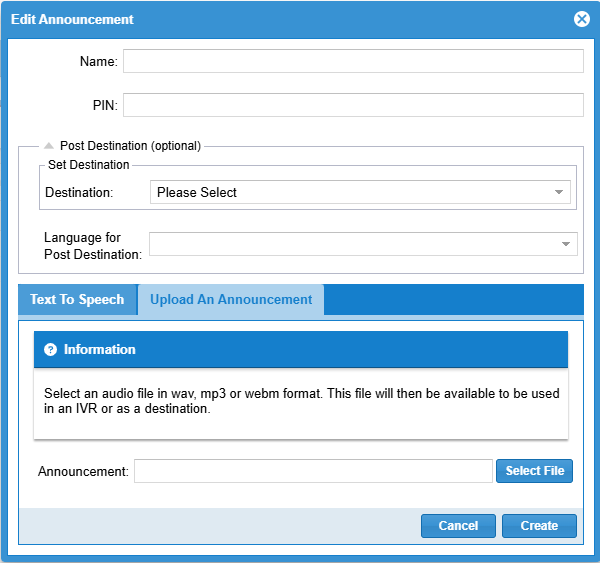
Record Greeting through your phone - From your phone, you can dial *60, which will prompt you to record your announcement.
- You will receive instructions on how to start the recording and save it.
- Once saved, it will playback the PIN for the recording you just saved
- You can now navigate to the Announcement tab here and view and rename the announcement based on the PIN saved for this new announcement by highlighting the new announcement and pressing the Edit Announcement button.
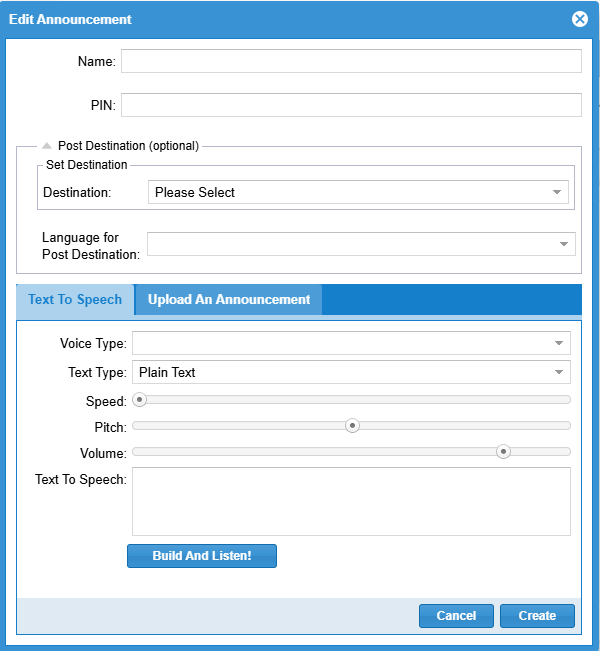
 Blocked Numbers - On this page, you can provide Phone Numbers you want to block from calling you. It’s a Black List per Client of numbers to block. Calls from these phone numbers will not reach any user or other destination in your system but rather get dropped.
- Click on the Blocked Numbers menu Option
 . 
- You can highlight any number to edit or delete the block with the buttons at the top
- For adding a phone number to block just click on the + Add Phone Number To Block button, give it a Name and input the number
Call Details - This page contains the logs of every call made or received from every extension. You can filter calls by using the search fields and export the log to a spreadsheet. CDR export to CSV is limited to 100 000 records.
- Click on the Call Details menu Option
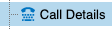 - From here, we can see information on each call, such as:
- Date and Time, Duration, User involved in the call, and Caller ID of who they were on a call with.
- You can also highlight any Call and click on the Download or Delete buttons to download or delete the call recording file accordingly.
 - If the call were set up to be recorded, you would see the following Play Icon to play the Call Recording.
 - If the call were NOT set up to be recorded, you would see the following Grey out Icon showing you the call was not recorded.
 Call Recordings Archives - Call Recording Archiving allows for storing and managing recorded phone conversations for long-term preservation and retrieval.
- The Call Recordings Archives menu provides a list of such call recording archives that exist in the system available for download.
- Call Recording Archives are programmed by the administrator under the Settings menu option; they can get set to get automatically created on a Daily, Weekly, or Monthly basis.
- Click on the Call Recordings Archives menu Option

- From here, we can see information on each call recordings archive, such as:
- Name, Creation Date, Expiration Date, and Size of the archive
- Highlight any Call Recording Archive and click on the Download button to download the call recording archive file accordingly

Calling Queues - If you need a solution to manage incoming calls and have customers waiting on the line until an agent picks up the call, you can create a Calling Queue entry. This will allow you to have multiple calls on hold, queued by first-in, first-out order until agents become available.
- Queues consist of:
- Incoming calls being placed in the Queue
- Agents that answer the Queue
- A strategy for how to handle the Queue and divide calls between agents
- Music played while waiting in the Queue
- Agents are the extensions or users answering the calls that have been placed into a specific queue. An agent logs in, indicating that they are now ready to take calls. An inbound call is sent to a queue, which is then transferred to an available agent.
- Click on the Calling Queues menu Option

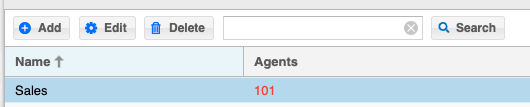
- We will now see a list of Calling Queues that are set up on this Client. This list will include which agents are members of that Queue and those current agents’ current state.
 - You can edit or delete any Queue by highlighting the Queue and pressing the edit or delete buttons at the top.
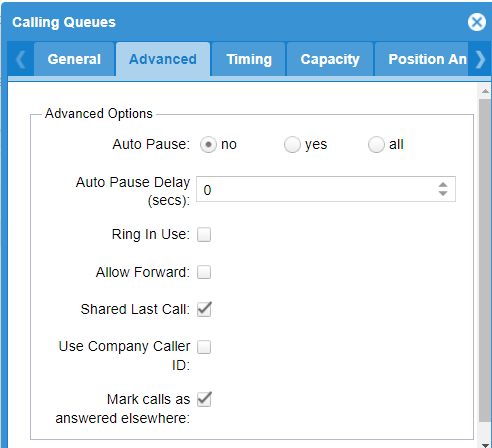
  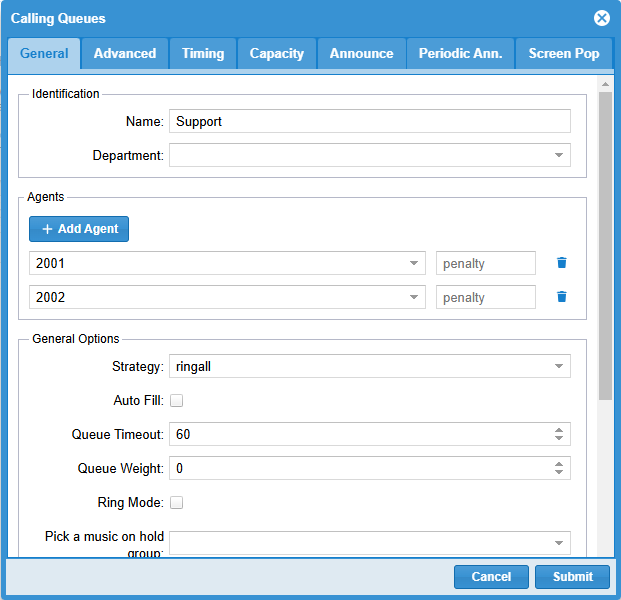 - Auto Pause - If an agent does not answer a queue call, we can auto-pause that Agent based on the options below.
- No - If an agent does not answer a queue call, we will NOT auto-pause them.
- Yes - If an agent does not answer a queue call, we WILL auto-pause them only in the Queue they missed the call in.
- All - If an agent does not answer a queue call, we WILL auto-pause them in ALL queues they are logged into.
- Auto Pause Delay - If using auto-pause above by default, an agent missing a single queue call will kick in auto-pause. Here you can set a delay that says the Agent must have been idle for X seconds since they last accepted a queue call before they will be auto paused.
- Ring In Use - If enabled, the Queue will send an agent on an active call, an additional attempt of a new call. If disabled, the Queue will attempt not to send additional calls to agents on active queue calls.
- Allow Forward - If a user has call forwarding enabled and this option is checked, the Queue will follow the user’s call forwarding settings.
- Shared Last Call - If enabled, this will allow the system to honor wrap up times across multiple queues by sharing the last call info of agents across all queues for agents who are logged into more than one Queue at a time.
- Use Company CallerID - If calling an agent is an External number and not an Extension on the system, checking this box will force the Caller ID to be the companies Global Caller ID, defined in the Settings module outline here. If this is not enabled, the system will set the Caller ID as the incoming caller’s Caller ID information.
- Mark Calls as Answered elsewhere - The members of the Queue will get this message when a call has been answered by another member.
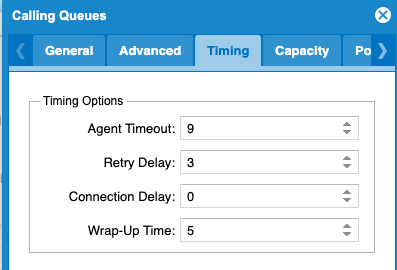
 - Agent Timeout - How long to ring the Agent for in seconds before trying the next Agent or Group of agents based on the Ring Strategy as defined above.
- Retry Delay - How long to wait between trying a new agent in seconds after the Agent Timeout above is met.
- Connection Delay - Do you want to add a delay in seconds after an agent answers an incoming queue call before connecting the caller to the Agent.
- Wrap Up Time - After an Agent has hung up with a queued caller, how long in seconds do we want to wait before trying to send that Agent another queue call.
 - Max Callers - Maximum number of callers who are allowed to be waiting in the Queue for an agent. 0 means unlimited. If set to a number, and that number is met, any new callers trying to join the Queue will be routed to the Fail-Over Destination of that Queue.
- Join Empty - Can a caller join a queue if it has no agents logged in to the Queue. If not enabled and a caller tries to join a queue with no agents logged in, the caller will be routed to the Fail-Over Destination of the Queue.
- Leave When Empty - If all agents log out of the Queue and the Queue still has callers waiting in Queue enabling, this will cause all abandoned callers to be routed to the Fail-Over Destination of the Queue once all agents have logged out of the Queue.
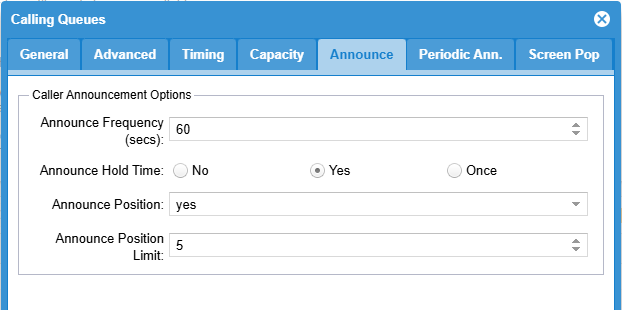
 - Announce (tab) - This option will play to the callers waiting in queue things like their Estimated Hold Time and their current position in Queue.
- Announce Frequency - How often in seconds should we announce the below settings.
- Announce Hold Time - Each time this announcement runs based on the frequency defined above, do you want to inform the caller of the estimated hold time.
- Yes - Setting to yes will have it play the estimated hold time each time the Announcement Frequency runs.
- No - Setting to No will have it never play the estimated hold time.
- Once - Setting to One will only announce the estimated hold time the first time the announcement happens and will not announce the hold time each frequency after that.
- Announce Position - Here, we can define if we want to announce the caller’s position in the Queue based on the Frequency settings above.
- Yes - Will announce to the caller their current position in the Queue each time based on the Announce Frequency above.
- No - Will never announce to the caller their current position in Queue.
- Limit - Will only announce the caller’s position in Queue if their position is below the Announce Position Limit set below.
- More - Behaves like Yes option above except if the Position of the Caller is higher than the Announce Position Limit below the system will only say there are more than X callers waiting in Queue ahead of you with X being the Announce Position Limit below.
- Announce Position Limit - A numeric value used with the Announce Position setting above when set to Limit or More.
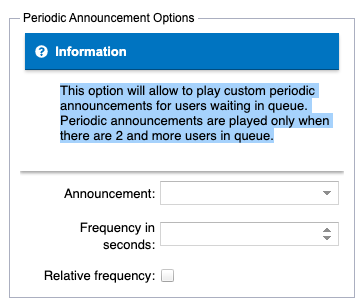
 - Periodic Ann. (tab) - This option will allow playing custom periodic announcements for callers waiting in Queue. Periodic announcements are played only when there are two and more users in Queue.
- Announcement - Pick which announcement you want playing to the callers on a period basis. The drop-down of Announcements is controlled through the Announcement module on your CloudPBX, as documented here.
- Frequency in seconds - How often in seconds should this announcement be played.
- Relative frequency - By default, the frequency in seconds above will take that setting and subtract the length of your announcement. If this is enabled, it will take the frequency in seconds and add on the announcement length on how often to play the announcement to callers.
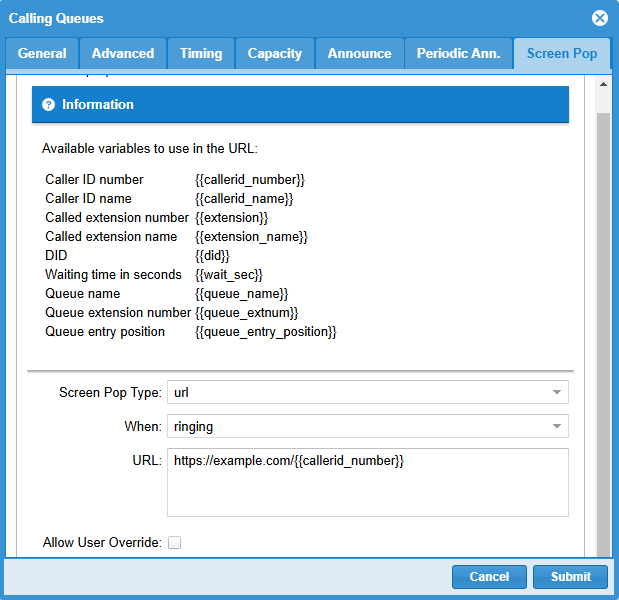
 - Screen Pop (tab) Available variables to use in the URL: - {{callerid_number}} = CallerID number of the originator of the call that is arriving to this queue
- {{callerid_name}} = CallerID name of the originator of the call that is arriving to this queue
- {{extension}} = the number of the Local Extension user receiving the call and ringing
- {{extension_name}} = the name of the Local Extension user receiving the call and ringing
- {{did}} = the number that the originator of the call that is arriving to this queue originally dialed
- {{wait_sec}} = how long, in seconds, the caller waited in the queue
- {{queue_name}} = name of the queue where the call is arriving to (this queue)
- {{queue_extnum}} = number of the queue where the call is arriving to (this queue)
- {{queue_entry_position}} = entry positinon that this call arrived to within the queue
Screen Pop Type - Enable or disable Screen Pops for when receiving an incoming call from this Queue. If enabled (setting this parameter to "url"), users working in the Call Panel will receive a screen pop when the call is ringing or answered (depending on your configuration).
When - Define the moment the screen pop will launch, either when the call starts "ringing" or when it gets "answered"
URL - The URL that will be opened when the screen pop launches. This URL can contain call variables so that the webpage for the exact correct resource gets automatically displayed when the screen pop triggers.
Allow User Override - This will allow end users to configure the Screen Pops settings from within their Call Panel.
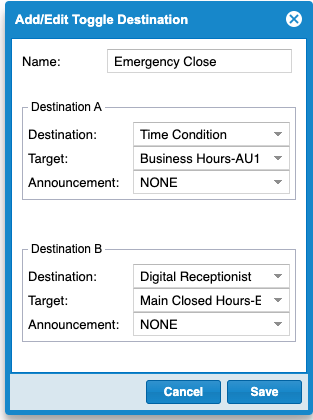
- Callback (tab) - The Callback feature allows callers to avoid long waits on a busy queue as they can exit and be called back at the moment when their position would have been serviced.
- Enabled - opt to provide the callback option to callers (yes or no).
- Announce Option - Define when to provide the callback instructions to the callers in the queue.
- Before Entry - The instructions will be reproduced to callers upon (right before) entering the queue.
- After Wait - The instructions will be reproduced to callers right after the time defined in the "Announce Frequency" parameter has lapsed (timer starts as soon as the call arrives to the queue).
- Peridically - Setting to One will only announce the estimated hold time the first time the announcement happens and will not announce the hold time each frequency after that.
- Before Entry + Periodically -
- Announce Position - Here, we can define if we want to announce the caller’s position in the Queue based on the Frequency settings above.
- Yes - Will announce to the caller their current position in the Queue each time based on the Announce Frequency above.
- No - Will never announce to the caller their current position in Queue.
- Limit - Will only announce the caller’s position in Queue if their position is below the Announce Position Limit set below.
- More - Behaves like Yes option above except if the Position of the Caller is higher than the Announce Position Limit below the system will only say there are more than X callers waiting in Queue ahead of you with X being the Announce Position Limit below.
- Announce Position Limit - A numeric value used with the Announce Position setting above when set to Limit or More.
Clearly Anywhere - In this section you can globally manage the Clearly Anywhere accounts associated to your users and their devices.
- There are three menus:
- Push Notifications for Clearly Anywhere Devices.
- Clearly Anywhere Users.
- Number Rewrite Rules.

Push Notifications for Clearly Anywhere Devices - In this menu you can check the status of the push notifications for the Devices using the Clearly Anywhere app, by displaying the status of the push notifications for all the Clearly Anywhere Devices of your clients with the following information.
- Username: The Cloud username associated with the device.
- SMS Capable: This lets you know if the device has SMS capabilities or not.
- Device ID: A unique device identification.
- Device Description: A description of the device.
- Device Platform: The operating system of the device. We currently support Android and iOS
- Device Version: This shows the version of the operating system of the device.
- Realm: The realm from which the user and device belong.
- Updated At: The date and time the information was updated.
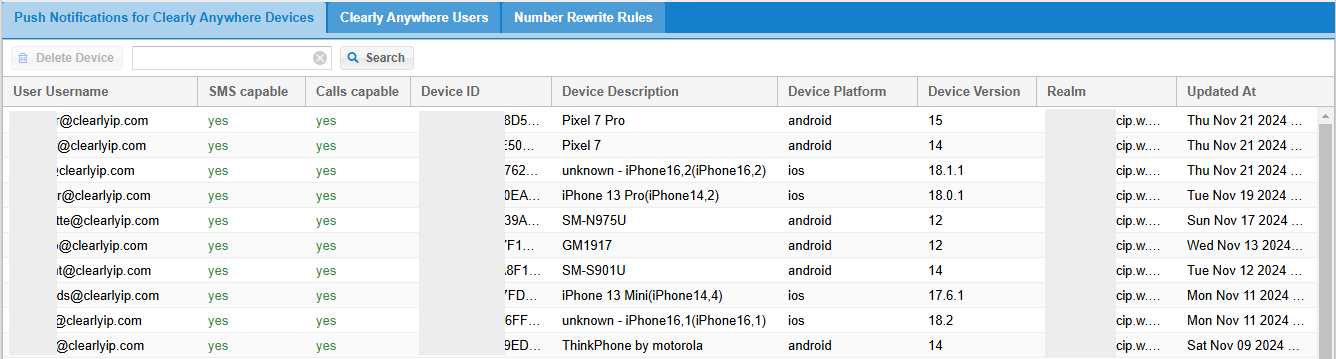
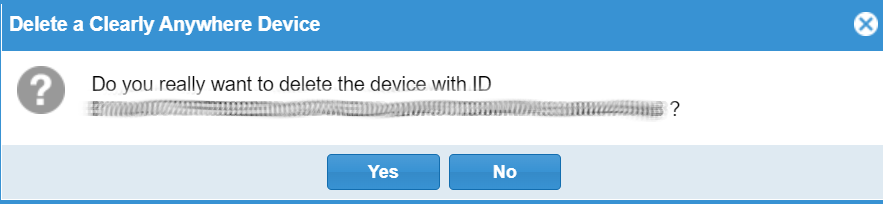
- You can delete any entry by selecting it with the mouse and then clicking on the Delete Device button after confirmation.
- In this section you can check the status of the Clearly Anywhere users from all your clients with the following information:
- Username: The Cloud username associated with the device.
- Email: The user's email address.
- First Name: The user's First Name.
- Last Name: The user's Last Name.
- Auth Token: The authorization token needed to allow the device register to the realm where it belongs.
- Realm: The realm from which the user and device belong.
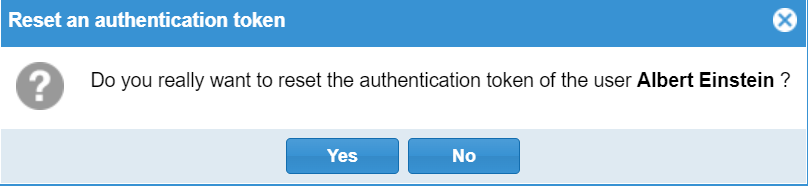
- Reset Auth Token is for Resetting the Authorization Token for any user
 - Clicking on this button you can reset the authentication token of the selected user after a confirmation.
- In this section you can set overrides for the dial action of the Clearly Anywhere app to use GSM or VoIP for when dialing certain phone numbers.

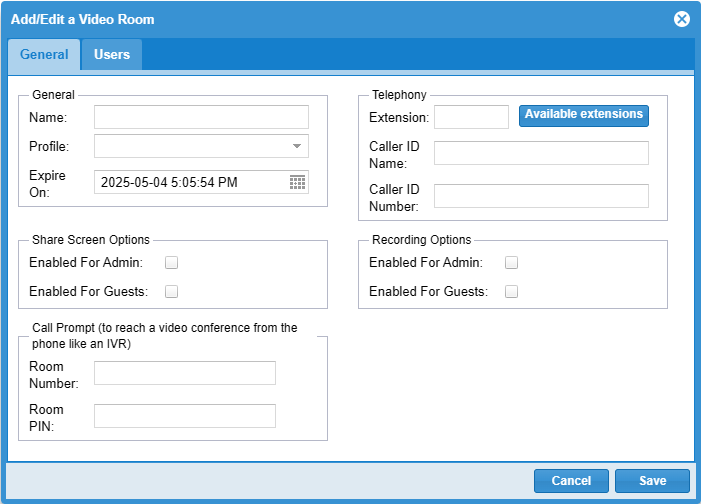
Conference - This menu allows you to create audio conference rooms that are available to users and outside callers. To access a conference, simply dial the conference extension number and enter the PIN, or you can route callers through DIDs or IVRs into specific Conference rooms.
- You do not need to create a conference room for each user as they receive a personal conference room already. They can see their personal conference room details when they log into Clearly Cloud at a User Level or into Call Panel.
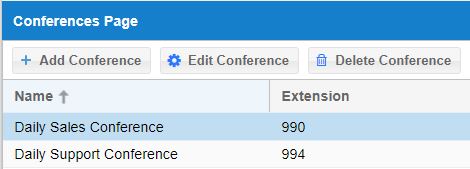
- Click on the Conferences menu Option
 - From here you can see all the non Personal conference rooms that are setup for this Client.
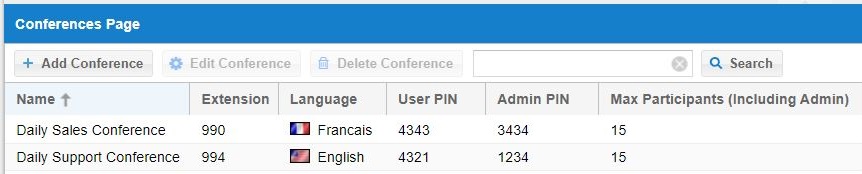 - You can edit or delete any conference room by highlighting the conference room and pressing the edit or delete buttons at the top.
 - For each conference room, you can set the following details.
- Name - Friendly Name for this Conference Room.
- Extension - Extension Number for this Conference Room. Once set up, you will be able to dial this Conference Room extension number to join the conference or transfer callers to it.
- Language - Add the ability for you to set the language of the audio conference prompts will be played to the participants. Currently only English and French are available.
- Admin PIN - PIN for when a Admin user joins, so we know they are a Admin User and not a Non-Admin User
- User PIN - Pin for when a Non-Admin user joins the call, so we know they are not an Admin User.
- Max Participants (Including Admin) - Maximum number of Callers allowed in this Conference Room at any one time.
- Record Conference - record the audio streams of this conference room together in a call recording file. Recording starts when first user joins.
- Wait for Admin - If enabled, non-Admin Users will be left on hold until the Admin User joins the Conference Room. They will not be able to hear each other or participate in the Conference Room until a user calls in and uses the Admin PIN to join the conference.
- Announce Join/Leave - When enabled, this will prompt each user to state their Name on joining, and it will play the User’s Name when they enter and leave the conference.
- Denoise - Attempts to remove background noise from the Conference Room; this action may also remove valid callers trying to talk.
- Music When Empty - Enabling this will play MOH when only one caller is in the Conference Room, so they do not get just dead air otherwise since no other callers have joined yet.
- MOH - Which Music On Hold category of music should be played. MOH Categories are managed in the Music On Hold section below.
- Quiet - When selected the enter/leave prompts and user introductions are not played to the participants.
- Announce User Count - If enabled, will announce the number of users in the conference room to the caller when they enter.
- Announce User Count To All - If enabled, this will announce the number of users in the conference room to the Caller and all Users already in the Conference room each time a user joins.
- Announce Only User - If enabled, it will play the number of users in the conference room only if the conference room was empty before the user calling in.
- Announcement - Set an Audio File that can be played to the user when they join the conference room.
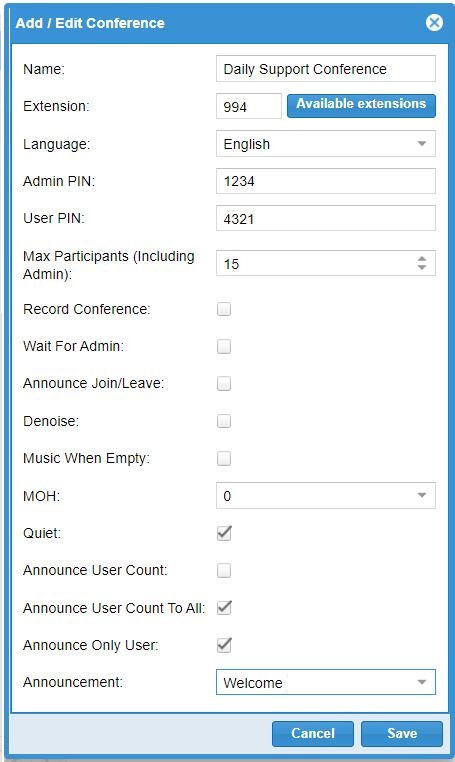
- Press the Save button when done to save your changes.
Contacts - In this module you can manage the shared contacts in your Clearly IP Cloud instance, and they will be available for your users. You can set one or many contacts as read only for some users, not accessible or filter what contacts a user can see through tags and permissions.
- To access this module just click on the Contacts menu Option
-
 - You will see the current status of your contacts and two Tabs: Contacts and Tags. The Contacts tab is shown by default.
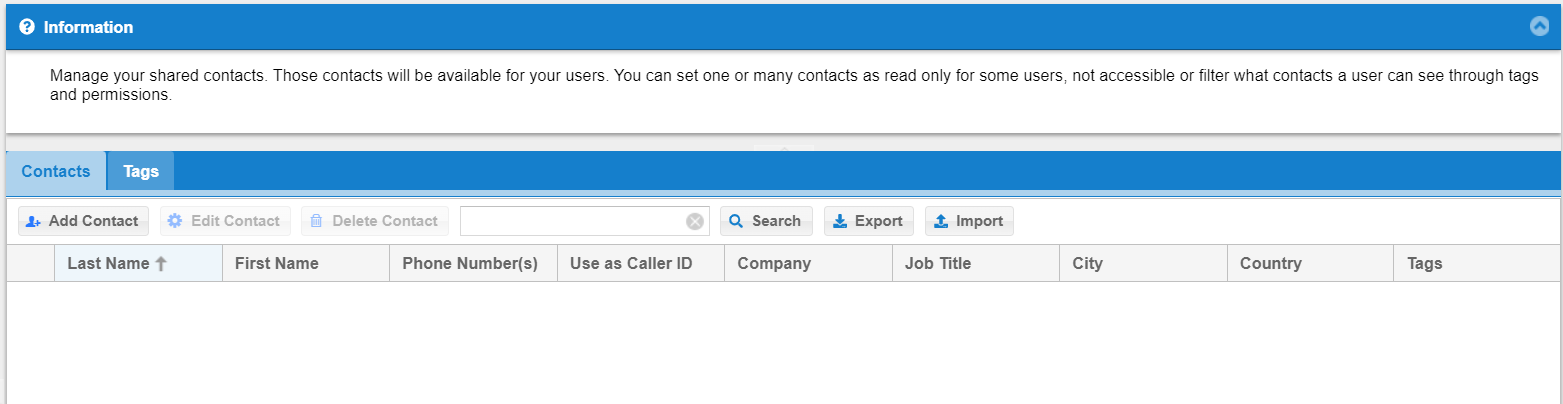 - There are two ways for adding a contact or contacts: Manually or by importing a CSV file.
Manually Adding Contacts - Click on the Add Contacts button and a new screen will pop-up.
 - This new screen has three tabs: Contact, Company, and Address
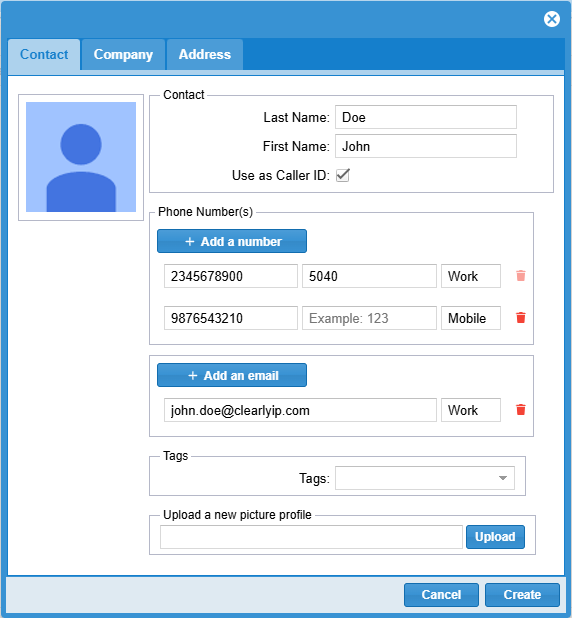
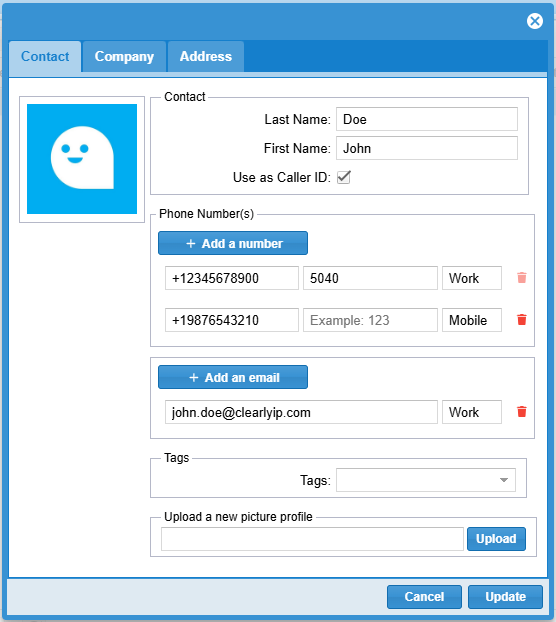
In the Contacts Tab you can enter the following information:
- Contact's Last Name and First Name.
- The option Use as Caller ID, if enabled, will override the Caller ID based on the First and Last names fields for received calls from any of the phone numbers entered below.
- Phone Numbers: Enter this contact's phone number(s) icnlusding any internal (office) extension if applicable
- In the Label field you can add a label to differentiate this number from the others.
- Clicking on Add a Number will add a new field where you can enter an additional number for this contact.
- The Add a Number button will show a new field where you can enter an email address for this contact. Succesive presses on this button will allow for entering additional email addresse of this contact, adding any corresponding Label to idnetify the type of each email address
- Tags: You can select the tag that can be applied to this number.
- Upload a new picture profile: Here you can map a photo and have it associated to the contact.
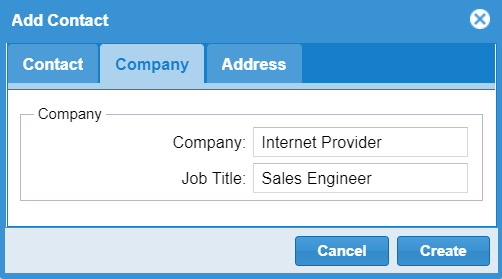
In the Company Tab you can enter the following fields: - Company and Job Title.
 In the Address Tab you can enter the following fields: - Address Type: This could be Home, Work, School, or Other
- Address Line
- City
- State/Province/Region
- ZIP/Postal Code
- Country
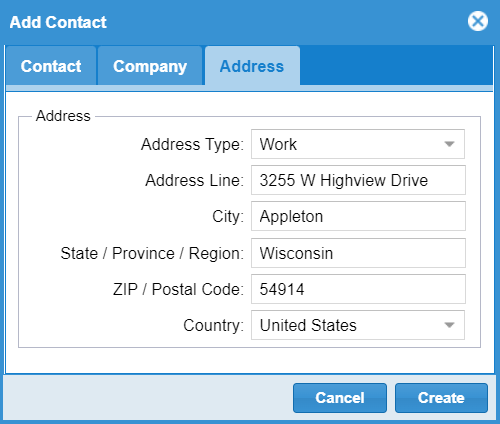 Just click on Create to add this contact.
Editing a Contact - Simply select the contact to edit and click on the Edit Contact button or double click on the contact to edit and the editing window will appear.
 - Update the desired fields and click on Update.
Deleting a Contact - Just select the contact to edit and click on the DeleteContact button.
 Exporting Contacts - Click on the Export button and a CSV file will be downloaded to your PC/Laptop.
 - The contents and fields of the CSV are as follows:
 Importing Contacts - Click on the Import button
-
 - A new window will appear and from there you can select the CSV file with the contacts to import.
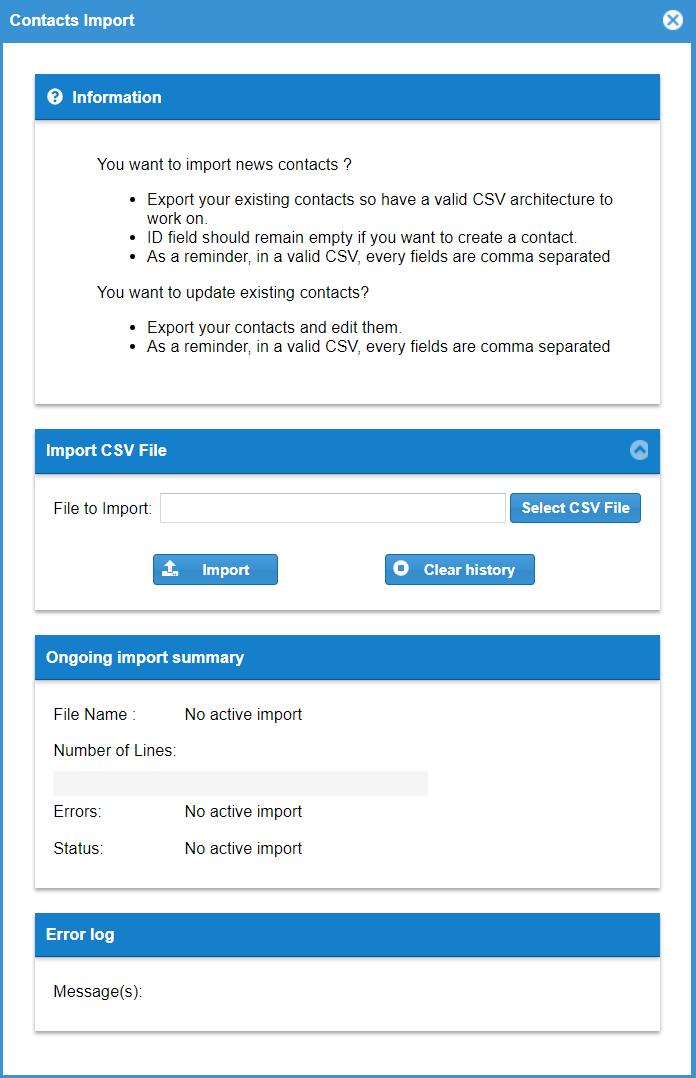 - Click on Import.
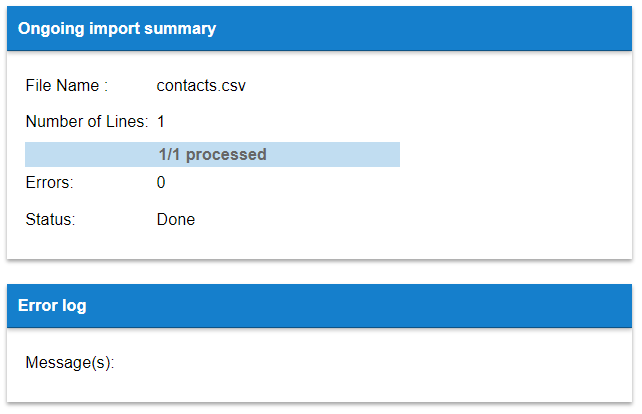
- The system will provide the status of the import in the Ongoing import summary section.
 - We recommend you to first create one contact, export it so have a valid CSV architecture to work on.
- ID field should remain empty if you want to create a contact.
- As a reminder, in a valid CSV, every fields are comma separated.
Tags (tab) Tags are useful to filter what contacts a user can see through permissions or just to group some contacts. The Tags Tab will allow you create a Tag that can be associated to any contact. - To Create a Tab, click on the Add Tag button
 - A new window will be showed on which you can add or create your Tag.
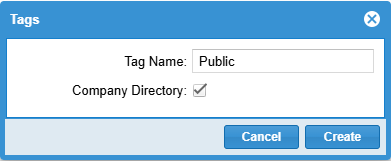
- You can also Edit or Delete a Tag
An on-production contact list should look like this:  In this link we explain how Contacts, Permissions and Permission Groups interact when working with contacts, users and tags. Custom Caller ID - From this page, you set up a custom caller id. This allows you to change the outbound caller ID sent on certain calls. This change can be triggered based on either a prefix dialed with the call or based on the destination phone number itself.
- Click on the Customer Caller ID menu Option
 - From here we will see a list of Caller ID rules that have already been created.
 - Highlighting an existing Caller ID rule will let you use the Edit and Delete buttons at the top for that Custom Caller ID rule
 - Click on the Add Customer Caller ID button to create a new Caller ID rule
 - From here, we can define the following information for each rule
- Rule Name - A friendly name to identify this Caller ID rule
- Phone Number to Display - This will be the Phone Number we set as your Caller ID Number when this rule is used.
- Name to Display - This will be the Name we set as your Caller ID Name when this rule is used
- Prefix - This is the prefix the user will dial to match this rule. For example, if I set this prefix to 999, then any time I call a number but add a 999 in front of the number I am calling, this rule will apply to that number. If you set a number here and leave the destination blank, then the rule will apply only when this prefix is dialed before the normal number.
- Destination -To trigger based on the destination phone number, set that phone number here. If you leave this blank, then the rule will apply to all numbers that match the prefix when making an outbound call. If you set a number here and leave the prefix field blank, the rule will only apply to that phone number you define here. For example, if I set the destination field to 9203833100 and leave the prefix field blank then any call to that number will show the custom caller ID.
- If both the Prefix and Destination are entered, the destination field contents are ignored and the prefix will govern.
 - Press the Apply button to save your changes
 Destination Aliases - From this page, you can assign an extension number to a destination. You will then be able to dial the extension number or transfer a call to this number to call the destination directly.
- Destination Aliases are usually used for Destinations that do not have their own extension numbers, but you want to be able to dial them directly from a Phone.
- Click on the Destination Aliases menu Option
 - You will now see a list of existing Destination Aliases for this Client and will see some included ones that we auto-create for you.
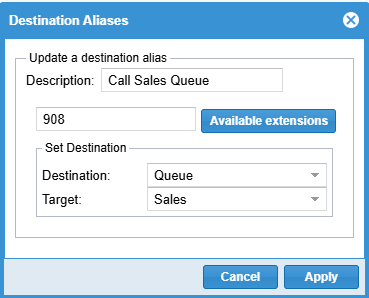
 - From here, you can Add, Delete or Edit any Alias. In our example, we will add a new Destination Alias for our Queue to transfer callers from our Desk Phone directly into the Sales Queue that we already set up on the system for this Client. Click on the Add Alias button at the top.
 - Enter a Description for the Destination Alias.
- Provide an Extension Number that can be dialed to use this Alias.
- Pick the Destination of Queue, and then the Sales Queue and press Apply to save your changes. You can now dial 908 from your phone to reach the Sales Queue.
 Device Registration Status - Here we can see a list of all current active registered phones and devices for this client domain
- Click on the Device Registration Status menu Option


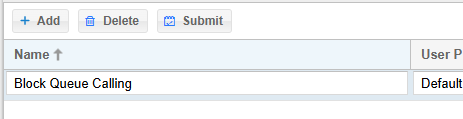
Dial Profiles - With a regular expression, you can define a set of extensions blocked for a given user profile. User Profiles are created at a Reseller Level and shared with a Client. Only your Reseller can create new User Profiles. The users assigned to this profile won’t be able to call the extensions defined by the regular expression. Double-click an item in the list to edit it. When you are done, click ‘Submit’ to save your modifications.
- Click on the Dial Profiles menu Option
 - Click the Add button at the top
 - This will add a new row for you.
 - You can now Name this Dial Pattern rule, pick which User Profile group it applies to, and in the extension (s) To Group-define what extensions the users of this User Profile are blocked from calling.
 - Press the Update button to save your changes
Dialed Number Rewrite - This feature allows to filter and replace patterns when dialing a number.
- Click on the Dial Number Rewrite menu Option

- This section will display the current dial patterns in your instance.
- These dial patterns are used when dialing outbound numbers.

- Click on Add Dial Pattern to add a dial pattern pattern. A small window will open where you can enter the following information.
- Name: Name or Description of the dial pattern.
- Matching Expression: This is the regular expression or string the system will try to detect.
- Substitution Expression: This is the regular expression or string that will be used for replacing any coincidence found.
- Replacement Expression: This is the text or number that each regular expression match is replaced with during the ‘search and replace’ process.
- Priority: Priority of rule
- Matching Rule: Matching operator for the rule: Same Characters or RegEx (Regular Expression)
- Case Sensitive: If our rule is case sensitive or not.
- Deactivate Rule: Status of the dial pattern: enabled or disabled.
- Here is an example for setting up a Dial Pattern to add an area code to 7-digit numbers for users that aren't accustomed to dialing with an area code.
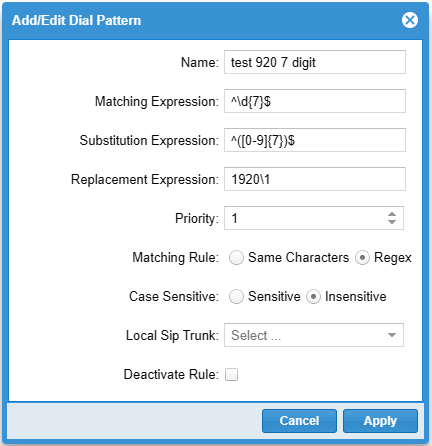
- Matching Expression explanation:
- ^ : Start of the line.
- ( : Start of what we want to select.
- \d : We are going to search for digits.
- {7} : Amount of digits to search. 7 of them in our example.
- ) : End of what we want to select.
- $ : End of the line.
- In other words, we are going to look for any number 7 digits long.
- Substitution Expression explanation:
- ^ : Start of the line.
- () : Grouped.
- [0-9] : Any digit between 0-9 (This is what will be replaced)
- {7} : Amount of digits to search. 7 of them in our example.
- $ : End of the line.
- Replacement Expression explanation:
- 1920 : Add this to the digits captured.
- \1 = The digits captured, in this case, the full 7 digit number.
- In other words, we are adding 1920 to the 7 digits captured, before dialing.
- In most cases, your Matching Expression SHOULD be the same as your Substitution Expression. Matching Expression is what you are looking for.
- When adding a Dial Pattern it is very important to check the Priority since it may conflict with the default or previous Dial Pattern entries.
- When the number is dialed, the system will search for the lowest priority (0) and if there are patterns with the same priority the system will evaluate the first from the top to the bottom and will use the first coincidence. It is worth mentioning it will not search for the best match on the rest of the priorities.
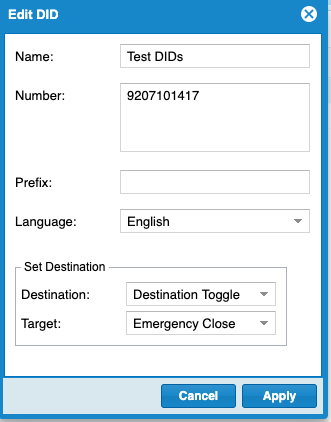
DID - This section will display to you all the Phone Numbers that have been purchased for this Client. You can not add Numbers here direct. All Numbers here are provided by the Clearly Cloud Portal, where you can buy numbers and cancel numbers at any time.
- This module allows you to route all purchased DIDs to the specific destinations on your PBX, such as Users, Queues, IVRs, or Time Conditions.
- Click on the DID menu Option
 - From here, you will see a list of all DIDs (Phone Numbers) that are set up for your Client and where they are currently routing to.
 - You can highlight any Number and Press the Edit button to edit the details of the number. For each number, you can edit the following fields.
- Name - A friendly descriptive name for this number
- Prefix - Allows you set a Caller ID Name prefix added to all calls that come in from this DID.
- Language – Choose which language sound prompts you want to use for any system recordings that are played when this DID is routed to a recording that is set up with more than one language support.
- Ringtone - Set a ring tone to differentiate calls coming from this DID from the others.
- Announcement - Set announcement to play before routing call to destination
- Call Limit - Set concurrent incoming calls limit on this DID. Set 0 for unlimited calls.
- Inbound Caller ID - Pick an inbound caller id rule, which will apply to either caller name or number. This setting will override any other caller ID settings.
- Destination - The module you want to route this call to, for example, Conferences, Ring Groups, Queues, Extensions, or any other destination module.
- Target - Which specific Target within the destination you want to route the call to. For example, if you picked Conferences as the destination, we could pick which Conference Room the call is routing to.
- SMS User Assignment - Which user(s) are allowed to send and receive SMS/MMS messages from this number from within Call Panel as outlined here.
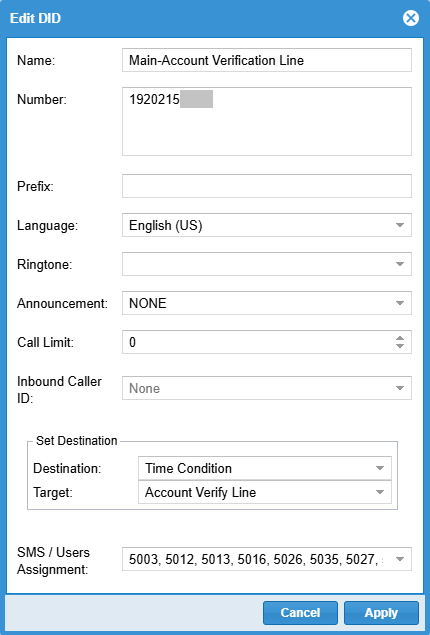
- Press the Apply button when done to save your changes.

Digital Receptionists (IVR) - A digital receptionist (or Interactive Voice Response, IVR) is an automated telephony system that interacts with users on the phone. It allows a caller to pick any IVR entry to route calls to specific destinations of the PBX.
- When creating an IVR, you will need to record an announcement that is played to the caller, instructing them of the options they have to pick from. See below on how you set up an announcement.
- Click on the Digital Receptionists menu Option
 - From here, you can see a list of all the IVRs that are set up for this Client

- Highlighting a IVR allows you to edit, delete or duplicate the IVR using the buttons at the top
- Click on the Add Digital Receptionist button at the top to create a new IVR.
 - The IVR feature is broken into 3 tabs at the top
 - Main Tab - This contains information about the IVR, such as announcements to play and different settings that apply to the whole OVR
- Invalid/Timeout Tab - Where to send the caller to if they enter a invalid option or no option at all after the timeout settings from the Main Tab
- Options Tab – Shows what input options the IVR has, such as Press 1 for Sales and 2 for Support, and how those options are routed.
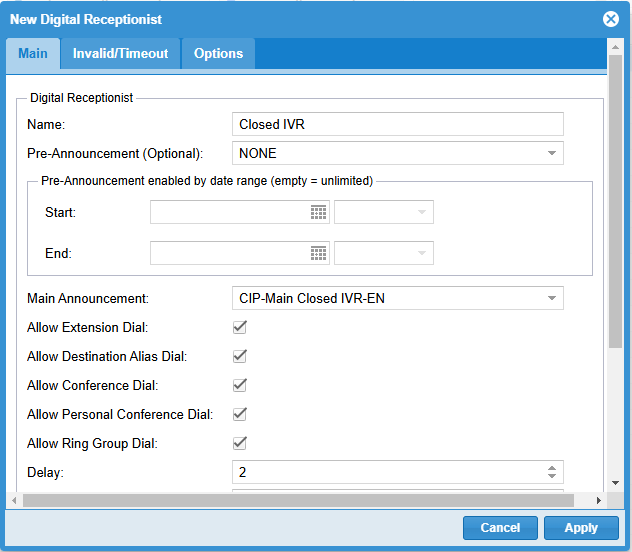
- Main (tab)
- Name - Name of your new IVR
- Pre-Announcement - Announcement that is played right before the Main Announcement below. You can pick from any created Announcement on the system
- Start & End - Pre-Announcement enabled by date range (empty = unlimited)
- Main Announcement - Main Announcement that is played to the caller instructing the caller on the options that can dial. You can pick from any created Announcement on the system
- Allow Extension Dial - If enabled, a caller can dial any user extension directly from this IVR.
- Allow Destination Alias Dial - If enabled, a caller can dial any Destination Alias setup for this Client from this IVR; without having to create an option in the IVR explicitly for that Destination Alias.
- Allow Conference Dial - If enabled, a caller can dial any Conference Room Number setup for this Client from this IVR without creating an option in the IVR explicitly for that Conference Room.
- Allows Personal Conference Dial - If enabled, a caller can dial any Personal Conference Room Number set up for this Client from this IVR without creating an option in the IVR explicitly for that Personal Conference Room.
- Allow Ring Group Dial - If enabled, a caller can dial any ring group setup for this Client from this IVR without creating an option in the IVR explicitly for that Ring Group.
- Delay - How long to wait after the announcement has been played in seconds, before considering the caller Timed out and going to the timeout option.
- Repeat - How many times to let them loop through the announcement without pressing any valid option before considering the caller Timed out and going to the timeout option.
- Invalid Message - Optional message to play to a caller if they press an invalid option before routing them to the Invalid call handling option as defined in the Invalid/Timeout Tab below.
- Timeout Message - Optional message to play to a caller if they press an invalid option before routing them to the Invalid call handling option as defined in the Invalid/Timeout Tab below.
- Ring Tone - Set a ring tone to differentiate calls coming from this Digital Receptionist from the others.
- Language - Select the language callers will hear when automated messages are triggered. This only affects system messages.
- Prefix - You can optionally provide a Caller ID Name prefix here that will be added to the Caller ID Name when the call is routed to an extension on the CloudPBX.
-
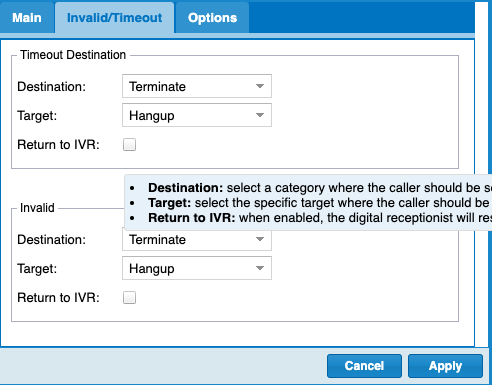
Invalid/Timeout (tab) -
Timeout Destination - Where to route the caller to if the Timeout Delay and Repeat settings has been met from the Main tab without the caller inputting any options -
Destination - What module you want to route this call to, such as Conferences, Ring Groups, Queues, Extensions, or any other destination module. -
Target - What specific Target within the destination you want to route the call to. For example, if you picked Conferences as the destination, we would pick which Conference Room the call is routing to. -
Return to IVR - If checked, this option will replay the IVR message and ignore the Destination and Target -
Invalid - Where to route the caller to if they press an invalid entry from the IVR. -
Destination - What module you want to route this call to, such as Conferences, Ring Groups, Queues, Extensions, or any other destination module. -
Target - What specific Target within the destination you want to route the call to. For example, if you picked Conferences as the destination, we would pick which Conference Room the call is routing to. -
Return to IVR - If checked, this option will replay the IVR message and ignore the Destination and Target.
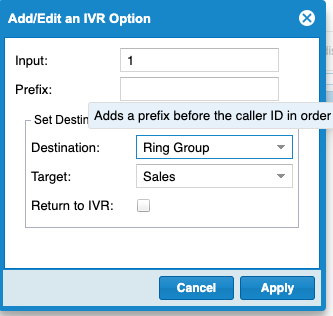
 - Options (tab) - Click on Add Option button to add a new option or click on any existing option and press the Edit or Delete button to Edit or Delete the option.
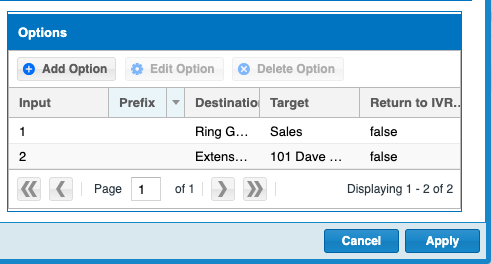 - Adding or Editing a Option will allow you to set the following fields:
- Input - This is the number dialed on the keypad that will match to this entry
- Prefix - You can optionally provide a Caller ID Name prefix added to the Caller ID Name when the call is routed to an extension on the CloudPBX if the caller pressed this option.
- Destination - Determines which module you want to route this call to, such as Conferences, Ring Groups, Queues, Extensions, or any other destination module.
- Target - What specific Target within the destination you want to route the call to. For example, if you picked Conferences as the destination, we would choose which Conference Room the call is routing to.
- Return to IVR - If checked, this option will replay the IVR message and ignore the Destination and Target. This is used when you want to give your IVR an option; like to hear your options again, press 9.
 Emergency Caller ID  -
Emergency Caller ID is broken into two tabs at the top. -
Call-back Profile - Has a Call Back Phone Number and Company Name. When calling 911, your Client tells us which Emergency Call Back Profile and which Emergency Dispatchable Location we send to the 911 center for each call. A single Call Back Profile can have one or more Dispatchable Locations associated with it. The Call Back Profile is how the 911 center can know the Caller ID of who is calling them and where they can call back if need be, and the Emergency Dispatchable Location tells the 911 center where you are physically located. -
Dispatchable Locations - This is a unique Physical Address. When calling 911, we send the Emergency Call Back Profile and the Emergency Dispatchable Location to the PSAP. You can have a single Call Back Profile as defined above and 5 Dispatchable Locations. For example, each Location would be a different identifier or address such as “Northeast Corner” or “Suite 5” or “2nd Floor West Wing”; but all part of the same primary address/building with the same Call-Back Number that is in the Call Back Profile below. -
The information in these tabs is auto-created and controlled by the Emergency services you have purchased for this Client from the Clearly Cloud Portal. -
This module will not let you edit any of the Emergency Caller ID information, which can only be done from the Clearly Cloud Portal account. -
From here, we can see a list of what Call-back Profiles and Dispatchable Locations we have set up, and from within the User Settings, as outlined above here, you can map each user to their correct location. -
You can also set a Global Call-back Profile and Dispatchable Location for each Client that all users will use by default unless overridden at a User Settings level, as shown in the Settings Section below. 
External Extensions - If you are a client that has more than one Client on CloudPBX, here is where we can set up the ability to allow calling between extensions on two different clients. To set this up, you will need to know the Extension Range and Realm of the other Client you want to dial directly from your extensions.
- Click on the External Extensions menu Option
 Ranges (tab) - Here we can see a list of Extension Ranges we have setup that match to other Clients on CloudPBX you want to be able to direct dial their extension from your extension
 - Highlighting a Extension Range allows you to edit or delete that Extension Range using the buttons at the top
 - Clicking on the Add button will let us create a new range
 - Below are the fields we need information on to set this up
- Name - Friendly Name on this Extension Range. Usually, something that identifies who the other Client is you are creating this pairing with.
- From Extension - The start of the extension range
- To Extension - The end of the extension range.
- Destination Realm - The Full realm of the Client these extensions belong to on the same CloudPBX that you are on. If you are not sure what the realm is of the other Client, you will need to log in as that Client into CloudPBX and look at the top of the page where it shows Logged in as XXX and XXX is that Clients Realm.
 - Prefix - What prefix you will dial to match to this range. For example I will put 99 here which means to call any of the users in this range on this realm I would dial 99102 to call 102 on this realm
 Detail (tab) - We can see all the actual extensions and prefixes we can dial based on the Range groups created above on this tab.

Feature Codes - Here you can see a list of this Client’s feature codes that users can dial.
- Click on the Feature Codes menu Option
 - You will now see a list of all feature codes, click on any of them to change the feature code.
Inbound Call Rules - From this page, you can manage your inbound call filtering rules based on the caller’s Caller ID through a regular expression. If caller ID matches your condition, your call will be redirected to destination true; otherwise, to destination false. For this rule to be applied, you have to route an inbound DID to this new rule.
- Click on the Inbound Call Rules menu Option
 - From here we can see a list of Rule that we have created on this Client already.
 - To add a new rule click on the Add Button
 - For each rule, you can define the following fields.
- Name - Provide a friendly Name for this filter.
- Match Caller ID Number - Provide the Caller ID Number in regex form to match against the Caller ID of the incoming call.
- Destination if the condition is true - If the inbound Caller ID number matches against this regex, we will route the call to this destination
- Caller ID Prefix if the condition is true - If the inbound Caller ID number matches against this regex, we can optionally prepend the Caller ID Name of the caller with this field.
- Destination if the condition is false - If the inbound Caller ID number does NOT matches against this regex, we will route the call to this destination
- Caller ID Prefix if the condition is false - If the inbound Caller ID number does NOT match against this regex, we can optionally prepend the Caller ID Name of the caller with this field.
 - Press the Apply Button to save your changes
 - Now that we have a rule, we need to go into an inbound DID record and route the call through this rule by picking the destination to be Inbound Filtering and the Target to be this new rule we just created for the DID we want this rule applied against.

Inbound Caller ID -
- From this page you can manage (modify) the caller IDs of inbound calls.
- You can link this to either a queue, ring group or a DID.
- All calls linked to an inbound caller id will replace or hide the caller number or name, depending on the configuration..
- Click on the Inbound Caller ID menu Option

- From here, you can see a list of all Inbound Caller ID modification rules that have been configured in the system

- Click on Add to create a new inbound caller id modification rule. The example above was created as follows
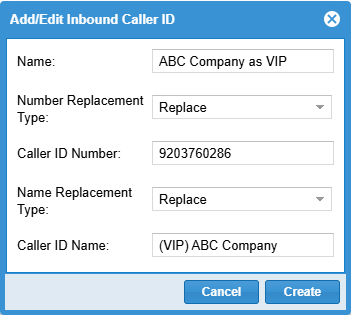
With the available fields for creating these rules being:
- Name - Descriptive name for the Caller ID modification rule.
- Number Replacement Type - Type between either Hide or Replace for the modification of the Caller ID Number.
- Caller ID Number - This textbox becomes active if the Number Replacement Type above is seleceted as Replace. It allows for etnerirng the number to replace the incoming call's Caller ID Number with.
- Name Replacement Type - Type between either Hide or Replace for the modification of the Caller ID Name.
- Caller ID Name - This textbox becomes active if the Name Replacement Type above is seleceted as Replace. It allows for etnerirng the name to replace the incoming call's Caller ID Name with.
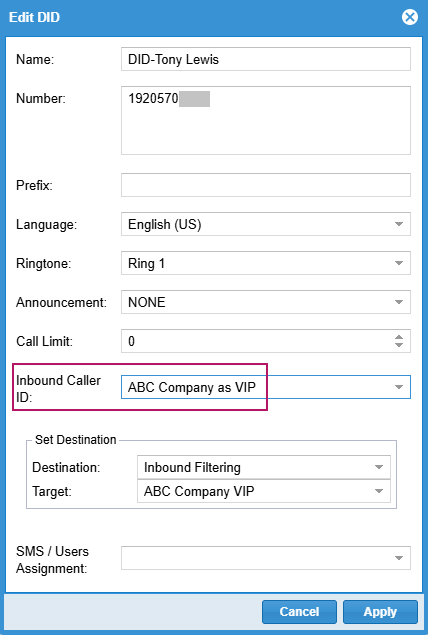
- After having created an Inbound Caller ID modification rule it will be available to be used in the DID, Calling Queues and Ring Group modules. The example here below shows the setting within the Edit DID popup:
Integrations - In this page you can manage integrations with external platforms using webhooks.
- Besides raw webhooks, which allows the integration of Clearly Cloud with any external platform supporting webhooks (which are the majority of all popular platforms/solutions commercially available), there are currently two integrations already natively available to be used: Zoho CRM and Zapier. Note that both these integrations use webhooks in the background as their integration method.
- Admins can configure the integration with third party apps in ClearlyIP's SPOKE Portal.
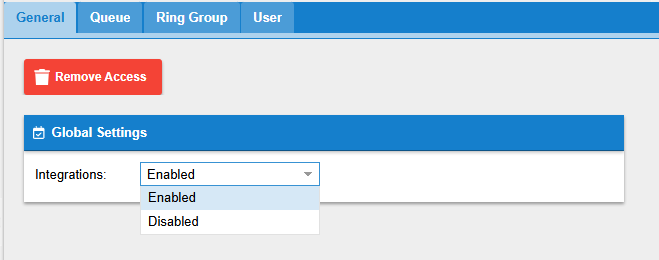
- Click on the Integrations menu Option
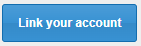
- The first step to do for starting to configure the integrations is to click on the Link your account button (the complete procedure for setting in place the different possible integrations available are detailed here).
- The four tabs available here are:
- General (tab) - Here you can Link your account to Clearly Cloud's SPOKE tool for allowing the integrations. Alos, globally Enable or Disable the integrations
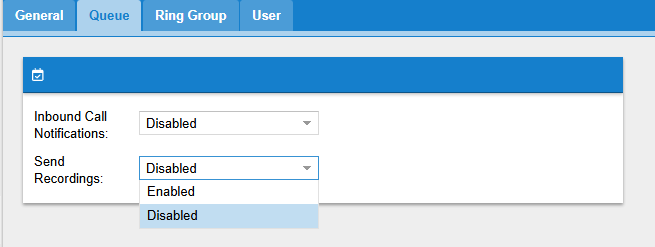
- Queue (tab) - Enable or Disable sending out corresponding webhook messages for each new occurrence of the following two types of events:
- Each new incoming queue call (Inbound Call Notifications) - can be Enabled for "on Ring" or "on Answer"
- Each new queue call recording file created in the system (Send Recordings)
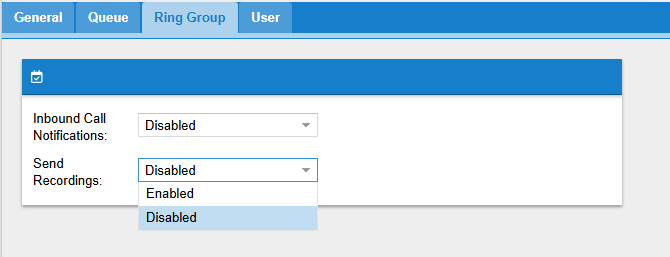
- Ring Group (tab) - Enable or Disable sending out corresponding webhook messages for each new occurrence of the following two types of events:
- Each new incoming ring group call (Inbound Call Notifications) - can be Enabled for "on Ring" or "on Answer"
- Each new ring group call recording file created in the system (Send Recordings)
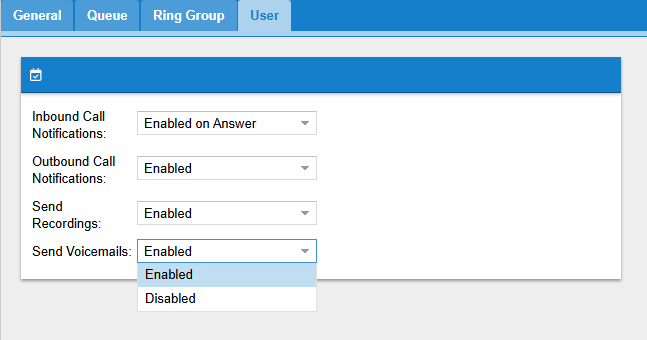
- User (tab) - Enable or Disable sending out corresponding webhook messages for each new occurrence of the following four types of events:
- Each new incoming user call (Inbound Call Notifications) - can be Enabled for "on Ring" or "on Answer"
- Each new outbound user call (Outbound Call Notifications)
- Each new user call recording file created in the system (Send Recordings)
- Each new voicemail message file left in the system for a user (Send Voicemails)
- Again, for the complete procedure for setting in place the different possible integrations available (raw webhooks, Zoho CRM, Zapier) go here
Music On Hold (MOH) - The Music On Hold menu option allows you to manage the MP3/Wav files or live audio streams used for Music On Hold, also known as MOH.
- You can listen to existing MOH entries, delete or add new ones and group your MOH entries into Groups that can be used in places like Calling Queues and Conference Rooms to pick which MOH files are played.
- The Default group contains the audio file(s) / live audio streams that will be played when a caller is put on hold by all the users under the client account.
- Click on the Music On Hold menu Option
 - From here, you can see a list of all MOH files and/or live audio streams that have been uploaded for your Client
 | | - Highlighting a MOH entry allows you to edit, delete or Listen to the MOH using the buttons at the top
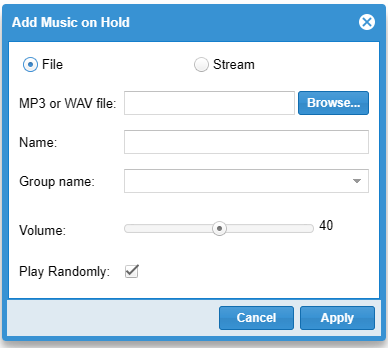
 - When creating a new MOH entry, you can select between uploading a file or setting a URL for live streaming the music on hold.
- For File upload of the Music on Hold, the following fields are available:
- MP3 or Wav File - Here is where you browse onto your local computer and pick the MP3 or Wav file you want to upload.
- Name - Provide a friendly name for this MOH file.
- Group Name - When adding a new MOH file, you can define what Group/Class the file belongs to, and inside Calling Queues and Conference Rooms, you can specify the Group/Class they will use.
Note: the 'default' Group/Class of MoH is used by all Users in the system when putting a caller on hold, hence if you want to use a custom MoH for this you first need to rename the Group of the preloaded MoH (default_moh_chopin) to something else other than 'default' and then just name the Group of the MoH you upload(ed) to 'default'.
- Volume - The level you want this file to be played to the caller.
- Play Randomly - Makes the system randomly select one of all the available MOH files to play back to the caller.
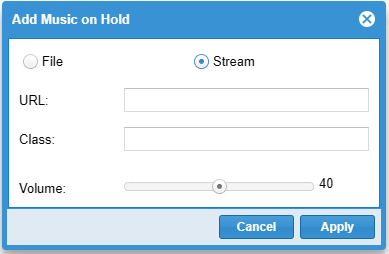
- For the live Streaming of the Music on Hold, the following fields are available:
- URL - http url poiting to a live audio streaming source (supported streams: MPEG layers 1, 2 and 3 (i.e MP1, MP2 and MP3) - with free format bit rates over 320kbit/s (VBR))
- Class - When adding a new MOH streaming source, you can also define what Group/Class the streaming source belongs to, and inside Calling Queues and Conference Rooms, you can specify the Group/Class they will use.
Note: the 'default' Group/Class of MoH is used by all Users in the system when putting a caller on hold, hence if you want to use a custom MoH for this you first need to rename the Group of the preloaded MoH (default_moh_chopin) to something else other than 'default' and then just name the Class of the streaming MoH you add(ed) to 'default'.
- Volume - The level you want this streaming source to be played to the caller.
- To listen to an existing file or streaming source, you can highlight it from your list of MOH sources and click on the Stream/Download button.

Notifications - The Notifications menu is where you setup your notifications and triggers whenever an specific number or numbers are dialed out.
- You can have notifications sent to Email, SMS, Clearly Cloud Chat and Text Messages sent to CIP phones.
- Notifications menu will use the following variables:
- %%CALLID%% - Caller ID of the call.
- %%COMPANY%% - Company of the user that placed the call.
- %%DATE%% - Date the call was placed.
- %%DIALED%% - Dialed number.
- %%EXTNAM%% - Extension name of the user that placed the call.
- %%EXTNUM%% - Extension number of the user that placed the call.
- %%LOCATION%% - Realm or domain.
- %%TIME%% - Time of the call.
- %%TRUNK%% - Trunk used by the call.
- The Notifications menu has two main sections:
- Notifications - Notifications are the actual specific Notification such as SMS or Email and they link to 1 or more Trigger Rules.
- Trigger Rules - These are the actual rules to trigger a Notifications such as someone calling 911 and the actual notifications link to these rules.

Trigger Rules - In this menu you can see the list of Trigger Rules created on your Clearly IP Cloud instance.
- To setup a Notification, you need to first setup a Trigger Rule.
- A Trigger Rule is where we define the number (literal) or group numbers (regular expression) the system will be aware of in order to send a Notification.
- To add a Trigger Rule click on the Add button
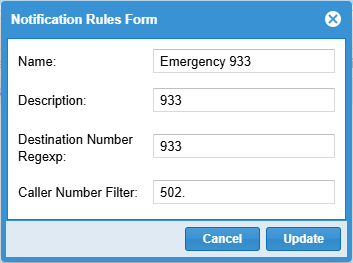
- A new window will appear on which you need to enter the following information:
- Name: Name of the Rule
- Description: Description of the Rule
- Destination Number Regexp: The phone number or group of numbers (by using regular expressions) that when dialed, the system will trigger a notification.
- Caller Number Filter: The local extension number or group of local extensions (by using regular expressions) that when they dial the destination number(s) defined above, the system will trigger a notification.
- Click on 'Create'
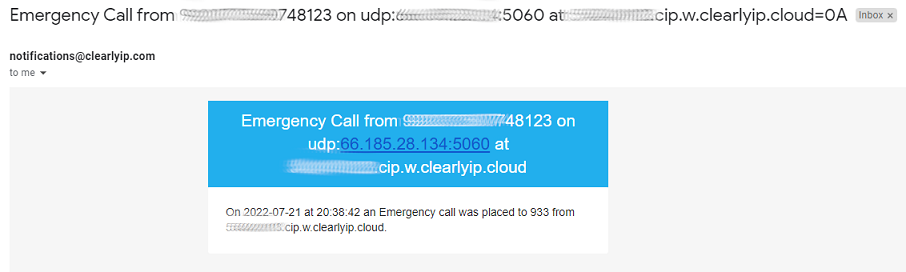
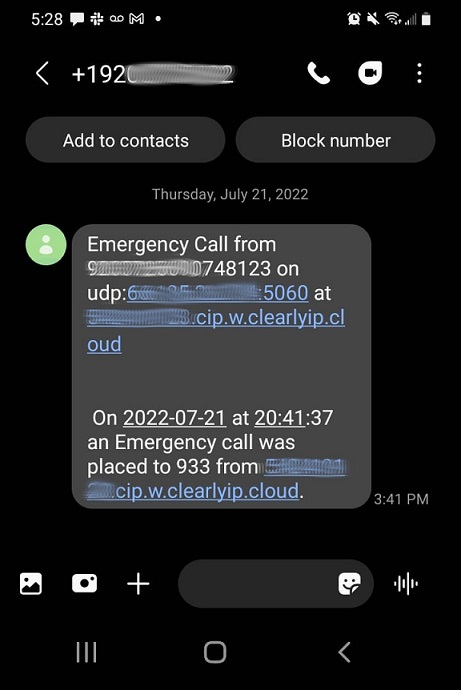
 Example - As an example we will create a Trigger Rule that will send a notification via email whenever any user whose local extension number begins with 502 dials 933.
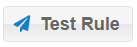
Managing Trigger Rules Remember that you can Edit, Delete (with previous confirmation), and search for a Trigger Rule. Also, when a Notification is using a Trigger Rule, we can test the Rule with the Test Rule Button. 
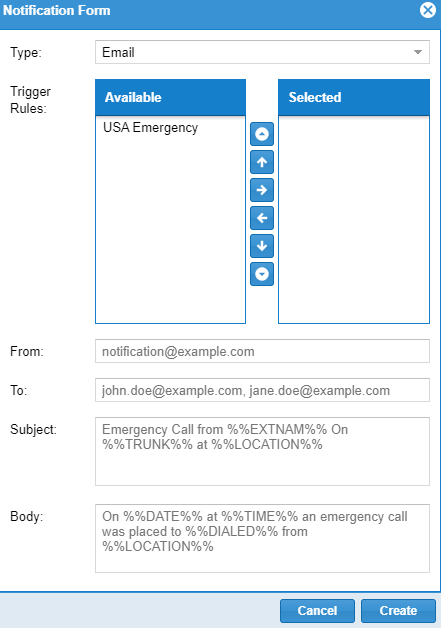
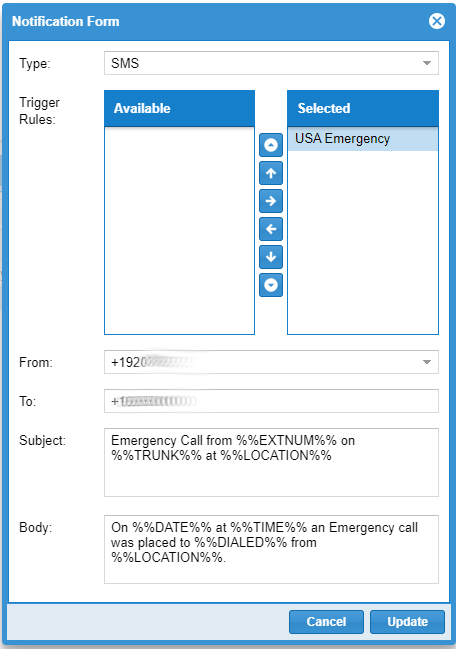
Notifications - In this menu you will see all the current notifications available in your Clearly IP Cloud instance.
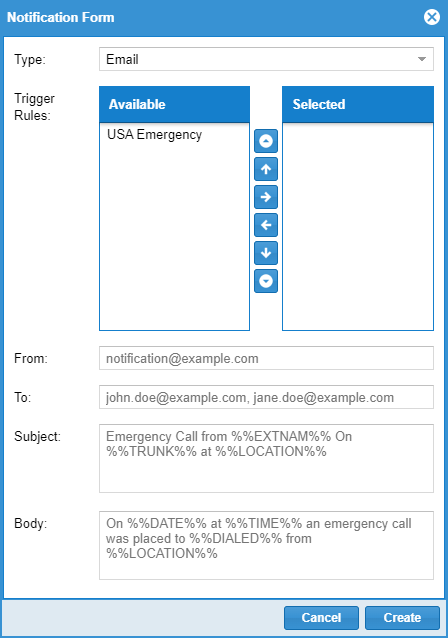
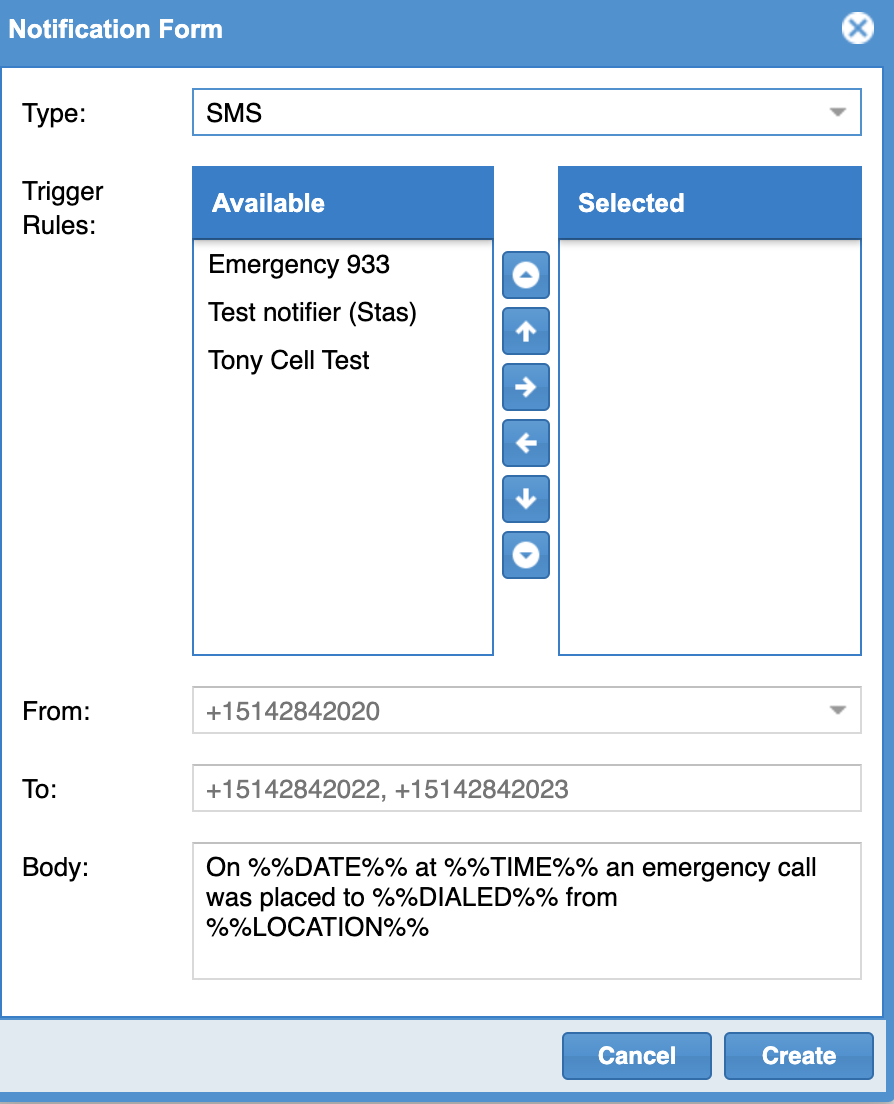
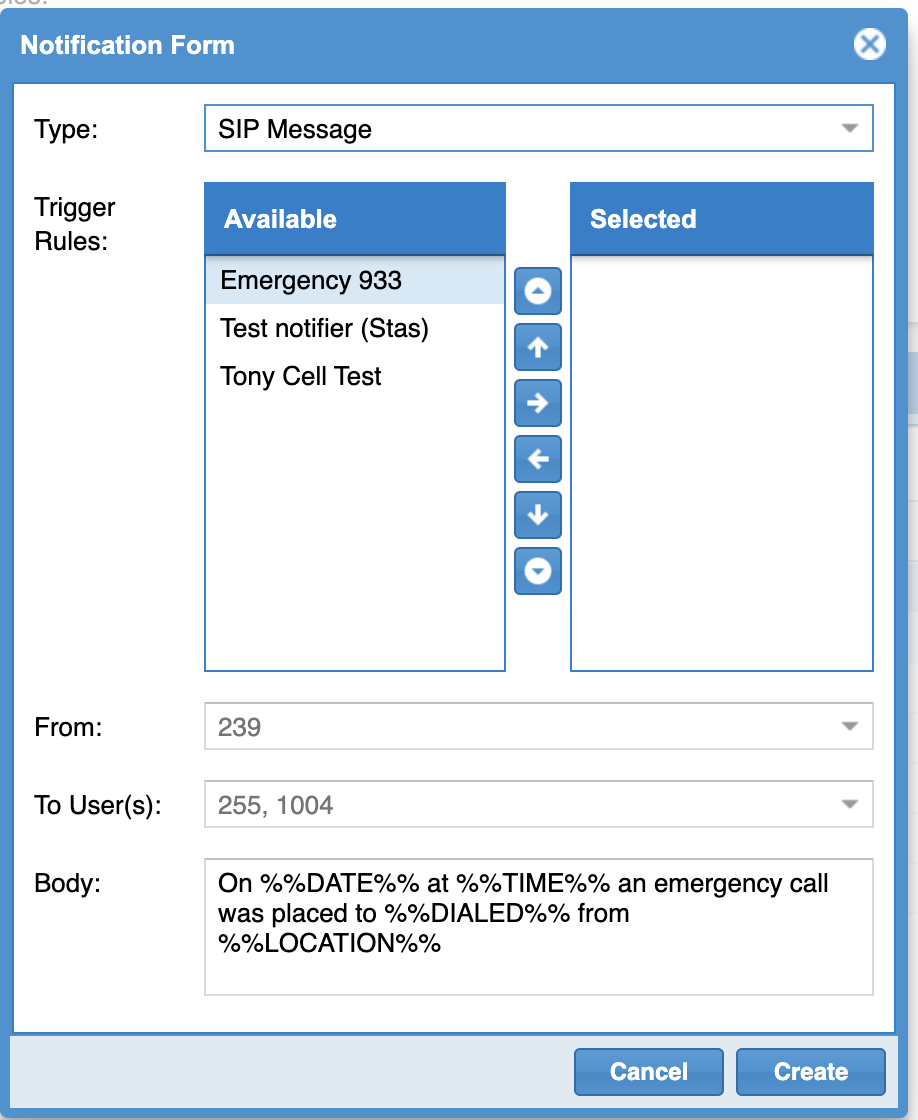
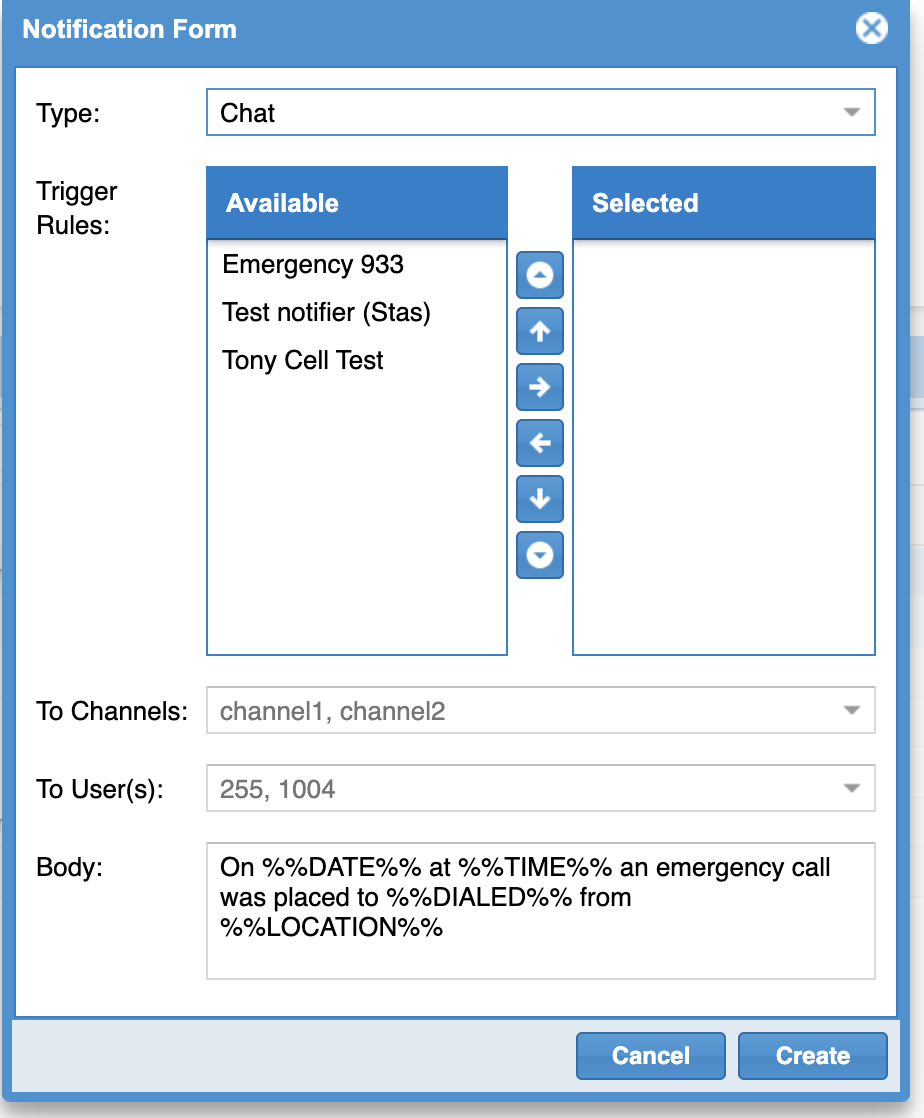
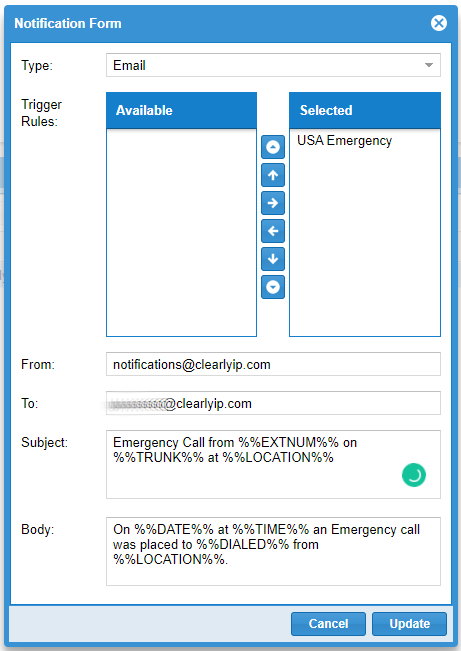
 - To add a notification click on the Add button and enter or select the following information:
- Type: Here you can specify the type of notification you would like to get: Chat, Email, SMS, SIP Message (call to an extension or number).
- Trigger Rules: Select the Trigger Rule to use for this notification. Use the arrows to move it from the Available column to the Selected column.
- From: This is the email address, or Caller ID (in case you select SMS) or extension in case you select Chat or SIP Message you would like to be displayed as the sender of the notification.
- To: This is the email address, or Caller ID (in case you select SMS) or extension in case you select Chat or SIP Message the notification will be sent to.
- Subject: This is the subject of the Notification. (Only used for Email)
- Body: This is the Body or main message for the notification.
- Please notice that depending on the type of notification a template will be displayed to help you fill the right information.
- Click on Create.
Notifications Templates - Here are the currently supported templates that will appear when creating a Notification.
- SMS
- In the From field you can use the drop-down menu to select the DID you would like to use to send the notification from.
- SIP Message
- Only works with phones that support receiving a SIP Text Message. CIP phones have been tested and verified to work. Other phones may work but you would have to verify they support SIP Messaging and configured to receive them.
- In the From field you can use the drop-down menu to select the extension you would like to use to send the notification from. A similar situation applies with the 'To' field.
- Chat
- In the From field you can use the drop-down menu to select the extension you would like to use to send the notification from. A similar situation applies with the 'To' field.
- You can pick to send notifications to 1 or more Chat users and/or 1 or more Public Channel rooms. At this time we do not support sending notifications to Private Rooms.
Managing Notifications Remember that you can edit, delete (with previous confirmation), and search for a notification. 
Testing Trigger Rules
- You can test a rule by pressing the Testing Rule button in the Trigger Rules menu.
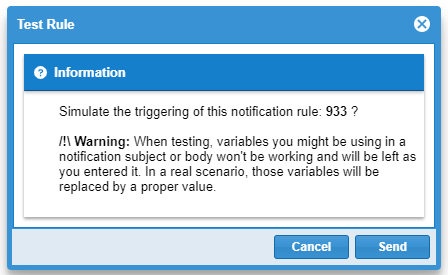
- Here is the example when testing a rule that will trigger a notification when someone dials 933 . A warning will be displayed letting you know that when testing, variables you might be using in a notification subject or body won't be working and will be left as you entered it. In a real scenario, those variables will be replaced by a proper value.
- Here is how the email notification associated with this Triggering Rule would look like:
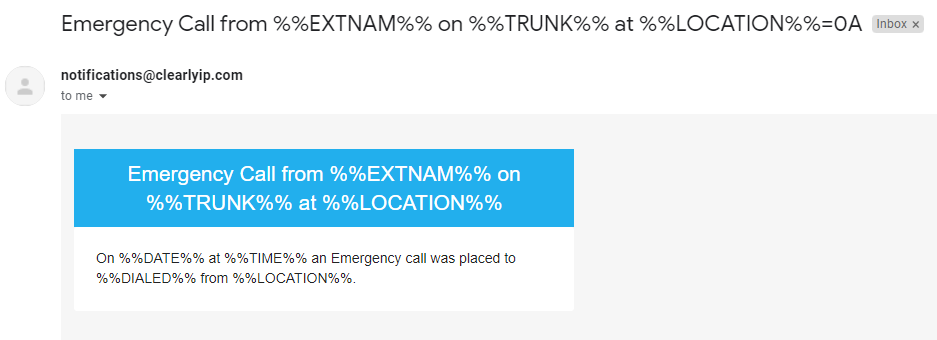
Example - Below is the implementation of setting up a Notification that will send an Email and an SMS when someone dials 933.
- Email:
- This how an an SMS and an Email are received when using the Notifications module.
Paging Groups Paging groups allow you to broadcast audio to multiple extensions at once. When the paging group is dialed the phones will auto-answer the call and reproduce the audio message in their speakers. The paging groups module will work with most of the supported models in CDM. - To visualize and create a paging group, go to Paging Groups Module

- Here you will see the Paging Groups that have been already created.

- To add a new paging group click on Add Paging Group.
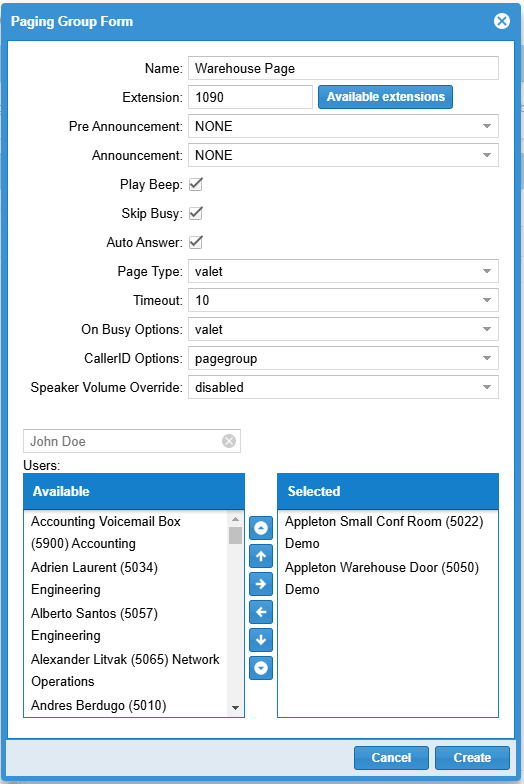
- A new window will appear allowing you entering the following information:
- Name - Assign a name to the Paging Group.
- Extension - Set a paging group number that extensions can dial to broadcast audio. If you click on the Available Extensions button, you can search for an available extension number that can be used for your Paging Group.
- Pre Announcement - This is a recording that will be played to the person that is dialing the Paging Group Extension.
- Announcement - This is a recording that will be played to all the devices that belong to the Paging Group.
- Play Beep - If enabled the paging system will play a beep to each device when they are joined into the page group.
- Skip Busy - If enabled the paging system will not page any device that is on another call. If not enabled all devices will be paged regardless of their status.
- Auto Answer - This will set the auto answer to each device to have it auto answer if set to yes. If set to no it will just call each device and add them to the page group as they answer.
- Page Type - This will set the two available types of paging: Live and Valet.
- Live - When paging group is called, the system will page the phones and play any optional announcements and then allow the caller talk live to the members of the paging group.
- Valet - When paging group is called, the system will send the caller to a menu on which where the user can record a message that will be played before the caller speaks live to the devices in the paging group. When using this option another setting will appear named Timeout.
- Timeout - Sets the maximum size in minutes of the recorded announcement.
- On Busy Options - These options will handle the paging depending on the status of the devices that are being paged. These options are busy and valet.
- Busy - Will play a busy tone to the caller.
- Valet - Will force the page into a Valet style even if the party is configured as Live but the pager party is busy with another party.
- CallerID Options - This option will set how to handle Caller ID Name and Number displayed to the devices during a paging call. There are three options for this: Pagegroup, Caller, Custom.
- Pagegroup - Will use Paging Group's Name and Number for caller ID.
- Caller - Sets Caller ID to be the Caller ID Name and Number from the internal caller that initiated the group page.
- Custom - Let the admin set the Caller ID Name and Number.
- Speaker Volume Override - Override the speaker volume for this page. Note that this is only valid for phones that support this feature, ClearlyIP Phones do.
- Users - Here is where you pick which users are part of this page group, required if Caller ID options is set to 'Custom'.
 To use the Paging Group, just dial the Paging Group extension or set it as a destination. 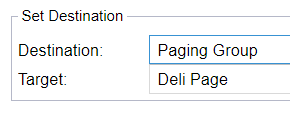
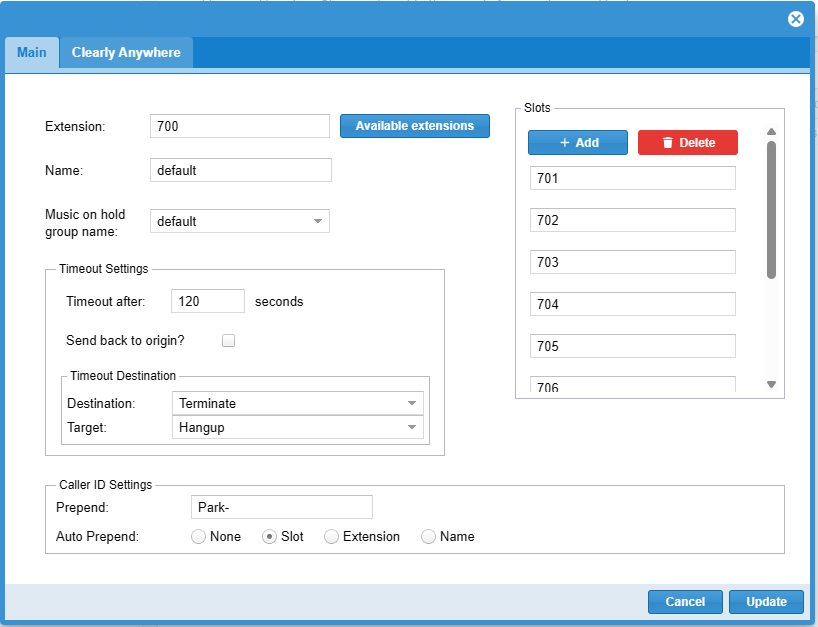
Parking Lots There are times when directly transferring a call to a specific destination is not possible or is possible but not ideal, in those cases sending the call temporarily to a virtual parking lot where you or other allowed users can then retrieve the call from to resume the conversation when ready can be a much better alternative. When using Parking lots, users can transfer a call to a parking lot extension to park the call. - This feature will, by default, set aside ten slots for parking, starting after the parking extension. For instance, if the parking extension is 700, 701 to 710 will be set aside as parking slots.
- Click on the Parking Lots menu option
- From here, we can see a list of all parking lots that have been created (the system comes with a default parking lot called "default" with extension 700 and slots 701 through 710)

To create a parking lot just click on the Add Parking button. The following are the parameters available when creating a parking lot: - Extension - Extension number for reaching the parking lot. When transferring a call to this number it will automatically get parked in the first parking slot, from this parking lot, that is currently empty
- Name - Name for the parking lot
- Music on hold group name - assign a Music on Hold group for this Parking Lot. Music on Hold groups are managed in the Music On Hold page ("Muisc On Hold" menu Option)
- Timeout after - How many seconds can a call sit on a parking slot before being sent somewhere else (either back to the origin extension who parked the call or to another destination depending on what gets configured below, accordingly)
- Send back to origin? - If checked, the parked call will automatically ring back the origin extension who parked the call after the configured timeout period has passed
- Destination - If "Send back to origin?" is not checked then you can define here what type of destination to send the call to after the configured timeout period has passed
- Target - If "Send back to origin"is not checked then you can define here which exact destination to send the call to after the configured timeout period has passed
- Prepend - String to prepend to the current Caller ID associated with the parked call prior to sending back to the origin extension or the timeout destination.
- Auto Prepend - Automatically prepend either the Slot number or the Extension number or the Name of the user (that parked the call) to the current Caller ID associated with the parked call prior to sending back to the origin extension or the timeout destination
- Slots - By default ten slots for parking, starting after the parking extension, get automatically set aside when creating a parking lot, here you can add or delete one or multiple slots by clicking the Add or Delete buttons accordingly - The slots get added in increments of one starting from the highest numbered slot; similarly, the slots get deleted one by one starting from the highest numbered slot back to the lower numbered slot
Similarly to other pages and modules, you can also Edit, Delete (with previous confirmation), and search for a Parking Lot.

Permission Permissions Overview - Permissions are primarily used to determine what level of access a User has in Call Panel but can also be used by the CloudPBX API to interact as a User with our APIs. So some Permission Rules that seem odd for Call Panel exist as they are generic permissions for our documented API that you can use to interact as a User.
- Permission rules are created every time a new User, Queue, or Conference Room is created for your Client.
- Once a Permission rule has been created, you have to apply that rule to a Permission Group that users will inherit as shown below or at a per User level as shown above in the User Overview as an override to the Permission Group.
- Click on the Permission menu option
- From here, we can see a list of all of our permissions that have been created.
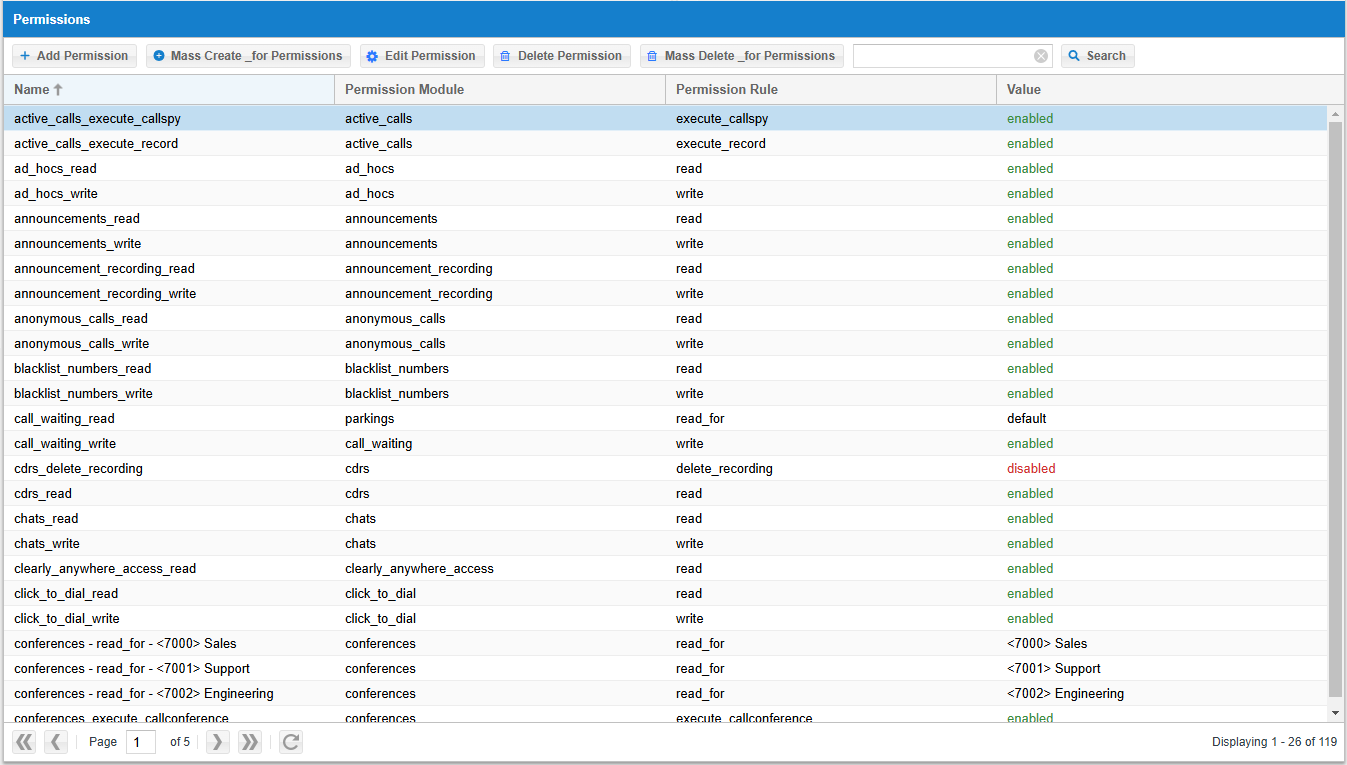
Permission Rules - Each time a User, Queue, or Conference Room is created for your Client, a rule for that specific User, Queue, and Conference Room will be auto-created here for you.
- For each rule, you can define the following information:
- Permission Name - Name of this permission Rule
- Permission Module - What feature module this rule applies to
- Permission Rule - What action this rule for that module applies to. For example, if it’s for a conference room, you might set this as a rule that says users in the call panel that have this rule in their permission group can call the conference as defined in the value field below. The most common Rules are the four below.
- The most common Rules are the four below.
- Write - This means the user can edit, create, or delete for the module above using the API for all the module’s destinations the rule is for.
- Read - This means the user can view the module above using the API for all the module’s destinations the rule is for.
- Write_For - This means the user can edit, create or delete within the module above using the API for the specific destination as defined in the Value field.
- Read_For - This means the user can view the module above using the API for the specific destination as defined in the Value field.
- Value - Drop-down to select which User, Conf Room, Queue, or other destination this rule applies would enable or disable that global permission.
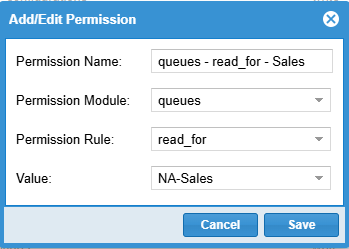
- An example of this we will use below is for conference rooms. Let’s say in our example company we have 2 General Conference rooms created.
- Let’s say we have the following two conference rooms created for this Client.
- Test Conference 1001
- Test 2 Conference 1002
- The system would of created the following 3 Read rules automatically for conference rooms
- conferences - read for - <1002> Test 2
- conferences - read for - <1001> Test
- conferences - read
- If we added the following two rules in the Permission Group, we would only view the 1001 conference room, not the 1002, as the 1001 is more restrictive than the generic “conferences - read” rule 1002 would not be shown.
- conferences - read for - <1001> Test
- conferences - read
- If the Permission Group had just the following rule, all users of this permission group could see ALL conference rooms on the system as we do not have a more restrictive rule limiting a conference room.
- This would generate the following rules automatically for the Conference Room module.
- Conferences - read - This would allow any user setup for this permission to Read the settings related to this Client’s conference rooms.
- Conferences - read for - <1002> Test 2 - This would allow any user setup for this permission to Read the settings related to conference room 1002conferences - read for - <1001> Test - This would enable any user to set up for this permission to Read the settings related to conference room 1001
- Conferences - callconference - This would enable any user to set up for this permission to Call ANY conference room for this Client from Call Panel or the API
- Conferences - callconference_for - <1002> Test 2 - This would allow any user setup for this permission to Call conference room 1002 from Call Panel or the API
- Conferences - callconference_for - <1001> Test - This would enable any user to set up for this permission to Call conference room 1001 from Call Panel or the API
- Conferences – confinvite - This would allow any user setup for this permission to Invite Callers into ANY conference room for this Client from Call Panel or the API
- Conferences - confinvite_for - <1002> Test 2 - This would allow any user setup for this permission to Invite Callers into conference room 1002 from Call Panel or the API
- Conferences - confinvite_for - <1001> Test - This would allow any user setup for this permission to Invite Callers into conference room 1001 from Call Panel or the API
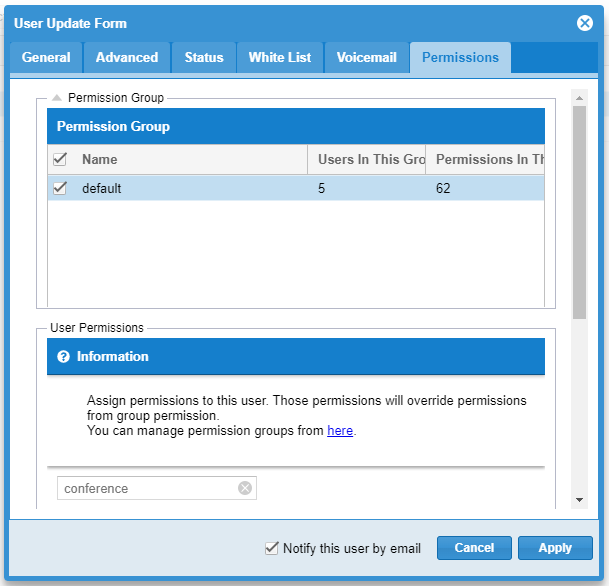
Permission Groups - Click on the Permission Groups menu Option
- Here is where we take different permissions, put them into groups, and pick which users are part of this permission group.
- If you have two conflicting permissions, the most restrictive one will win out.
- From here, we can see a list of all of our Permission Groups that are created.
Managing Permission Groups
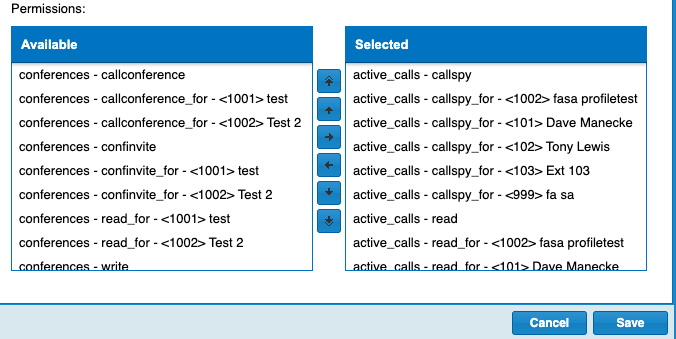
- Creating or Editing an existing Permission Group will bring up a screen like this.
- From here, we can move Users into this permission group under the Users > Select Section. Users added to Selected will be part of this Permission Group. Users in the Available Group are not part of this Permission Group but can be moved to the Selected heading to be part of this Group.
- Under the Permissions section, we can see under the Available Heading a list of all Permissions that can be moved to the Selected Heading and be part of this Permission Group.
- Press Save when done to save these changes.
- You can manager your queue agent pause status from here. Your agent will be able to add their own pause status, from their Call Panel, if you enable the permission 'queue_member_pause_codes' on write. Please note that you can't edit default status.
- Click on the Queue Member Pause Codes menu Option

Queue Reports - Click on the Queue Reports menu Option
 - In this menu you can find the Queue Reports tailored for your Cloud Instance so you can review your Queues' and Agents' performance.
- The current available reports are:
- Historical Report
- Agent Report
- Queue logs (for debug purpose only)
Historical Report - Historical reports are designed to easily access information related to a queue depending of the time. It is perfect to check the status of a Queue per day.
- You can generate this report by entering a time frame in the Start Date and in the End Date and you can also search for a particular entry in the Search box.

- Description of the Reports:
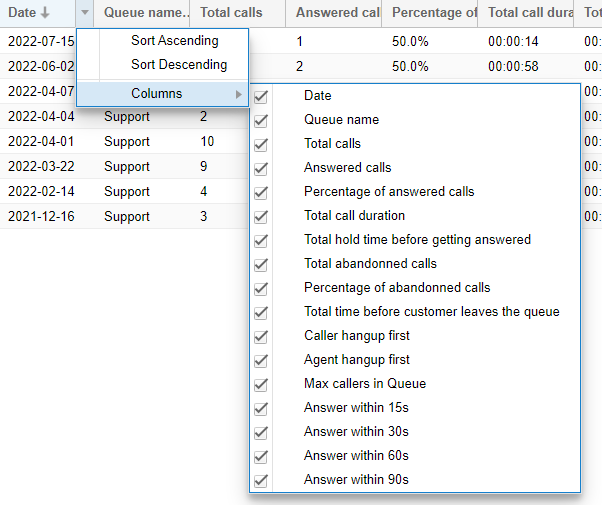
- The available columns this report generates are:
- Date: The Date for the report.
- Queue name: The name of the Queue.
- Total calls: The total amount of calls that entered the Queue.
- Answered calls: The total amount of calls that were answered by the agents of the Queue.
- Percentage of answered calls: This is the number of answered calls divided by the total amount of calls that entered the queue, multiplied by 100%.
- Total call duration: The total duration of the talked time of the answered calls.
- Total hold time before getting answered: The total amount of time of all calls waiting to be answered by an agent.
- Total abandoned calls: The total amount of calls that entered the Queue and never were answered by any agent.
- Percentage of abandoned calls: This is the number of abandoned calls divided by the total amount of calls that entered the queue, multiplied by 100%.
- Total time before customer leaves the queue: The amount of time before the caller leaves the queue.
- Caller hangup first: Total amount of calls terminated by the callers.
- Agent hangup first: Total amount of calls terminated by the agents.
- Max callers in Queue: The Maximum number of callers in queue.
- Answer within 15s: The total amount of calls answered within 15 seconds.
- Answer within 30s: The total amount of calls answered within 30 seconds.
- Answer within 60s: The total amount of calls answered within 60 seconds.
- Answer within 90s: The total amount of calls answered within 90 seconds.
Agent Report -
This is a daily report showing all relevant information about your agents per day.
 - You can generate this report by entering a time frame in the Start Date and in the End Date and you can also search for a particular entry in the Search box.

- These are the definitions of the columns showed in the report:
- Date: The date of the agent's consolidated activity.
- Agent: Agent’s name and extension.
- Queue name: The name of the Queue where the agent belongs to.
- Total calls: Total calls sent to the agent's extension.
- Answered calls: Total amount of calls answered by the agent.
- Answered (%): This is the number of answered calls divided by the total amount of calls that were sent to the agent, multiplied by 100%.
- Total call duration: Total duration of the calls handled by the agent. This means the talked time of the calls.
- Total abandoned calls: Total amount of Abandoned calls. This means, calls that were sent to the agent, but never were answered.
- Missed (%): This is the number of missed (abandoned) calls divided by the total amount of calls that were sent to the agent, multiplied by 100%.
- Caller hangup first: Amount of calls terminated by the caller.
- Agent hangup first: Amount of calls terminated by the agent.
- Last call hangup at: Time of agent's last call of the day.
- The sum of Missed calls precentage and Answered calls percentage should be 100%
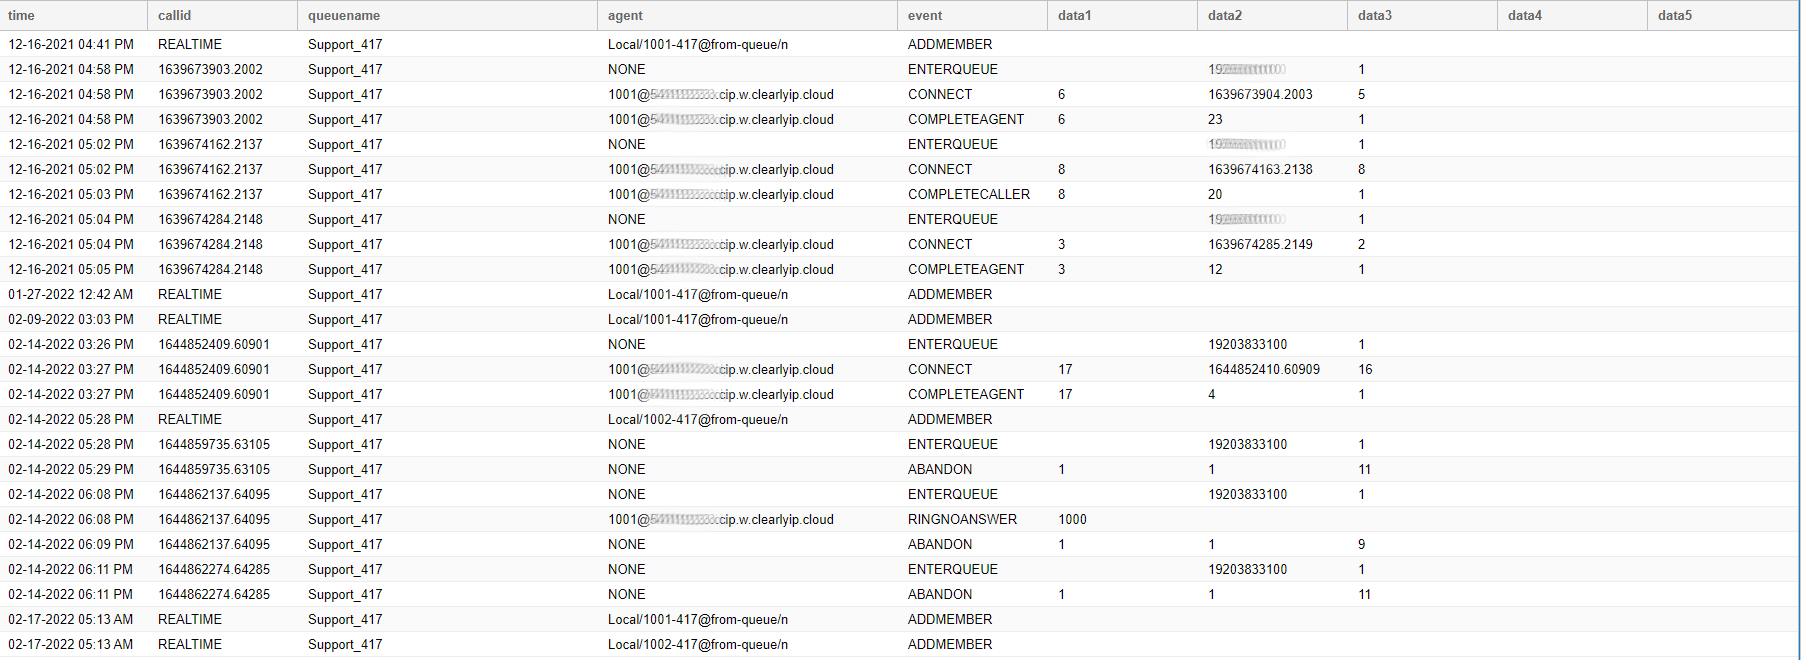
Queue Logs (for debugging purposes only) - This report contains all the raw data used to generate the Historical and Agent reports.
- This report logs all the events for all the queues in your system.
- The fields from left to right are:
- Time: Date and time of the entry.
- CallID: A unique identifier of the entry.
- Queuename: Name of the Queue.
- Agent: Agent's name and extension.
- Event: Type of Event Generated by the Queue or an agent.
- Data1: Event parameter 1.
- Data2: Event parameter 2.
- Data3: Event parameter 3.
- Data4: Event parameter 4.
- Data5: Event parameter 5.
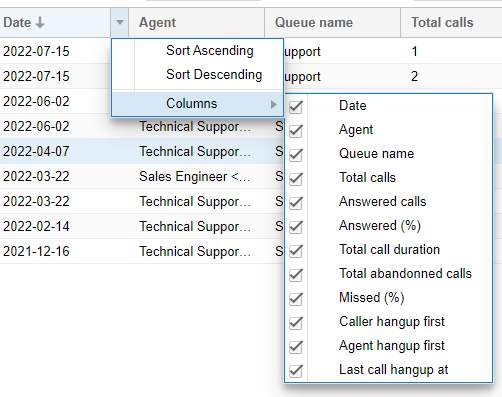
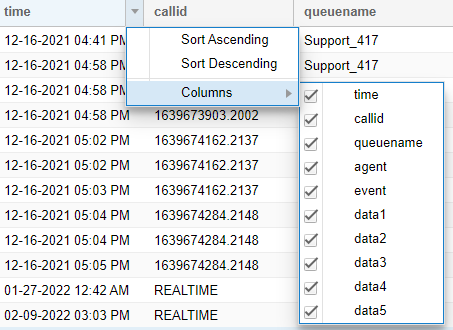
You can find the description of the Queue Events here . - You can right-click on any column header to sort the order of the rows and to select what columns you would like to be displayed in the report.
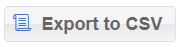
Exporting Queue Reports - You can export to a CSV file your Historical and your Agent Reports by simply clicking on the 'Export to CSV' button next to the search options.
 Reports - To access the Reports menu just click on the Reports icon.
- Under the Reports Tab you will see 2 menu options.
- Activity Log
- Duplicated NAT Log
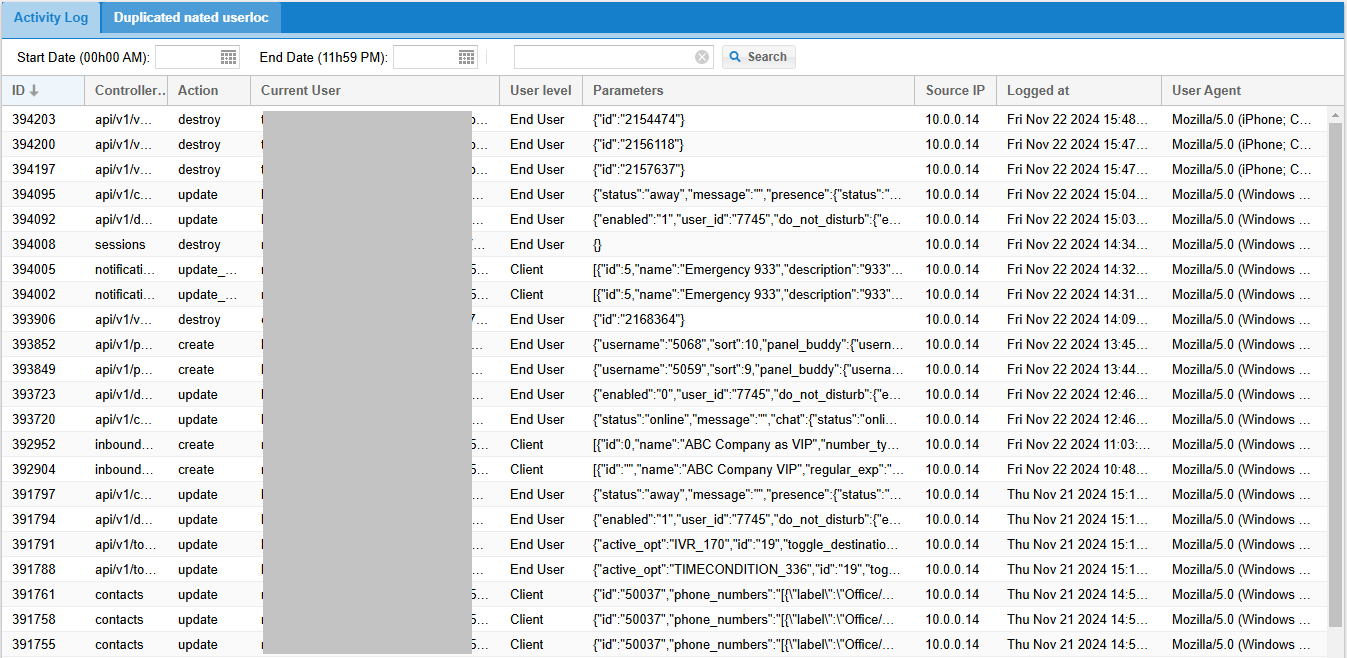
Activity Log - In this menu you will see a report of all the activities performed by any user. With this you can track what changes a user has done to any configuration point of your instance or instances.
- The report will show the following information:
- ID: An identification number assigned by the system.
- Controller: The resource modified. In other words, this is the menu where the modification was done
- Action: The action performed by the user on an entry. These actions can be:
- Current User: The username of the user that performed the action
- User Level: The level of the user that performed the action. These levels are:
- Parameters: The parameters updated by the user. If this parameters are hard to read, you can copy and paste them on a text editor.
- Source IP: The IP of the user that applied a change in the menu
- Logged at: The date the modification was applied
- User Agent: A resource to identify the web browser and the operating system of the user.
- As you can see, you can search through the Activity Log by date and perform a search based on any criteria.
 - You can right-click on any column header to sort the order of the rows and to select what columns you would like to be displayed in the report.
Duplicated nated userloc - This report will show if you have two devices from the same external IP address, such as your office, both trying to use the same NAT port for SIP. If this happens, it will create issues. When we send a call to a phone, the route would not know which device to send the phone to. This usually happens because of NAT issues related to SIP ALG on a firewall or SIP helpers trying to help but get in the way.
- This report will only show devices that are sharing the same Public IP and NAT port for SIP. If the report is empty, that means you have no duplicated NAT devices.
 Ring Groups - Ring Groups allows you to create a grouping of extensions or external phones that can be called at once by dialing the Ring Group’s extension number or routing calls to the Ring Group from IVRs or DIDs.
- Click on the Ring Groups menu Option
 - From here, you can see a list of all the Ring Groups that are set up for this Client.
 - You can edit or delete any Ring Group by highlighting the Ring Group and pressing the edit or delete buttons at the top.

- When creating a Ring Group, you can set the following options for each Ring Group:
Settings (tab):
- Group Name - Friendly Name for this Ring Group
- Group Extension - Which extension number is assigned to this Ring Group so you can call it directly from your phone or transfer callers to this Ring Group.
- Ring Strategy - The method for distributing calls to the users/extensions:
- Ring All Extensions - All extensions in the group ring simultaneously until one answers. If no one answers before the dial timeout expires, the call is sent to the failure destination.
- Ring Extensions Sequentially - The extensions ring alternately, with each ringing for the duration of the dial timeout. If none of the extensions answer, the call is sent to the failure destination.
- Ring Extensions Sequentially with Memory - Rings extensions sequentially, retaining previous extensions in the ringing process until the call is answered.
- Dial Timeout - Time in seconds to ring the numbers in the list below. If nobody answers the call during that set time, the caller will be routed to the Failure Destination below.
- Caller ID Prefix - A prefix added to the Caller ID Name sent to the extension in the list below.
- This is a great way to know where the call came from. For example, the Sales Ring Group, by adding Sales here and to the Caller ID name portion of the inbound Caller ID, will be prefixed with the word “Sales” when it calls the extensions below.
- Allow Forward - If an extension in this list has Call Forward enabled should we honor the Call Forward rules when someone is routed to that extension from this Ring Group.
- Mark As Answered Elsewhere - Notify to the members of the Ring Group that an incoming call has been answered by someone else.
- Early Answer - Ring Group signals "Answer" immediately, before the ring strategy is applied. This makes the call to be in an established state, allowing longer workflows when calls are being routed across systems or other scenarios.
- External Caller ID - If enabled, the system will use the Client’s primary Caller ID when calling the external phone number. If not enabled, it will pass the Caller ID of the inbound call to the External Phone number. This is only used when calling External Phone numbers, not internal extensions. Internal Extensions will always show the Caller ID of who called into the Ring Group. When inbound is an external number and follow-me destination is an external number then you can set option the to 'Use Users External Caller ID' to see your company caller id on the external number instead of the real Caller ID. You can also set this to inbound or to a custom value.
- Ringtone - You can set an specific ringtone to differentiate calls coming from this Ring Group from the rest of the calls.
- Inbound Caller ID - Pick an inbound caller id rule, which will apply to either caller name or number. This setting will override any other caller ID settings.
- Failure Destination – Determines where to send the caller if nobody in the Number list of Extensions and External Numbers answers the call after the Dial Timeout period.
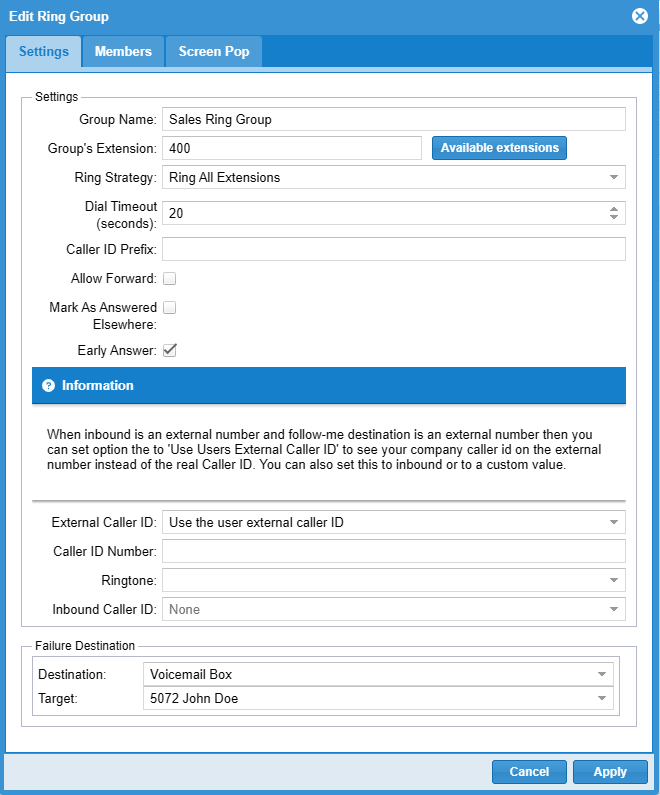
Members (tab): - Local Extensions - What extensions are part of this Ring Group and will be dialed when a Caller is routed to this Ring Group. Pick each number from the dropdown box menu.
- External Numbers - What external phone numbers are part of this Ring Group and will be dialed when a Caller is routed to this Ring Group. Separate each number by a comma.
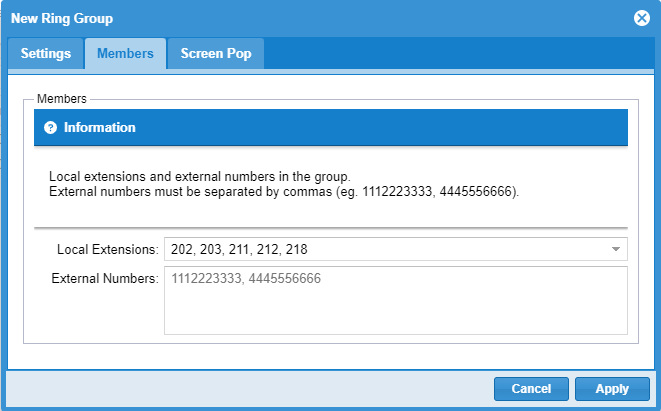
Screen Pop (tab): -
Available variables to use in the URL: - {{callerid_number}} = CallerID number of the originator of the call that is arriving to this ring group
- {{callerid_name}} = CallerID name of the originator of the call that is arriving to this ring group
- {{extension}} = the number of the Local Extension receiving the call and ringing
- {{extension_name}} = the name of the Local Extension user receiving the call and ringing
- {{did}} = the number that the originator of the call that is arriving to this ring group originally dialed
- {{wait_sec}} = how long, in seconds, the caller waited in the ring group
- {{ringgroup_name}} = name of the ring group where the call is arriving to (this ring group)
- {{ringgroup_extnum}} = number of the ring group where the call is arriving to (this ring group)
Screen Pop Type - Enable or disable Screen Pops for when receiving an incoming call from this Ring Group. If enabled (setting this parameter to "url"), users working in the Call Panel will receive a screen pop when the call is ringing or answered (depending on your configuration).
When - Define the moment the screen pop will launc, either when the call starts "ringing" or when it gets "answered"
URL - The URL that will be opened when the screen pop lanuches. This URL can contain call variables so that the webpage for the exact correct resource gets automatically displayed when the screen pop triggers.
Allow User Override - This will allow end users to configure the Screen Pops settings from within their Call Panel.
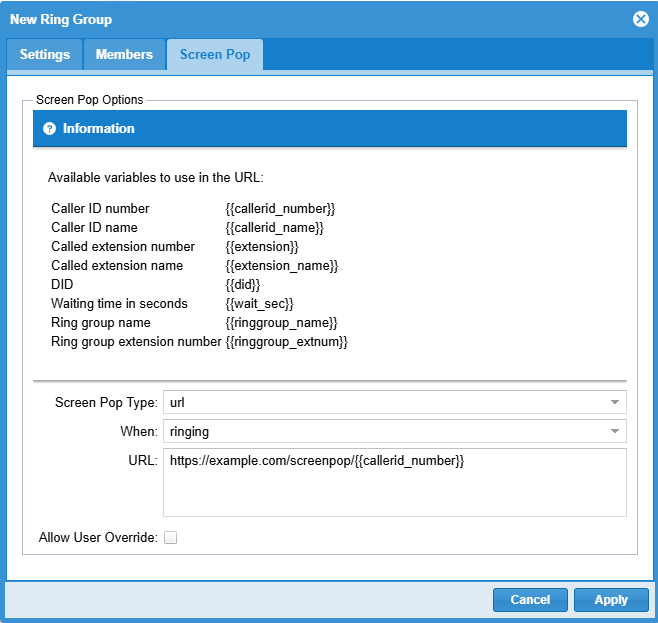
- Press the Apply button to save your changes

Settings  
- General (tab)
- Language - you can pick the default language you want the GUI to be shown in for this Client
- Time Zone - Time Zone to be applied system-wide. Each user can have their own Time Zone depending on their location but this setting here is the system-wide Time Zone
- Available Destinations - Will show the Number prefixes such as Area Codes for US and Canada that this Client is set up with to dial. This is read-only, and only your Reseller or Clearly IP can change these settings.
- Voicemail Option 0 Default Destination - While a user is leaving a voicemail, they have an option of pressing 0 to be connected to an operator. Here is where you define what the destination is if someone presses 0 from the voicemail system. This destination is a global destination that all Users will use unless, at the user level, you override this option on a per User basis as outlined here.
- STUN Server - Possibility to set one or more system-wide STUN Servers for aiding with proper routing of Call Panel's webphone audio streams.
 -
Caller ID (tab) -
Default External Caller ID -
Name - The Caller ID Name that is used by default when an extension calls an outside number. This can be overridden at a per User level, but this is the default if the user has no override set. -
Number - The Caller ID Number that is used by default when an extension calls an outside number. This can be overridden at a per User level, but this is the default if the user has no override set. -
Pick your default Emergency Caller ID - The drop-downs here are provided by the Emergency Caller ID module of your CloudPBX -
Default Callback Profile - This Lets you pick which Call-back Profile is the default to be used when an extension calls 911. This can be overridden at a per User level, but this is the default if the user has no override set. -
Default Dispatchable Location – This lets you pick which Dispatchable Location is the default to be used when an extension calls 911. This can be overridden at a per User level, but this is the default if the user has no override set. -
Subnet & Caller ID - This lets you set different External Caller IDs based on the device's IP Address network making a call. - Anything set here will override what the user has set and the Default External Caller ID defined above.
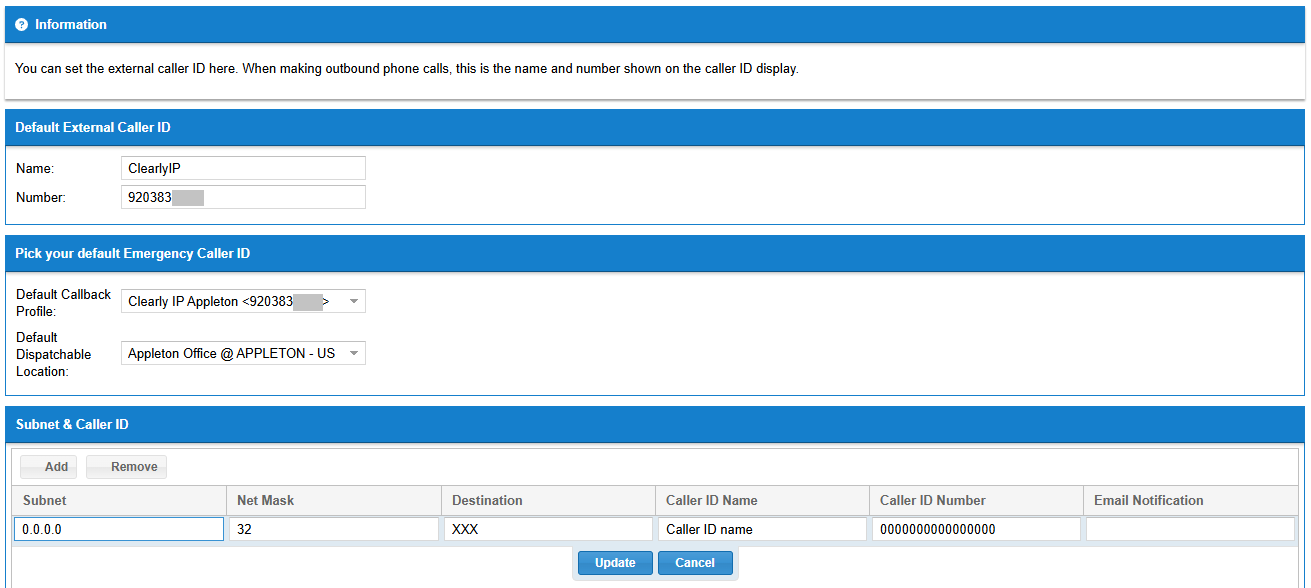
- Preferences (tab) - This Lets you set a bunch of more advanced settings related to the Client, as outlined below
- Voicemail File Limit - The number of voicemails a user can store at any time. If this number is reached, no new voicemails will be able to be left for the user.
 - Voicemail Length Limit - The maximum length in seconds of voicemails your users can receive. By default a voicemail is limited to 120 seconds.
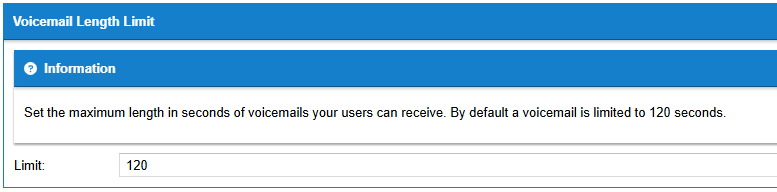
- Skip the playback of instructions for leaving a message to the calling party - By default when you get to users' voicemail to leave a message you hear instruction message: "Please, leave your message after the tone, when done hangup or press the pound key". This option will disable instructions for all existing voicemail boxes and for all newly created users.

- Outbound Calls Announcement - Set announcement to play to caller and callee for all oubound calls.
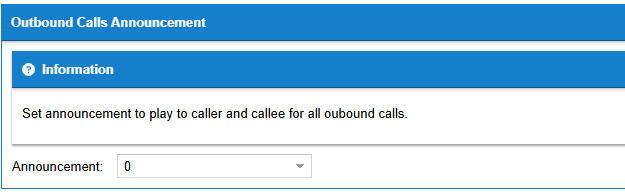
- Use the busy message rather than the unavailable message in your user's voicemailbox. - If this is enabled, it will force all callers who reach your user's voicemail boxes to hear only the busy message. This allows your users to only record one voicemail greeting versus recording one greeting for unavailable and one for busy.
 - International PIN Dialing - Enabling this will require your users when calling a International Number to enter their voicemail password before they can complete the outbound international call.
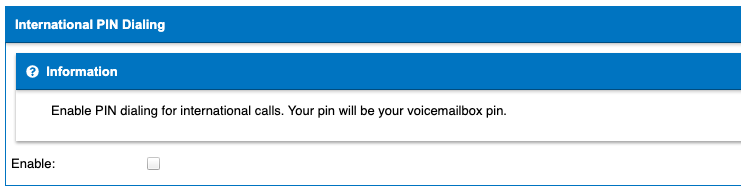 - Default ringtone for calls to extensions - For compatible endpoints, such as ClearlyIP Phones, set a default ringtone for calls going to an extension.
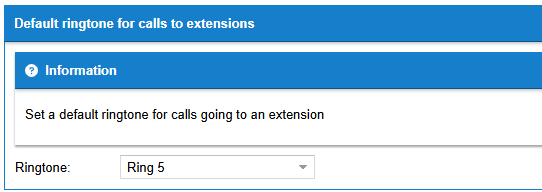
- Force external calls codec - The default codec for external calls is ulaw. You can set your preferred codec here, such as g722, gsm, etc. If this option is set to "any", then the session will be negotiated by end-point user agents. It is important to understand how VoIP codecs work. Setting the wrong codec here may lead to dropped external calls.
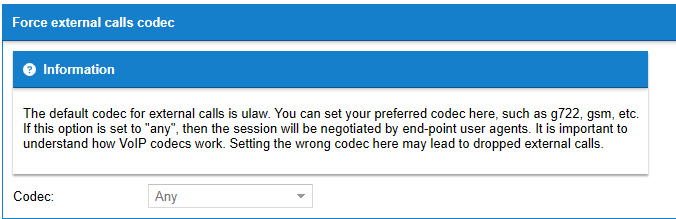
- Disable DTMF Transfer Parameter - Disables call transfers using Dual-Tone Multi-Frequency signals (DTMF). This disables the Call Blind Transfer feature (code: ##)..
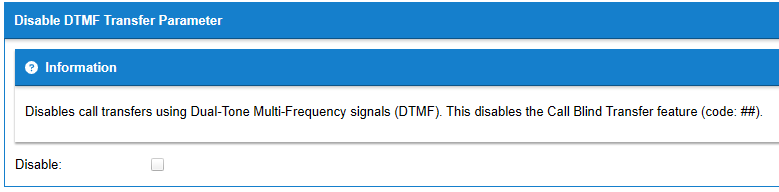
- Web Authentication (tab) - Place to optionally enable different SSO (Single Sign On) providers for when logging in into the different web interfaces in Clearly Cloud
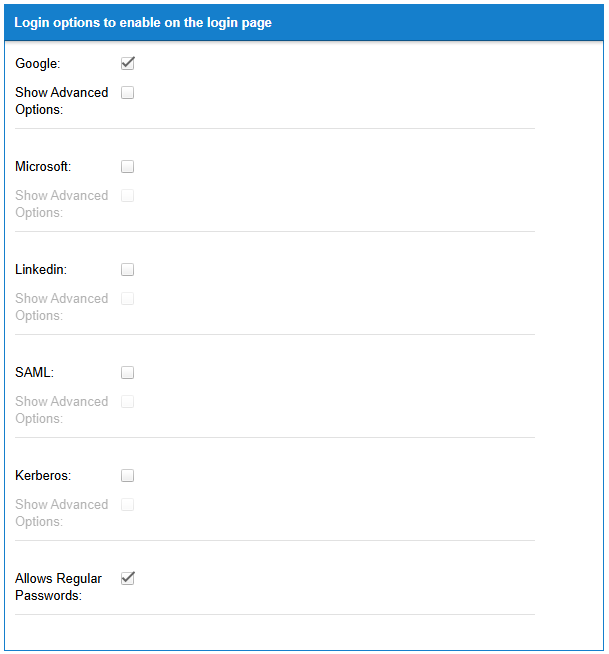
For SAML documentation go here. Time Conditions - From this page, you can create automated schedules for handling calls based on time of day. Once you have a Time Condition created, you will need to route your calls into the Time Condition from places like DIDs or IVRs.
- Click on the Time Conditions menu Option
 - From here, you will see the Time Conditions you have created
 - You can edit or delete any Time Condition by highlighting the Time Condition and pressing the edit or delete buttons at the top.
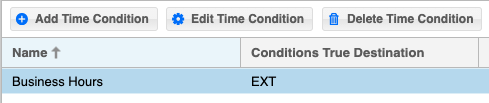 - Press the Add Time Condition button to create a new Time Condition
 - Within a Time Condition, you will have three tabs as explained below
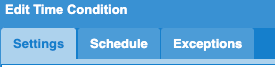
Settings (tab) - These are your general settings for this Time Condition, such as Name and where to route calls to when the Time Condition is matched and unmatched - Early Open/Close - Is time condition in the opposite mode until the next scheduled change? (Toggled by dialing *27*NNN where NNN is a time condition ID).
- Name - Name this Time Condition for your reference.
- Time Zone - Time Zone to be used for when evaluating this time condition in case the current time matcher or not the time condition
- Enabled - If checked the time condition evaluation is active (performed) for when calls reach this time condition, otherwise (if unchecked) the evaluation of the time condition will not take place (the call is always sent to the 'Match Destination').
- Shared - Allow this Time Condition to be accessed from other sections of the system, such as 'Follow-Me'?
- Match Destination - Select the specific destination where the caller should be sent when the conditions are true.
- No Match Destination - Select the specific destination where the caller should be sent when the conditions are false.
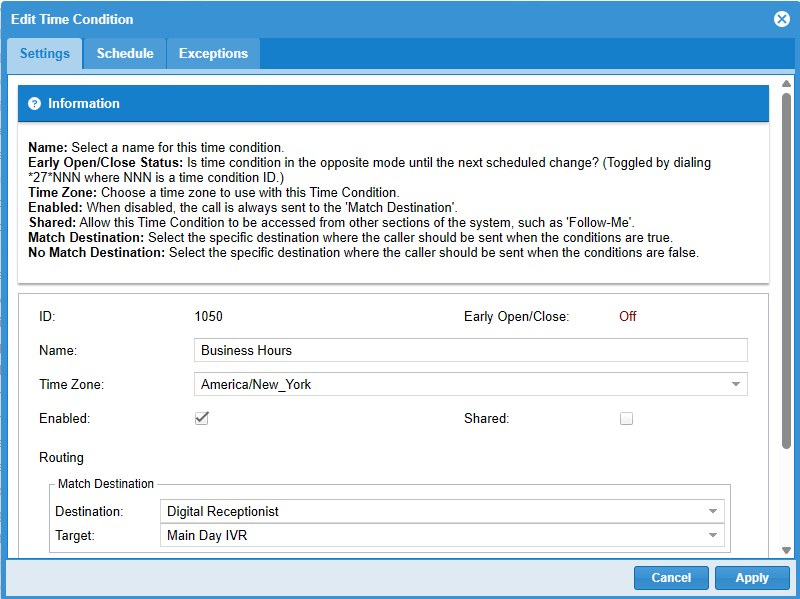
Schedule (tab) - Here is where the logic is applied to determine if the caller should go to the True or False Destination. - Weekdays - This is where we define our Open and Close hours on a per day of the week basis of Monday thru Sunday.
Click on each day of the week, and you can set the Start and End Times. If you are closed for a period like a Lunch Break, you can define that Start and End time for a Break, and that time will be considered closed.You can click on the Closed button  to quickly mark the whole day as closed.Anytime a caller makes a call that falls between your Closed time, it will be matched to the False Destination, and any calls that fall between your Open time will be matched to the True Destination. to quickly mark the whole day as closed.Anytime a caller makes a call that falls between your Closed time, it will be matched to the False Destination, and any calls that fall between your Open time will be matched to the True Destination.
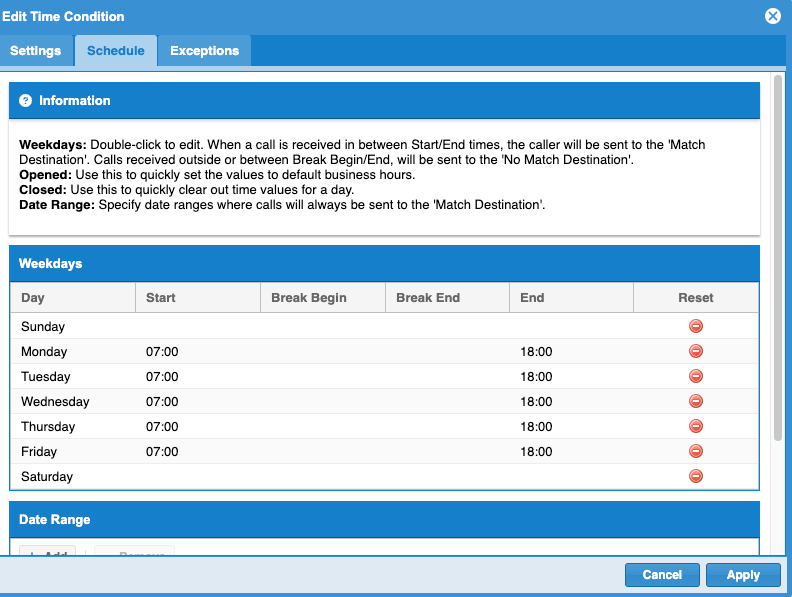
- Date Range - Here, you can optionally set specific Start and End Dates indicating when this Time Condition will be active. If you leave this blank, it will apply to all days of each year.
If you wanted to set this only to be active for January 1st thru March 31st, 2021, you could set the Start and End dates here. All calls received here after March 31st would automatically go to the False destination. All calls received between January 1st and March 31st, 2021, would be matched to True destination. 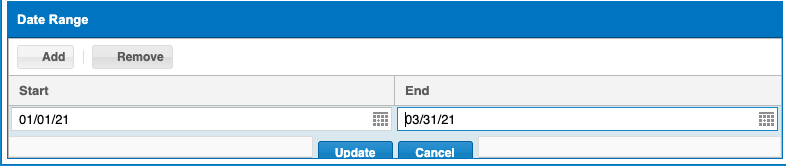
Exceptions (tab) - The exceptions list allows you to provide exceptions to the standard Planning Weekdays Conditions described before. This is mainly used to define specific days of the year, such as a holiday, that you would be closed all day.
From here, you can define the Date and the Start and End time for that date that you will be closed. Unlike Planning Weekdays Conditions, the Start and End times will match the False Destination, not the True Destination, since this is an exception rule.
You can define one or more Exception rules here
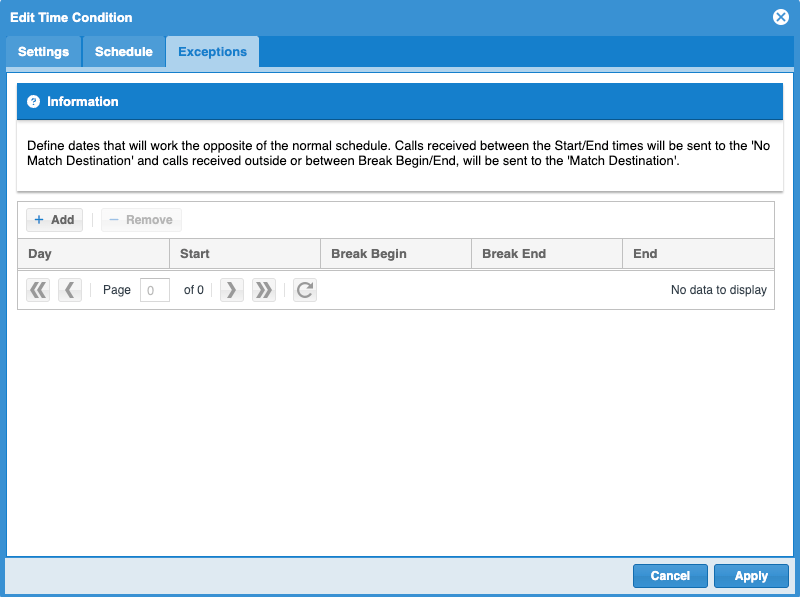 Users - Users are utilized in 2 ways in CloudPBX. A user has a login to the End User Level login for CloudPBX and Call Panel. A user is also set up with an extension on the CloudPBX that allows them to connect one or more Desk or SoftPhone to the CloudPBX Client they are under.
Click on the Users menu Option  - From here, you can create, view, and edit existing Users.

- To log in as a User into the User Level login, you can highlight any user and click on the Connect As User button at the top. You will now be logged in as that end User and can see all the things that the user would see as outlined in the documentation here for a User Level login
Adding UsersThere are 2 ways of adding users: - manually
- in bulk via csv file import
Adding Users manually To add a new User, with its own new extension, just click on the "Add User" button:

A popup window will show in the center of the screen containing all the following configurable User Settings, grouped into corresponding tabs:
Users Settings General (tab) - Contact Information
- First and Last Name - First and Last Name of this User
- User Settings
- Vanity User - Check to turn this user into a Vanity user. Vanity users have a lower licensing cost but cannot make any outbound calls, they can only receive calls
- Username - Username to login as this user into the CloudPBX Web Interface as an End User, Call Panel, and Clearly Anywhere mobile app.
- Email & VM Email - This is the Email address we will use for a password reset and to send Voicemails to
- Profile - What Profile this User is linked to for permissions. See Profile Section for more explanation on how profiles work.
- Web Interface Password - Set the password used for this User to Login to the CloudPBX Web Interface as an End User, Call Panel, and the Clearly Anywhere mobile app.
- Voicemail PIN - Voicemail Numeric only password for accessing this user’s extension voicemail box.
- Department - Optionally link this user to a Department. See Department Section for more information on how Departments work
- Language - Pick from which Language the Web GUI will be shown in a drop-down of support languages.
- Phone Settings
- Extension - What Extension number you want to assign for this user.
- SIP Password - The SIP Password for this extension. If you generate a new one, all devices for this extension will need to be re-provisioned with the updated SIP password.
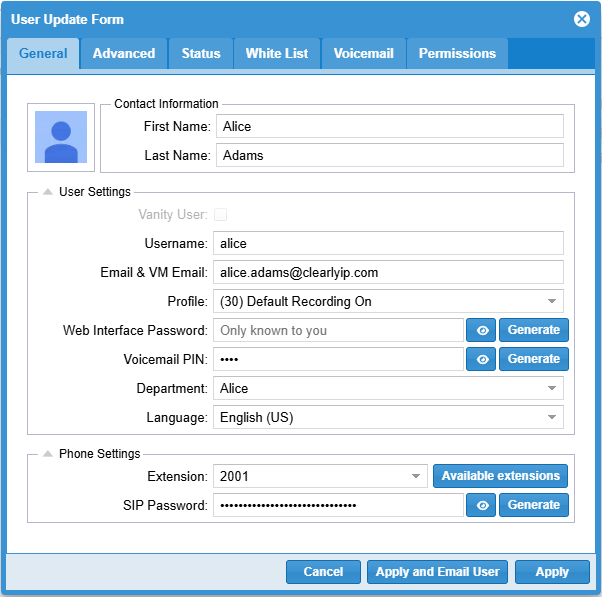
Advanced (tab) - Caller ID
- Internal Caller ID Name - The Caller ID Name is used by default when an extension calls another extension on the system
- Internal Caller ID Number - The Caller ID Number is used by default when an extension calls another extension on the system.
- External Caller ID Name - The Caller ID Name is used by default when an extension calls an outside number. If this is not set, the user will use the Global Caller ID set for this Client in the Settings module as outlined here.
- External Caller ID Number - The Caller ID Number used by default when an extension calls an outside number. If this is not set, the user will use the Global Caller ID set for this Client in the Settings module as outlined here.
- Ignore caller ID settings - When enabled, caller ID settings (client and end user) will be ignored.
- Default SMS Identity for Clearly Anywhere
- Pick a SMS DID - here you pick the default DID that will be used whenever this user starts a new SMS message from Call Panel or Clearly Anywhere.
- Time Zone - User’s time zone. Used for Voicemail, Time Stamp purposes, and Call Details when logged in as a User, not a Client.
- Custom Destination on Unavailable - By default, if the user does not answer an inbound call to their extension, the caller will be directed to the user’s unavailable voicemail greeting. You can override that destination to be any PBX destination instead of the user’s voicemail box, including a different user’s voicemail box.
- Custom Destination Busy - By default, if the user does not answer an inbound call to their extension and they are on ANOTHER call, the caller will be directed to the user’s busy voicemail greeting. You can override that destination to be any PBX destination instead of the user’s voicemail box, including a different user’s voicemail box.
- Voicemail Option 0 Destination - While a user is leaving a voicemail, they have an option of pressing 0 to be connected to an operator. Here is where you can override the Client level default Destination if someone presses 0 from the voicemail system. The Client Level Global default Destination is defined in the Settings module as outlined below.
- Emergency Calls - Here is where we define the Caller ID handling when someone calls 911.
- Use Default Emergency Caller ID - If enabled, this user will use the Global Emergency settings for Call-back Profiles and Dispatchable Locations as defined in the Settings module below.
- Default Callback Profile - If not using the Default Emergency Caller ID settings above, here is where you can pick from a list of Call-back Profiles that have been created for your Client. For more information on Emergency Call-back Profiles, please review the Emergency Caller ID module below here.
- Default Dispatchable Location - If not using the Default Emergency Caller ID settings above, this is where you can pick from a list of Dispatchable Locations that have been created for your Client. For more information on Dispatchable Location, please review the Emergency Caller ID module below here.
- Dial Timeout - How many seconds to try and call the user before timing out to the Unavailable Destination, which by default is the Users Voicemail box unless defined differently above in the setting.
- Contact Tags - Group your contacts. Permissions can be applied per tag assigned to end user by the administrator.
- Screen Pop Options - Configure for automatically pop up a web browser window/tab whenever this user receives a call (either at "ringing" time or at "answered" time).
Available variables to use in the URL: - {{callerid_number}} = CallerID number of the originator of the call that is arriving to this user
- {{callerid_name}} = CallerID name of the originator of the call that is arriving to this user
- {{extension}} = the number of the Local Extension user receiving the call and ringing
- {{extension_name}} = the name of the Local Extension user receiving the call and ringing
- {{did}} = the number that the originator of the call that is arriving to this user originally dialed
- {{wait_sec}} = how long, in seconds, the caller waited before their call was answered
Screen Pop Type - Enable or disable Screen Pops for when receiving an incoming call from this Queue. If enabled (setting this parameter to "url"), users working in the Call Panel will receive a screen pop when the call is ringing or answered (depending on your configuration).
When - Define the moment the screen pop will launch, either when the call starts "ringing" or when it gets "answered"
URL - The URL that will be opened when the screen pop launches. This URL can contain call variables so that the webpage for the exact correct resource gets automatically displayed when the screen pop triggers.
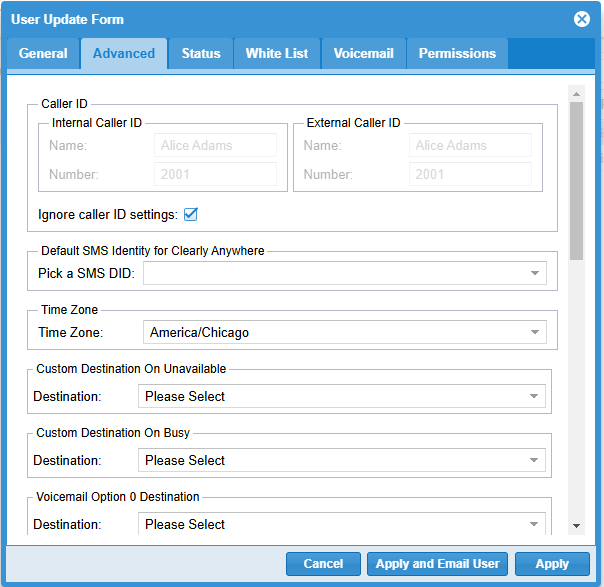
Status (tab) - Status
- Forward Number - This lets you define a phone number you want all calls forwarded to. If blank, then you have no call forwarding enabled, and callers will ring your extension.
- Do Not Disturb - If set to Off, inbound callers will reach your devices. If set to On, all inbound callers will be sent right to your busy voicemail greeting.
- Call Waiting - If set to On and you are on an active call already, and an additional call comes for your user in that call will be sent to your extension as an additional new call. If turned Off and you are on an active call, and an additional call comes in for your user, the caller will be sent to your busy voicemail greeting.
- Follow Me Settings
- Follow Me Number - This lets you define one or more numbers you want to be called when your extension is called.
- Ring Strategy - Ring strategy to use when ringing the Followme devices:
-
- Ring All Extensions: all extensions in the group ring simultaneously until one answers. If no one answers before the dial timeout expires, the call is sent to the failure destination.
- Ring Extensions Sequentially: the extensions ring alternately, with each ringing for the duration of the dial timeout. If none of the extensions answer, the call is sent to the failure destination.
- Ring Extensions Sequentially with Memory: Rings extensions sequentially, retaining previous extensions in the ringing process until the call is answered.
- Press 1 to Accept the Call - If a call is sent to an external number such as your Cell Phone, this will require you to press 1 before the caller is transferred upon you answering the call from your external number. This is done to keep the caller from going to your cell phone voicemail box if your cell phone is turned off or out of range.
- Caller ID Prefix - Prefix to add to the original Caller ID so that it is displayed on the receiving devices when this Followme is ringing them.
- External Caller ID: This parameter sets how the Caller ID will be displayed in the FollowMe destination number. There are two options: Use Users External Caller ID and Use Inbound Callers Caller ID.
- Use Users External Caller ID: This will display on the FollowMe destination number the Caller ID of the person who is calling your extension.
- Use Inbound Callers Caller ID: This will display on the FollowMe destination number the external Caller ID of your Company number.
- Delay between devices - This is how long we should wait before calling your FollowMe list of numbers. If you set this to a setting like 5 seconds, then the first 5 seconds will be just your desk phone ringing, and only if you do not answer after 5 seconds will it start to ring the numbers in your Follow Me list above.
- Ring Timeout - How long to call all the numbers in the Follow Me list above before giving up and sending the call to your Users voicemail box.
- Mark as Answered Elsewhere - This option will let you know that the call was answered elsewhere.
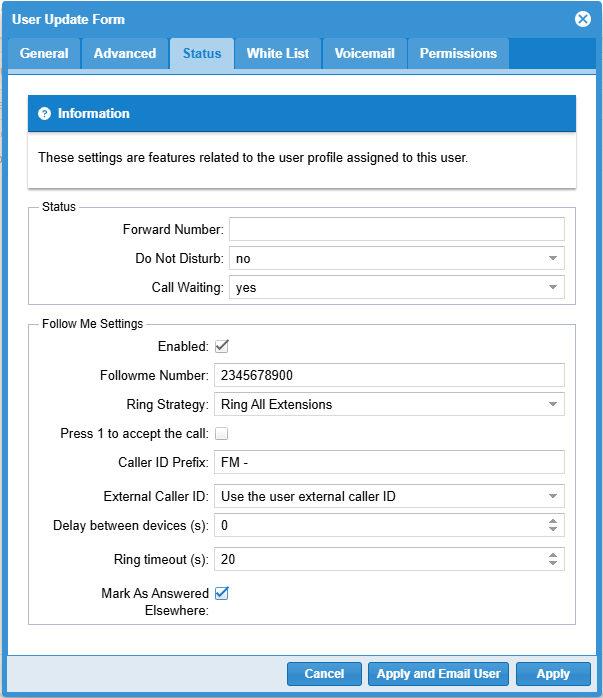
White List (tab) - Extension List - The white list allows you to define a list of extensions allowed to dial this user. Only the extensions listed here are allowed to dial this user. If empty, anybody can dial this user.
Voicemail (tab) - Voicemail Settings
- Voicemail Limit - Here, you can set how many voicemail messages a specific user can store in their voicemail box. This number is pulled from the Voicemail Limit field in the Client level Settings module as outlined here. This field becomes an override to that global setting; if you change it here, it will override the global client setting.
- Play CID - Read back caller's telephone number prior to playing the incoming message and just after announcing the date and time the message was left.
- Play Envelope - Read the date and time stamp of when the voicemail was left when listening to a message.
- Disable VM rotate - By default, if the user reaches the voicemail limit, the system will delete the oldest voicemail each time a new voicemail is left. Enabling this option will disable this feature, and a user will not be able to receive new voicemails once they reach this limit until they delete some of their existing voicemails.
- Enable Transcription - If enabled, your voicemail file will be sent to a 3rd party transcription API service to transcribe the audio file and include a transcription of the voicemail in the email notification above.
- Enable Translation - If enabled, the above Transcription will be translated to French.
- Voicemail To Email
- Enable Notification - Enable the ability to get Notifications for new voicemails through email.
- Use login email - This will set up voicemail to email notifications to just the Email address of this user and an attachment of the actual voicemail file. If you enable this, you can only send it to this email address; if you want to send it to more than one email address, you need to use the “Send notification to” field below instead. If you enable this, the “Send notification to” field will be hidden.
- Send notification to - Provide a custom list of email addresses to send voicemail to email notifications to. If you define more than one here, separate them by commas.
- Send short notification to - Provide a list of email addresses to send voicemail notifications without attaching a copy of the voicemail as an attachment.
- Delete voicemail after notification - If enabled, the voicemail message will be deleted once the email notification has been sent from the CloudPBX system.
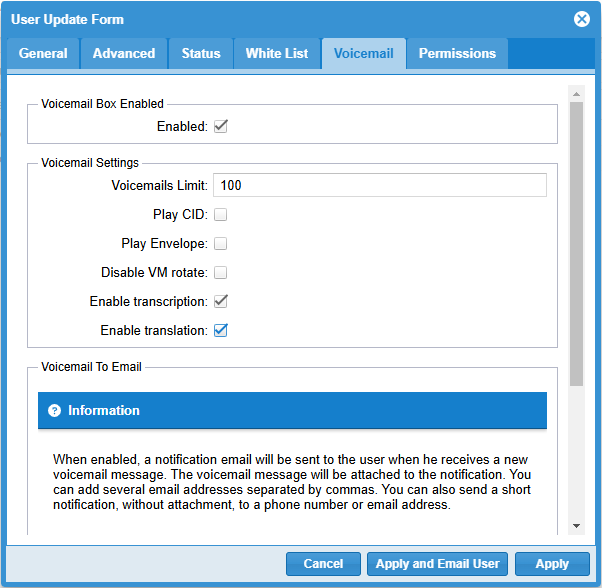 Permissions (tab)
Adding Users in bulk To add new users in bulk, just click on the Import button
and upload a properly built csv file. To know the current structure required for the csv file you can first manually create a user and then click on the Export button to download a users csv file for reference.
The following screen shows after clicking the Import button:
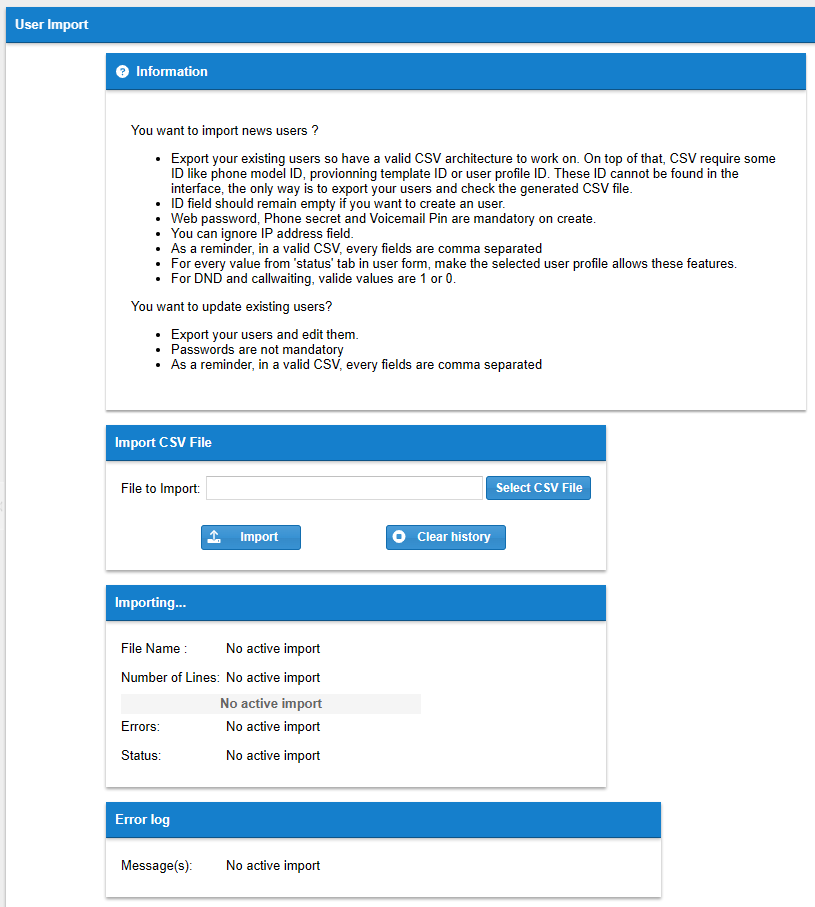
Actions you can perform to the Users - If you right-click over any user a set of actions you can perform to a user will be displayed.
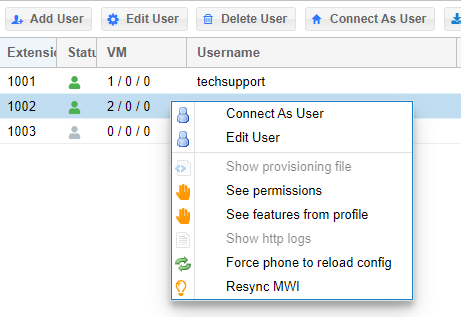 - Connect as User
- Edit User
- See permissions
- See features from profile
- Force phone to reload configuration - This will reboot the user's phone
- Resync MWI - Resync the Message Waiting Indicator in the user's phone or phones
Bulk Assign Emergency Caller ID - By clicking on the "Bulk Assign Emergency Caller ID" on the right side of the top menu you can conveniently manage the Emergency Caller ID assignments, both the Callback Profiles and the Dispatchable Locations, per users in bulk
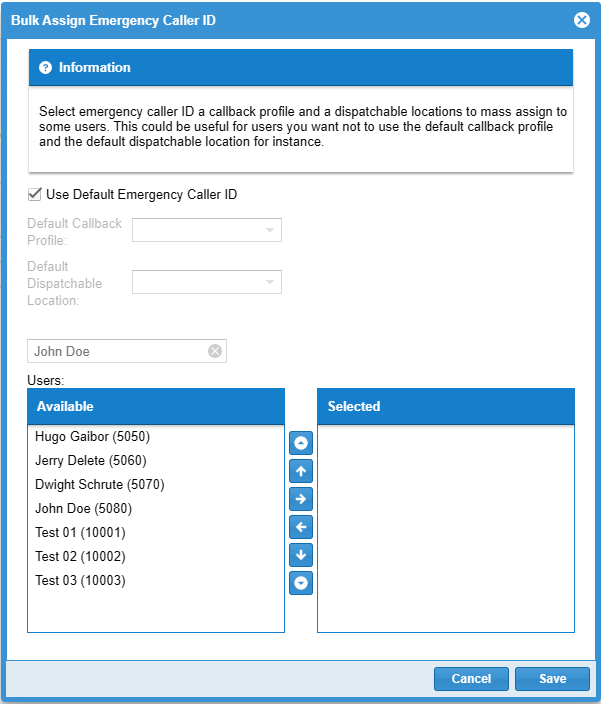
Video Conferences - Click on the Video Conferences menu Option
 This section will show the list of available Video Conference rooms. This section will show the list of available Video Conference rooms. - We can execute six actions to the list of Video Conference rooms.
- Launch a Video Room as an Administrator
- Launch a Video Room as a Guest.
 ![]() Adding a Video Room Adding a Video Room
- Click on the 'Add a Video Room' button.
 - The following screen will appear.
General (tab)
- General
- Name - This is the name of the Video Room we are creating. No special characters or spaces are allowed.
- Profile - Select a recording profile - (Default Recording Off or Default Recording On). This option will allow us record the Video Room.
- Expire On - This is the expiration date of the Video Conference Room. Please use the calendar to select the appropriate date.
- Telephony
- Extension - Associate an extension to the Video Room. We can either enter the extension number in the text field or click on Available Extensions. If we click on 'Available Extensions', a list with the extensions we can assign to the Video Room will appear.
- Caller ID Name - Set the Caller ID Name.
- Caller Id Number - Set the Caller ID Number.
- Share Screen Options - here we can allow either the Admin or the Guest or both to perform a screen share during the conference.
- Enabled For Admin
- Enabled For Guests
- Recording Options - here we can allow either the Admin or the Guest or both to start recording the audio and video of the session during the conference.
- Enabled For Admin
- Enabled For Guests
- Call Prompt (to reach a video conference from the phone like an IVR)
- Room Number - local extension number to reach the video conference room
- Room PIN - optional PIN to lock access to the video conference room
Users (tab)
- We can give access to the Video Conference room to users, selecting them as administrators or regular users.
- If we type the name of a user in the text box, the users that match the entered text will appear in the Available Section.
- From here we can select the user or users we want to assign the Video Room, and move them with the arrows to the 'Selected' section.
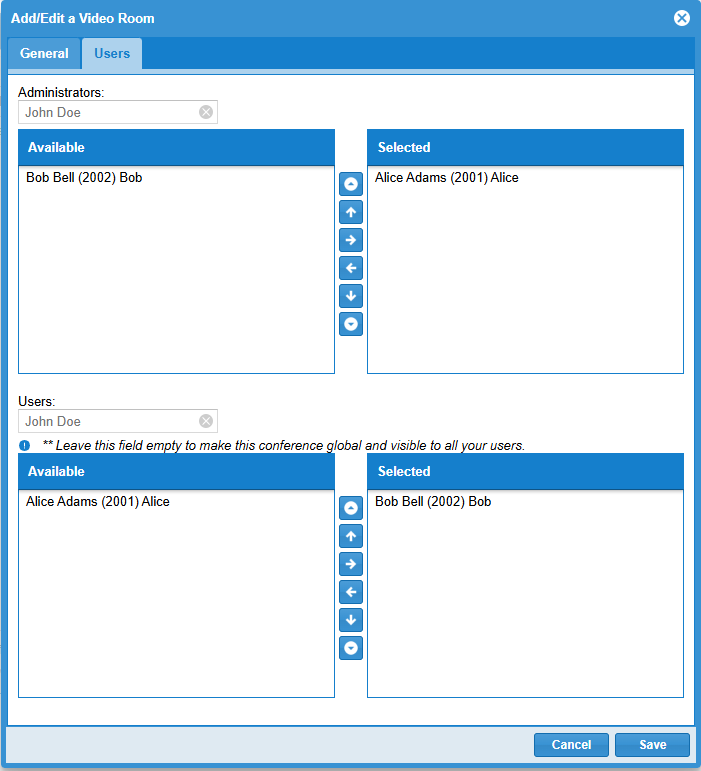 - Once all the required parameters are set, we need to click on the 'Save' button.
 - Once the Video Conference room is added, it will appear in the list of video conferences available.
![]() - If we select any Video Conference we can Edit it (this will display the settings of the Video Conference), Delete it, Launch it or Search for it.
Editing a Video Conference - Simply click on the Edit a Video Room button and the main configuration screen will appear allowing you to modify the pertinent options.
 Deleting a Video Conference - Just click on the Delete a Video Room Button.
 - After this, a message will appear asking you to confirm the deletion of the Video Conference Room.
 Launching a Video Conference. - Clicking on the 'Launch (admin)' or 'Launch' button will open a new navigation tab on your Web Browser allowing you enter the Video Conference room as an Administrator or as a guest and test it.
![]() 
 Voicemail Broadcasts -
From here, you can send an audio recording directly to the voicemail boxes of selected users. -
Click on the Voicemail Broadcasts menu Option

-
You can either send an audio file to a specific user’s voicemail boxes or create a Mailing List. A Mailing List lets you send audio files by picking the list you have made and uploading the audio file without defining the voicemail boxes each time.
Sending a Voicemail Broadcast
- You can click on any Mailing List group to have it auto-populate the Select Users list on who will get the voicemail message you want to send. You can manually move Users from the Available Users list to the Selected Users list.
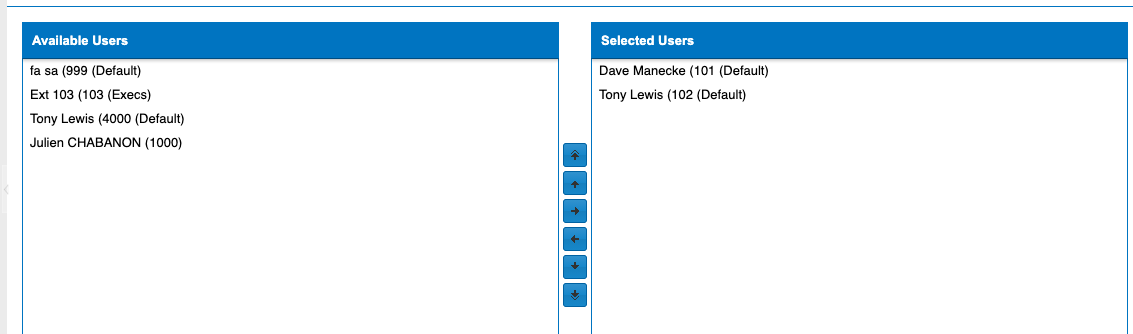 - Once you have one or more users in the Select User list, you can use the Select Wav file button to upload the audio file you want to send to all the users.
 - Press the Apply button to send the voicemail file.
 - You will get a pop up notification showing the Voicemail Broadcast is sending.
 My Mailing List - From here, we can Create, Edit, or Delete a predefined Mailing List that contains groups of users that you can quickly send blast voicemail messages to.
- Click that Add button under My Mailing List
 - Provide a name for the Mailing list and press the Apply button
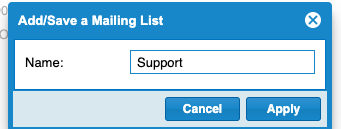 - Click on the Mailing List name to highlight it
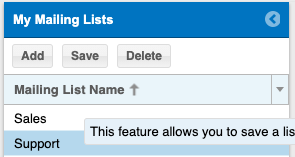 - Now under the Available and Select Users list, move over the users from the Available Users list to the Selected Users list for all the users you want to be part of your new Mailing List we just created.
 - Press the Save button to save those users to the List you highlighted.
 Sign Out - To Sign Out from the Client portal Click on the Sign Out menu Option
 - You will now be signed out and taken back to a Login page

Below are Guides that do not relate to specific menu options in Clearly Cloud but help expand on specific features.
Dial By Name Directory - The Built-in Dial-by-Name Directory enables callers to route themselves to the extension of the person they are looking for by searching the person's name or last name and without the intervention of a receptionist or operator.
- The callers can search for the person's first or last names by entering the first 3 letters using their phone's DTMF keypad. When the system matches what the caller entered it will reproduce a prompt with the person's name and connect the call.
- By default the system will play back the person's Voicemail Name if recorded for each match and if no Voicemail Name is recorded it will spell the users first and last name.
- The Dial By Name Directory known as "Directory" can be set as a destination in your IVR.
- To route an inbound Caller to the Directory we will add an option in the digital receptionist module of your Clearly Cloud system by modify your digital receptionist and adding a new option routed to the Directory. You can review more in-depth documentation on the Digital Receptionist here.
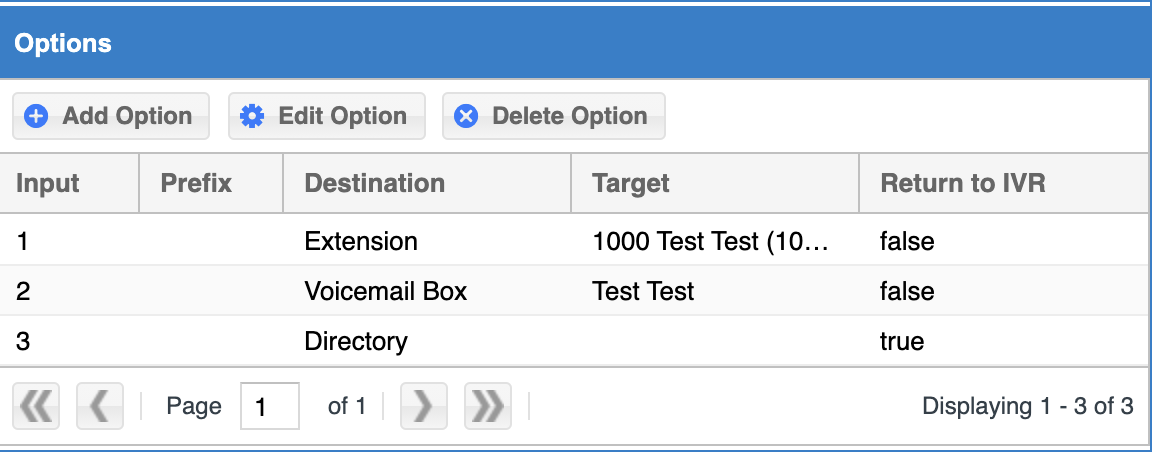
- When a caller has reached your IVR and presses option 3 they will be prompted to enter the first 3 letters of the person's first or last name and all matches will be played back and the caller will be prompted to pick one of the matches or continue entering more letters and then connect the caller with the person they are looking for.
Multiple Directories - You can have as many internal directories as needed, just consider that the key element for this is using a Contact Tag per directory.
- As outlined here, you can crate a tag and associate that tag with a contact.
- By default, the system creates a default directory on all clients and all users are by default part of that directory.
- Also, this module adds the feature of having users in multiple Company Directories.
Example: - For instance let's create a Directory that will have the Support Team in it.
- In the Contacts module click on Tags > Add Tag.
- Enter the name of the Tag and select Company Directory
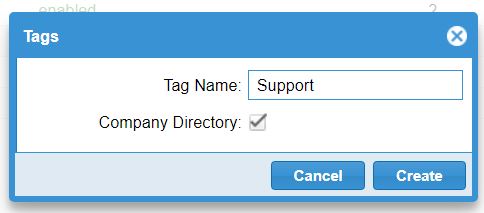 - Then In the Users module, Advanced Tab you can assign the Directory tag or tags for this user from the drop down menu as shown next.
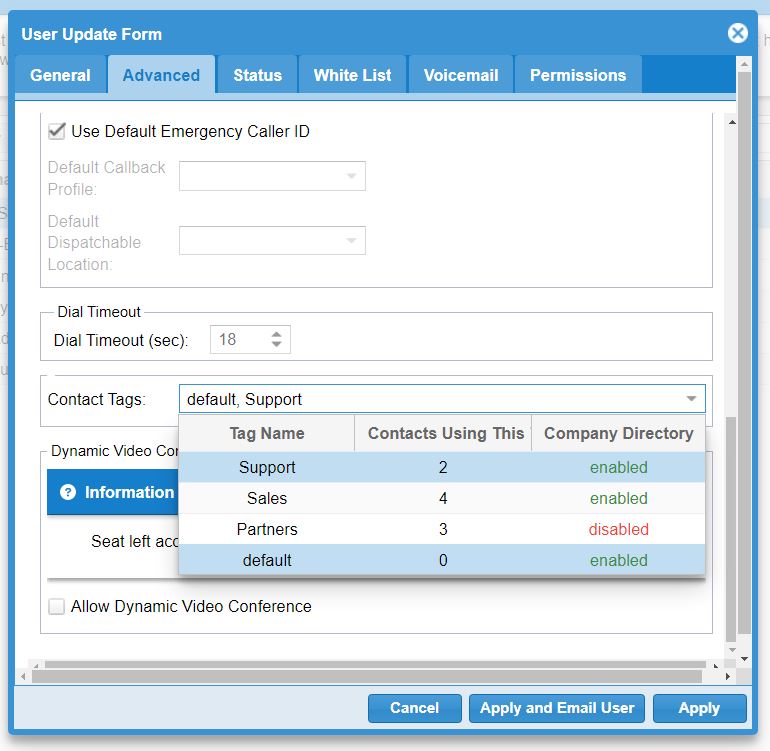 - In the Digital Receptionists module we can add an option to route callers to the Support Directory as shown below:
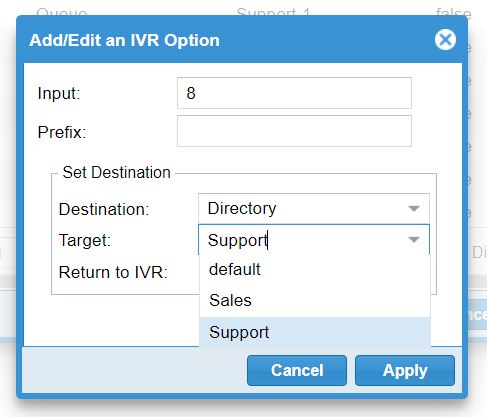 - At the end our IVR options may look like this.
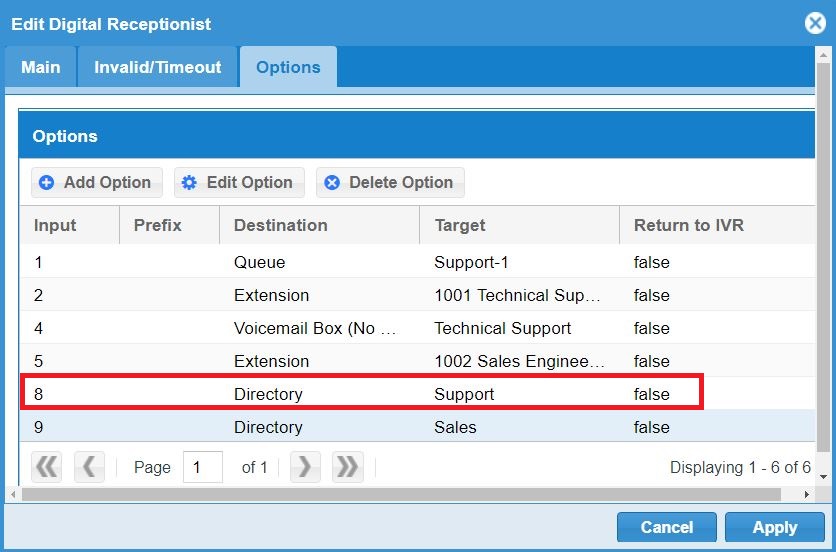
Bulk Import Users with CSV - If you need to create a large amount of users you can use the Import feature under the User Tab to bulk import from CSV your users.
- Navigate to the Users menu option and click on the Import button
 - Click on the Select CSV file button and pick from your local computer the CSV file you want to import from

- Click on the import button and the system will now import all the users from your CSV. If any errors are found they will be displayed below
- For a sample Import file we recommend that you create a User manually in the GUI and than use the Export button to export the existing users to use as a guide when importing new users.
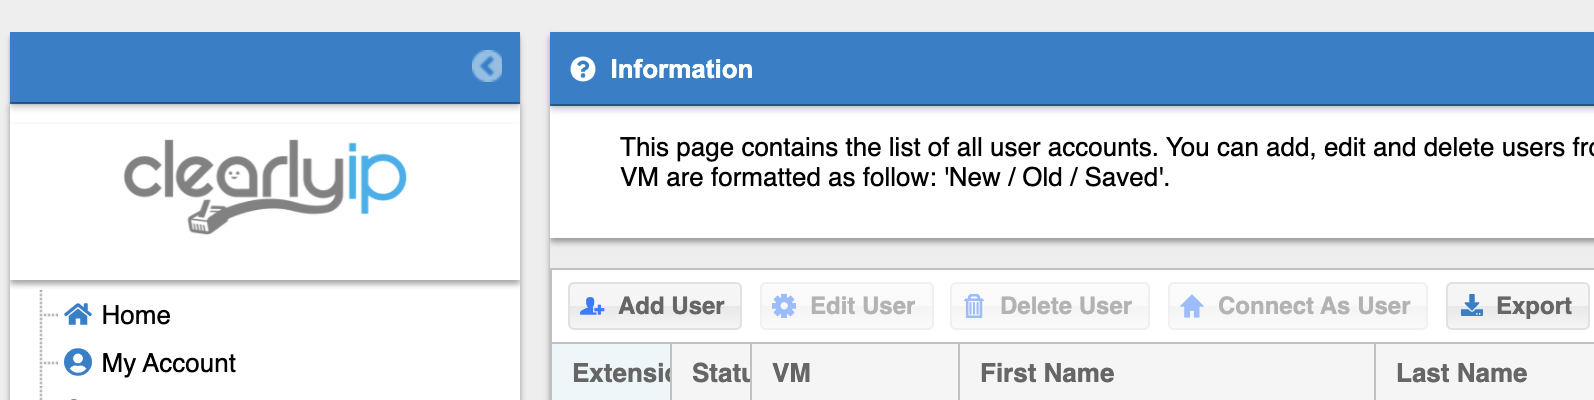
- When importing a new user you will leave the ID field blank in the CSV and the system will auto generate the ID field. On your export when you open the file you will see in row 1 a header of all the fields. Any column in the header with a * is a required field that you must provide when importing.

How to Manage Column Selections for any Grid View All the modules and menus from Clearly Cloud display their information in columns and rows in an easy and intuitive way called Grid View. Depending on our preferences or our day-to-day operations, sometimes we need to view the information in the way that best suits us. To do this, the Clearly Cloud GUI allows us to set which columns we want to view each time we visit a module. To set what columns we want to see in any menu click on the arrow at the end of any column title.
 The following options will appear:
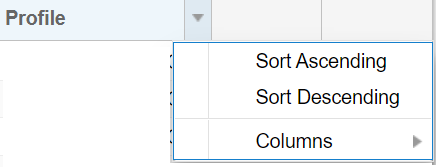 Sort Ascending - With this option we sort the data of the selected column in ascending order. Sort Descending - This option sorts the data of the selected column in ascending order. Columns - This option allows us to select which columns will appear the next time we visit a menu. If we move the pointer over the Columns option, the available columns for the current menu will appear.
For example, let's go to the Users module. As we can see, by default, the following columns are shown: Extension, Status, VM, Username, First Name, Last Name, Profile, 2FA, Vanity User.

Let's say we want to remove the the 2FA (2-Factor Authentication) and the Vanity User columns from the grid view. We just simply click on the arrow at the end of the title of any column and the list of available columns will appear. To fulfill our objective, we simply uncheck the columns that we don't want to be displayed; 2FA and Vanity User in this case. 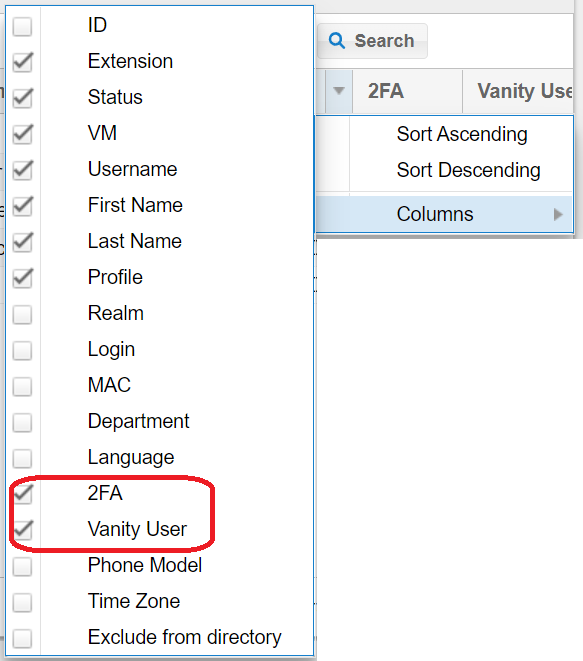
And the grid will be shown as follows:
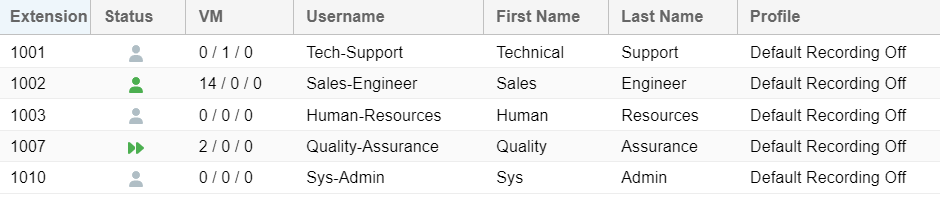 Now, let's say we want to add the Department and Time Zone columns. We just follow the steps described above and select these two options from the list.  And the grid will now be shown as below:
The next time we visit this menu, the column view will appear as we just modified it. We recommend you to first un-check the columns you don't want to be displayed, refresh the web page and then add or check the columns you want to be on the grid.
|
|
|
| | | |
|