Uploading ....
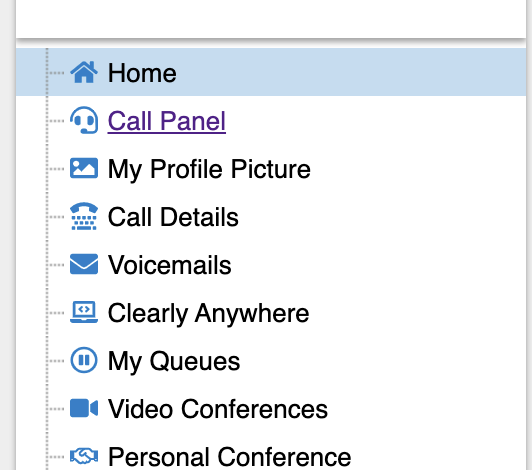
The ClearlyIP Call Panel is a powerful communication tool that offers a wide range of features for managing calls, conferences, voicemail, contacts, and more. It provides a user-friendly interface that simplifies communication workflows and enhances productivity. With features like user management, call flow settings, and voicemail management, users can efficiently handle their communication needs.
The Call Panel’s chat functionality enables real-time collaboration through direct messages and channel rooms. It facilitates efficient communication, file sharing, and team collaboration. The Queues feature allows for easy management of call center operations by adding and removing queues, monitoring queue statistics, and gaining insights into performance.
The Call Panel also includes features like conferences, call history, contacts management, tags, and click-to-dial, providing users with comprehensive control over their communication activities. The built-in softphone feature allows users to make and receive calls directly from their computer, eliminating the need for physical desk phones. With personalized user settings and customizable presence, users can tailor their communication experience to their specific preferences. Overall, the ClearlyIP Call Panel streamlines communication management, improves collaboration, and boosts productivity.
Logging In
- You log into Call Panel by having the End User login to the Client Login with the Username and Web Interface Password you set up for each user of the system
- They will log in to your Clearly Cloud Login URL provided to you at Location Creation time, such as https://w.clearlyip.cloud or whatever the URL was for your location.
- From here you can click on the Call Panel tab and be directed into Call Panel
Overview
-
Using the Main Navigation Bar across the top of the screen, you can access all Call Panel features.
-
Some features may not be enabled for your login. Make sure to contact your Client PBX Administrator if something is documented here but does not work for you. Most likely, it is because you do not have permissions for that feature or action.

Users
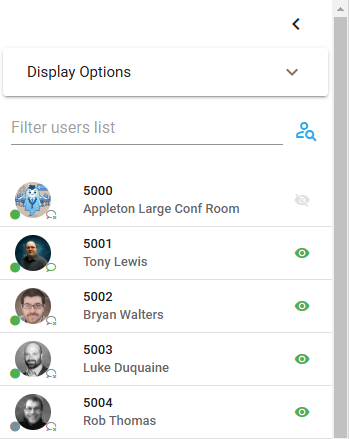
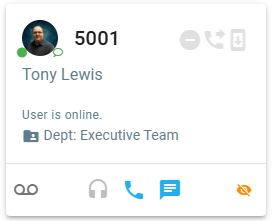
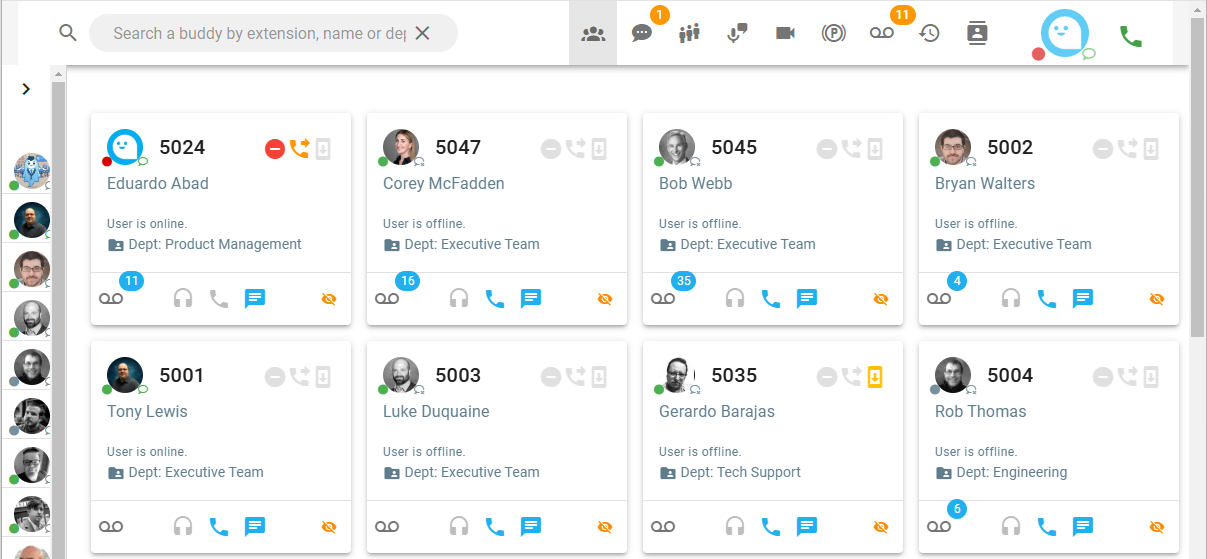
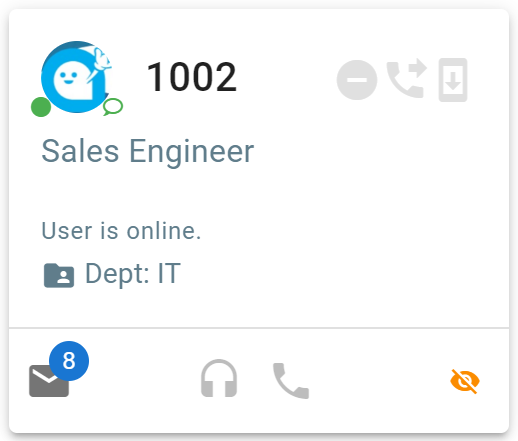
- Upon logging into the Call Panel, you will see the main Users page. This page will display all users you wish to make visible on your Dashboard. Here you can view other users' status, listen to active calls, and make calls directly to other users.

Add and Remove Users
- To add users to your Dashboard, if the left-side panel is not opened already, click on the right arrow (">") on the screen's top left-hand side to open it.

- This will open up a panel on the left of the screen that displays all users you can add to your User dashboard. To the far right of each name, you will see an image of a grayed-out eye with a line through it.

-
This means the User is not in your Dashboard. Click on that image to add a user to your Dashboard. To remove a User from the Dashboard, click the green image of an eye.

-
Once you have all the users you want on your Dashboard, click the left arrow on the sidebar's top right side to close it.

-
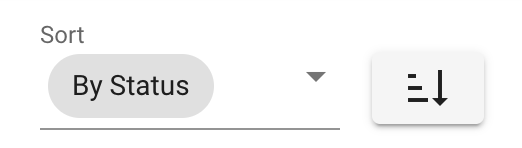
- By clicking on "Display Options" below the left arrow mentioned above
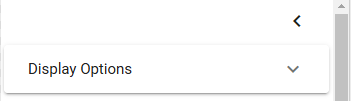
you can access the box size and Sort alternatives
- The User tab has 4 Sort orders you can pick from to determine how the users in your Dashboard are sorted by.
- Custom - Lets you drag and drop the order you want the users to be shown.
- By Extension - Will auto sort by Extension number
- By Name - Will Sort by First name in Alphabetical order.
- By Status - Will show all users on a active call at the top and the rest of the users below that.
- The User tab has 3 size modes on how the users will be shown in your Dashboard
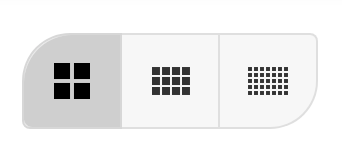
- Large - Takes up the most amount of space but shows the most about of details.

- Medium - Takes up less space then Large but still has each user in a compact box

- Small - Shows just the Avator of the user as a small bubble and what the current Status of the user is.
- Large - Takes up the most amount of space but shows the most about of details.
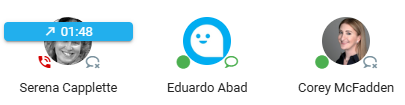
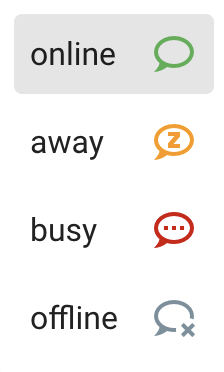
See user status
- A user status can be seen by the icon to the right of the User Profile Bubble in each user Card.
- In the example above the Green circle to the left of the User Profile picture shows if they have 1 or more phones connected to the system and the green speech bublle icon to the right of the User Profile picture will show one of the user status options from below. The statuses below are set by a user as outlined in the User Profile section below.
Viewing Current Call Flow Settings
- For each user you at a glance see if they have the following Call Settings enabled or now
- Do No Disturb - If enabled the following icon will be shown red and not greyed out.

- Call Forwarding - If enabled the following icon will be shown Orange and not greyed out.

- Follow Me- If enabled the following icon will be shown Orange and not greyed out.

- Do No Disturb - If enabled the following icon will be shown red and not greyed out.
Checking Voicemail
- On the display cards, you will see a voicemail icon in the bottom left corner. If you have one or more voicemail message(s) yet to check, the icon will display the number of them. You can also direct a call to a user's voicemail by clicking it in Call.

Listen to Active Call
- To listen in on other users' active calls, you can click on that User's display card's headphones icon.

Calling a User
- To call another user directly, click on the phone icon of that User's display card.

Chat with a user
- You can chat with users directly from their User Profile Bubble by clicking on chat icon.
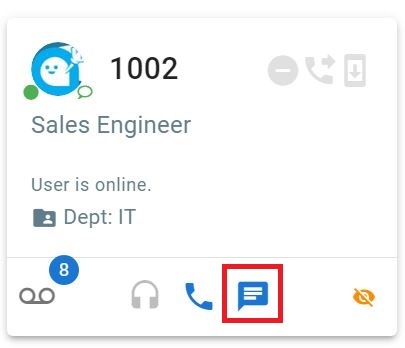
- After this, you will be redirected automatically to Call Panel's Chat section, where you can start or continue a Chat session as outlined here.
Barging
- Depending on the users permissions outlined and set here, a user can barge-in other users' calls for monitoring the agents performance, call quality assurance, coaching and assisting agents or users, etc.
- To barge-in on other users' active calls, you can click on that User's display card's headphones icon.
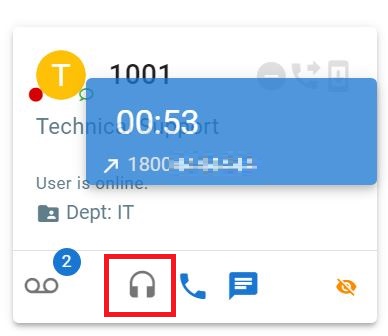
- A small window will appear showing the extension number and the called number or the caller number. In our example, the user from extension 1001 called to a 1800 number:
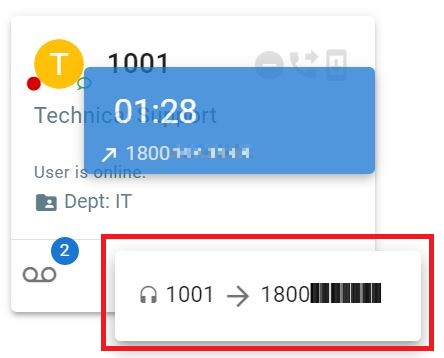
- Click on that pop-up window. This will show the Call Barge-in options.

- The Call Barge-in options are:
- Monitor Call: Allows the person doing the Barge to come into the call and listen to both legs of the call but not talk and neither side of the call is aware the barger has barged in.
- Full Barge-in: Allows the person doing the Barge to come into the call and listen to both legs of the call. Connect user will be muted and can unmute themselves and can take part of the call. A tone would be played informing the callers that someone barged in.
- Whisper on XXX: Allows the person doing the Barge to come into the call and listen to both legs but talk only to one particular caller. Only the selected leg of the call will hear the tone informing them someone has barged in.
- Whisper on YYY: Allows the person doing the Barge to come into the call and listen to both legs but talk only to one particular caller. Only selected leg of the call will hear the tone informing them someone has barged in.
Chat
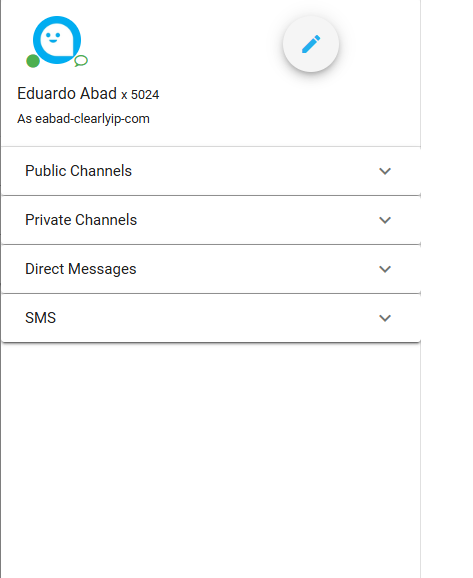
- The chat widget allows you to start chat messages with other users inside your organization, create and manage channels (Group Chat) and even send and receive SMS and MMS messages to any phone number capable of SMS/MMS messaging.
Starting a new 1 on 1 Chat (Direct Messages)
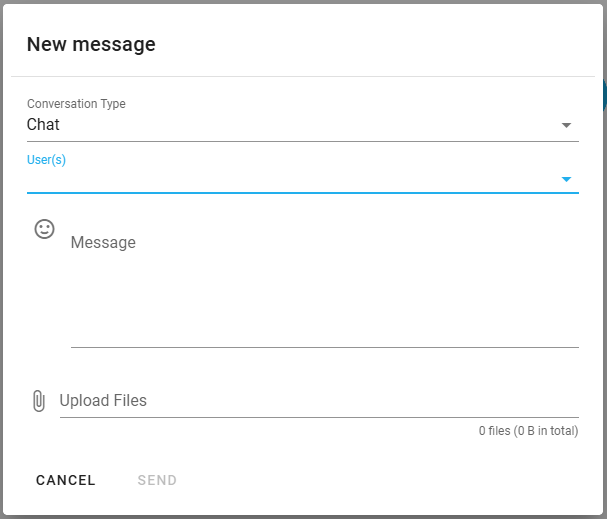
- Click on the chat speech bubble icon on the top bar of the Call Panel

- The following screen will be shown
- Click on the pencil icon to start a 1 on 1 Chat

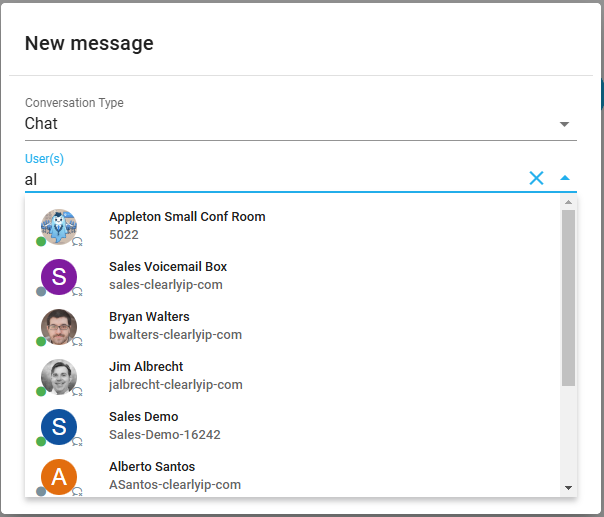
- In the appearing screen, make sure the 'Conversation Type' is 'Chat'.

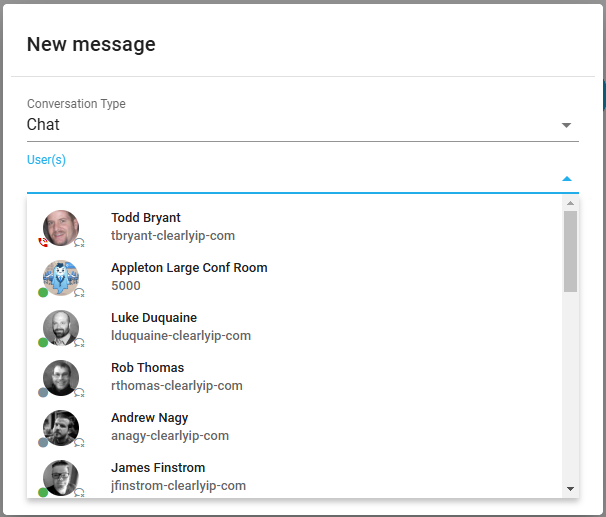
- In the Section 'User(s)', select the user you would like to chat from the Drop Down Menu

- You can also start typing the name of the user you would like to start a conversation. Call Panel will display the best match as you type.
- In the Message Section, enter the message you would like to send to the destination user. Remember you can also use emojis in the conversation.

- If you want to attach a file in the message, you can map it from your Hard Drive using the 'Upload Files' section.
- Finally click on "SEND" to send the message.
- If you add more than one Contact, a Chat room will be automatically created when starting the conversation.
- In this case you can select the Channel Type: Private or Public.
- If you want to cancel, press the Cancel button.

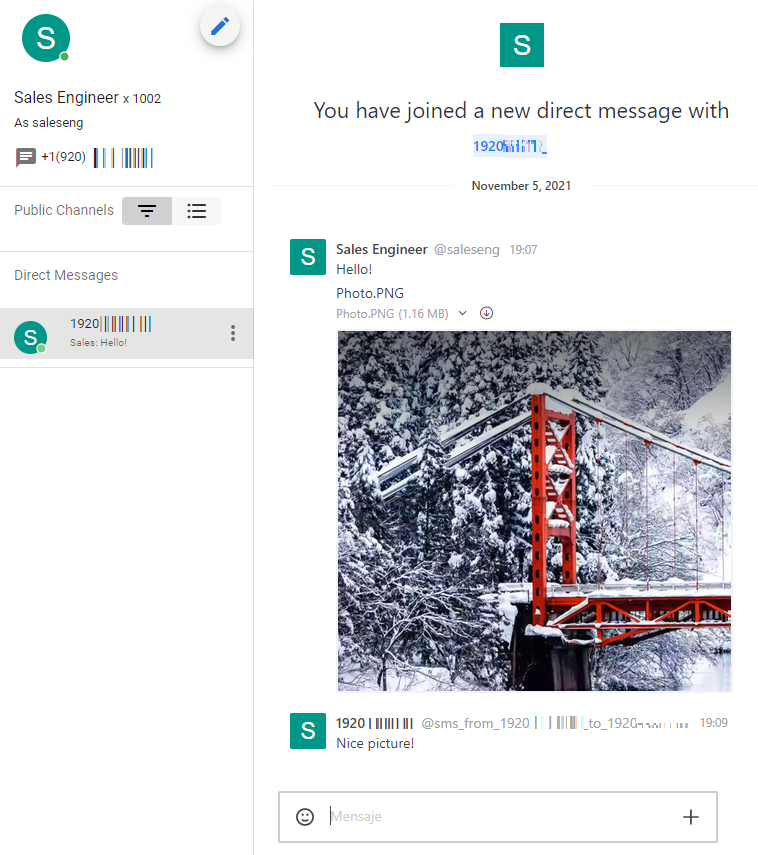
- Once the message has been sent, the recipient will receive a notification about a new direct message.
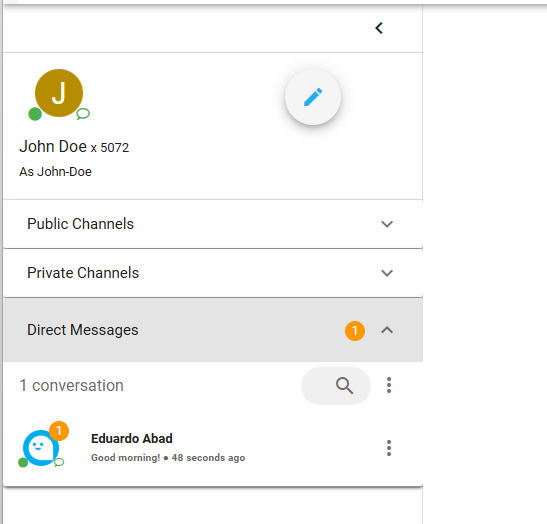
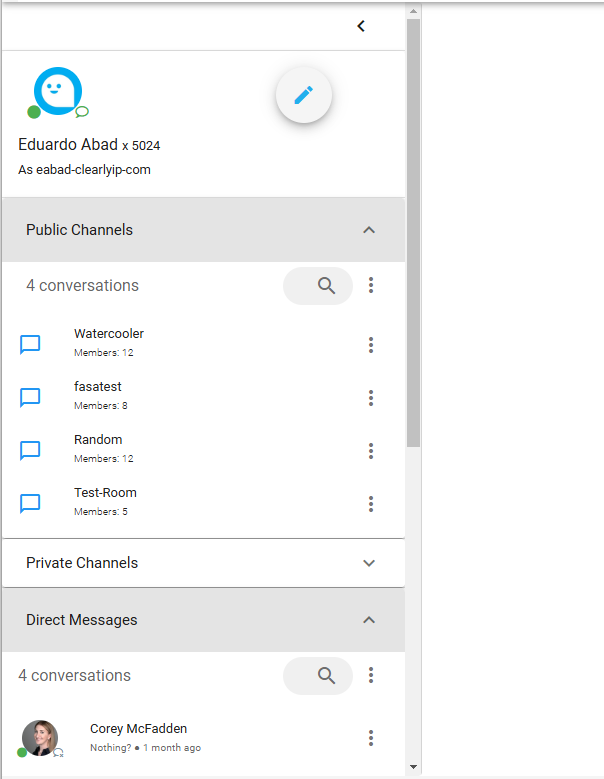
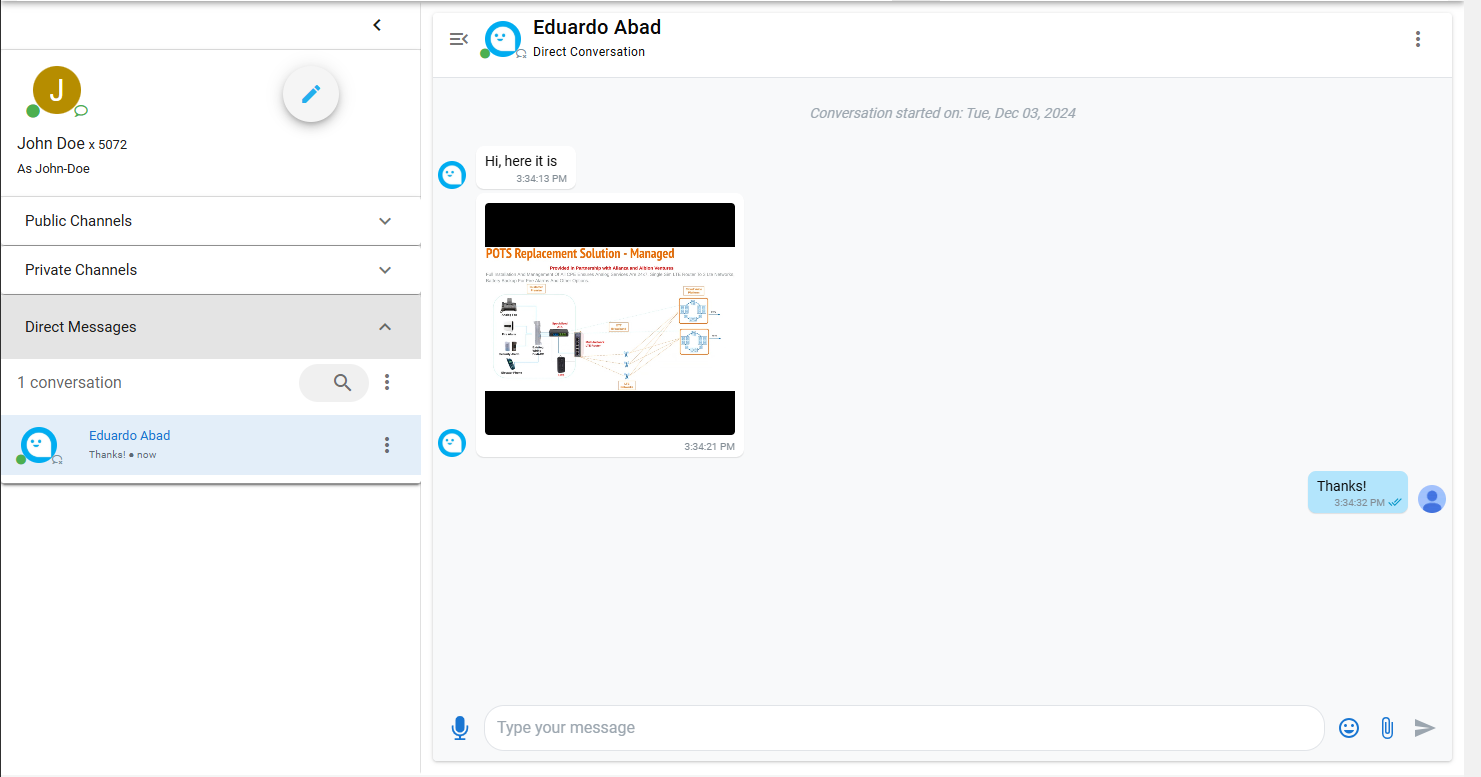
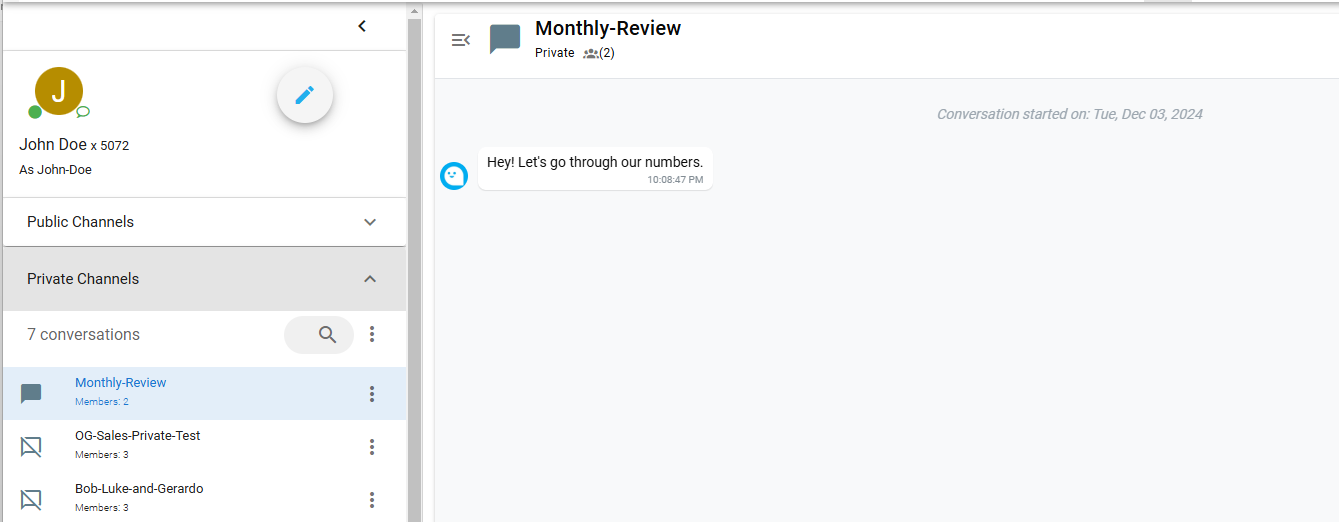
- Clicking in the Direct Messages section, the main screen will show the conversation. You can see the conversation's history and, if available, the shared files.
- Below is an example of a conversation between two parties.
Handling messages.
- To reply or send a message, enter the appropriate text in the text box.

- When done, click on the Send icon to send it.

- You can also add an emojis to the conversation and combine them with the text. To do this, just click on the emoji icon and a new window will appear with a large list of emojis.
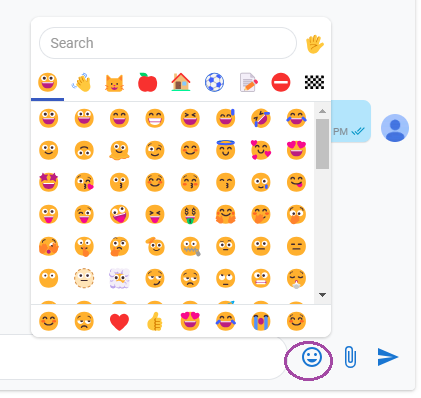
- Example:
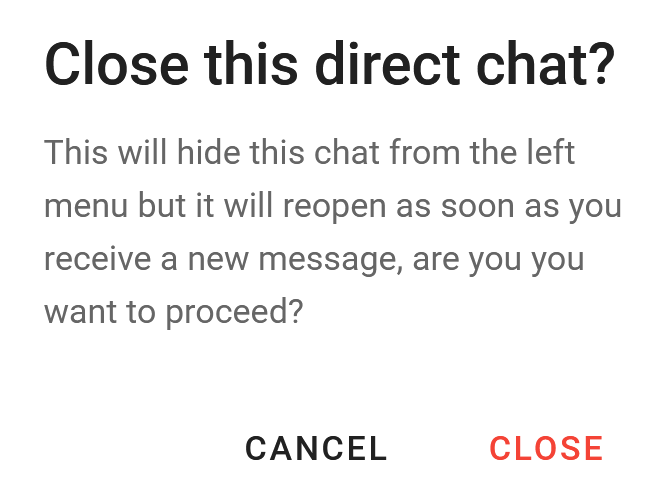
- Being on the Direct Messages section yo can click on the "three dots" menu to close it.
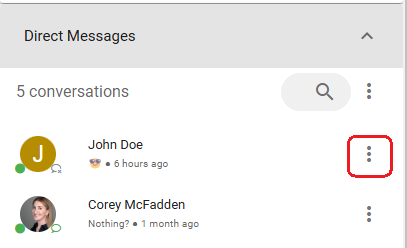
- Clicking on Close, you can hide/remove the current Direct Message you don't want to be shown in the Notification area:

- You must confirm the action before closing the Direct Message.
- Clicking on the magnifying glass icon allows you to search for any specific text strings within the name of the conversations, be it the name of a contact or of a channel room or the phone number in the case of SMS. Note that this searchbox is case-sensitive.

- The process for creating a Channel Room is similar to sending a new Direct Chat message.
- Click on the pencil icon to start a 1 on 1 Chat

- In the appearing screen, make sure the 'Conversation Type' is 'Chat'.
- In the Section 'User(s)', select the users you would like to chat from the Drop Down Menu
- Once you have selected the users, a new section will appear, allowing you enter a name for the Channel Room. This section is called Channel Name. No spaces are allowed for the Chanel Name. They will be substituted by the character '-'.
- Also, a Channel Type will appear. This sets the type of the conversation: Private or Public.
- In the Message Section, enter the message you would like to send to the users.
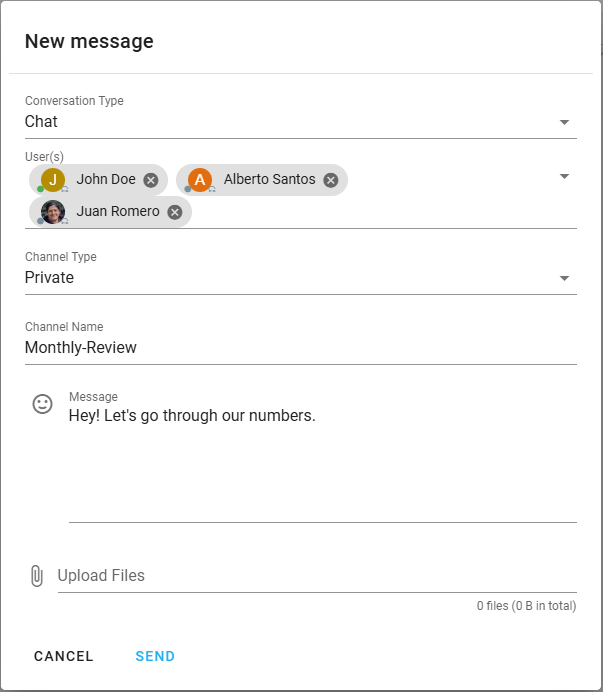
- If you want to attach a file in the message, you can map it from your Hard Drive using the 'Upload Files' section.
- Finally click on "SEND" to send the message and create the Channel Room.
- If you want to cancel, press the Cancel button.

Note: All the described actions you can perform in a 1 to 1 Chat are available in the Channel Rooms as well.
Managing Channel Rooms
- There are two types of Channel Rooms in Call Panel: Public and Private
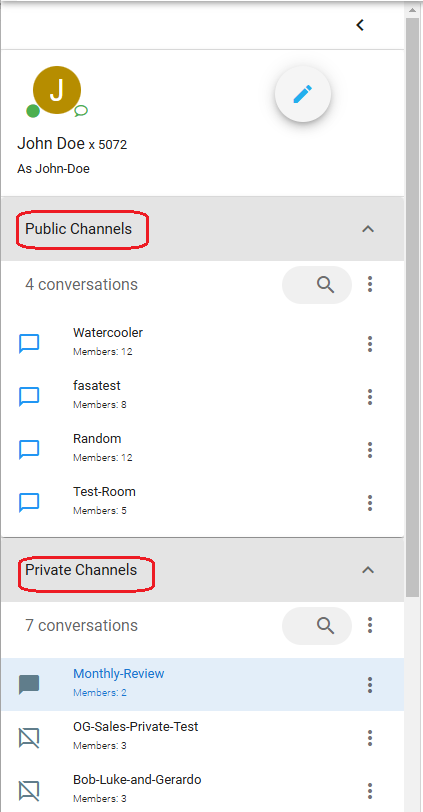
- The same actions are available to both types of Channel Rooms.
- A Public Channel Room's Menu icons are blue whether a Private Channel Room are dark gray.
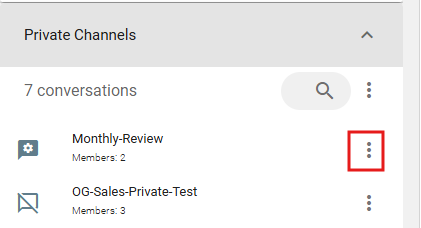
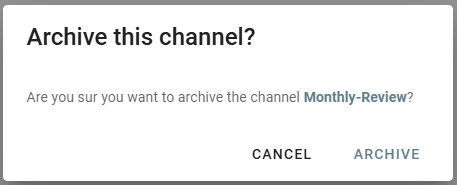
- If you create a Chat room and add participants, you can archive, manage members, rename, and delete the channel room. To perform these actions, just click on the icon with the three dots and these options will appear.
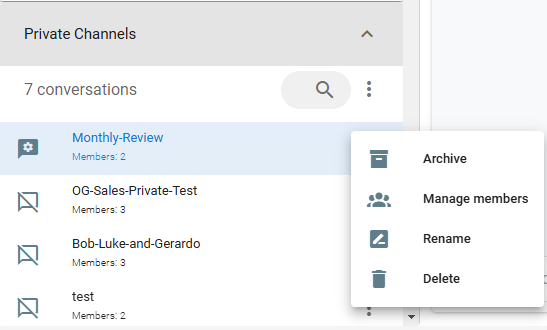
- Archive - Clicking on the Archive, a new window will appear asking for your confirmation for archiving the channel room. The channel room will be archived and will disappear from the main view.
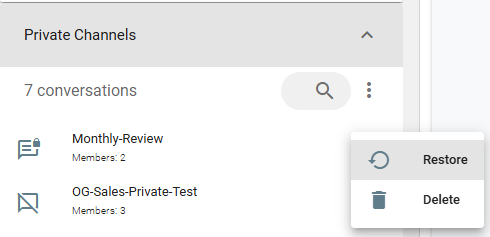
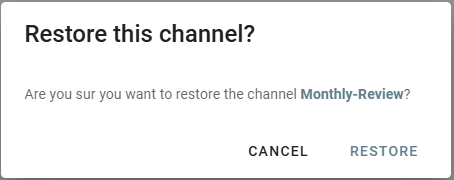
- If you browse the list of all the channels you are enrolled or have permissions to enroll, you will see your archived channel rooms. Clicking on the icon with the three dots will allow you restore or delete the channel room.
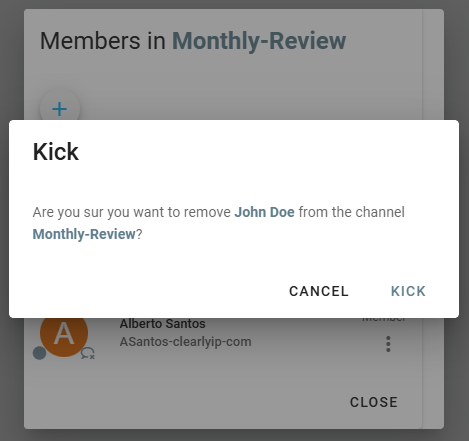
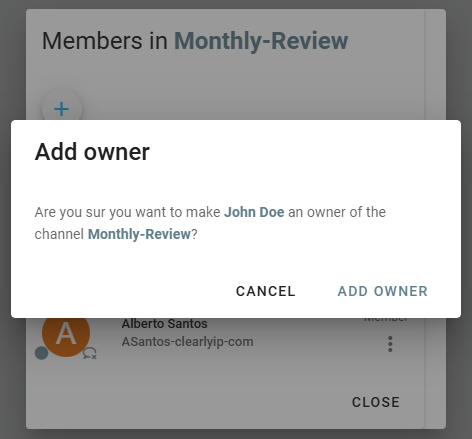
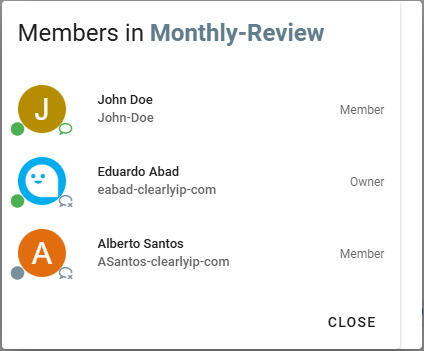
- Manage Members - if you click on the Manage Members option, a new window will appear showing the member list of the channel room, the status of the members in terms of ownership (administrator) or plain member.
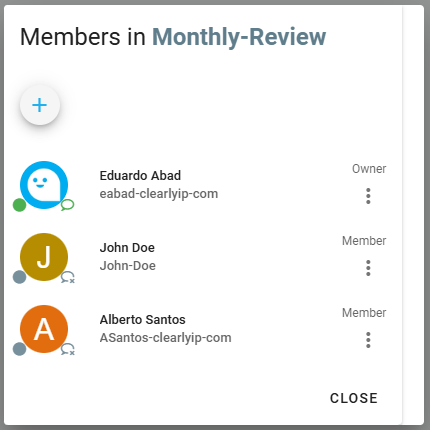
- If you select a member and click on the three dots icon, two options will appear: kick (remove the member from the channel room) and remove or add ownership to the channel (depending on if the user is already and owner of the channel or not)
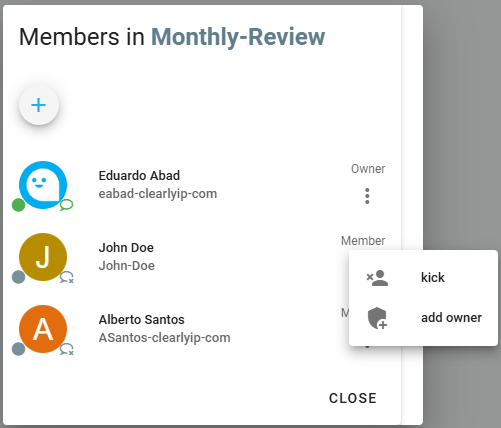
- On both options, the system will ask for confirmation.
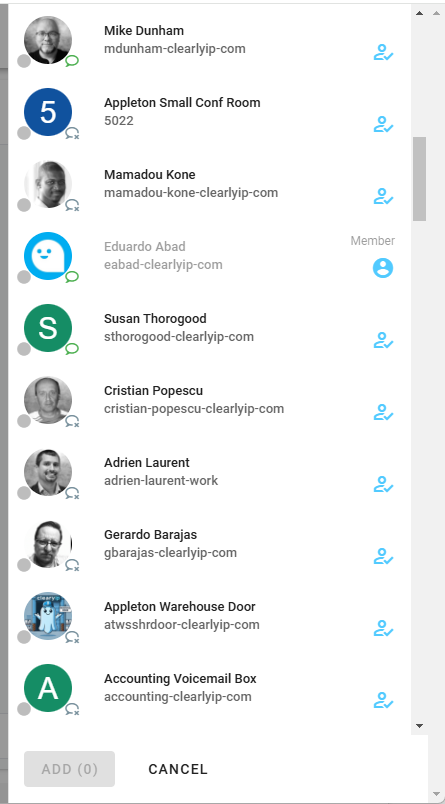
- Adding Members - To add members to the channel room, click on the plus sign
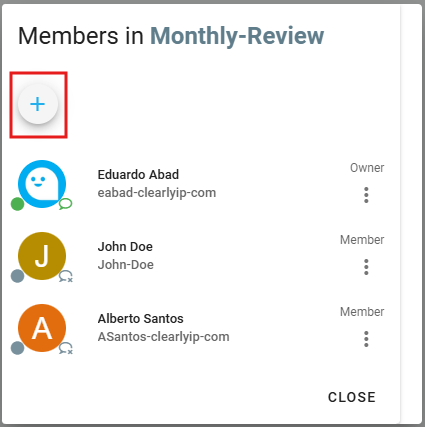
- A new panel will appear on the right side of the call panel window with the list of available users. Select the user(s) you want to add to the channel room and click on the ADD button.
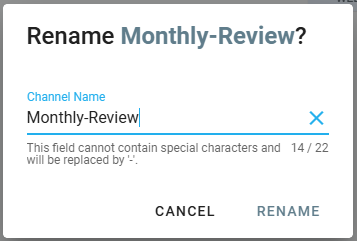
- Rename - This action will rename the channel room. You can only rename the channels you have created or have permission to do so. Keep in mind the name of the channel cannot contain special character and the spaces will be replaced by '-'. Just click on the Rename option and the following screen.
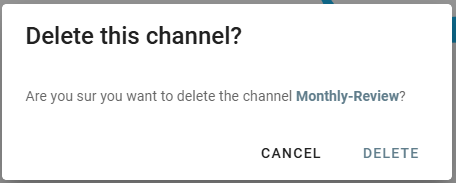
- Delete - This action will delete the selected channel room if you have permission for doing it. Just click on the icon and after that a new window will appear asking for confirmation.
- If a third party creates a Chat room and adds you as a participant, you cannot delete the channel room, just leave, close it (hide), or see the members from your active channel list.
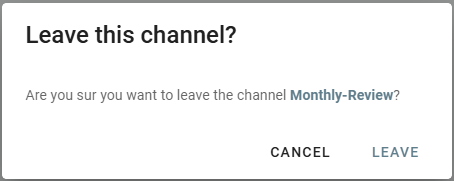
- Leaving a Channel Room - Clicking this option will allow you to leave the Channel Room after a confirmation
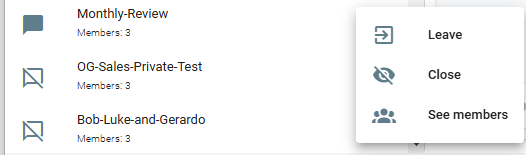
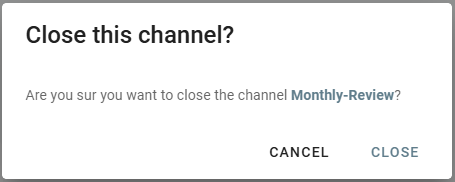
- Close a Channel Room - Closing a Channel Room, means the Channel will not appear on your active Channels list. It can be found in the list of all the Channel Rooms you are part of. To close a Channel Room, just click on the Close icon and confirm the action.
- See Members - This option will allow you to see the list of members of the Channel Room.
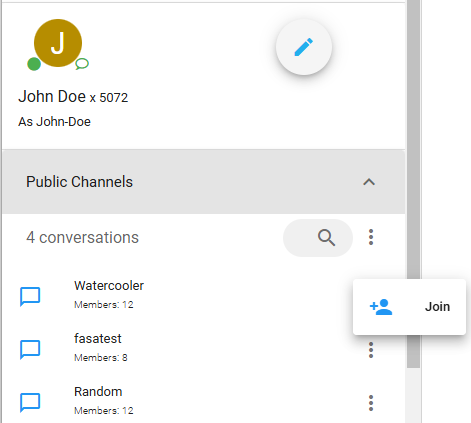
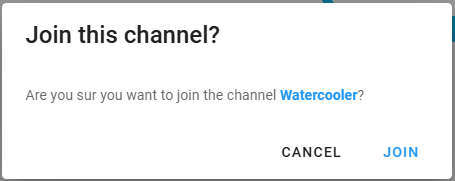
- Rejoining a Channel. If you click on the list of Public Channels you will see all the instant messaging rooms you can join.
- Click on the options (three dots) of the channel you would like to join
- Click on Join and you will join the Channel Room and your status in it will be displayed to the members.
- To send a new SMS/MMS the Administrator must assign a DID with SMS/MMS capabilities to the user. This can be done in the Clearly Cloud Administration Interface as shown here.
- Now in Call Panel, click on the 'Chat' Button

- The following menu on the left side of the screen will be shown
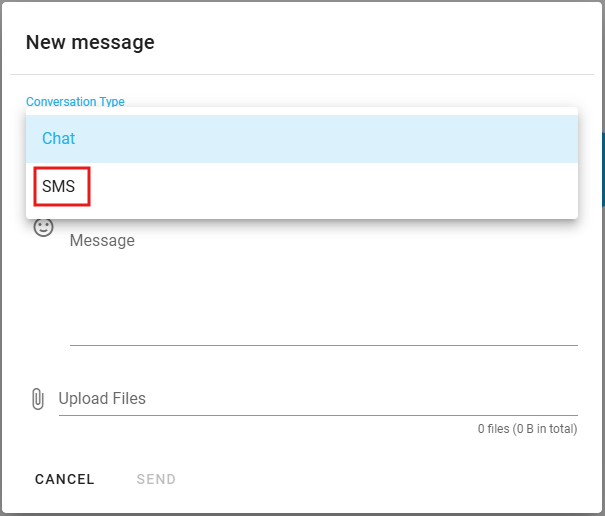
- Click on the pencil icon to start a new SMS message.

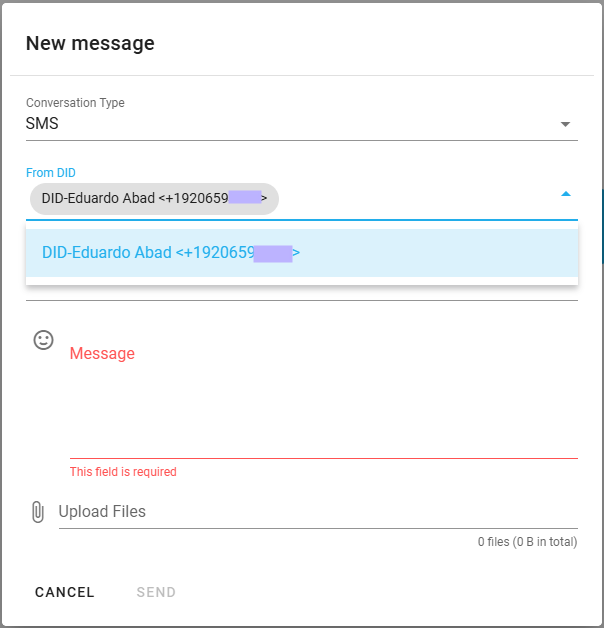
- In the appearing screen, make sure the 'Conversation Type' is 'SMS'.
- Then select the DID that you wanto to use for when sending out this SMS.
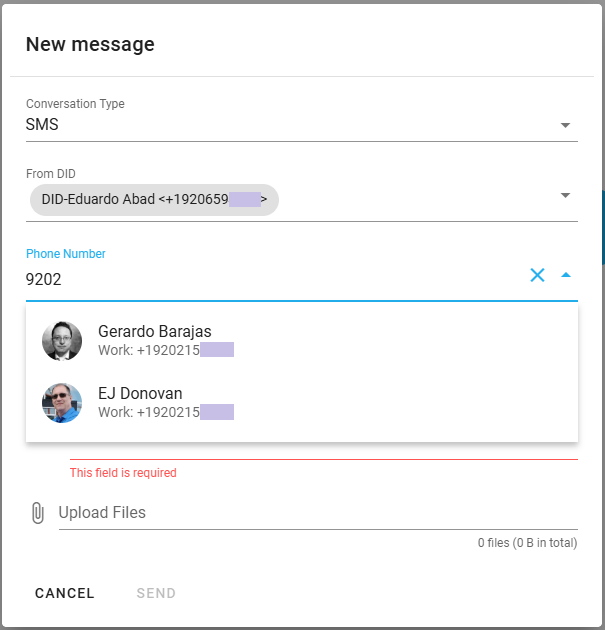
- Now in the 'Phone Number' section you can either: type the complete destination number
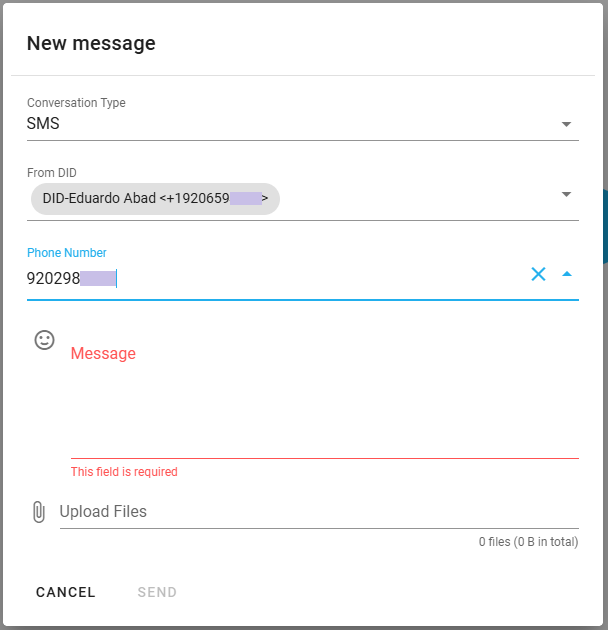
- or you can also start typing the name of the contact you would like to start a SMS conversation with. Call Panel will display the best match as you type.
- In the Message Section, enter the message you would like to send to the users.
- If you want to attach a file in the message (MMS), you can map it from your Hard Drive using the 'Upload Files' section.
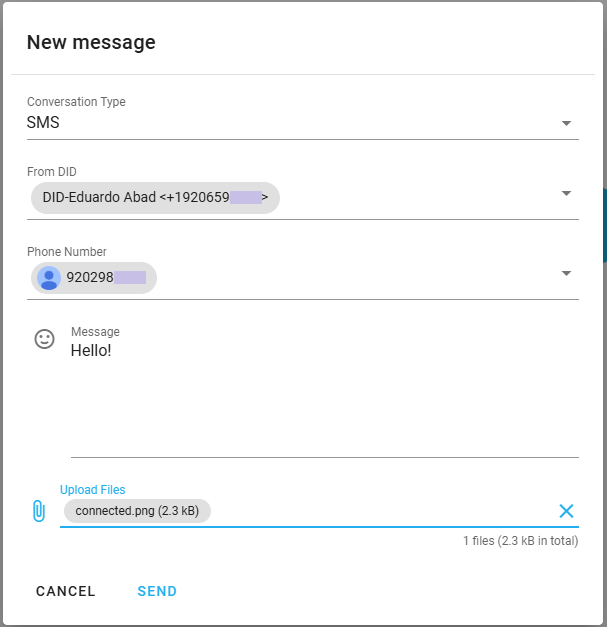
- Finally click on SEND to send the SMS or MMS
- If you want to cancel, press the Cancel button.

- Once the message has been sent, the recipients will receive a notification about a new message in the Channel Room, and a new conversation will appear under the active conversations section.
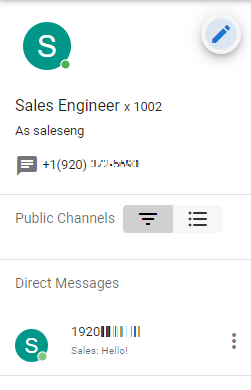
- Click on the conversation to view the sent message.
- If the the other party sends an SMS/MMS reply, a new notification will appear.
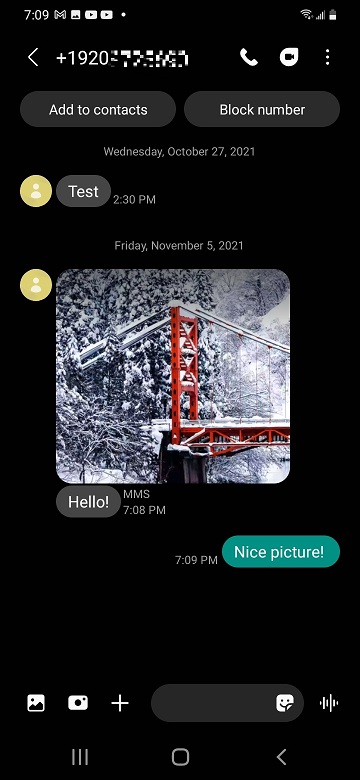

- Finally, all the actions to the messages and to the conversations described in the Chat Section are available to the SMS/MMS conversations.
- You can sort your SMS messages into two different categories: by 'Recent Activity' or 'Alphabetically'.
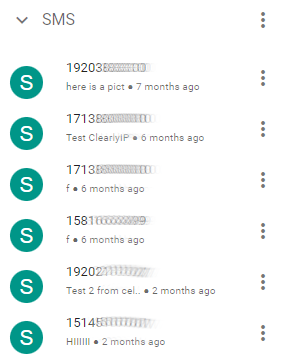
- Just click on the three dots menu next to the SMS section and you will see two available sorting options: Recent Activity and Alphabetically.
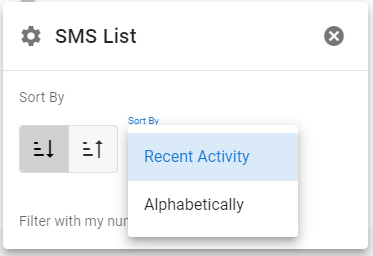
- If you select the 'Recent Activity' category your messages can be sorted as follows:
-
 Newest to oldest.
 -
 Oldest to newest.
-
- If you sort your messages Alphabetically (based on the number or contact name) you can use, the options are from the left to sort the messages from the first to the last or from the last to the first.

- If you have more than one DID assigned for incoming SMS, you can select the desired DID and perform your SMS sorting.
- Having Call Panel active and in the foreground, every time you receive a new chat message from any user, a notification will appear at the bottom of the page.
- This Notification will not be sent if your have set your User Status to be Busy.
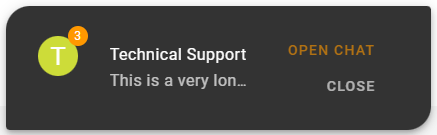
- This notification will show the user's name, a portion the message sent to you and the options to either close the notification or open the chat room associated with the user that just messaged you.
- The counter above the user icon will let you know the number of new messages you have received from this user.
Queues
- To the right of Users on the Main Navigation Bar is Queues. Here you see queue groups and statistics on all active queues.
Add and Remove Queues
- To add a queue to your queues Dashboard, click on the sidebar icon on the left.

- This will open up the sidebar to display all the queue groups. Click on the grey eye icon to add a queue group to your display.
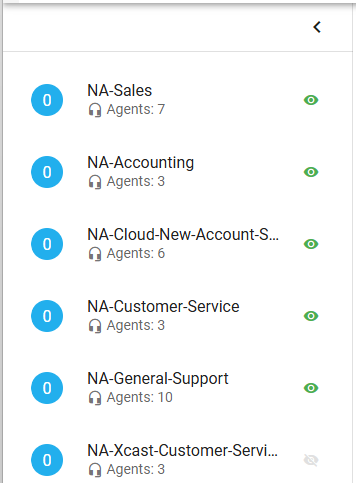
- To remove a queue from your Dashboard, pull the sidebar out and click on the green eye icon.

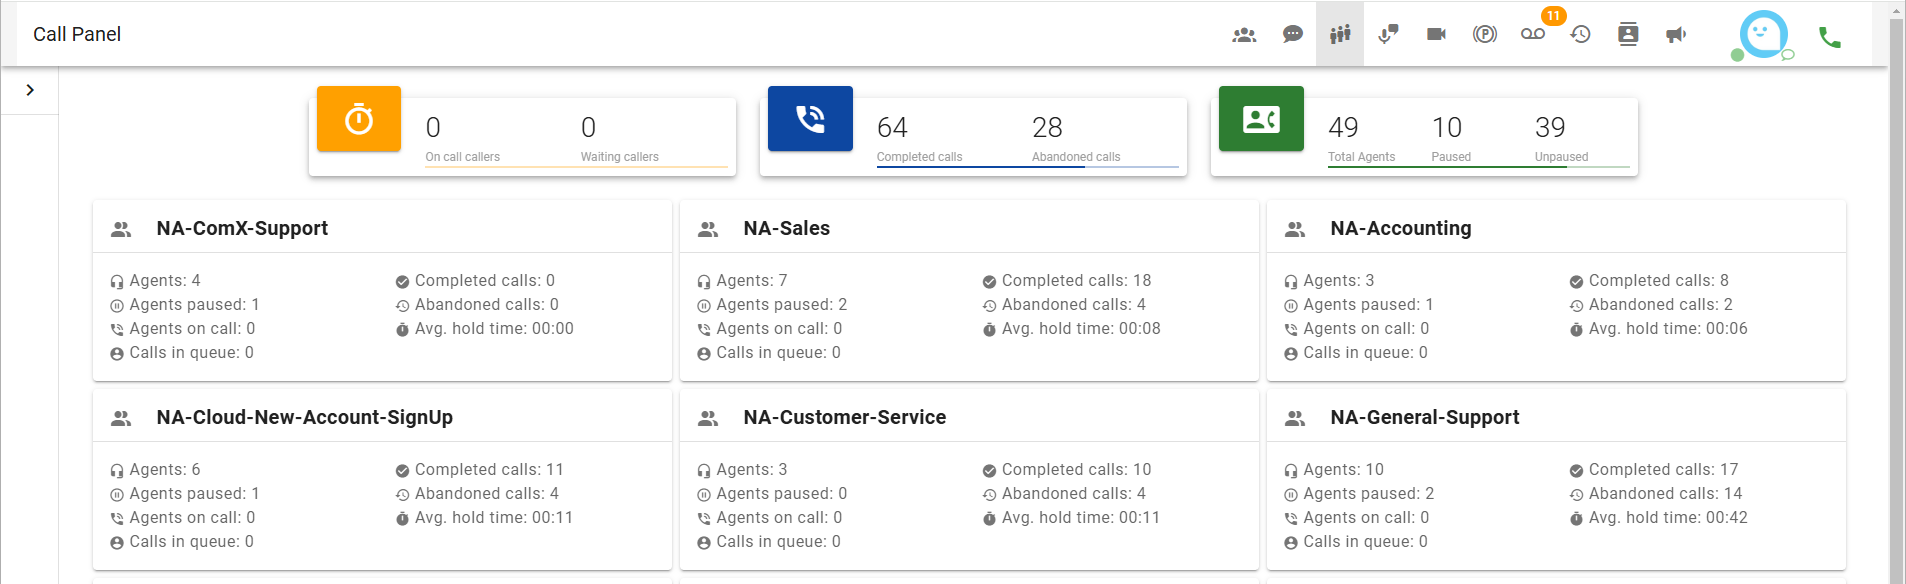
Queue Statistics
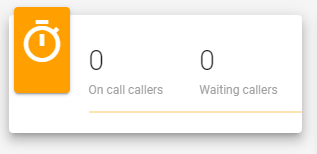
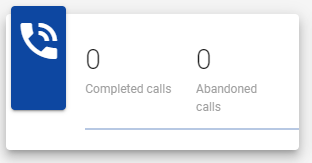
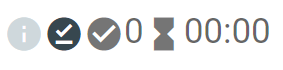
- Now that you have some queue groups displayed, you can see general statistics for all queue groups. Up top, you can see how many callers are on the phone and how many are waiting.
- You can see a total of both completed calls and abandoned calls.
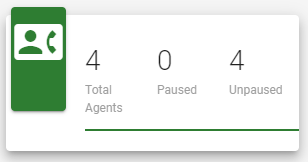
- You can also view the total number of agents online and if any are paused or unpaused.
- You can also see general statistics for each specific queue group on your Dashboard.

Viewing a Queue
- To view a specific queue group, Click on the Header bar for the Queue you want to see details on

- This pulls out a sidebar to the right that shows you the queue group's real-time information and the Queue Header bar will be blue now. Click on the Header bar again to hide the ream time information slide out.
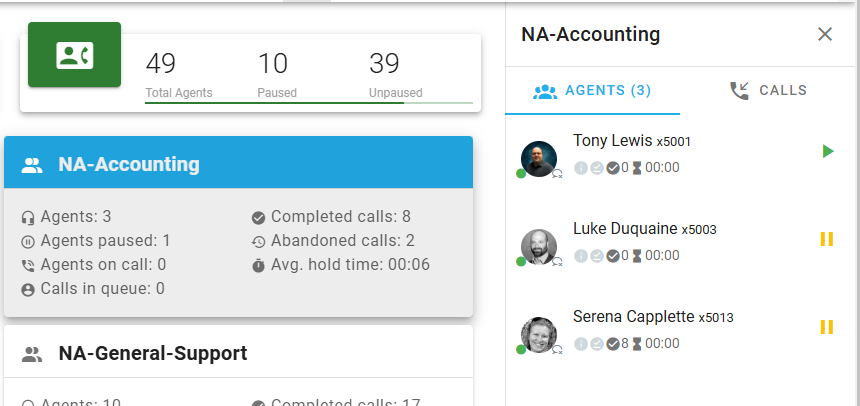
- Under Agents, you can see all agents in that queue.
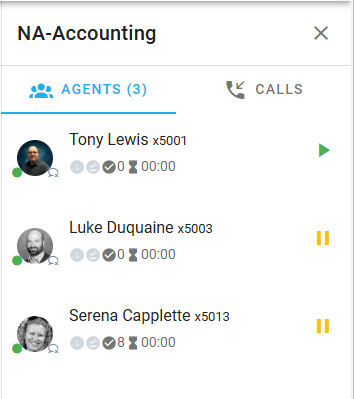
- Clicking on the yellow pause icon next to their name will pause the agent.

- Clicking on the green play icon next to their name will unpause the agent.

- Under the agent's name, you can see if they are set to ignore, busy, or ring in use. You will also see their total calls taken and delay time.
- Next to the Agents tab is the Call tab. Here you can view all active calls happening in that queue group.
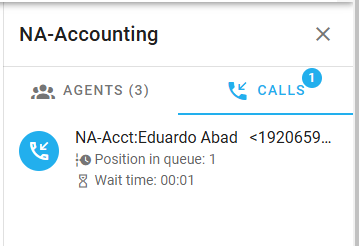
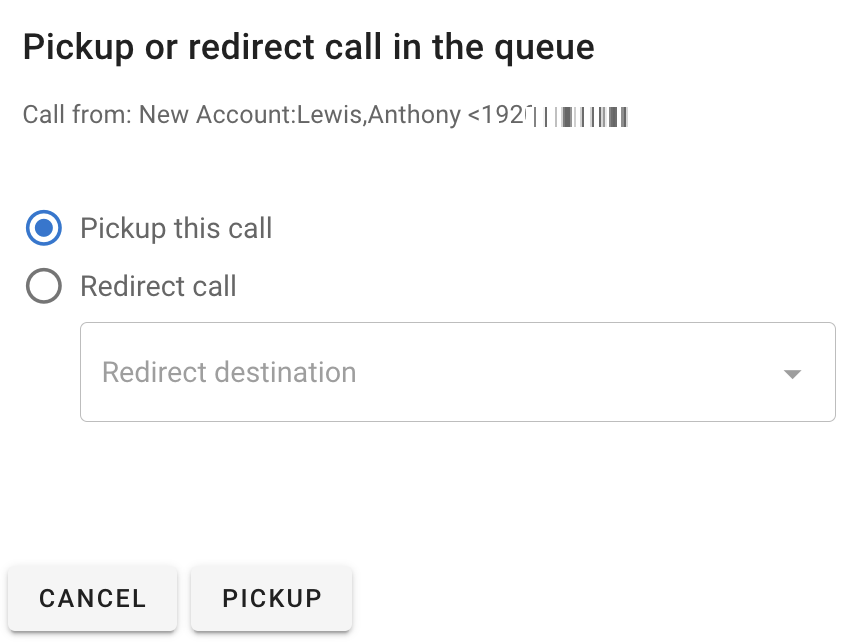
- From within the Calls tab you can click on the Pickup button
 to transfer the caller out of queue to yourself or any other user on the system.
- At the bottom of the AGENTS tab on the right side panel there are options to pause and un-pause all users in the queue group

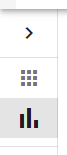
- You can hide the queue details slideout (the right side panel) by clinking on the X icon on the top right of it.
Queue Reports
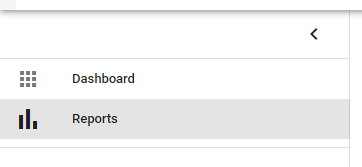
- Clicking on the Reports (bars) icon on the left side panel will bring up the Queue Reports
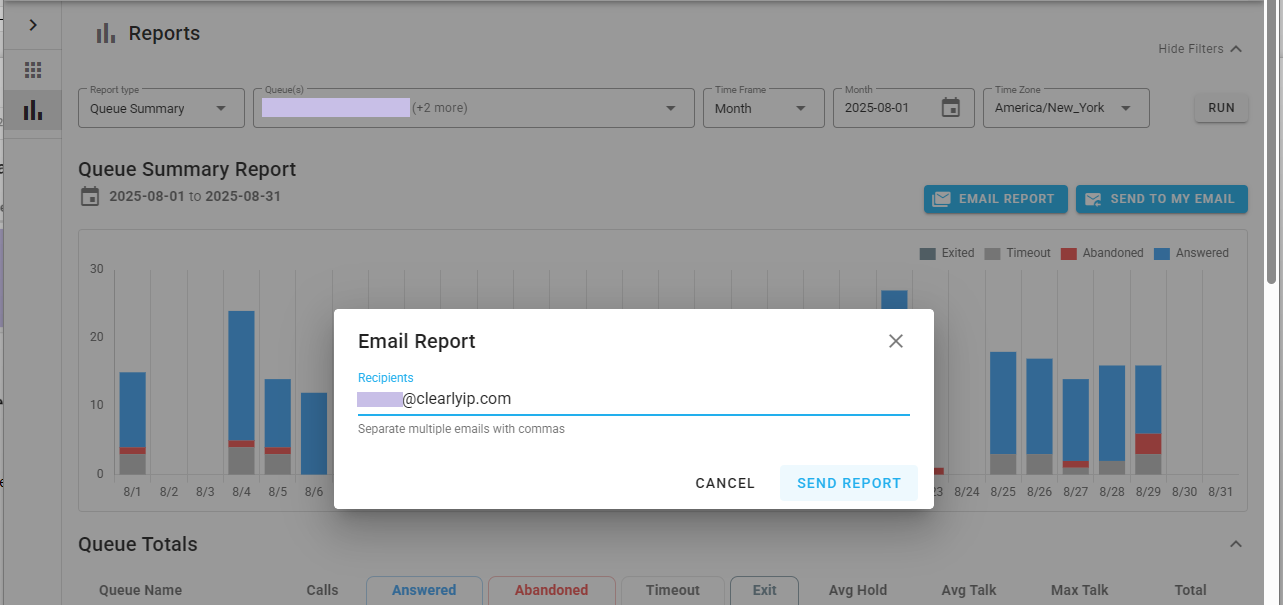
- From Queue Reports you can generate on-demand reports of received queue calls as well as report on agent activity
- For this you can select the Report type, among: 'Queue Summary', 'Call Details', and 'Agent Details'. Then you need to select the queue or queues for the report along with a time frame or custom date range. Finally just click on the SUBMIT button and the corresponding report will get generated and be displayed on the screen

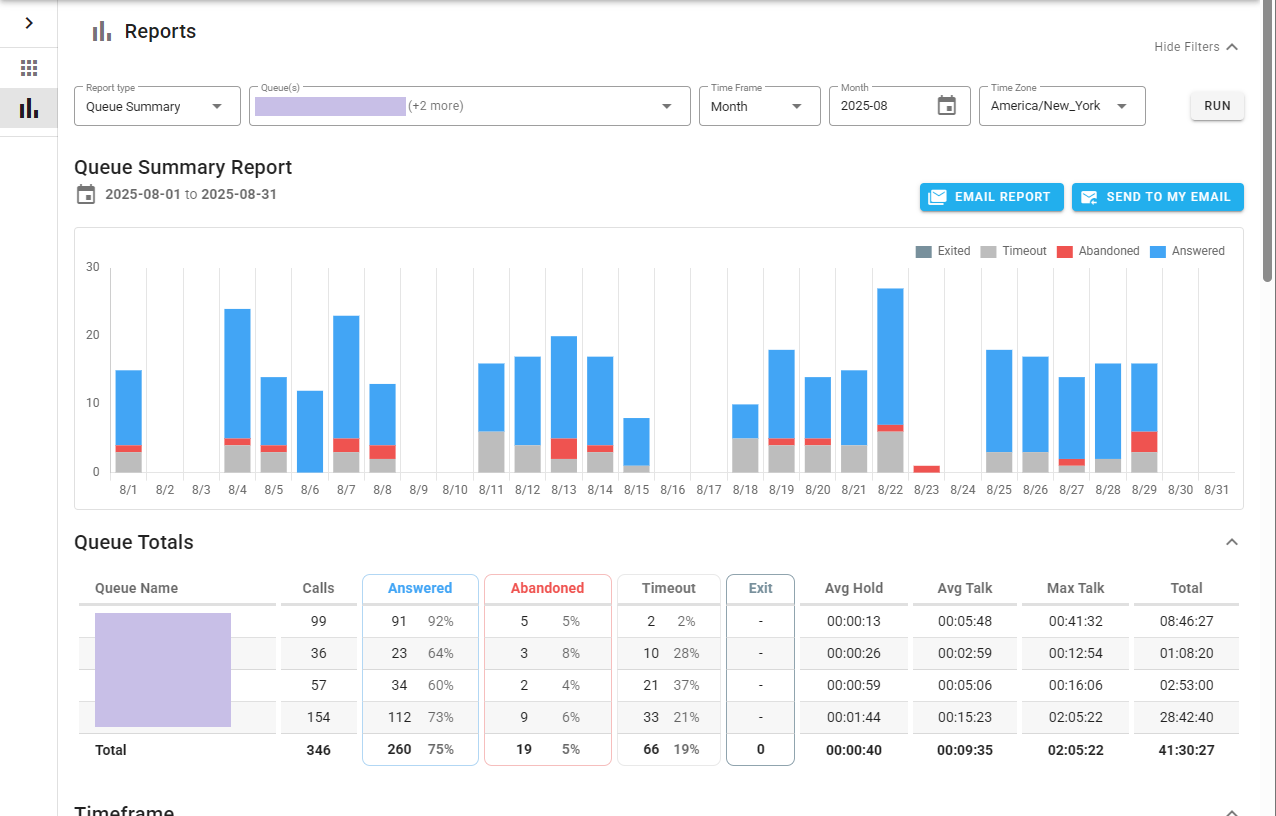
- You can also click to send out the genearted report via email. The report will arrive as an .xlsx attachment in the email.
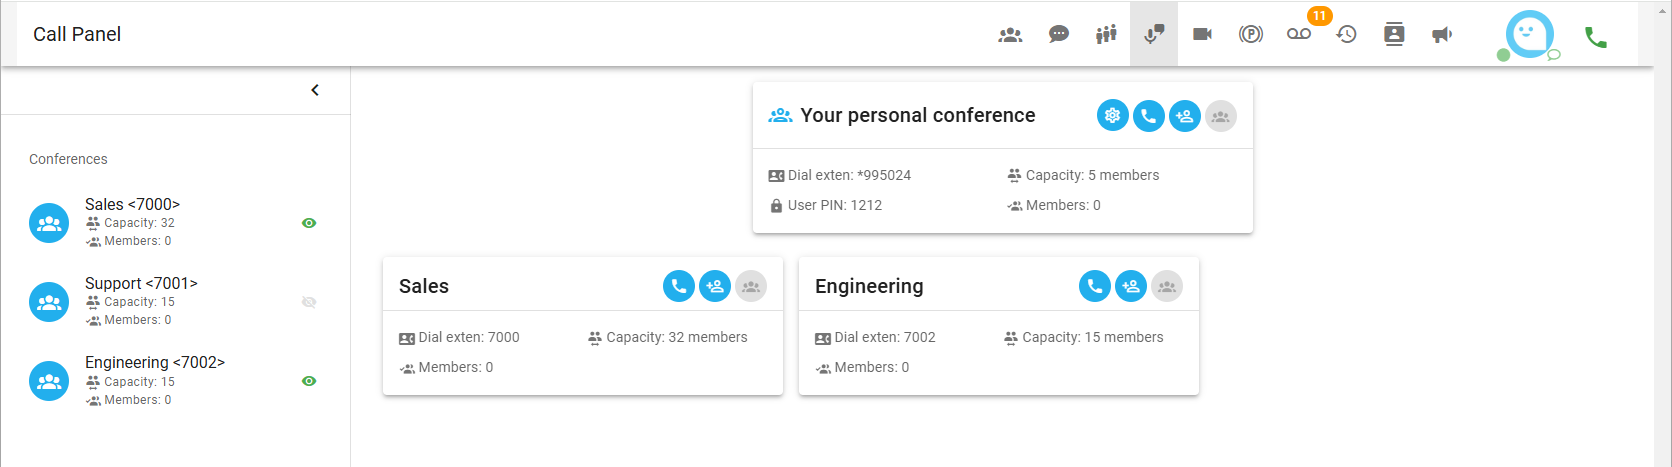
Conferences
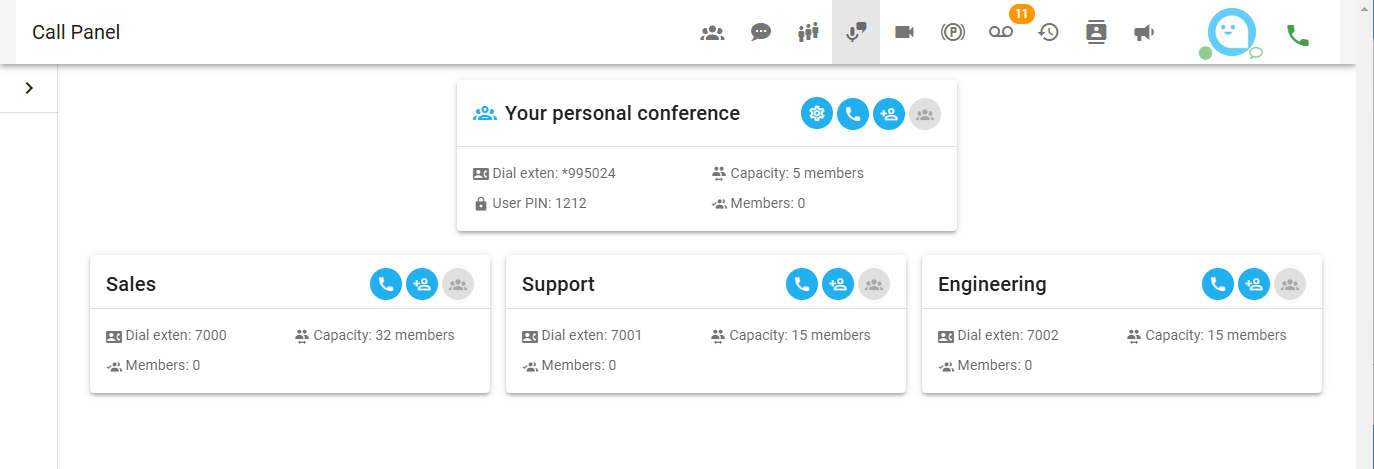
- Just after Queues on the Main Navigation Bar is Conferences. Here you can view your personal conference room and any others you may be a part of.
Add and Remove a Conference
- To add a conference room to your Conferences dashboard, click on the sidebar arrow icon on the left.

- This will open up the sidebar to display all the Conferences. Click on the grey eye icon to add a Conference Room to your display.
- To remove a Conference from your Dashboard, pull the sidebar out and click on the green eye icon.

it will turn gray at that moment.
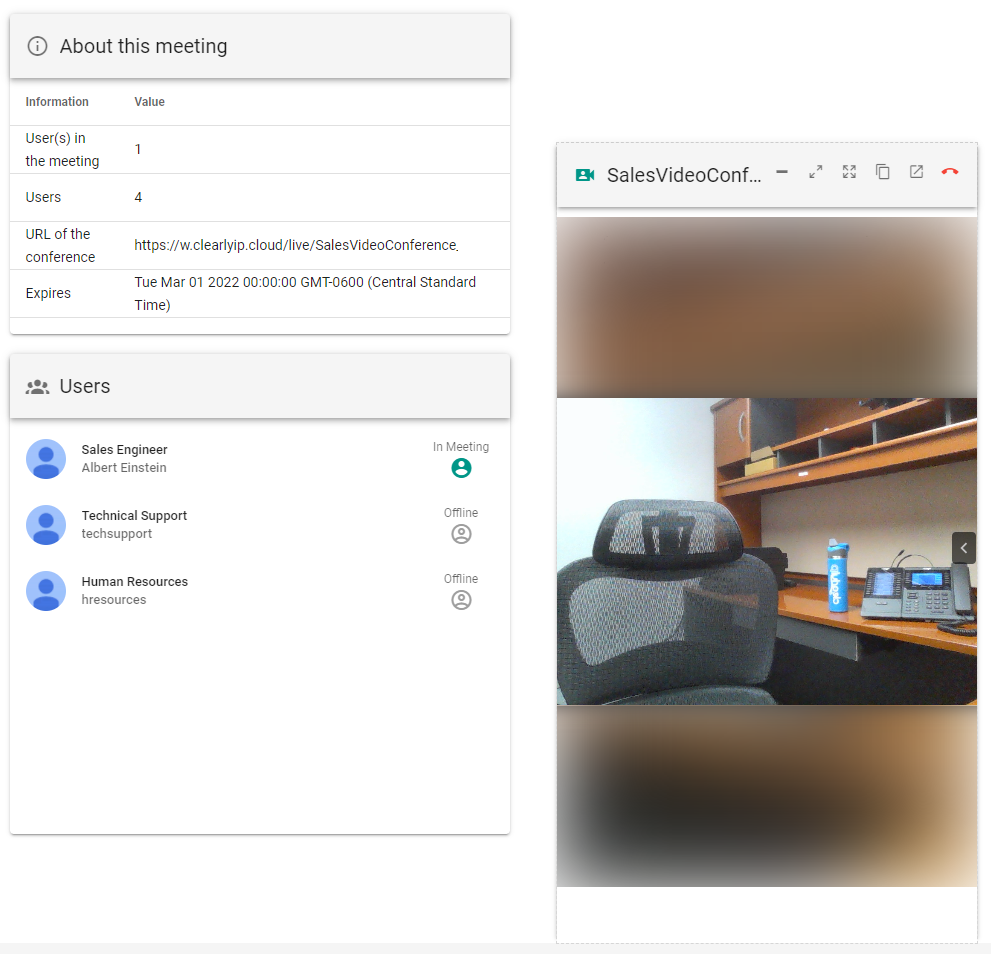
Conference Display Card Information
- For each conference room you have on your Dashboard, you will see a conference display card. The top of each card displays the conference room name and gives you the option to call into that conference directly and invite other users to join the conference. It also has an icon that will show you how many users are present in that conference.

- On the conference display card, you will also see information for the conference, such as the extension to dial to reach that conference, the max capacity of members allowed in the conference, and a listing of all callers present in the conference. Using that list, you can mute and even kick-out specific users from the conference. You will see your user PIN to give users you want to invite into the conference on your conference display card.

- If the Conference Room has one or more callers in the room, the Details button will be Dark Grey
and you can click on it to see the details of the callers in the Conference Room and mute, unmute or kick out any of the users.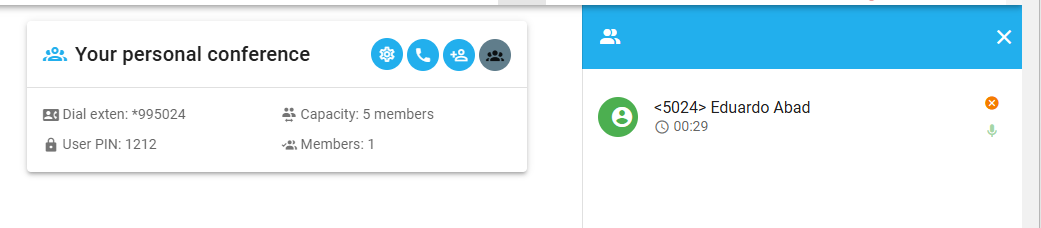
-
Press the Orange X Icon next to the Caller you want to kick from the room.

-
Press the Green Microphone Icon next the the Caller you want to mute in the room

-
Press the Red Microphone Icon next the the Caller you want to Unmute in the room

Personal Conference Settings
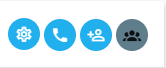
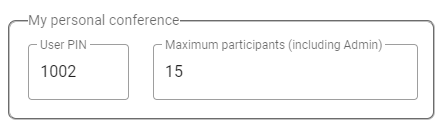
- Click on the Gear Icon and the Personal Conference Settings will appear.

- Under 'My personal conference', we can change the conference's PIN number and modify the amount of maximum participants, including the Admin or owner of the conference.
- We have the following options that work as a toggle switch
- Activate my personal conference

- Announce user count. Announce the current number of participants to a user when joins the conference.
- Music on hold. This will play music on hold when there is just one participant in the conference.
- Wait for the Admin's arrival to start. If 'Music on hold' is enabled, all the participants will hear music on hold until the host (Administrator) of the conference arrives.
- Announce user join/leave. This will announce when a user joins or leave the conference to all the participants.
- Open the options menu by pressing "*". This will allow the participants to listen to the conference option menus by pressing "*".
- Listen only mode (users). Participants connected to the conference using the User PIN will be muted permanently in the conference.

- Do not forget to Save or discard the changes made.

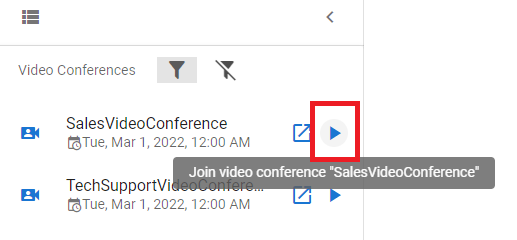
Video Conferences
- The Video Conferences tab will show you all Video Conference rooms your platform Admin has setup and given you permission to see.
Joining a Video Room
- From here you can click on and Room to join or start the conference room.

- Clicking on the following icon, the Video Conference will be opened on a New Browser Tab.

- Clicking on the Start icon on the left navigation will launch the Video Conference room and use your computers camera, microphone and speakers.

- As you can see, you can check the status of the Videoconference and the status of the users allowed to enter.
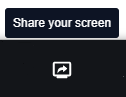
- Once inside a video conference room you have the ability to share your screen, set background images and control different settings with the menu bar on the bottom.
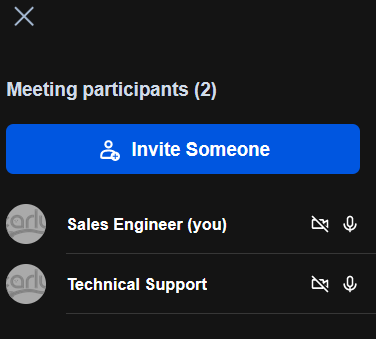
- To invite users to the Conference, click on the Participants icon from the menu bar.

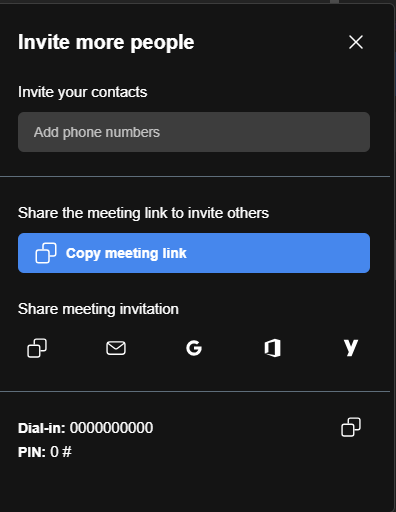
- This will open a side window showing the list of participants in the conference. To invite a user, click on the 'Invite Someone' button.
- A new window will appear with the available options to invite or share the Video Conference. These options are:
- Share the meeting link with others. Just click on the blue button to copy the Video Conference link.
- Share the meeting via: Copy/Paste, email (This will open your default email client), Google mail, Outlook email, or Yahoo email.
- Or Copy the Video Conference Dial-In number.
Managing Audio and Camera Settings
Audio Settings
- To review the microphone settings, click on the arrow icon next to the microphone icon in the menu bar
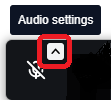
- An audio menu will be displayed
- You can select and test your microphone, in that menu. Notice how the volume bar keeps moving as long as you speak. If you speak and the bar is not moving, you might need to allow your Web Browser to use your microphone.
Mute/Unmute your microphone.
- To mute/unmute your microphone just click on the microphone icon. It works like a toggle switch: If you press the microphone, you will be muted, but if you press it again, you will be unmuted. The following pictures shows the microphone when unmuted and when muted.

- Unmuted

- Muted

Speaker Settings
- From the audio menu, you can select the speaker device you would like to use during the conference.
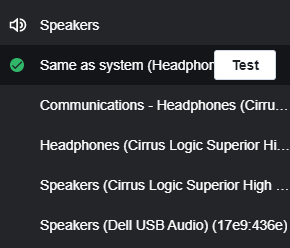
- Clicking on the Test button a tone will be sent to the device. If you can hear the tone means the device is working properly. If not, try another device or check the Browser's permissions.
Camera Settings
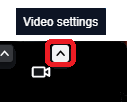
- Click on the arrow icon next to the microphone icon in the menu bar.
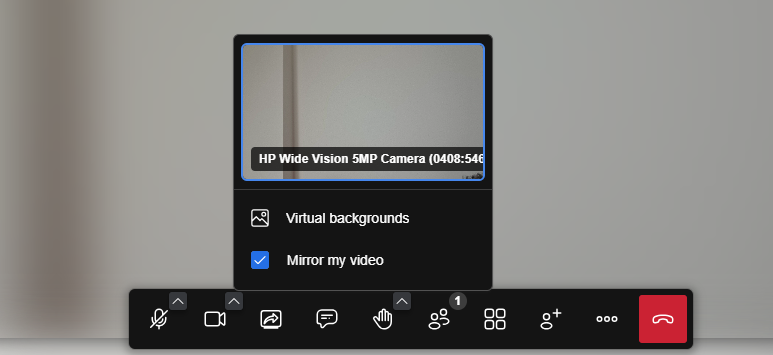
- This will start your camera showing you what is going to be shown to the users in the Video Conference. Make sure you allow your Browser the permission to use your camera.
- With this a new menu will appear:
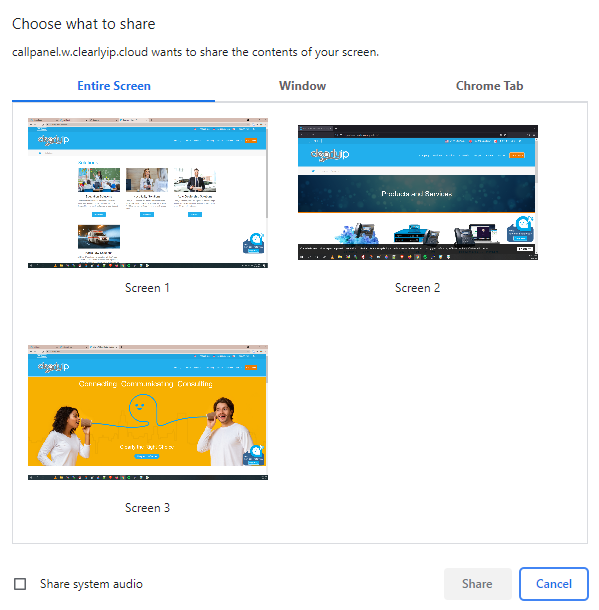
- In this menu you can choose if you would like to share any of your screens, an specific program (window) or a Web Browser tab (this option depends on the Web Browser you are using).
- Select the proper option and click on 'Share'.
- Once your screen or window or tab is being shared, a notification will be displayed as long as the sharing is taking place.

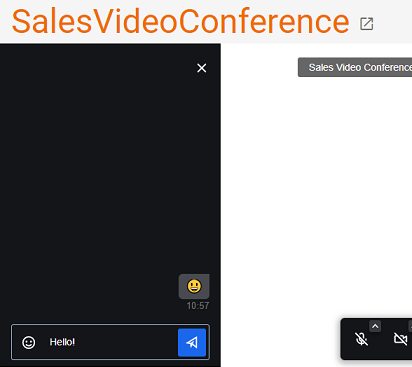
- To send a chat message to all the participants, click on the chat icon to open the Video Conference's chat room.
- The chat room will be displayed to you. To send a message, just enter it in the text box and click on the send icon. Emoticons are supported.
Direct message to a participant
- To send a direct message to any participant of the conference, click on the list of participants.

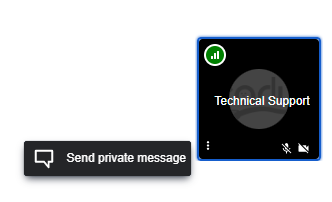
- Click on the participant, and then click on the "Send private message" option that appears.
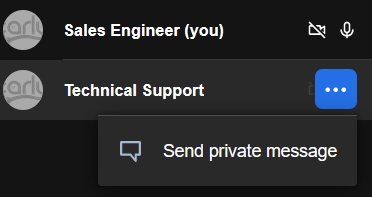
- You can also do it through the conference default view. Just hover on the user's icon close to the dots-icon and the Send private option will appear.
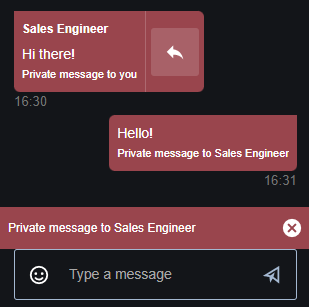
- A new chat room will be created only for you and the other participant. Enter the appropriate message in the text box and send it.
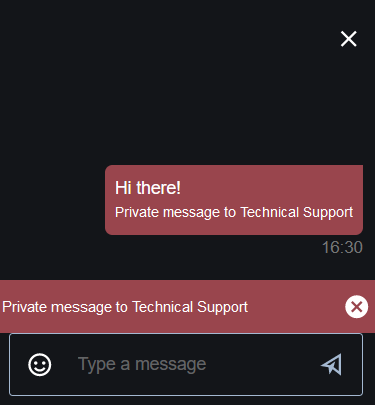
- The other party will receive a new notification regarding a private message received.

- Clicking on the notification, the other party can reply the message.
- You can change the background while your camera is active during the Video Conference.
- Click on the 'More Options' icon.

- Then click on 'Select background'.
- A new window will appear with the available background options. Select the right option and click on 'Apply'.
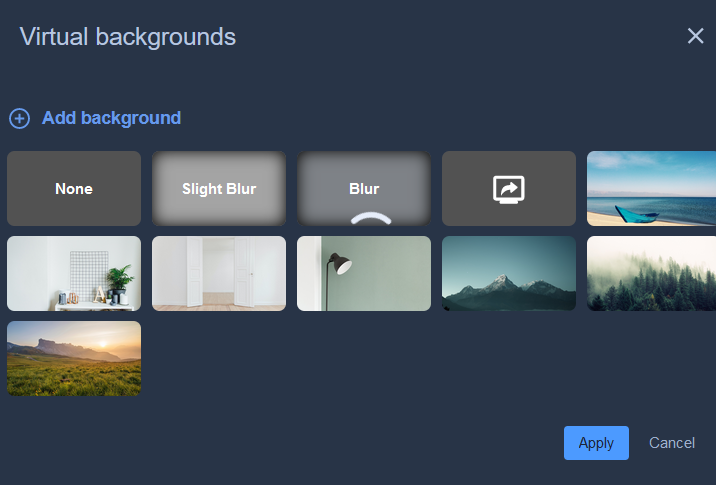
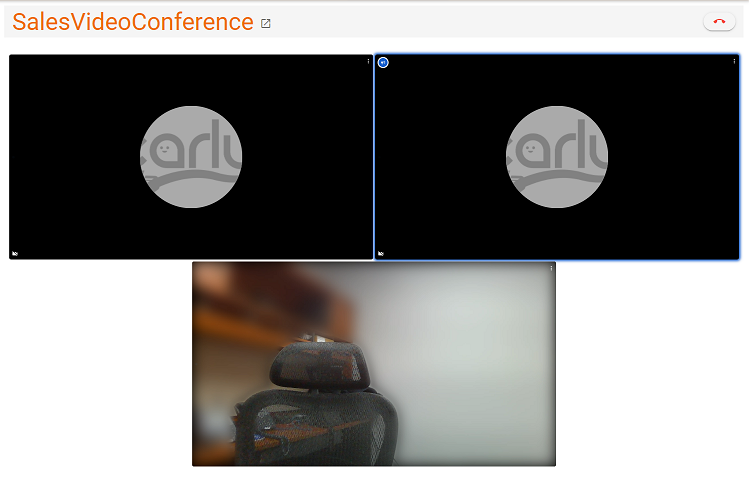
- Your back ground will be changed and display to the other participants. The following picture is an example showing the 'Blur' background.
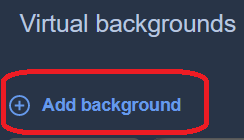
- You can add a different background by selecting the 'Add Background' Option.
- In this option, you can upload from your PC/Laptop/Tablet the image you would like to use as a Background.
- You will see a preview of the new background interacting with your camera. If the option is correct, don't forget to click 'Apply" when done.
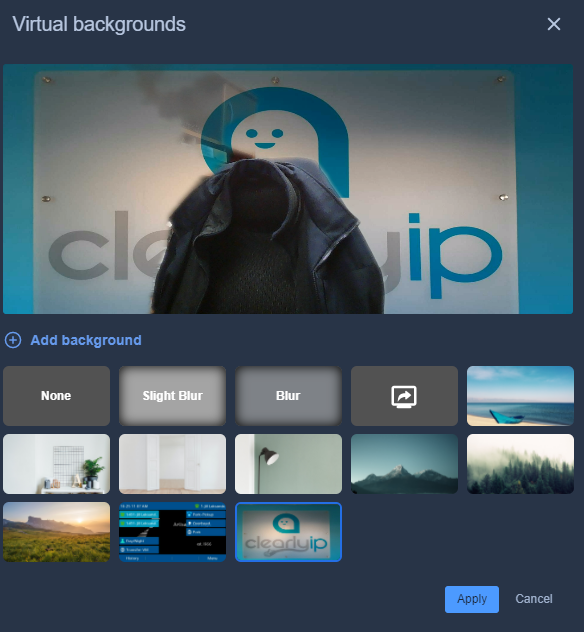
- Below is an example when uploading a background in action.
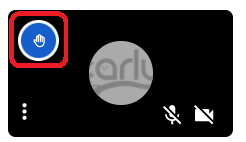
- Whenever needed, any user in the conference, can raise the hand to gain attention from the speaker without interrupting the Video Conference. To do this, just click on the 'Raise your hand' option.
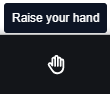
- The other participants will notice a blue icon in the thumbnail of the person who raised the hand.
- To lower your hand, press again the 'Raise your hand' icon.
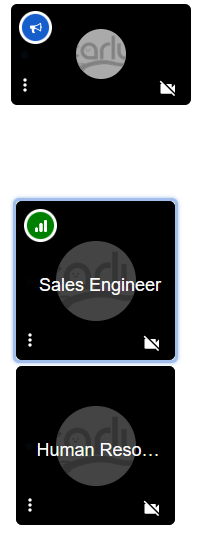
Status of users
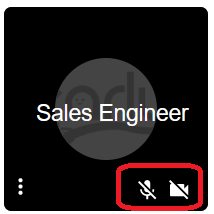
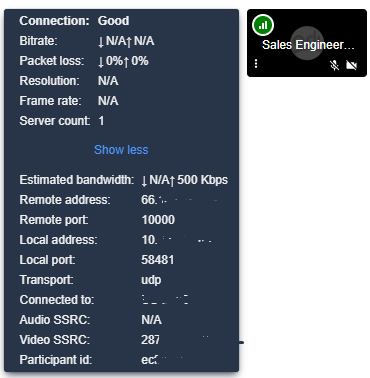
- Looking at any user's thumbnail you may notice status of the microphone (muted or un-muted) and the camera (on or off).
- You can learn more about the state of everyone's connection by hovering on the bars in their thumbnail.
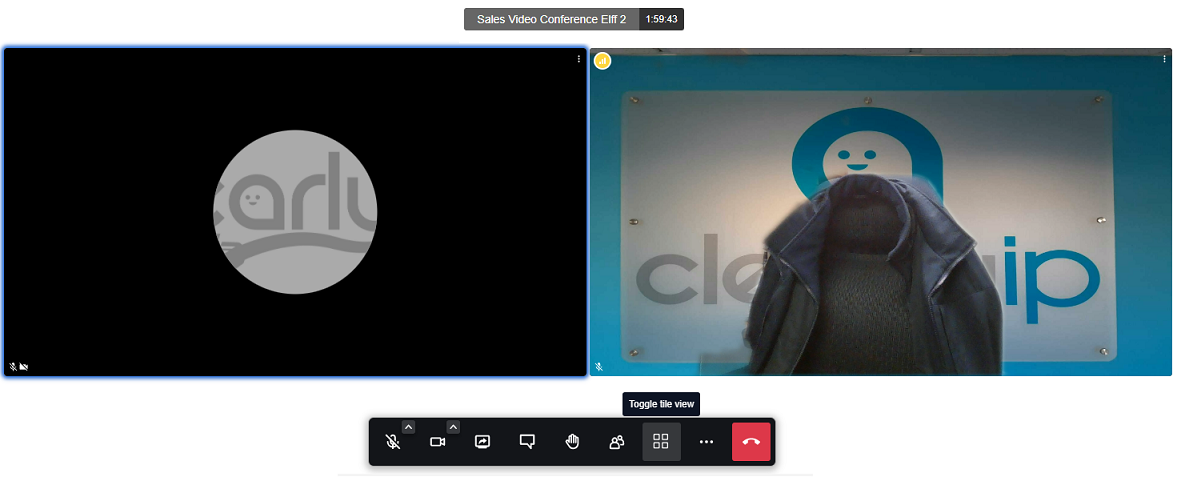
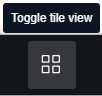
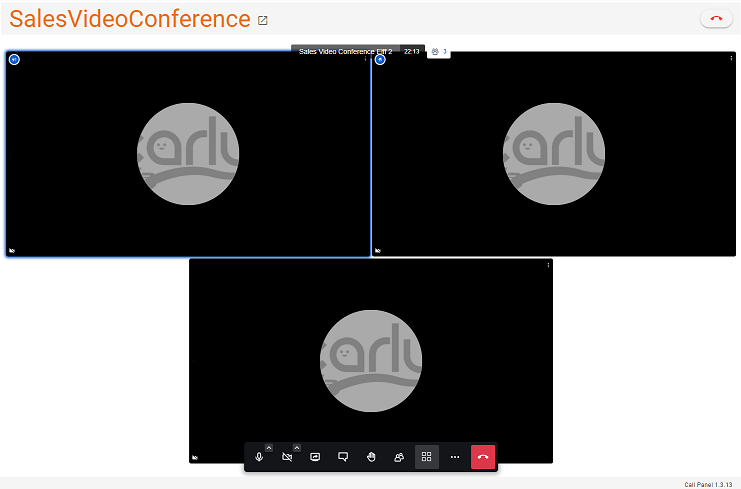
Toggle tile view
- This option will switch between tile and thumbnail views. The default Video Conference view shows thumbnail views of the participants.
- Click on a thumbnail to zoom in on the participant's video or screen shared.
- The tile view displays all the participants in the central frame of the Video Conference.
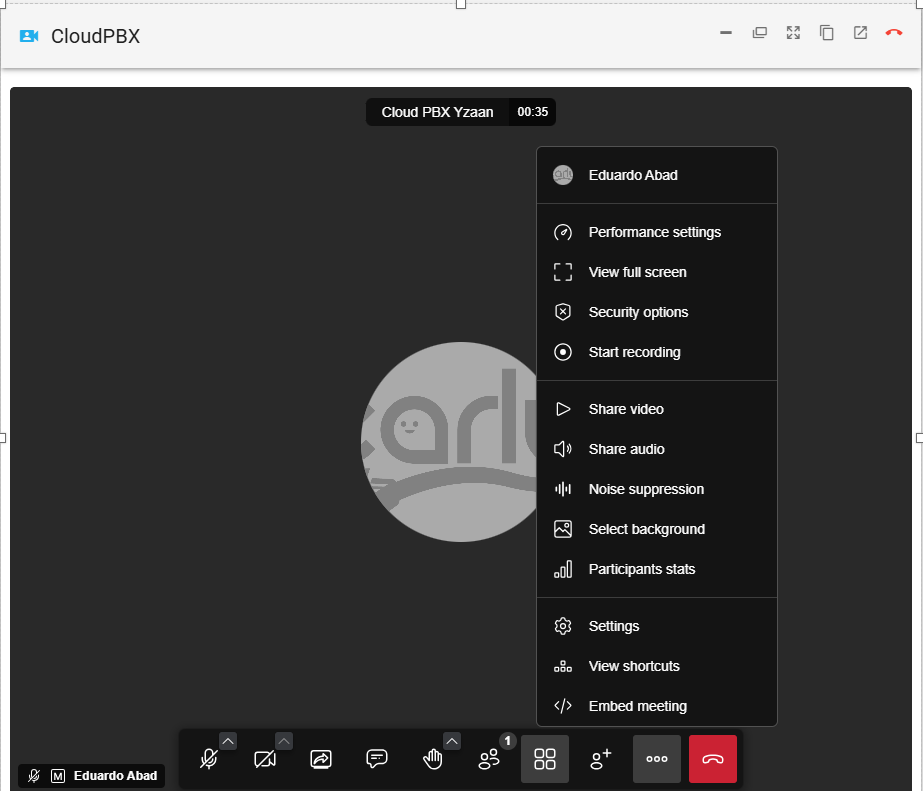
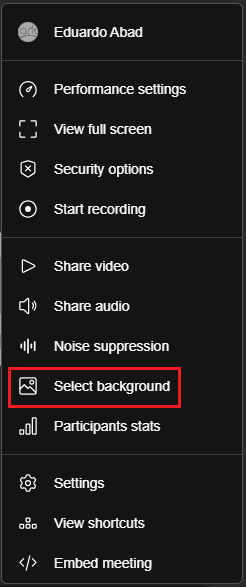
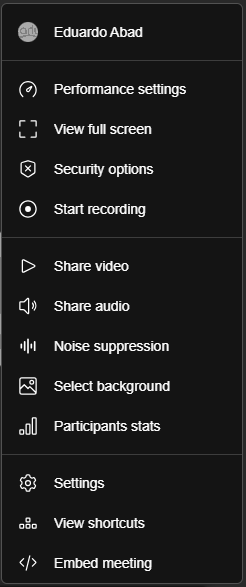
More Actions
- As mentioned above, clicking on the dots menu in the bottom bar will provide a list of more actions you can execute during the conference.
- These actions are:
- User profile settings
- Performance Settings
- View full screen
- Security Options
- Start recording (audio & video)
- Share video (link)
- Share audio (from program or tab in your computer)
- Noise supression
- Select background
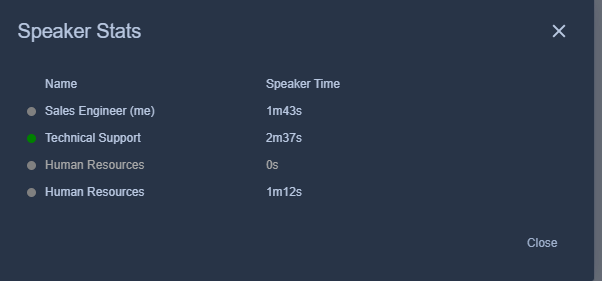
- Participant stats
- Settings
- View shortcuts
- Embed meeting
Profile Settings
- Clicking on this option (the name of the user) a new window will appear allowing you change your display name and set your gravatar email on order to display your Gravatar.

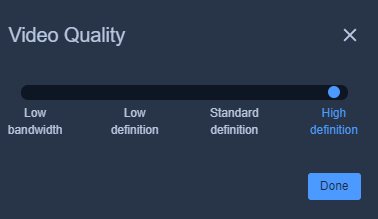
Manage Video Quality
- If necessary, this setting will change the video quality in order to save bandwidth.
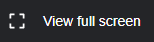
View Full Screen
- This is a toggle button that will allow you see the conference in full mode or full screen. Click again on this icon to exit this mode or press the Escape (Esc) key.
Settings
- Clicking on this option will take you to a consolidated menu where you can configure your camera, microphone and speakers, also change your profile settings, enable or disable the pre-meeting screen and the interface's language.
Devices
- This menu has three main settings:
- Devices
- Profile and,
- More
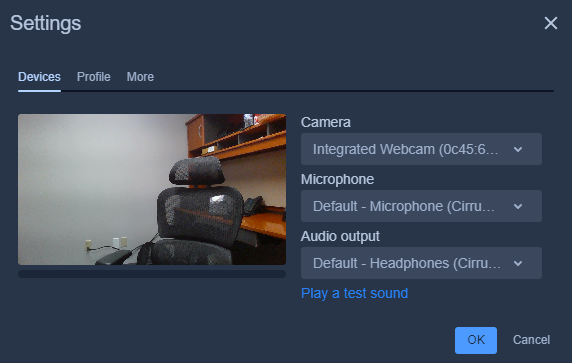
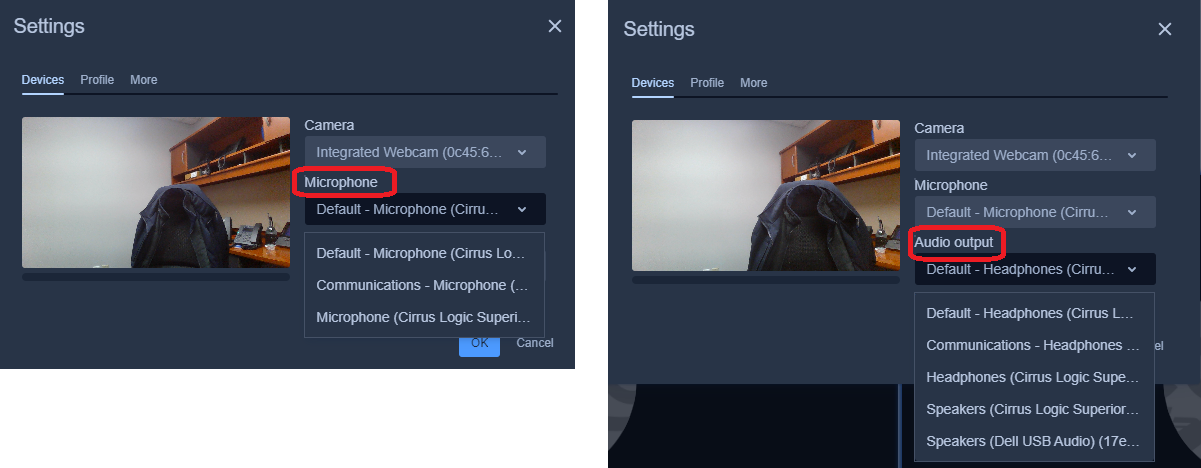
- In this menu you can set your video camera. microphone and speakers.
- If you have multiple video cameras, you can select the appropriate one from the 'Camera' drop-down menu.
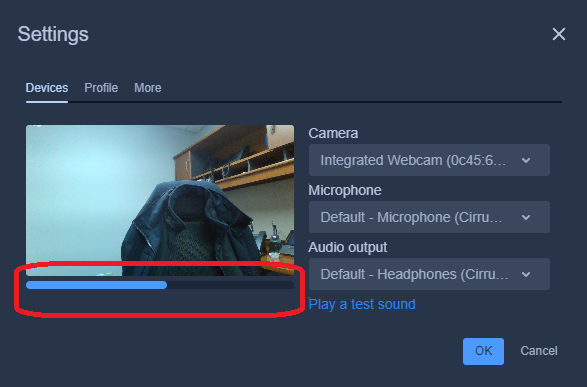
- You can also check if the microphone is active by watching the progress bar move along as you speak.
- Finally you can select the microphone and the audio output (speakers). Don't forget to click on 'OK' to apply your changes.
Profile
- Here you change your display name and set your gravatar email on order to display your Gravatar.

More
- This menu will allow you enable the pre-meeting screen and the language of the Video Conference options.
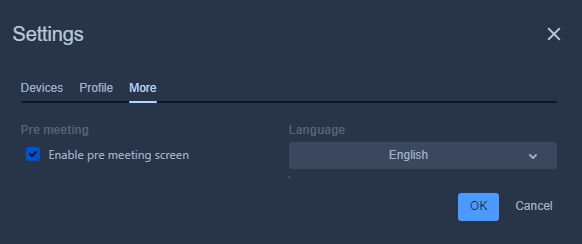
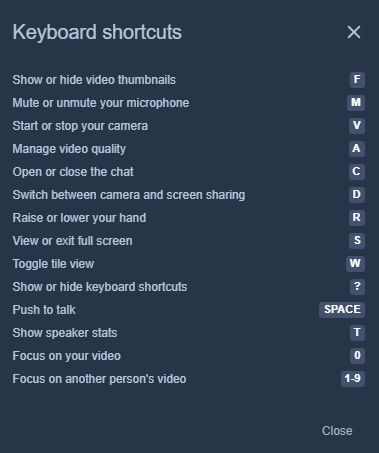
- This option will display the keyboard options available in the during the Video Conference.
Leaving a Video Conference
- To leave a Video Conference room just click on the Hang-up button.
Parking
- In the parking screen you can view all parked calls and information about each parked call.
- Callers can be parked into call parking by transferring a call to your main parking Lot which by default is 700 and it will auto park them in slots 701 through 710 or you can park to a specific Slot like 701, 702....
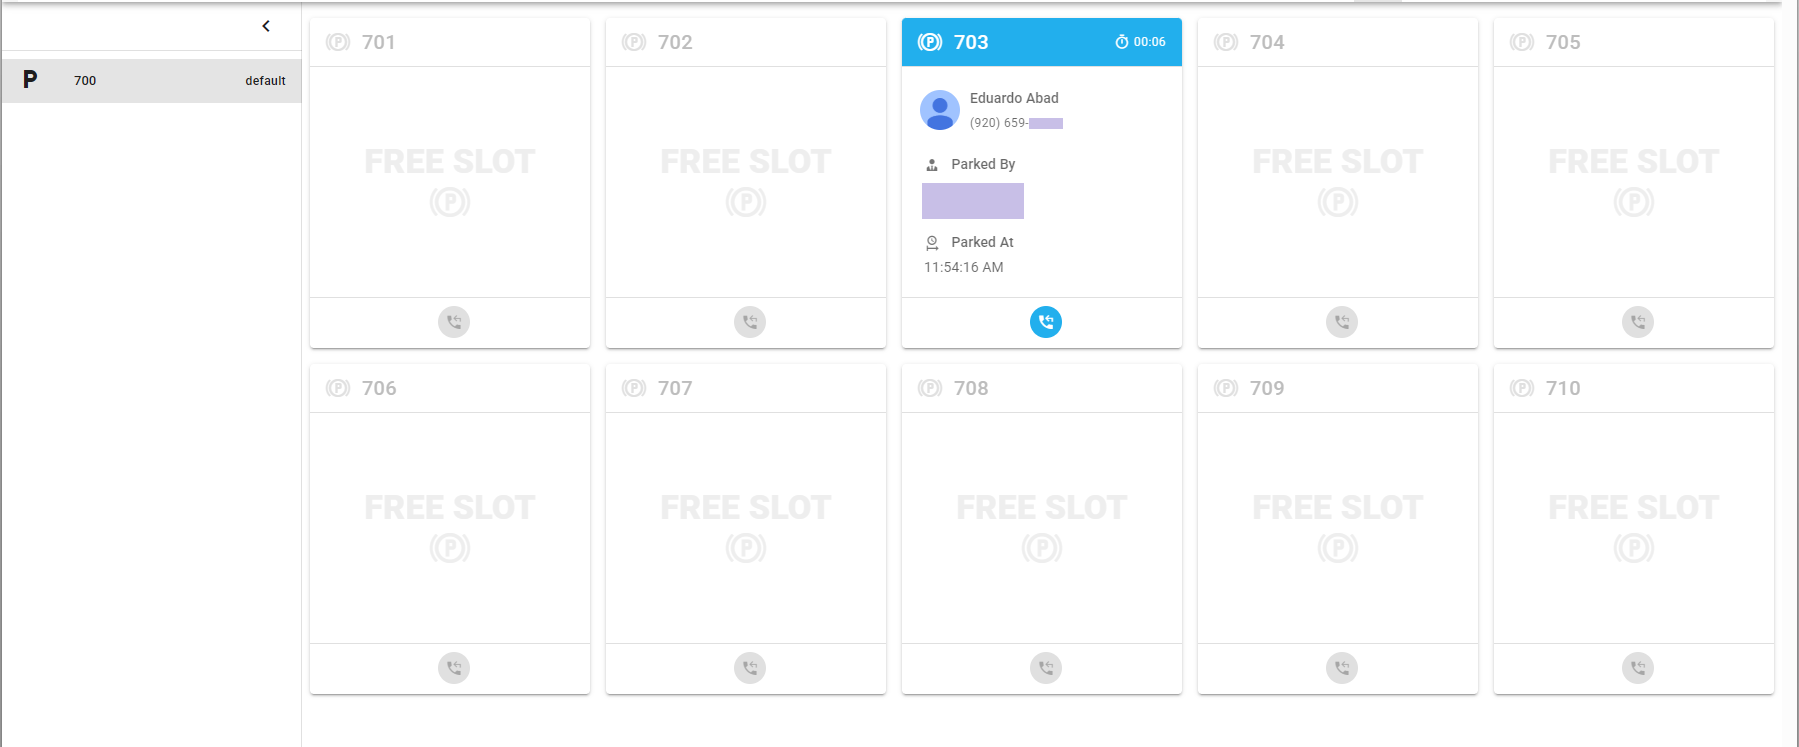
- Any callers who are parked will be shown here along with the following information.
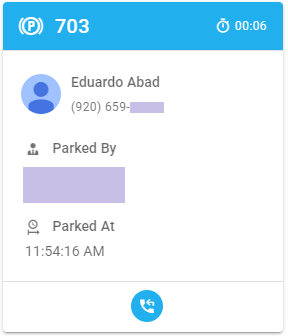
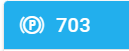
- Slot Number: Number at the top showing the Slot the call was parked in. In our example here it is 703
- Duration - How long they have been parked for

- Parked call information: In the main section of the Parking Slot card, at the top, it is displayed the Name and Caller ID Number of the caller parked in this Parking Slot.
- Parked By: What user or resource on the system parked the caller.

- Parked At: What time the caller was parked at.

- Pickup Park Button - Clicking this button will Pick-up the Parked call in Call Panel or you can dial the parking lot of for example 701 to Pick-up the parked call from any desk phone.
- Slot Number: Number at the top showing the Slot the call was parked in. In our example here it is 703
- To park a active call you have in Call Panel press the Park Button on the active call screen.
 . Alternatively, you can drag and drop an active call on to an open Parking Slot.
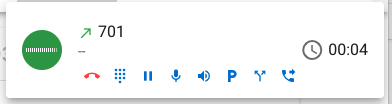
- If your user was setup with permissions to see Announcements you will see the Announcements icon in Call Panel's top menu section.
- This will allow you to listen to all the Announcements recorded for things like IVRs and optionally upload new files or use Text To Speech to create new files.
- Click the Play button to listen to any announcement

- Click on the edit Icon to change/update a Announcement

- From here we can:
- Update the name of the Announcement.
- Listen to Announcement.
- Modify the Announcement's PIN.
- Set the language of the Announcement.
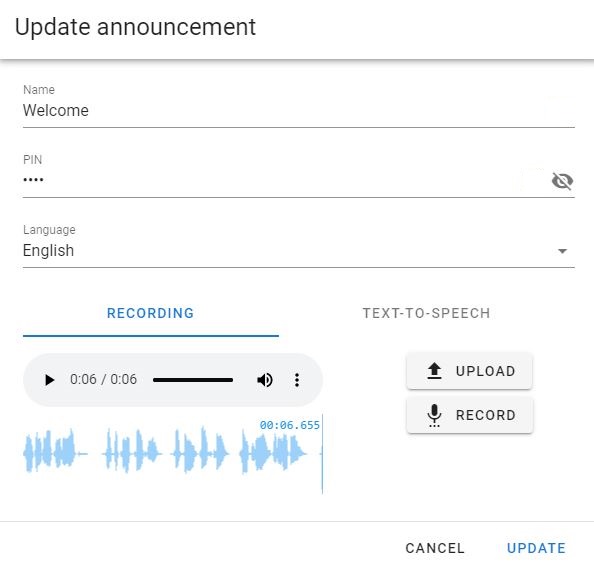
- You can choose to upload a new file by clicking on the Upload button and picking a new file from your Desktop

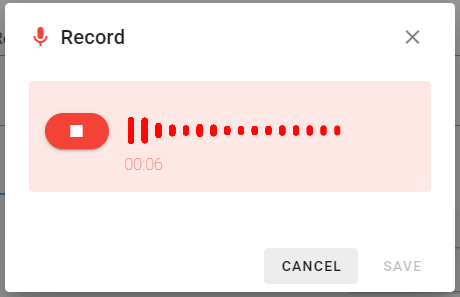
- You can record a new announcement from within call panel by clicking on the Microphone ("RECORD") button. This will make a pop up appear that will let you perform this action.

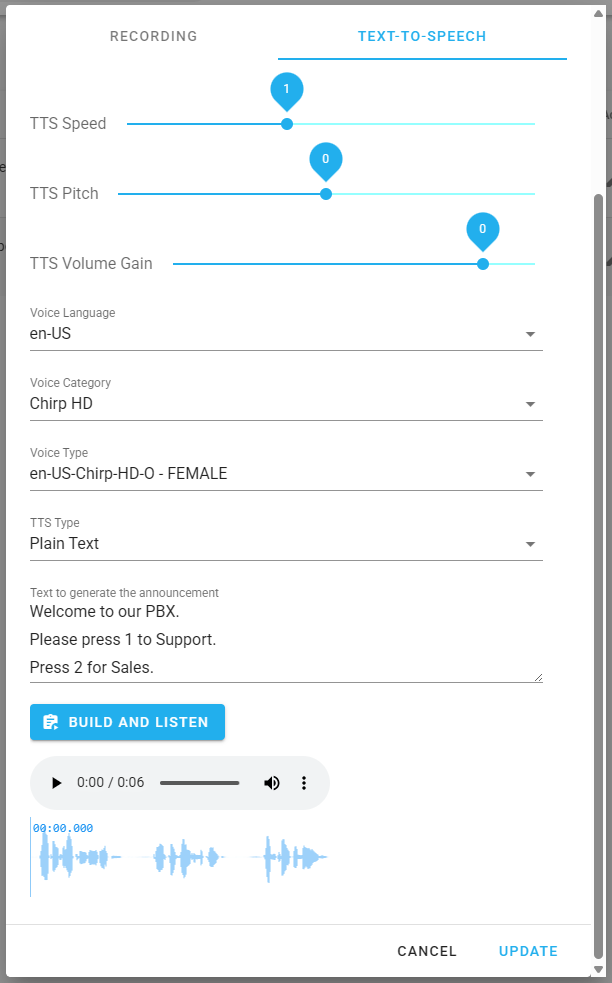
- Or you can click on the Text To Speech tab and modify or type out a new Announcement
- When using this tab the following options will be available for the Text To Speech engine.
- TTS Speed - Slide the bar to increase from 1 to 4 the speed level of the Announcement. Normally left at the default speed, you can increase the speed to make it play the audio faster.
- TTS Pitch - Set the pitch of the audio of the Announcement.
- TTS Volume Gain - This will set the volume of the Announcement. Slide to bar to increase it or decrease it.
- Voice Language - Language that the resulting tts audio prompt will be spoken in.
- Voice Category - Select from a list of different sources that group together the actual individual voices ("voice types").
- Voice Type - Select between different types of Male and Female voices.
- TTS Type - This option allows you to enter Plain Text or Speech Synthesis Markup Language (SSML) if you want to handle special breaks and formatting.
- Text to generate the announcement - Here you can define the Text that will be converted to speech (audio) using the settings above.
- To hear a preview of the Announcement, click on Build and Listen.
- Press the Update Button to use our Text to Speech engine to update the audio of your Announcement.
- When using this tab the following options will be available for the Text To Speech engine.
Voicemail
- Next up on the Main Navigation Bar is Voicemails. Here you can listen to your voicemails, transfer or delete them, and adjust voicemail settings. As voicemails come in, they are shown on their own display cards.
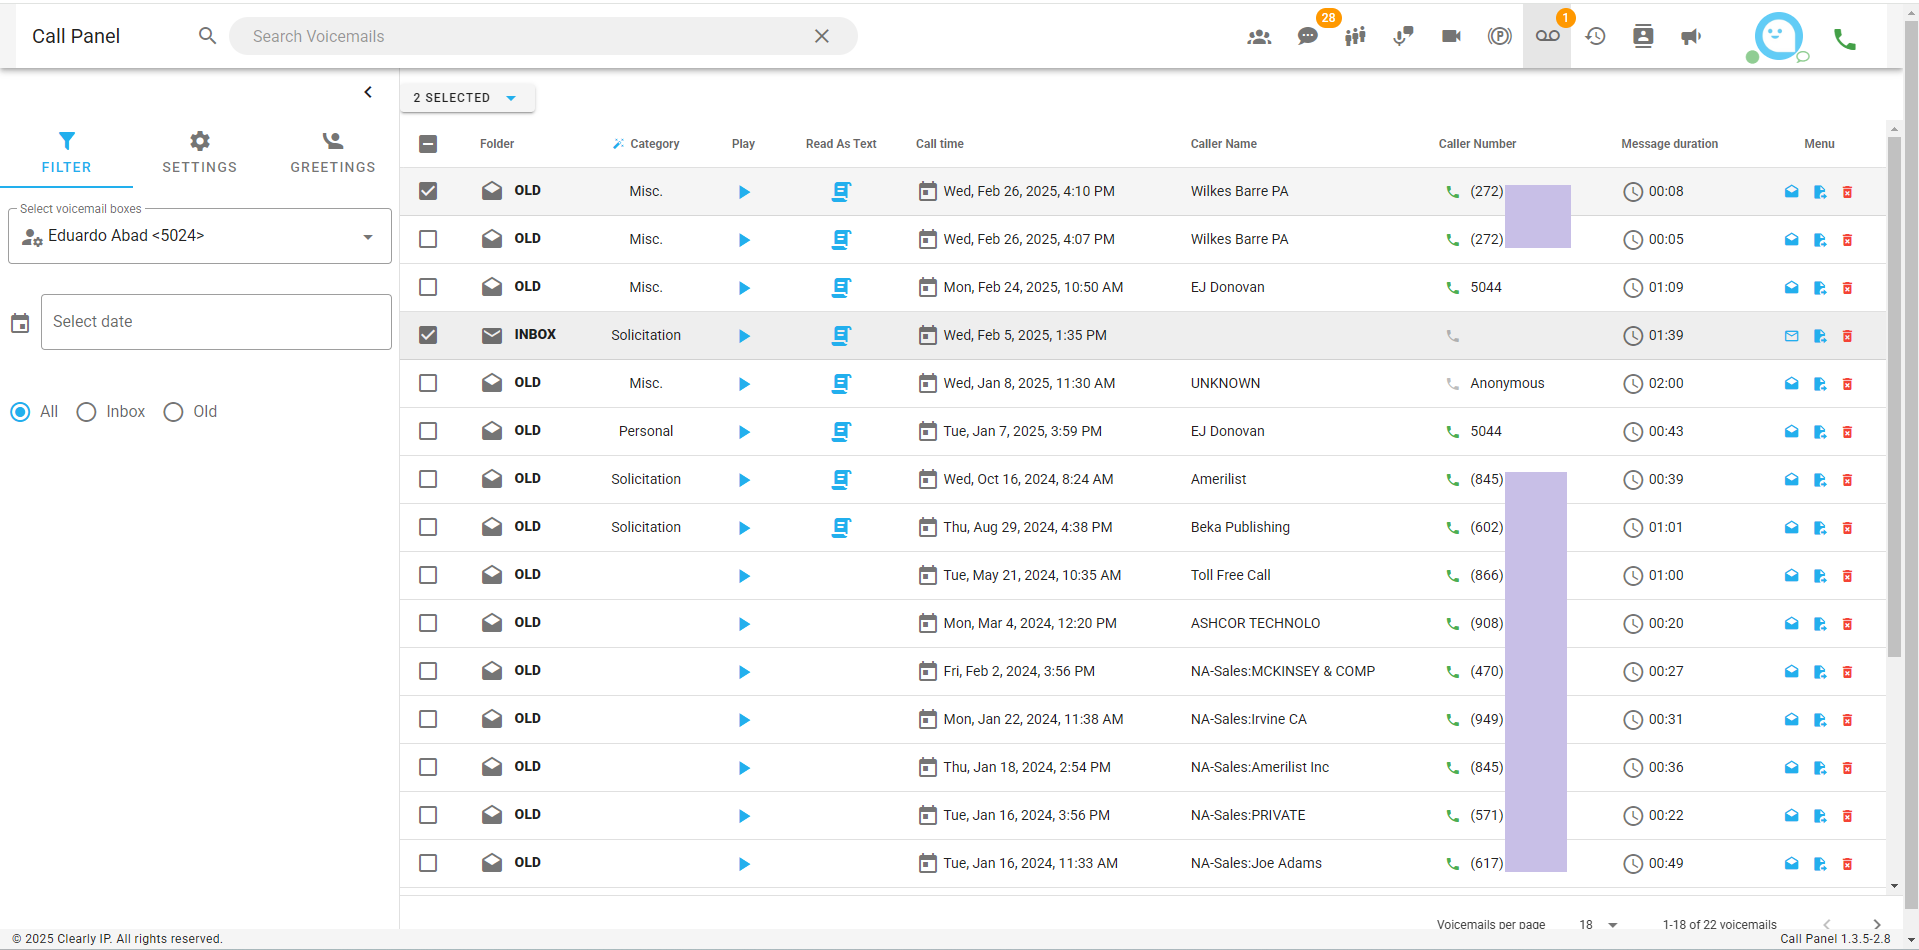
Listen to a Voicemail
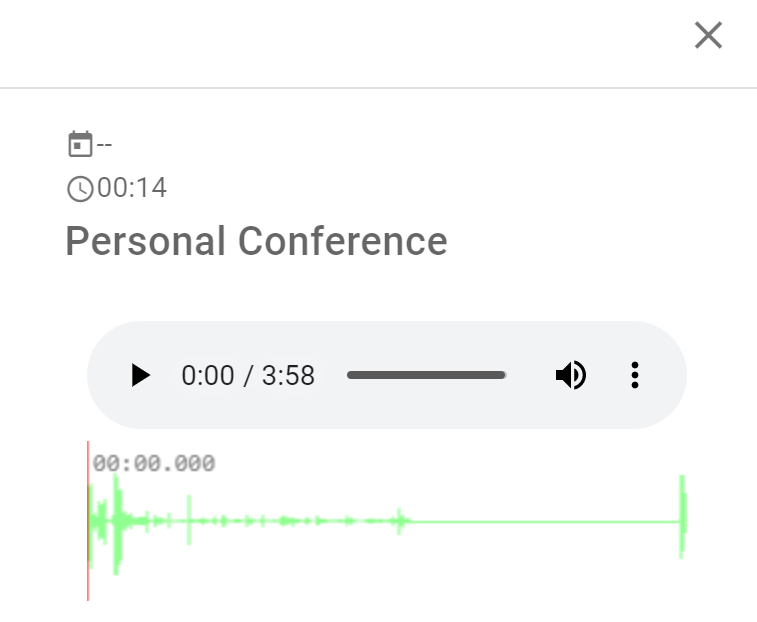
- To listen to voicemail, locate the voicemail’s display card you wish to listen to and hit the Play Button.

- This opens an embedded audio player and lets you listen to the voicemail.
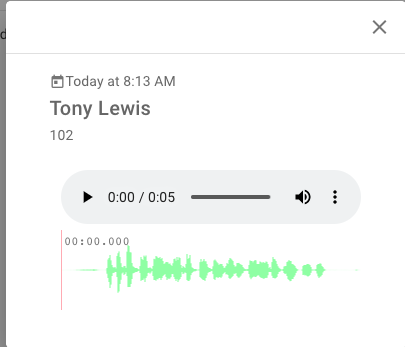
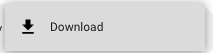
- Pressing the three dots icon will give you the option to download the voicemail file.

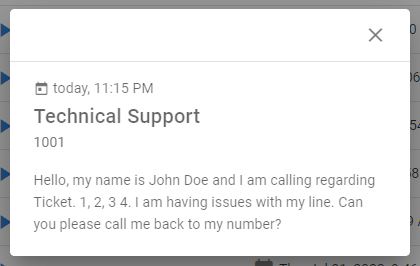
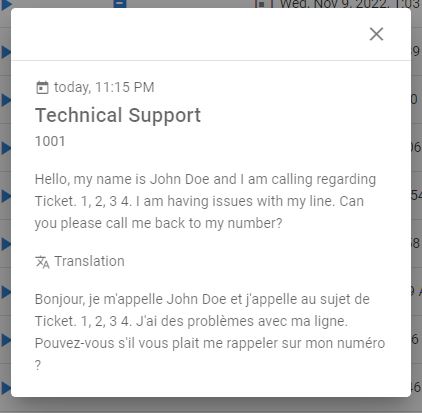
Reading transcripted Voicemails
Having Transcription enabled (see section Voicemail Settings), you can read the transcription of your voicemails in Call Panel.
- To read the transcription of a voicemail, locate the voicemail’s display card and click on the transcription icon.

- A new window will appear showing the transcription of the voicemail.
- If Translation is enabled, the translation of the text will also appear as shown below.
Voicemail Options
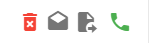
In each voicemail display card, on the bottom right, you will see a series of options.
-
Use the trashcan icon to delete the voicemail.
-
Use the envelope icon to mark the voicemail as read and move it to old messages.
-
Use the paper icon to transfer the message to another user.
-
Use the green phone icon to call the person who left you the voicemail back.
Voicemail Settings
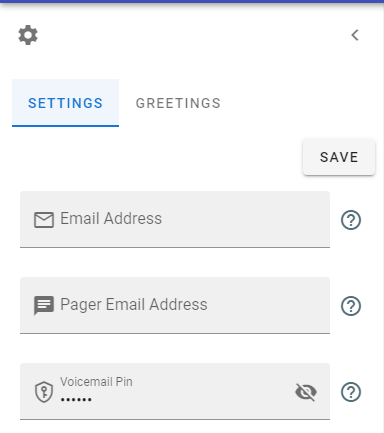
- Open the Voicemails sidebar by clicking on the Gear Icon on the upper left-hand side.

- Under settings, you can set up how you want your voicemails to be processed.
- Email address: Set an email address for voicemail notifications to be sent to
- Pager email address: Set a pager/mobile address to send voicemail notifications to
- Voicemail Pin: Set the password for your voicemail box. The password can only be numeric.
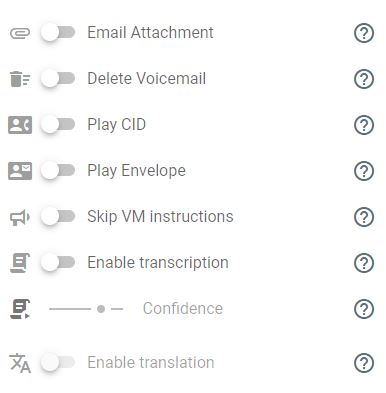
You can also set these additional settings:
-
Email Attachment toggle: Toggle on to send a recording of the voicemail to your email
-
Play Envelope Toggle: Toggle on to have the date and timestamp of the Call read off before playing the message
-
Play CID toggle: Toggle on to have the Caller ID of the calling party read off before playing the message
-
Delete Voicemail toggle: Toggle on to delete voicemails from your voicemail box after sending them off in an email
-
Skip VM instructions: When this option is enabled it causes the instructions “Please leave your message after the tone. When done, hang up, or press the pound key." to be skipped.
-
Enable Transcription: Toggle on to have your voicemails be transcripted to text, so you can read them in the web interface.
-
Confidence: Move the bar to increase or decrease the level of confidence for the transcription requests. The value of confidence can be set between 0 and 1 and this sets the degree of accuracy expected for the transcription requests.
-
Enable translation: If transcription is enabled, this toggle, when enabled, will translate the transcripted text to French or English depending on your language settings.
Searching Voicemails
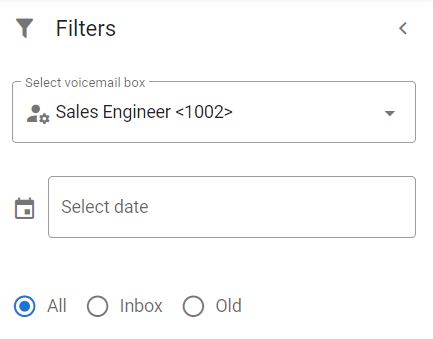
- You can use the search bar at the top of Call Panel.

- Or click on the filter icon (funnel)

- The menu will be expanded offering the options to search messages by date and by folder (All, Inbox or Old)
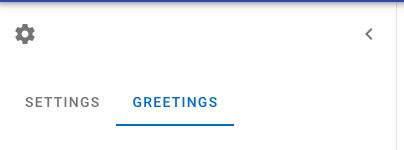
Voicemail Greetings
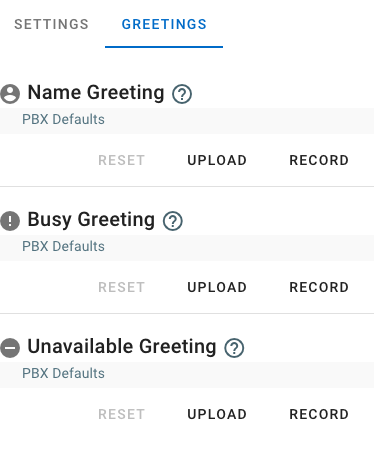
- Next to Settings is the Greetings tab. Here you can set, upload, and record your greetings straight from the Call Panel.
- From here, you can upload or record the following greetings:
- Name Greeting: Record just your name to be read off in a generic voicemail greeting
- Busy Greeting: Create your voicemail greeting for when you are on the other line
- Unavailable Greeting: Create your voicemail greeting for when you are unavailable
Switch Between Voicemail Boxes
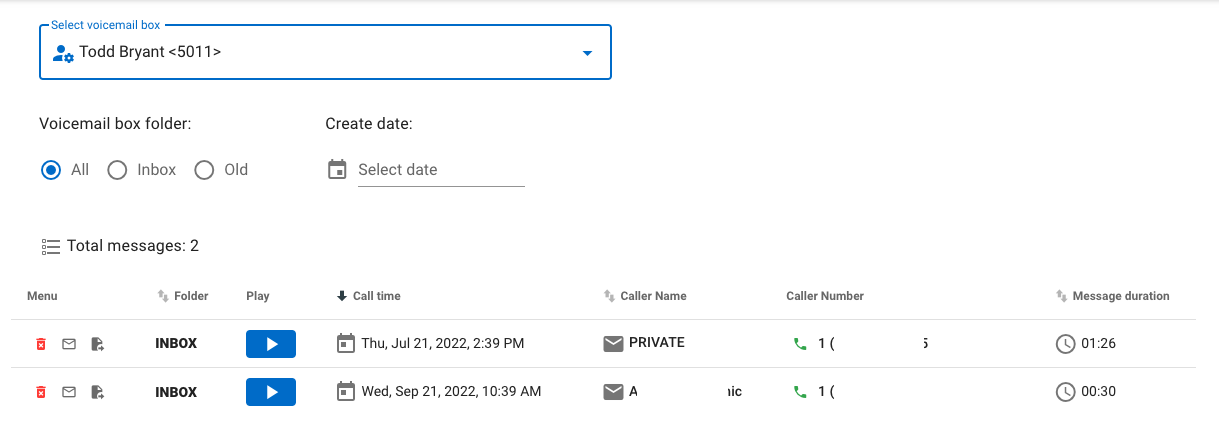
- If you have been given permissions to view other Voicemail Box Settings or Voicemails you will see the option at the top of the Voicemail Page called "Select Voicemail Box" that will let you pick which voicemail box based on permissions granted to you that you would like to View Settings, Greeting or the actual Voicemails.

- Once you switch to a different voicemail box the page will reload and all Voicemails, Settings and Greetings will now be related to the Voicemail Box you have chosen here.
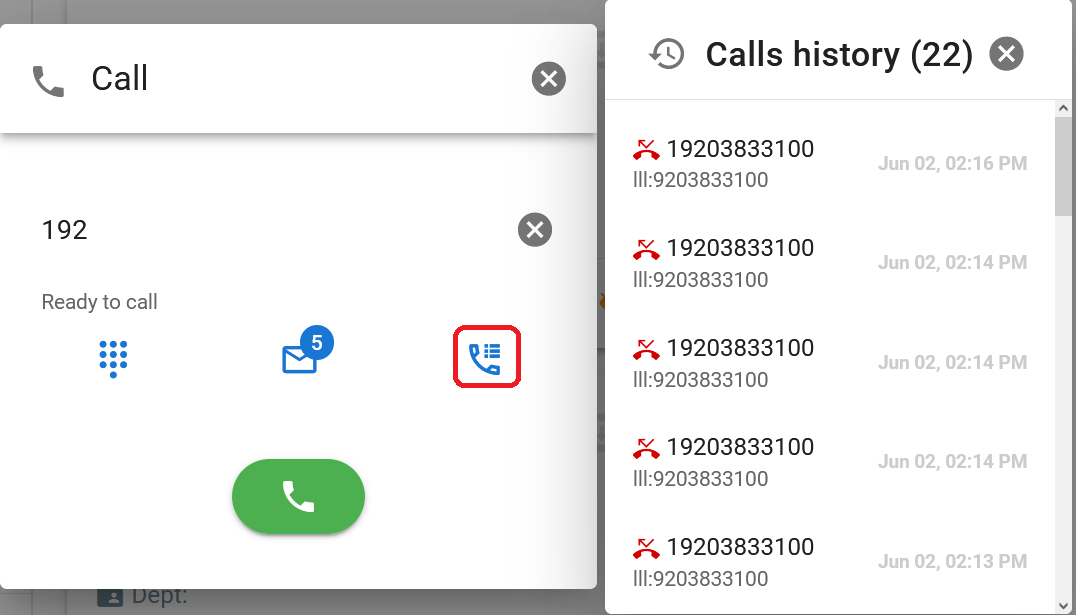
Call History
- Call History is accessed from the top menu by clicking on the clock icon


- You will see all inbound and outbound calls related to your user here.
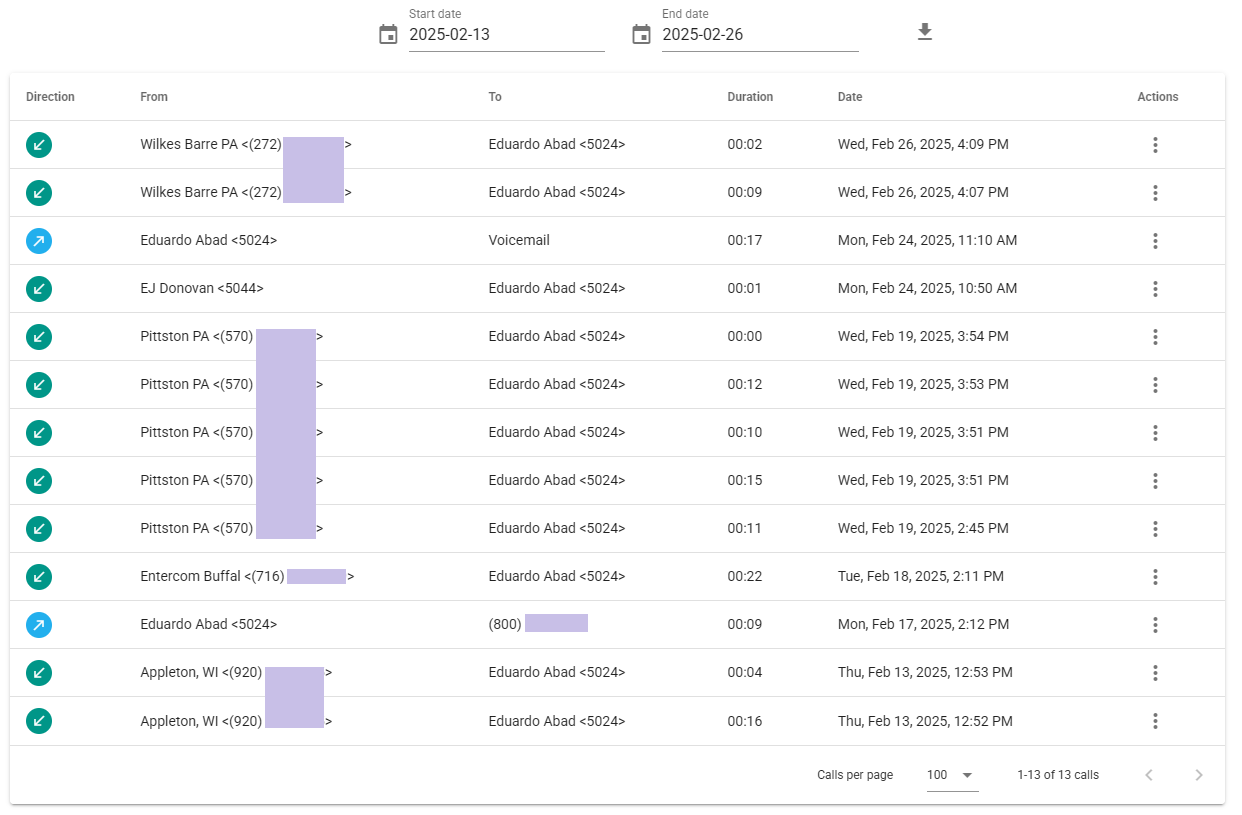
- At the top you can select a Date range for filtering out the call history entries to get displayed. Also you can export the filtered out call history entries being displayed as a .csv file by clicking on the download icon to the right of the Date range filter

- For each call record you have the following actions:
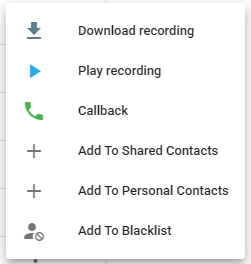
- Download recording - The download button will let you download the call recording for the call if recorded.

- Play recording - The Play button will let you play the call recording from a embedded audio player in your browser if the call was recorded

- Download recording - The download button will let you download the call recording for the call if recorded.
- Callback - Will call the person back from within Call Panel Soft Phone

- Add To Shared Contacts - Add the phone number as part of your Shared Contacts address book

- Add To Personal Contacts - Add the phone number as part of your Personal Contacts address book

- Add To Blacklist - Add the phone number as part of your blacklist so that, from now on, calls coming from this number can no longer reach you and rather get blocked (automatically terminated)
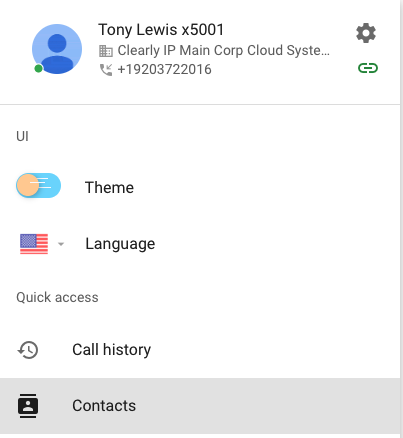
Contacts
- Contacts can be found under your User Profile. Click on the User Profile icon in the upper right corner of Call Panel


- Click on the Contacts option now
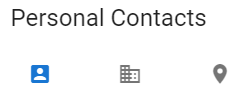
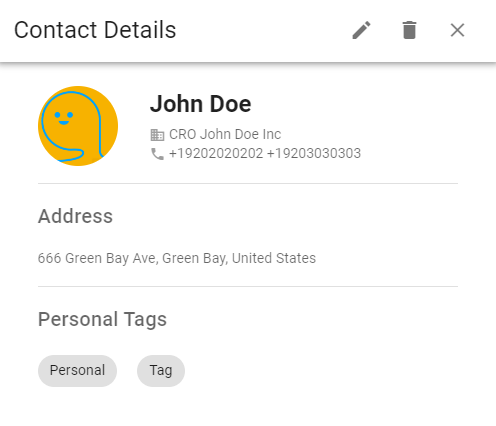
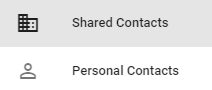
- In this page you will see and manage the contacts that are shared with you by the Administrator of your Clearly Cloud Instance, and your personal contacts.
- Shared Contacts

- Personal Contacts

Manually Adding Contacts
Click on the Create Contacts 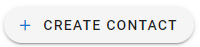 button and a new screen will pop-up.
- This new screen has three icons: Contact, Company, and Address
- Contact's Last Name and First Name.
- The option Use as Caller ID, if enabled, will override the Caller ID based on the First and Last names fields for received calls from any of the phone numbers entered below.
- This is a personal contact: This option sets this contact as personal and it is not shared across the Cloud Instance.
- Phone Numbers: Enter the desired phone number for this contact. In the Label field you can add a label to differentiate this number from the others. Click on the + sign to an additional number for this contact.
- Personal Tags: You can select the tag that can be applied to this number or type a new personal tag to create it.
- Upload a new picture profile: Here you can map a photo and have it associated to the contact.
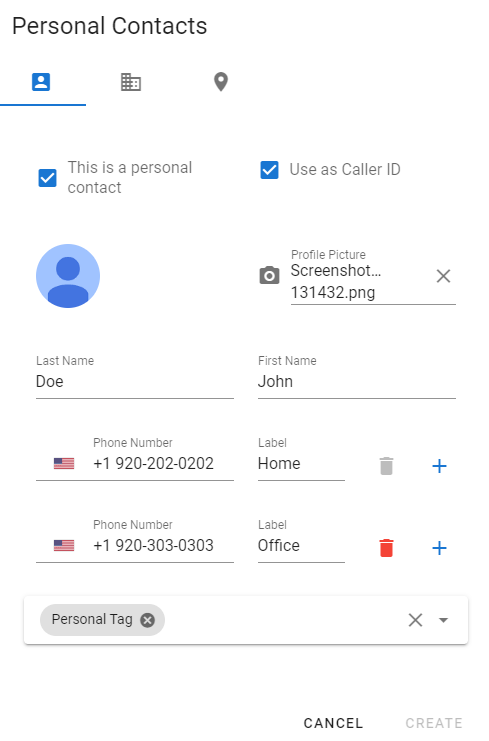
- Company and Job Title.

- Address Type: This could be Home, Work, School, or Other
- Address Line
- City
- State/Province/Region
- ZIP/Postal Code
- Country


- Keep in mind that if you start dialing any number, Call Panel will try to show the contact assigned to the number you are typing:

Tags
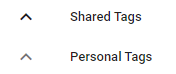
Call Panel has two types of Tags: Shared Tags and Personal Tags.
- Shared Tags are created by the System's Administrator and shared with the users.
- Personal Tags are created by you.
Shared Tags
- Expanding the Shared Tags menu will allow you visualize the tags shared with you.
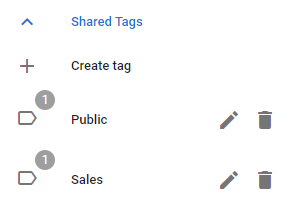
It will show you the amount of contacts associated to each tag. Clicking on a tag will display the contacts associated to it.
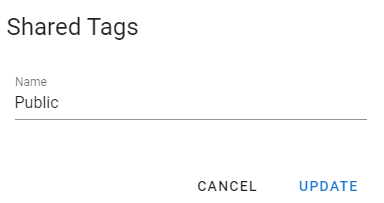
Editing and deleting a tag
- To edit a Tag click on the edit icon.

- A new window will emerge allowing you enter the new name of the tag
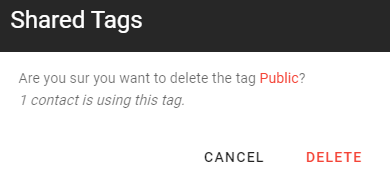
- Clicking on the delete icon you can delete a tag.

- When doing so, the system will ask you for a confirmation.
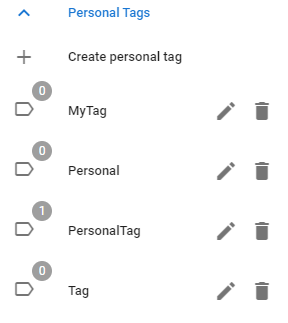
Personal Tags.
- Expanding the Personal Tags menu will show the tags created by you.
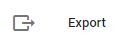 and a CSV file will be downloaded to your PC/Laptop.
Importing Contacts
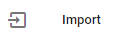
- A new window will appear and from there you can select the CSV file with the contacts to import.
- It will also show the instructions for importing your contacts.
- Click on Import.
- The system will provide the status of the import in the Ongoing import summary section.
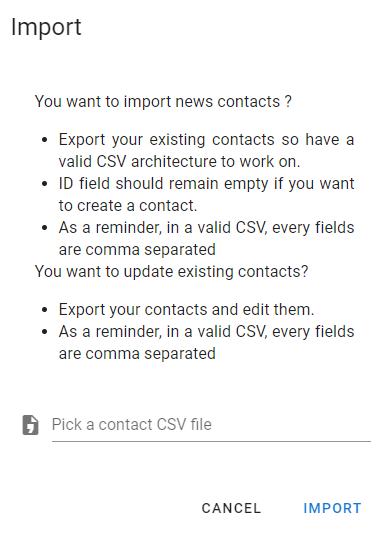
- We recommend you to first create one contact, export it so have a valid CSV architecture to work on.
- ID field should remain empty if you want to create a contact.
- As a reminder, in a valid CSV, every fields are comma separated
Changing User Status
- User Status can be found under your User Profile setting. Click on the User Profile icon in the upper right corner of Call Panel
- You can see what your current Status is set to and change your Status to any other Status on the system by hovering over the current set Status.
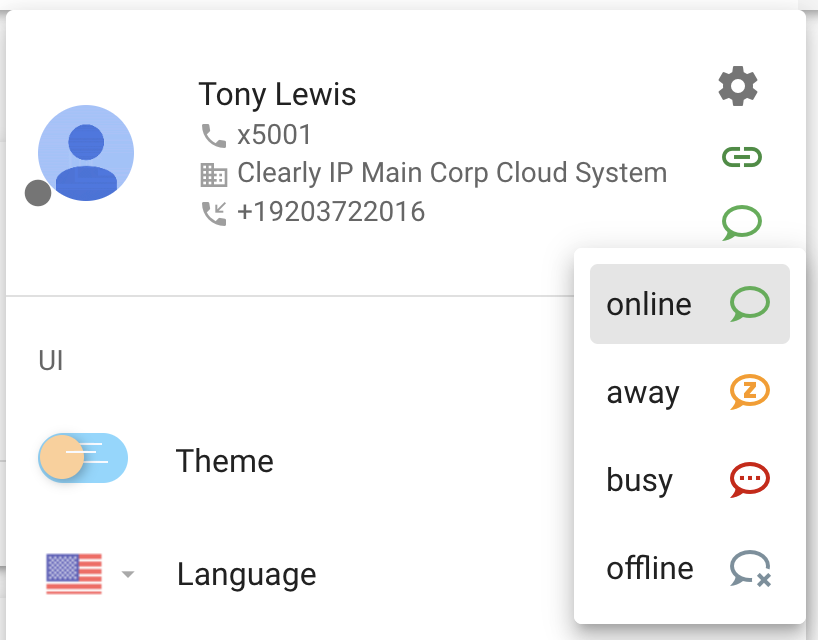
- If you set a Status to be Busy you will not receive browser pop up notification for new inbound messages. The new messages are still delivered to the Chat tab and show as unread but you will not get a pop up notification.
Custom Presence
- In addition to the default Statuses in Call Panel (online, away, busy, and offline), you can set your own by hovering over the current set Status section.
- You will see a field where you can enter any text specifying the desired Status.
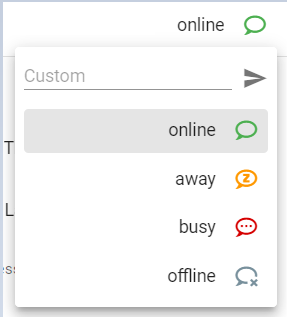
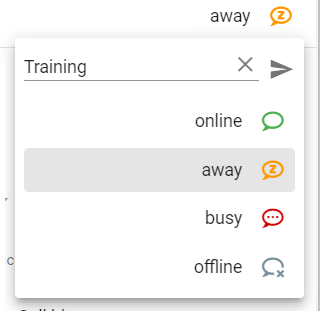
- In the following example, we will show how to set a Presence State called 'Training' associated with the 'Away" status.
- Select the status from the pre-defined list. In our example we will select ‘away'.
- Next, enter the text status you would like to show when using the selected status above.
- In our example it will be ‘Training’. Press Enter or click on the > icon
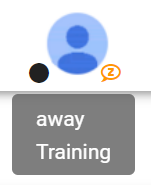
- To verify the status we just created, we will hover over our status at the top of Call Panel, in the User Settings section.
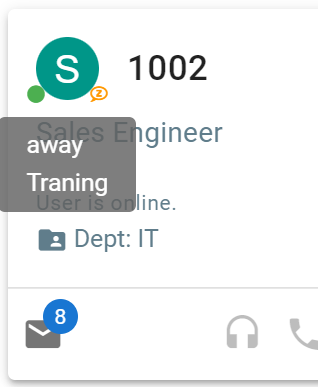
- The other user will see the custom status in the Users section as shown below.
Settings
- In settings, you can set your Call Forwarding options, set up your Follow Me, and toggle your DND and Call Waiting functions along with changing your login information and other related items.
- Settings can be found under your User Profile setting. Click on the User Profile icon in the upper right corner of Call Panel
- Click on the Gear Cog now to bring up your user settings

Personal User Settings
- In this section you can update your username, email and password. You can also enable the OneTime Password feature. This changes will be also displayed to the user administrator. When done click on 'Save Changes'.
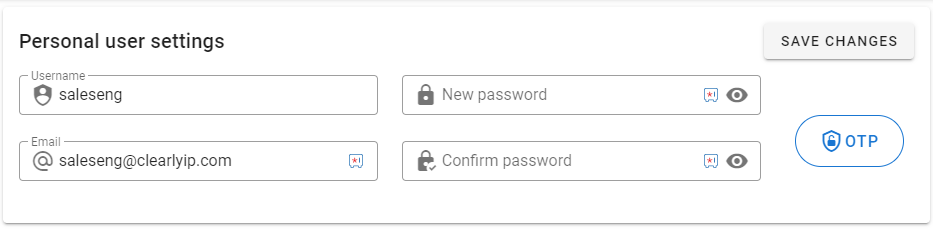
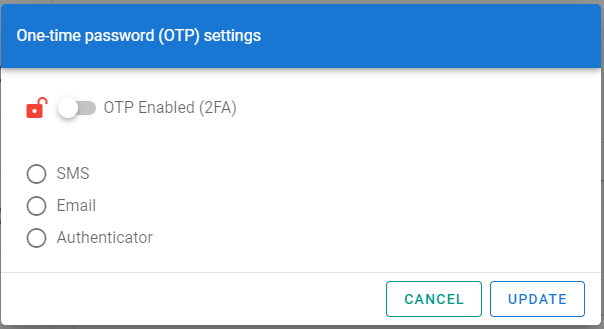
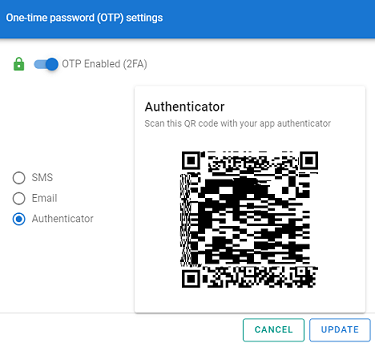
- Clicking on the OTP icon, will take you to the following menu where you can enable the One Time Password for your account.
- Here you can select the method for enabling the OTP (2-Factor Authentication). It could be SMS, Email or Authenticator (QR Code)
- Click on 'Update' to enable it
DIDs
In this section you can see the Phone Numbers (DIDs) linked to your user and also check any SMS assignment status on them.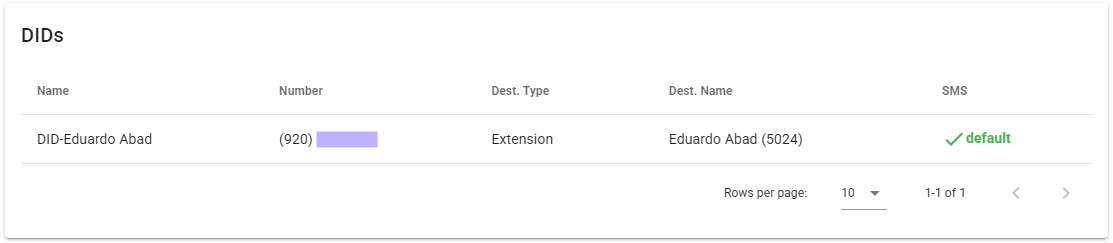
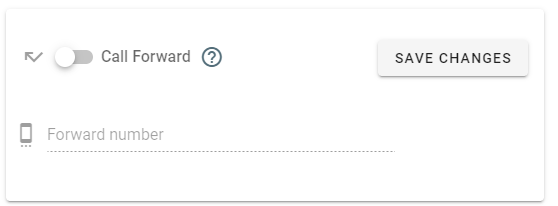
Call Forward
- Call forwarding will allow you to redirect all calls to a number you set. Just toggle the Call Forward option on, put in the forwarding number, and hit Save Changes.
Follow me
Follow Me settings enables incoming phone calls to be received at different locations on different phones. First, toggle the Follow Me toggle on.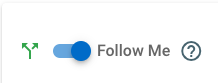
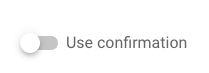
- Use Confirmation can be toggled on or off.
- Toggle it on if you will be sending calls to external numbers whose voicemail may pick up. When enabled, it will require you, after answering the Call on your remote phone, such as your Mobile, to press 1 to be connected with the caller.
- You can select a Time Condition when enabling your Follow Me feature. When a Time Condition is set then call to Follow Me numbers will be made only if the incoming call reaches you during a time that matches the Time Condition. Time Conditions are configured by system administrators.

- CLID Prefix is a short prefix you can set that will be prepended to the Caller ID Name
- Caller ID setup for external numbers - This option is only applied to the Follow Me external numbers. If the incoming call is from an external number and Follow Me is set to external number (like cell phone) then here you can set the Caller ID you will see on your external, destination device. It can be set to show the caller's CID or your company external caller ID or your custom external caller ID.

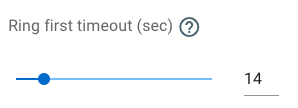
- Ring first timeout is a timer you set for how many seconds you want it to ring directly to your main extension before rolling over to the Follow Me list.
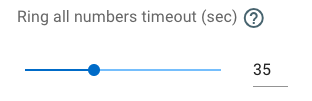
- Ring all numbers timeout is the Max amount of rings to everything on the Follow Me list before rolling over to your voicemail.
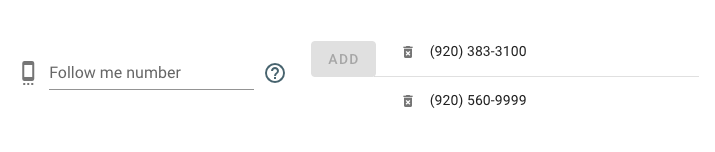
- At the bottom, you can see your Follow Me list. You can add local extensions or external numbers. Be sure to click ADD after each entry.

Do Not Disturb - Call Waiting - Intercom
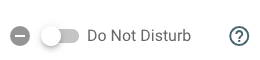
- Use the toggle to turn 'Do not Disturb' on and off
- Use the toggle to turn 'Call waiting' on and off. When call waiting is on, you can receive a second call while on the phone. When call waiting is off, the second Call will go straight to your voicemail.

- Use the toggle to enable or disable Intercom. When enabled, the phone will automatically answer intercom call.

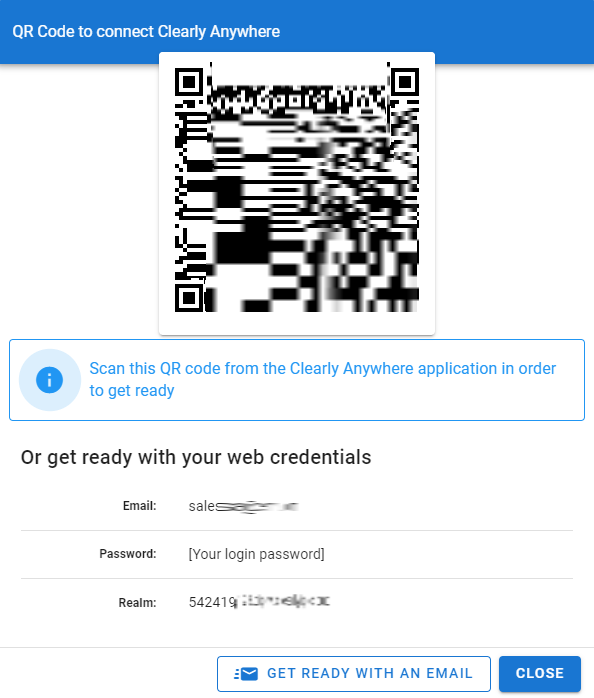
- In this menu you can setup to your Clearly Anywhere Client.
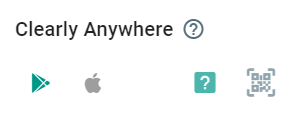
- You can download the Client depending on your Mobile's Operating System.
- Just click on the QR icon to access the QR menu.
- Scan the QR code with your mobile and your Clearly Anywhere Client will be configured or use your email and password to setup the Client by receiving an email with the instructions.
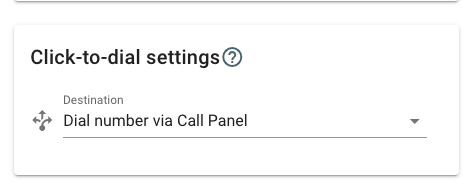
- When using the Click to Dial feature of Call Panel to call any number you can pick from the following 3 behaviors on how you want us to call the number.
-
Show Softphone - When you click on a number it will open the softphone in call panel and pre-fill in the number but not call the number. You will have to press the dial button.
-
Dial Number via Call Panel - Same as Show Softphone except it will auto call the number for you.
-
Call my devices and dial after answer - Instead of the call being sent to the Call Panel softphone the call will be sent into the Clearly Cloud system which will call your extension and on answering your extension we will auto call the number for you.
-
Media devices select
- Although they are detected automatically by Call Panel, this section will assist us on setting up the input and output devices for web calls, recording etc.
- For multiple devices, we can use the drop down menu to set them accordingly.
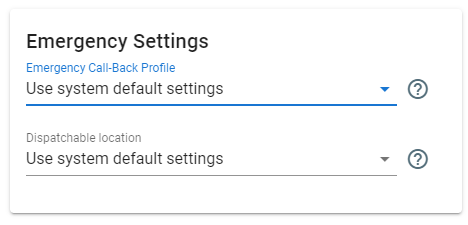
Emergency Settings
- Here you can set the Emergency-Call-Back profile which provides a Name and a Call Back number when 911 is dialed.
- You can also set the Dispatchable Location
Toggle Destinations
- Toggle Destination has two destinations.
- You can switch from one to another by dialing '*44*ID' (You can find the ID in this grid) or from this page by clicking destination.
- You can use it as a destination from your favorite feature (digital recepcionists, destination aliases, time conditions, etc.)

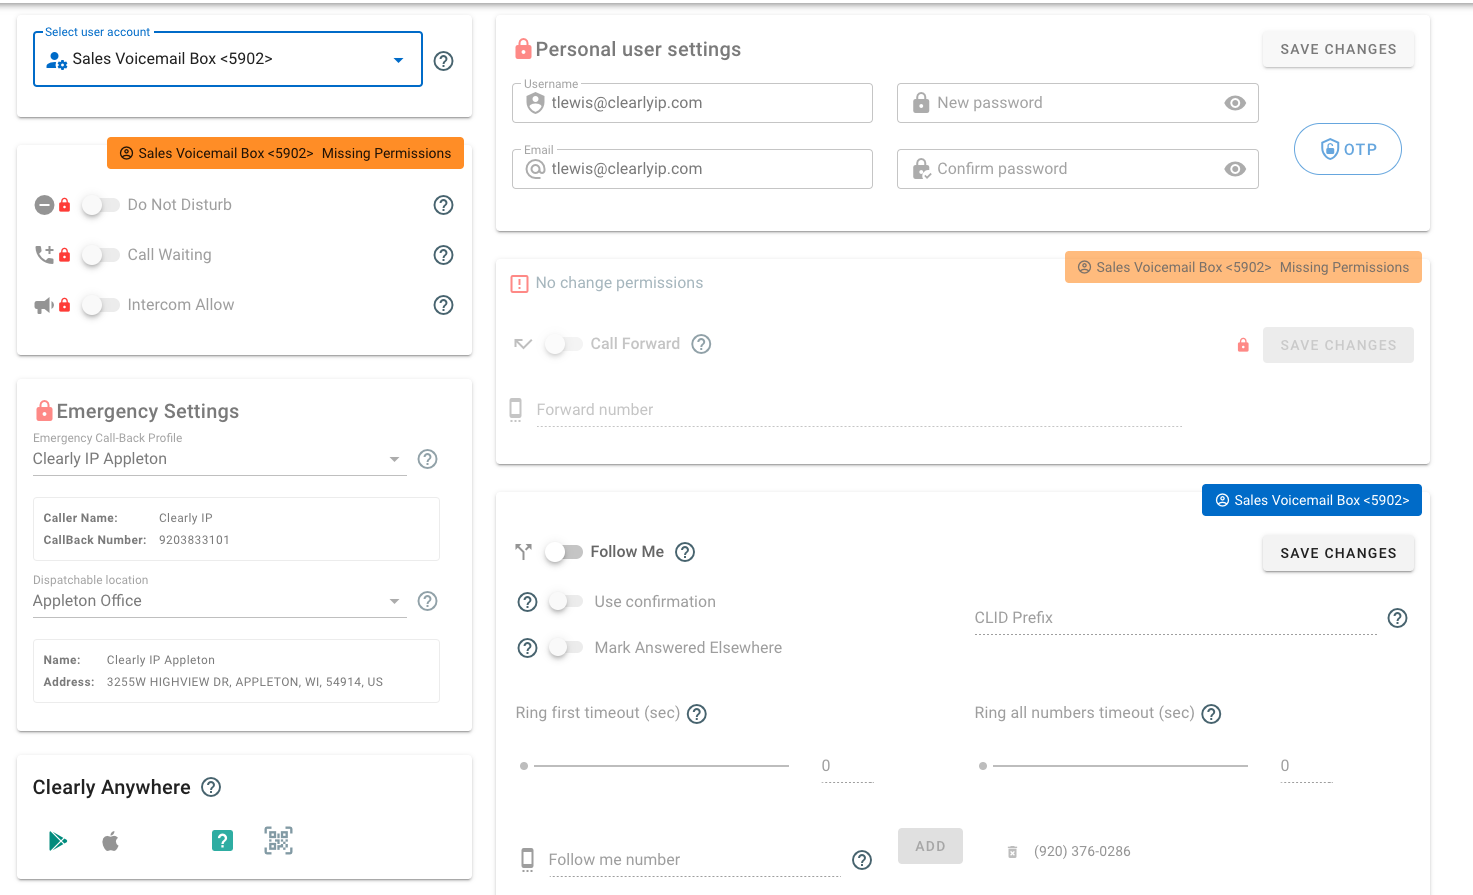
- By default when you change settings for Follow Me, Call Forward, DND and Call Waiting you are changing for your logged in user. You can also change these 4 settings for any other user you have been granted permissions to change these settings for. If you have been granted permission to change these settings for additional users by your PBX admin you will see a new Select user Account box in the top left of the Settings screen.
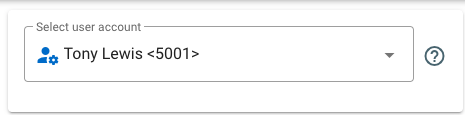
- From here you can pick which user you want to switch to and now the settings that you have permissions to for that user will be shown and you can change any of those settings. In our example we were only granted permissions for Follow Me for the Sales Voicemail Box User. You will see the other settings are all greyed out with a warning you do not have permission to those settings.
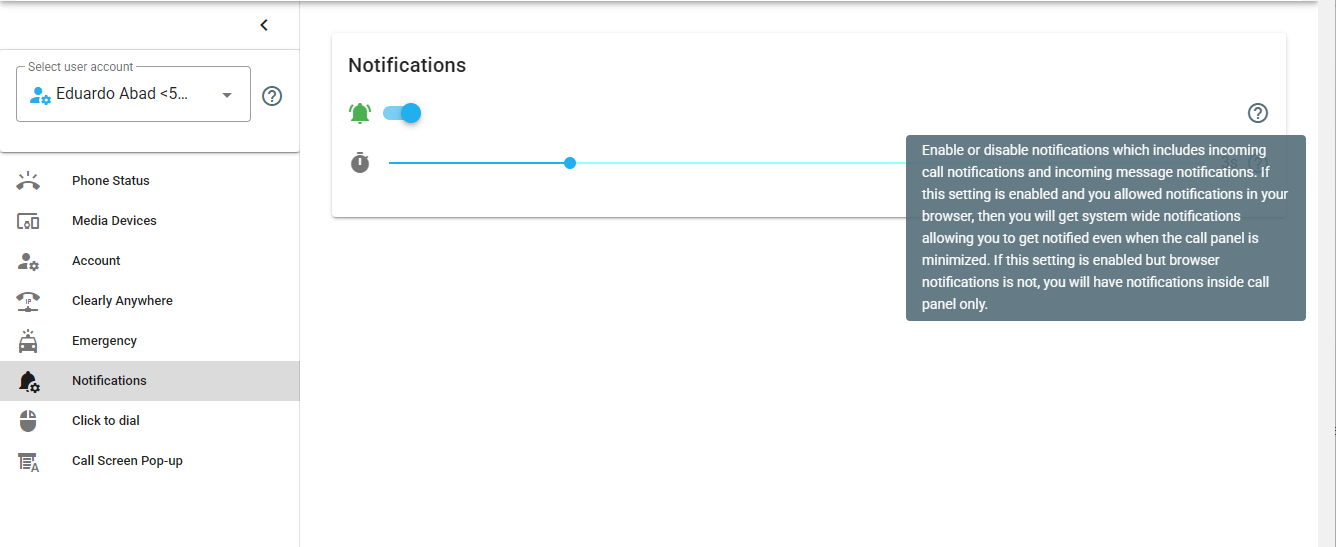
Notifications
Users can manage their Call Panel notifications under the Notifications menu in their Call Panel Settings. Notifications can be enabled or disabled altogether and, if enabled, define how long they will remain visible in the screen. If this setting is enabled and you allowed notifications in your web browser, then you will get system wide notifications allowing you to get notified even when Call Panel is minimized. If this setting is enabled but web browser notifications is not, you will have notifications inside Call Panel only.
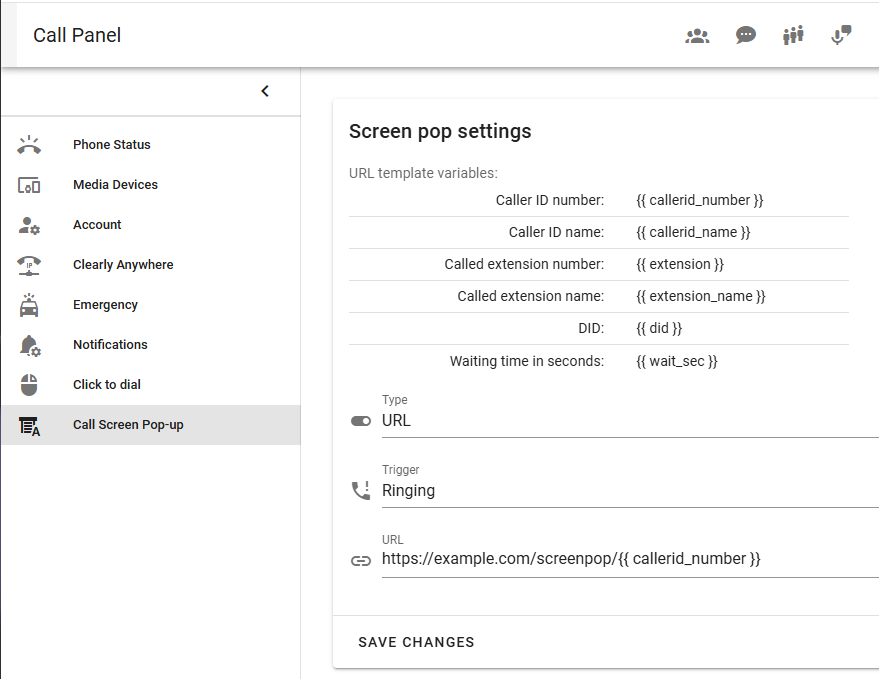
Call Screen Pop-up
Users can manage their Screen Pops settings under the Call Screen Pop-up menu in their Call Panel Settings. The settings available for users to be able to configure are: enable, disable, select the trigger, or set the URL for their Screen Pops.
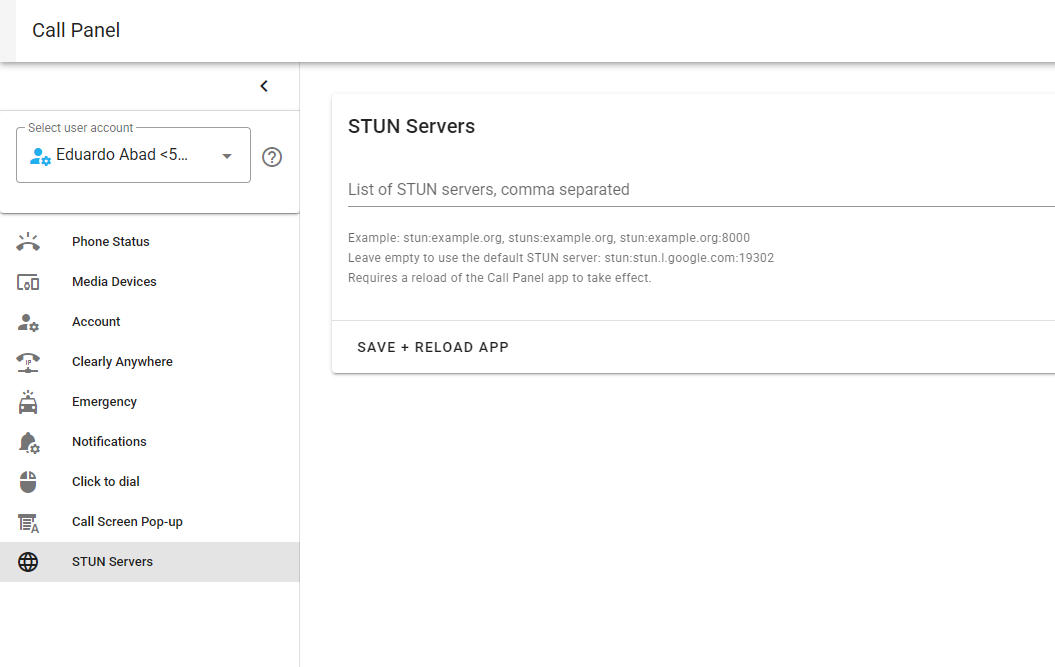
STUN Servers
In the rare cases where audio streams could be absent in Call Panel's webphone calls, defining one or more STUN Servers for it to use can solve the issue, here you can do so.
Call Panel Softphone
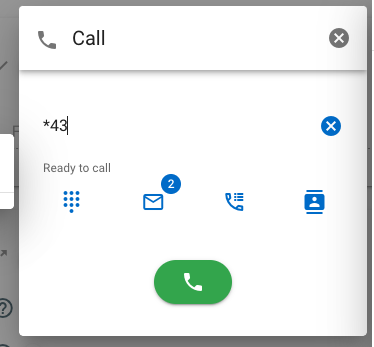
- Next to Settings on the' Main Navigation Bar' is a status bar that will be green and say 'Online' with a phone next to it.

- To access the SoftPhone, click on that green 'Online Phone' bar, and the phone will pop up.
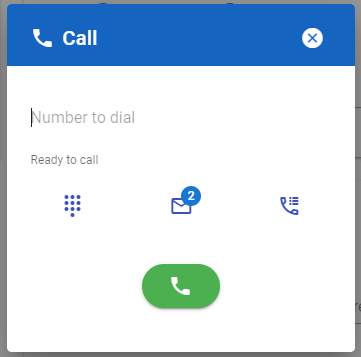
- Use the number pad to dial the number you are looking to call and hit the green phone icon at the bottom to dial.
- You can also open up a dial pad using the icon with the dots.
- You can also call your voicemail box by clicking on the envelope.
- Another way for calling is by typing the name of any of your contacts and Call Panel will search for the possible match as you type
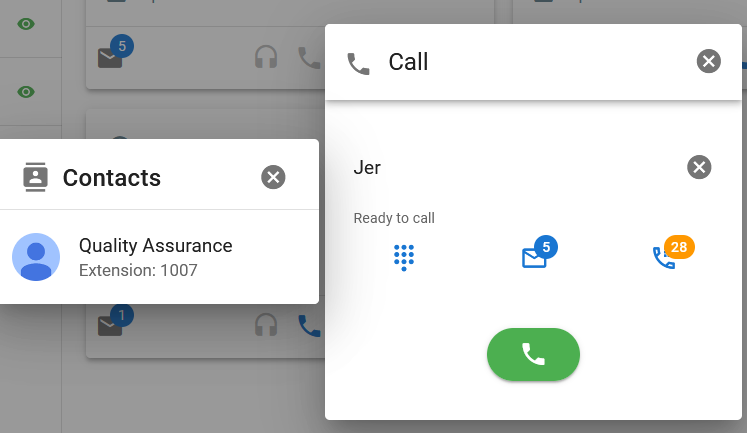
- As you enter any number, Call Panel will also try to make the best match of the numbers stored in call history and your shared and personal contacts:
- To view call history, click on the phone icon to the right of the envelope, and your call history will pop up in a box there.
- While on a active SoftPhone Call, you have different action buttons to control that call, as shown here.
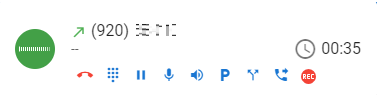
These actions are:
- Hang up
- Display the Dial Pad
- Hold
- Mute
- Increase the volume of the call
- Park
- 3-way conference
- Transfer
- Record
User Profile Avatar/Picture
-
You can set an Avatar/Picture for your User in Call Panel. The process is as follows:
-
Click on the User Profile icon in the upper right corner of Call Panel.

-
Then hover over the user’s contact Avatar/Picture and the Edit icon will appear.
-
Tap the Edit (Pencil) icon and a new window will pop up.

-
Click on the 'Upload a new profile picture'.
-
Map from your Hard Drive the Avatar/Profile picture you would like to use.
-
Use the Crop Tool to select the area of the picture you want to use for your Avatar/Picture.
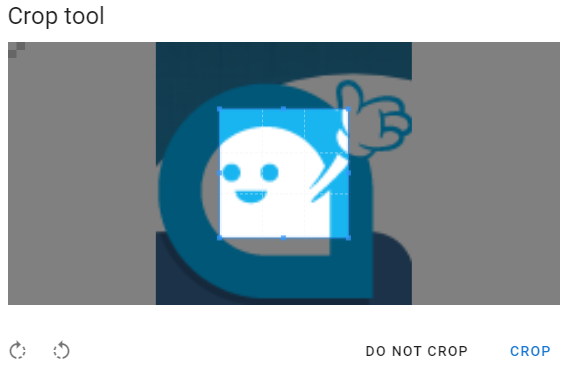
- Use the highlighted select tool to expand or reduce the area to show in your Avatar.
- These rotation icons are used to rotate the picture 90 degrees clockwise or counterclockwise.

- Click on 'CROP' or 'DO NOT CROP' (if you don’t want to modify your picture).
-
Upload your Avatar/Picture by clicking the upload button.

-
Will will see immediately the result of this action so you can use the uploaded picture or choose a different one
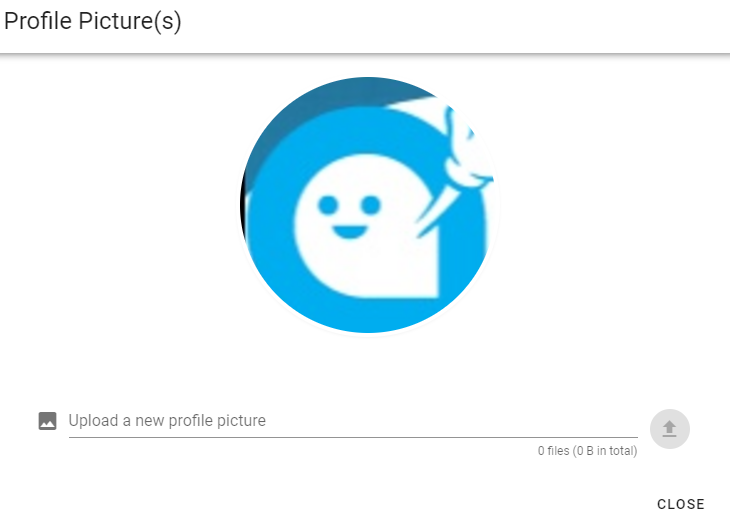
-
If you are satisfied with what you have uploaded, click on the ‘Close’ button to confirm your Avatar/Picture.
Click to Dial
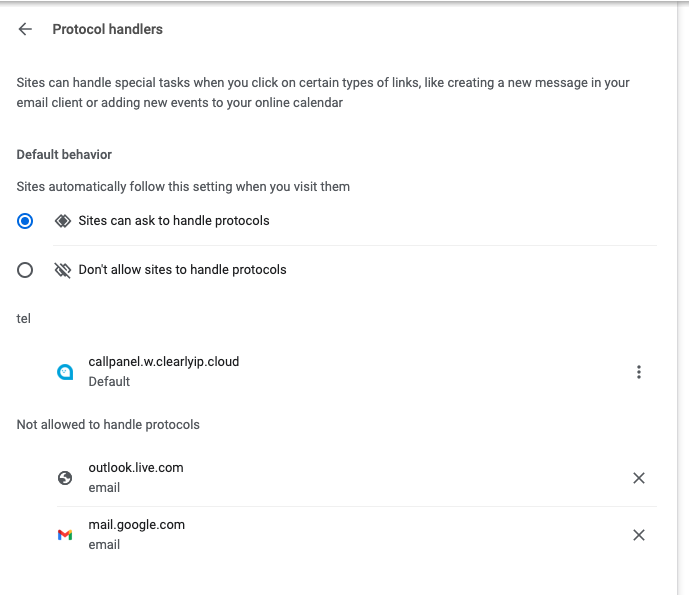
- Click to Dial is a feature of Call Panel that allows you to register Call Panel as a TEL handler in your browser. The TEL handler of a browser is what allows the browser to take any number on a web page that is setup as a Telephone number and let you click on that number to call them. Web browsers Chrome. Edge and Brave all support this feature.
- To register Call Panel as a TEL handler you need to open up Call Panel and go make a outbound call from the built in softphone.
- Your browser should prompt you if you want to setup Call Panel as a Telephone Handler. Click on Allow and you can now go to any webpage that has phone numbers on it and use the click to call to call those numbers.
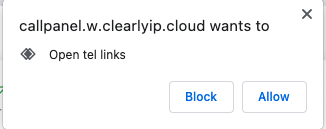
- You can also pick how you want Call Panel to handle calling the number when using Click to Dial as outlined here in our Click to Call Settings.
- If you are not getting the prompt to setup Tel Links when making a call through Call Panel most likely you either do not allow Sites to register this handler or you blocked it at one point. You can view these settings in Chrome by going to chrome://settings/handlers in your browser