The ComXchange Call Accounting Server receives and analyzes Station Message Detail Records (SMDR), records sent from the ComXchange PBX interface. If the Call Accounting Server determines there is a charge for the call based on the SMDR record information, it is sent out the PMS interface of the Call Accounting Server to the PMS system to be applied to the guest's room account. The Call Accounting server can be configured by a ComXchange Admin and can be accessed through the ComXchange web GUI by navigating to Reports > Call Accounting. Before configuring the Call Accounting Server a Call Accounting license must be purchased and a V&H (Vector & Horizontal) file which provides tables for pricing between the two parties on the call ordered. Once You have the file you can follow the steps for the V&H Process and Configuration
Accessing ComXchange Call Accounting
To access ComXchange Call Accounting you will need to first log into the ComXchange Web GUI
Once logged in navigate to Reports > Call Accounting
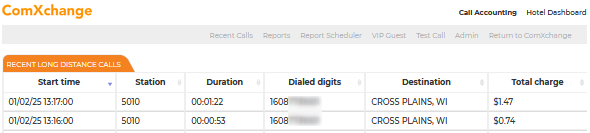
The landing page is a list of recent calls that may be billable
Call Accounting Admin and Users
By Default a a ComXchange Admin will be granted Call Accounting Server Access and will be logged in automatically when navigating to Call Accounting via the ComXchange Web GUI unless their access has been restricted.
Call Accounting Users
ComXchange Admins can create other users such as for hotel staff and grant them access to Call Accounting. This is done through the ComXchange Users Module. Hotel Users would usually log in to Call Accounting through the UCP (User Control Panel) on the WAN IP address using https://<WANIP or FQDN> then choosing the Call Accounting Widget.
Navigate to Admin > User Management
For more detailed information on setting up a user and the dashboard to login to Call Accounting see the section of Creating a
Hotel Staff Login for the Hotel Dashboard. The basic instructions for creating the user are below
- Click on the + Add button to create a new User
- Login Name - Fill in the Login Name
- Description - Enter a description
- Password - Enter a Password
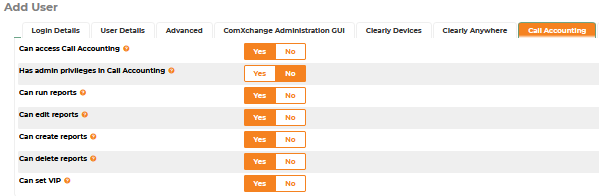
- Click on the Call Accounting Tab
- Choose the permissions for the User
- Usually the user should not need Admin privileges
- Click on the UCP tab
- Set Allow Login to Yes
Call Accounting User Permissions
- Access - Allow a User to log into the Call Accounting Module or Not
- Admin - The User has access to all features of Call Accounting
- Run Reports - The User can generate and email PDF's of reports
- Create Reports - The User can create new report templates
- Delete Reports - The User can delete user created templates (cannot delete the preloaded report templates)
- VIP - Can access the VIP Guest and update the VIP status of specific guest extensions
Call Accounting Server Overview
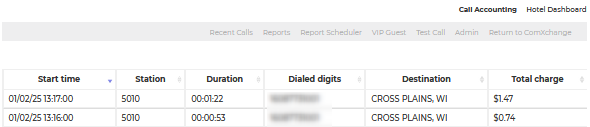
The landing page for the Call Accounting Server GUI will list the most recent Log Distance, Billable and International calls that have been processed by the server. Across the top there are navigation buttons to the various sections of Call Accounting
Recent Calls Tab
The Recent Calls Tab will provide a list of the most recent SMDR call information the Call Accounting server has received from the ComXchange SMDR interface. This will include the station (extension) that originated the call, the number that was dialed, the type of call and charges that would be assessed by the Call Accounting server.
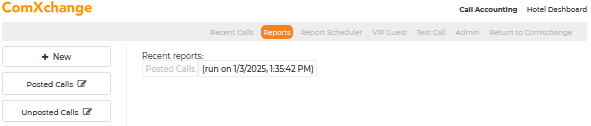
Reports Tab
The Reports tab will take you to the reports landing page that lists default and user created reports in the side bar on the left. Recently run reports will appear in the center of the page. From here you can manually run reports, have them sent to an email as well as view, download and or print the report. You can add a new report by clicking on the + New button on the top of the left side bar or you can edit a current report by clicking on the edit icon to the right of the report name.
Note: any new reports that are created will be available to all users with access to Call Accounting Reports.
Running a Report
From the Reports tab click on the report you want to run
Fill in any filters you want to use
When the report is ready it will open the report or ask for permissions for it to popup in the browser.
Once the report is open it can be downloaded or printed
Creating a Report
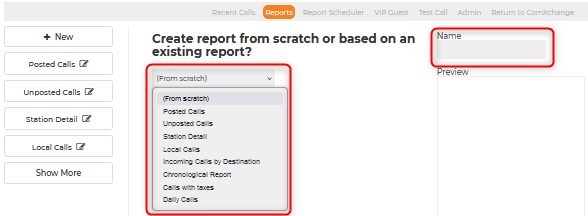
To Create a new report click on the + New button on the reports page
- Create a report from scratch or choose and existing report as a template from the dropdown
- Fill in the name field for the report
- Click on next
Note: The preview window may appear empty until partway through the design process or if Call Accounting has not received any call records. The calls shown in the preview may not be the calls that appear in the report as some filters and constraints are not applied in the preview.
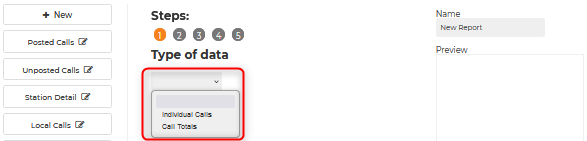
- Choose between Individual Calls or Call Totals
- Individual Calls - each row of the report will contain data about a single call
- Call Totals - each row of the report will contain data about a set of calls matching some criteria
- Click Next
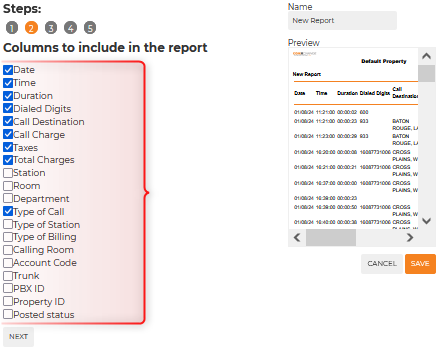
- Check which columns should be visible in the report
- Click Next
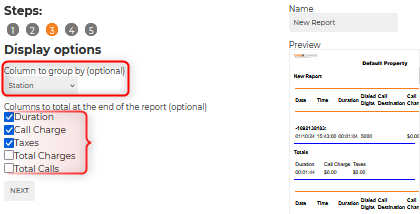
- Choose the Display Options Column to Group by or Columns to Total
- Column to Group by - If an option from this dropdown is chosen the reports data will be ordered with liked value calls being grouped together based on the selection.
- Example: If station is selected the report will display all calls made from one station grouped together followed by all calls made from the next station grouped together.
- Columns to Total - Checked columns will include a Totals at the end, totaling the selected columns values.
- Click Next
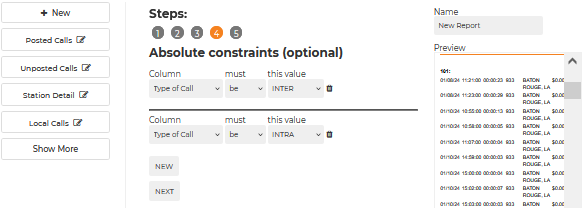
- Choose any absolute constraints by clicking on the New button to define an absolute constraint
- These are filters that apply every time the report is run
- Click Next
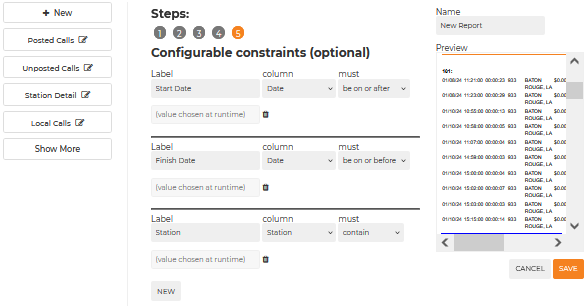
- Specify any Configurable Constraints by Clicking on the New button
- These are constraints that are defined when running the report such as a start and finish date of the report and the station
- Click on Save
To Delete a report click on the edit icon to the right of the report name then click on the delete button below the preview pane
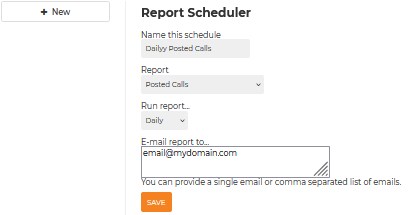
Report Scheduler Tab
The Report Scheduler allows you to automatically run and email a report in PDF form at a daily, weekly, or monthly interval. You can only schedule reports that do not contain Configurable Constraints
Create a Report Schedule
- Click on the + New button
- Choose a report from the dropdown
- Choose an interval from the Run Report dropdown
- Once the schedule is created it will run at midnight on the appropriate interval
- Fill in an email in the Email report to field
- multiple addresses can be entered separated by a comma but emailing a distribution group is preferred
- Click on Save
Modify a Schedule
- Click on the schedule
- Make the desired Changes
- Click on Save
Delete a Schedule
- Click on the schedule
- Click on the delete button
- Click on the Confirm button
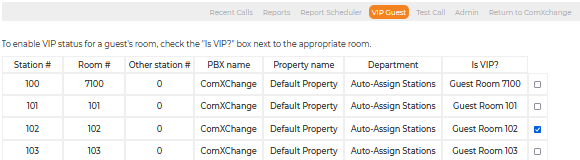
VIP Guest Tab
The VIP Guest page allows you to toggle on a VIP status for specific guest extensions. This can be used to to grant special discounts on call rates for specific rooms. VIP rates are configured in the call pricing section of the Admin Area.
- Check the box next to the extension to designate an extension as a VIP extension
- The change takes place immediately
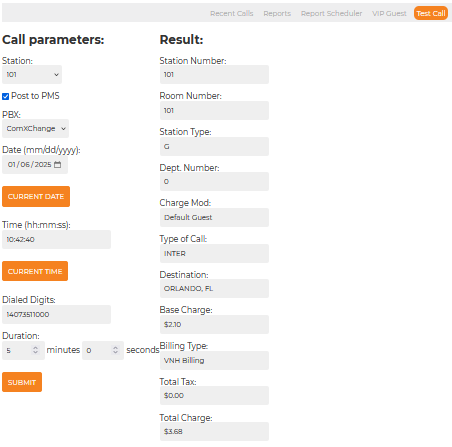
Test Call Tab
The test call feature allows you to see how a call, given a set of parameters would be priced. Note: This feature will not work unless the V&H file has been loaded and the
Stations have been added in the Admin Tab.
- Generate a Test Call
- Click on the Test Call Tab
- Choose a station (guest extension) from the station drop down
- Choose whether you want to post to the PMS
- You can use the Data monitor option in the Admin section to see the data being sent to the PMS
- Click on the current date button
- Click on the current time button
- Note: this time is pulled from the web browser and should be adjusted for the time of the hotel PMS if they are different or you may get the wrong pricing
- Enter the test number in the dialed digits field
- This should not include the 8 or 9 that might be required for guests to make outside calls
- Click on the submit button and the results fields should automatically appear and populate on the page
Admin Tab - Call Accounting Configuration Overview
The Admin section contains settings and features that are most commonly used when setting up the Call Accounting server. When you click on the Admin tab you will be redirected to the System Status page and a menu for configuration options will appear on the left side of the page. Clicking on the Show More / Show Less button will toggle between a list all of the menu options or an abbreviated list. You may need to click on the Refresh button to update the system status
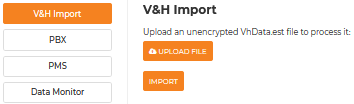
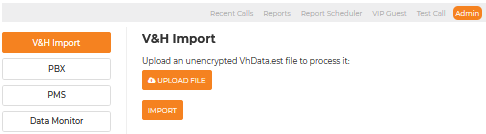
V&H Import
The V&H Import page is where you can upload a V&H table file for the Call Accounting server to process and populate its database.
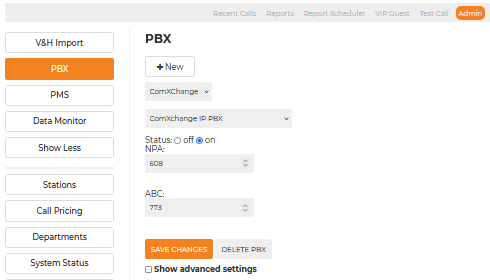
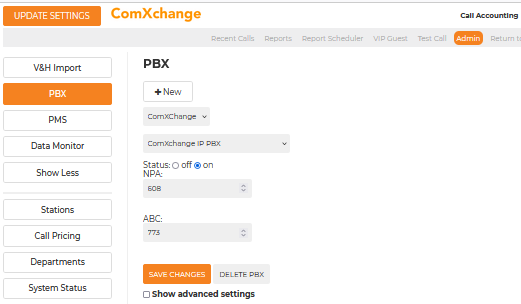
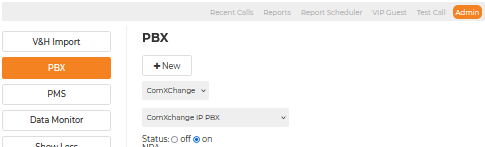
PBX - Call Accounting Interface
The PBX page provides the ability to turn the interface that receives the SMDR data from the PBX on and off, and add the 3 digit area code NPA (Number Plan Area) and the local exchange in the ABC field to define the local numbers for the PBX. These fields affect the V&H import process and should be set prior to the import.
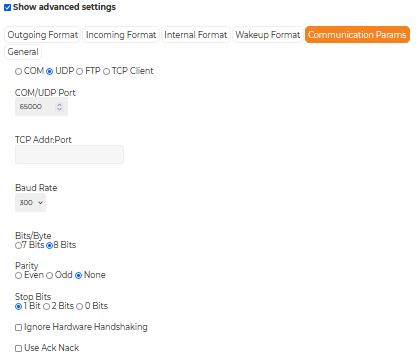
PBX Advanced Settings
Click on the Show Advanced Settings to manage the settings of the PBX interface. This interface is preconfigured to connect to the SMDR interface of the ComXchange server and should not need to be changed. Here you can make changes to the format the interface uses to communicate and the communication parameters of the interface which is preconfigured to listen for data on port 65000.
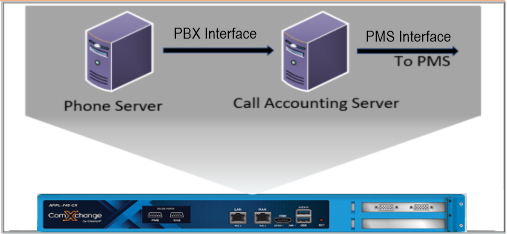
Note: Below depicts the data flow from the phone server to the call accounting server where the call is processed. If there should be a charge for the call the charge will be sent to PMS over the PMS interface
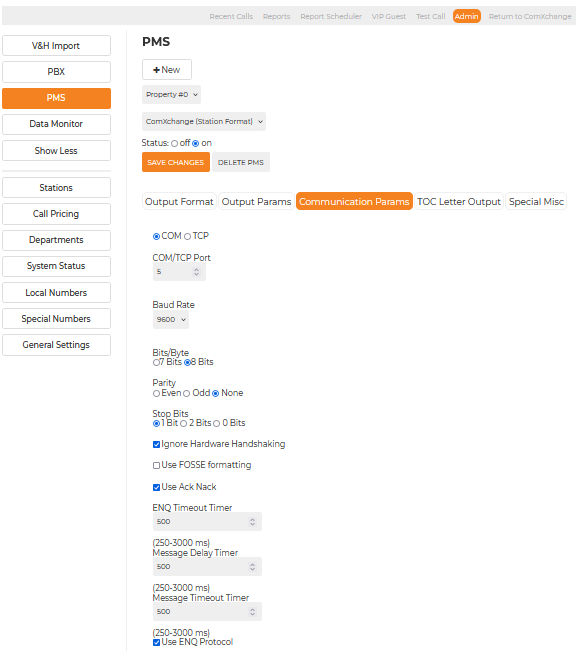
PMS - Call Accounting Interface
The PMS page is where you can configure the PMS interface and turn it on and off. Mainly you will use the PMS page to setup the interface's communication parameters and format between the Call Accounting server and the PMS.
Communication Params
The PMS communication parameters are the settings for the interface between the Call Accounting server and the PMS server. This can be over a serial or an IP connection. If you are using Fosse there is a checkbox to match their communication standard. There is also a dropdown to choose whether to use the default Station of Room format when sending priced call data to the PMS server.
For information about setting up Call Accounting for a FIAS interface to send posting charges over a single interface connection to the PMS such as for the Hilton Interface see the Hilton Interface Call Accounting Section here:
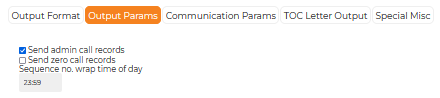
Hilton Call Accounting ConfigurationSending Admin Calls
In the PMS > Output Params tab you can check the send admin call records to have the Call Accounting server process call from Admin (Staff) phones and send charged calls to the PMS
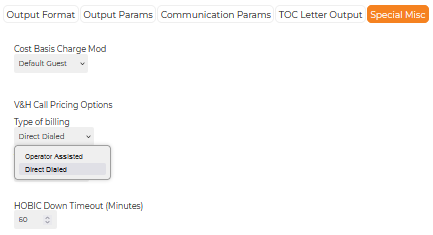
V&H Call Pricing Options
When a new PMS Call Accounting interface is created the default pricing option is set to Operator Assisted which will charge calls at a much higher rate than direct dialed. You will want to make sure this is set to Direct Dialed to match the preconfigured interface.
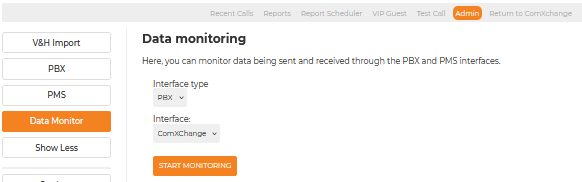
Data Monitor
The Data Monitor page provides a tool for monitoring the SMDR data being sent to the Call Accounting Server from the PBX and or outbound call charge data from the Call Accounting server to the PMS server.
- Choose the PMS Interface type in the drop down to see call records that should be sent to the PMS or PBX to monitor the The SMDR messages that are sent from the ComXchange PBX
- If there is more than one PMS interface you can choose between them from the interface dropdown
- Click Start Monitoring
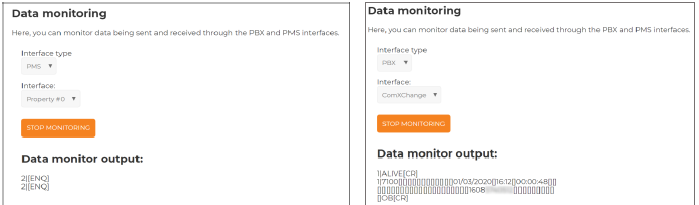
The data being sent across the interfaces will be shown in the Data Monitor Output Window
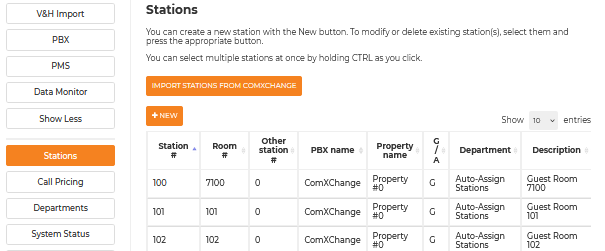
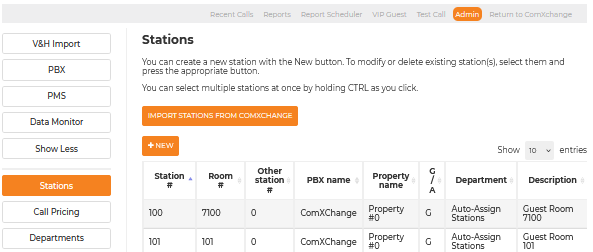
Stations
The stations page displays a list of all configured stations (guest extensions) and is where you will import, create, or modify stations in the Call Accounting database. The stations can be modified to connect to a specific PMS (Property name) and will be assigned a G for Guest stations or an A for Admin (staff) stations. The stations can also be assigned to departments which can be used for grouping ereporting.
- Use the Import Stations From ComXhange to pull the station and room numbers from the Staff and Guest extension databases
- Use the +New button to manually add a station
- Modify or Delete a station by highlighting the station to enable the Modify or Delete options
- You can highlight multiple stations at once using the Ctrl or Shift keys
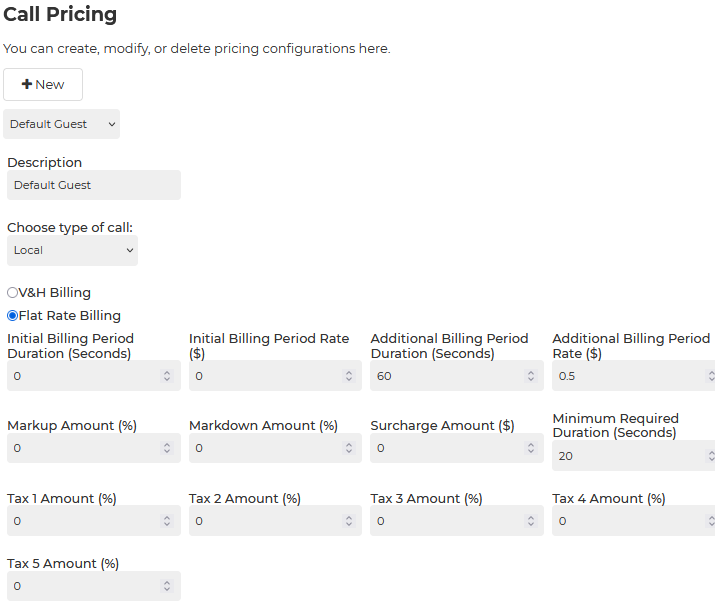
Call Pricing
The Call Pricing page is where you can view and modify the rates the property charges guests for different types of phone calls (Local, Intrastate, Interstate, etc)
- Calls can be priced by V&H Billing or Flat Rate Billing and can be different for each type of call and a default pricing can be different for different departments
- V&H Billing is a standard billing formula based off of AT&T Rates. Calls are priced according to rates set in the V&H tables that are populated by importing the V&H file.
- Flat Rate Billing is a pricing structure where calls are charged at an initial amount (Initial Billing Rate Period) and granted a set amount of time for the phone call (Initial Billing Period Duration). If the phone call exceeds the number of seconds specified in the Initial Billing Period Duration the customer is then charged an additional cost (Additional Billing Period Rate) and granted an additional amount of time (Additional Billing Period Duration)
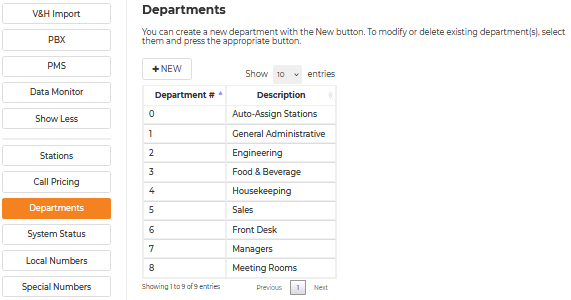
Departments
The Departments page provides the ability to create, modify and delete departments that stations can be assigned to in the
Stations page and used for reporting
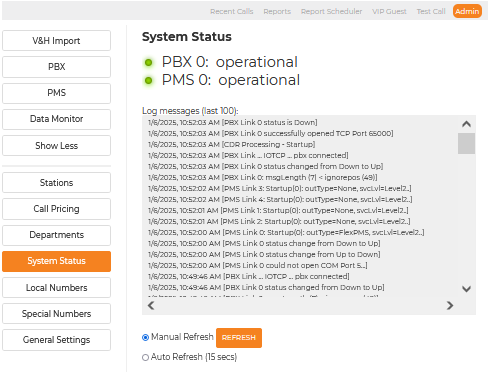
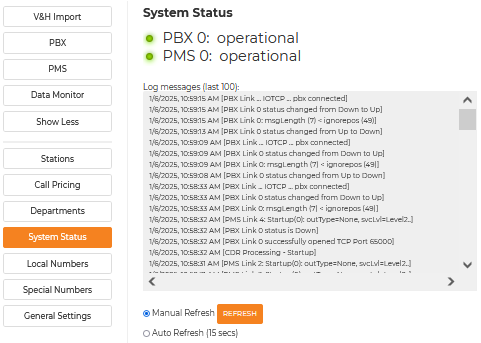
System Status
The System Status page describes the state of the PBX and PMS interfaces. There is also a Logs Messages section that displays the last 100 system messages generated by the system.
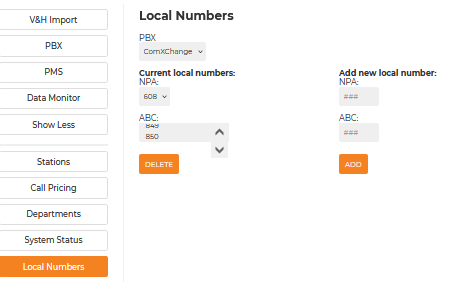
Local Numbers
The Local Numbers page allows you to examine and modify the list of area codes and exchange numbers that are considered "local" to the property for call pricing purposes. This can be useful when you want to charge local rates for your guests with a specific NPA/ABC that would otherwise be charged as a log distance call.
Note: Any NPA/ABC combinations added here will only affect what the property charges the guest. It doesn't affect the charge the property is billed for the calls.
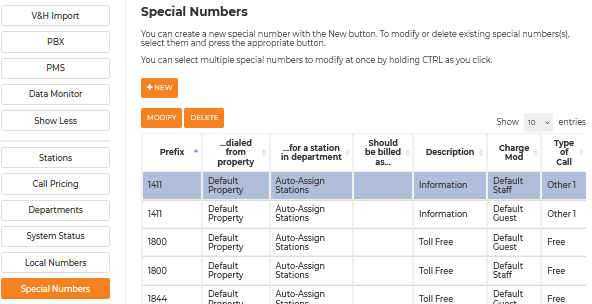
Special Numbers
The special numbers page is where you can assign a prefix or a digit pattern to a charge model and call type. This allows you to assign it to be free or charged at a rate by associating it with a type of call. You have the options of creating new, modifying or deleting Special numbers. You must highlight the row for the modify and delete options to appear
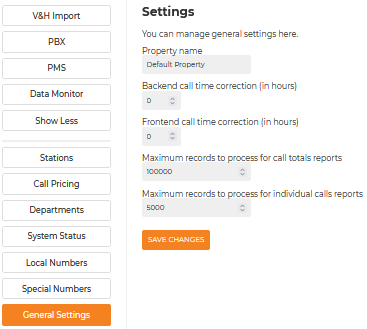
General Settings
The General Settings page allows you to change the property name and manipulate the time of calls if needed as well as setting limits for data in reports
Call Accounting Quick Start Process and Configuration
Configure PBX
Add the Local NPA (Number Plan Area) and exchange information. This will be the Properties main phone numbers Area Code and exchange (the three digits following the area code.
- Navigate to Admin > PBX
- Add the area code in the NPA field
- add the exchange numbers in the ABC field
- Click on the Save Changes button
- Click on the Update settings Button
Import the V & H File
- Navigate to Admin > Import V&H
- Click on Upload file
- In the popup window navigate to the VhData.est file received from ClearlyIP
- Click on Import
- Wait for the V&H file to be processed
- When processing is finished click on Update Settings
Turn PBX Interface On
Navigate to Admin > PBX
Click on the Status "on" radio button
Import Stations from ComXchange
The Call Accounting database needs to have the stations populated to be able to charge calls to the guest rooms correctly. Any stations that are created in the PBX can be imported into call accounting.
Navigate to Admin > Stations
Click on the Import Stations From ComXchange button
Create a Test CallAfter the stations have been created you can test that local calls will not be charged and that long distance calls will be charged following these steps for performing a
Test Call. These test calls can be used to verify that the PMS is receiving call charge records using the
Data Monitor tool
Call Accounting for International partners
For Call Accounting outside of the NANP (North American Numbering Plan), Call Accounting will be set up using the Special Numbers and flat rates to allow calls to be charged at specific rates or to not be charged. Dialed call details will be referenced against the Special Number Prefix value and depending on what Type of call is associates with the prefix the call can be processed by the call accounting server as a chargeable or non chargeable call. Any calls that do not match a prefix will be processed as a "Local Number" for the type of call. You can choose to set some Prefixes and Free Calls and calls that do not match can be charged a flat rate as a "Local" call.
Note: there is no need for a V&H file for Call Accounting to process calls using this method. The "V&H data awaiting import" can safely be ignored
Creating the Special Numbers
Navigate to the Admin > [More] > Special Pricing page
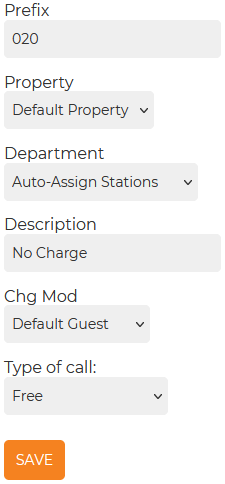
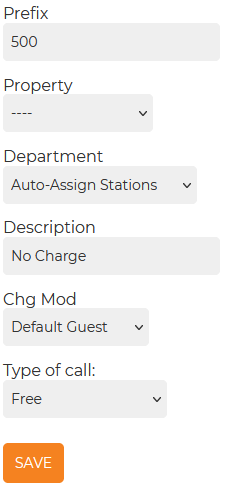
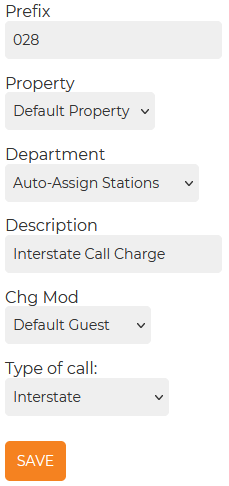
Click on the Add New button
- Prefix - Enter the beginning digits of a call you want to match such as calls that begin with 500, 0800, 020, 021, etc
- Property - Choose the default Property
- If you are using this for a dual property choose the ------- (dashes)
- Department - Can be set to Auto-Assign
- Description - Enter a description for the Special Number being created
- Charge Mod - Choose Default Guest of Default Staff
- Type of Call - Choose a Type for the Call
- The Type of Call will be used to set the flat rate in the Call Pricing page
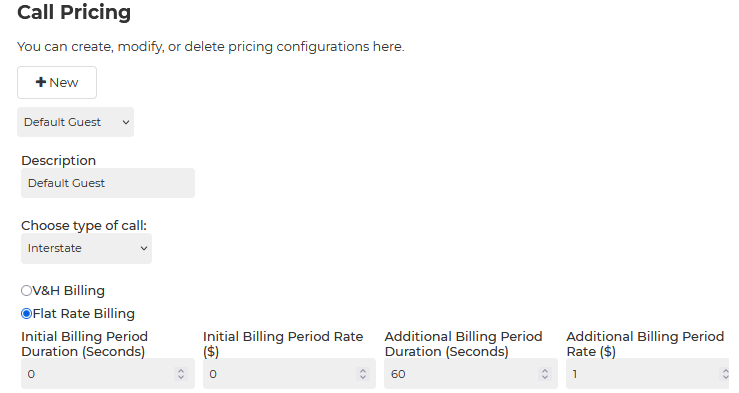
Configuring Call Pricing
Navigate to the Admin > [More] > Call Pricing
- Chose the type of call associated with your Prefix In the Choose Type of Call drop down.
- Configure the Call type as a Flat Rate and enter the charges based on the Call Charge section above
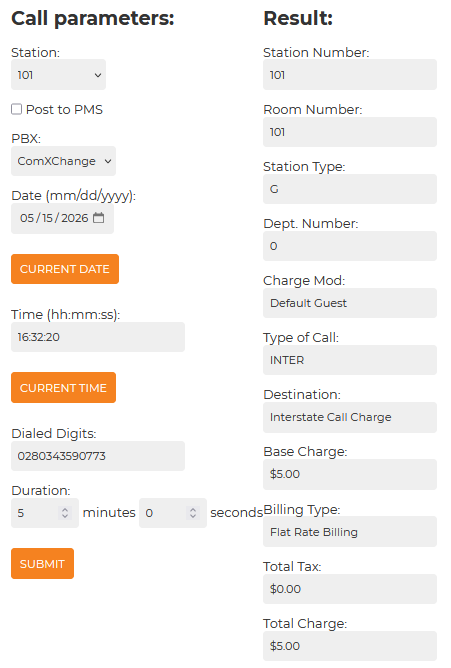
Examples
You can then run test calls from the Test Call Tab and verify the expected charge.
![]()
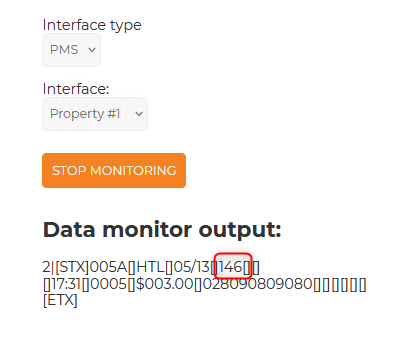
Special Number Call Rate Testing
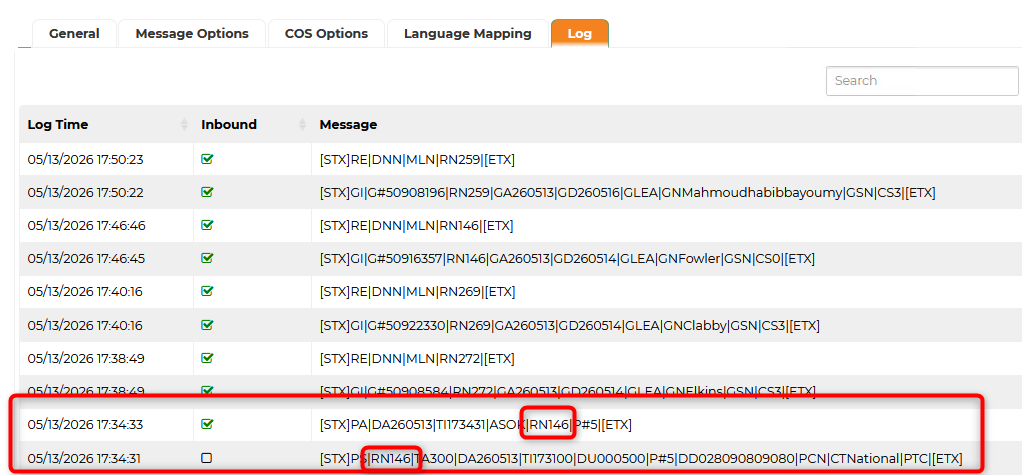
To verify the Calls are being posted you can use the "Post to PMS" option when running a test call and observing the Data Monitor for the PMS interface as discussed in the Test Call and Data Monitor sections above. If you are posting a call from room 146 you will see information in the data monitor that is passed to the PMS (or back to a FIAS interface) See the below example for a Hilton test call posting.
Data from the Call Accounting server will appear like the below that is passed to the Hilton Interface
 Uploading ....