| | | |
 Uploading .... Uploading ....
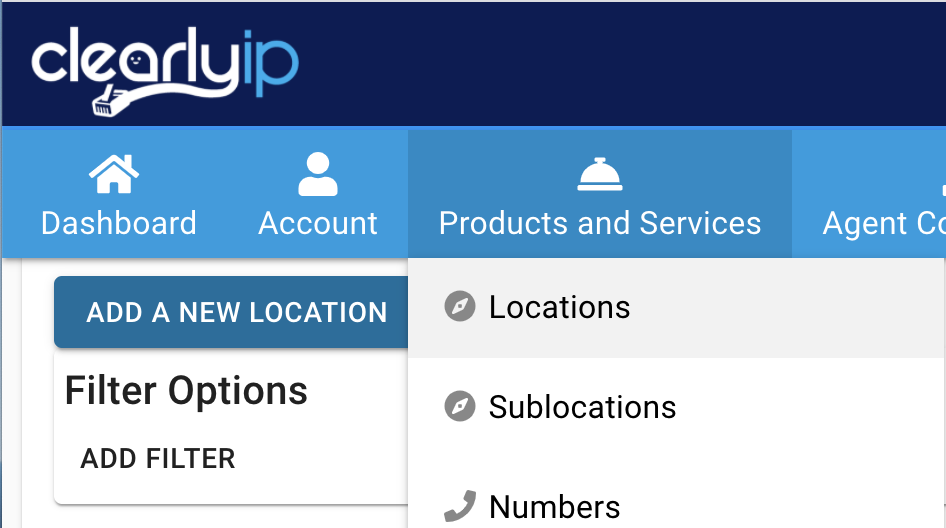
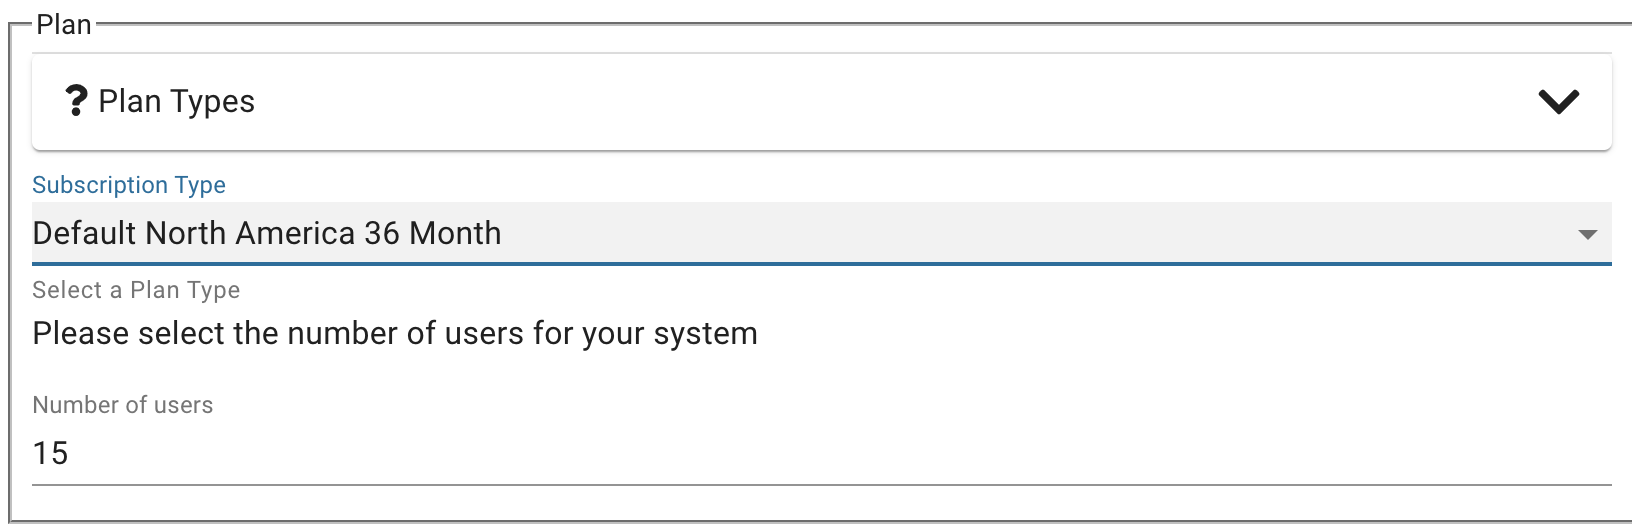
OverviewCreating New Location 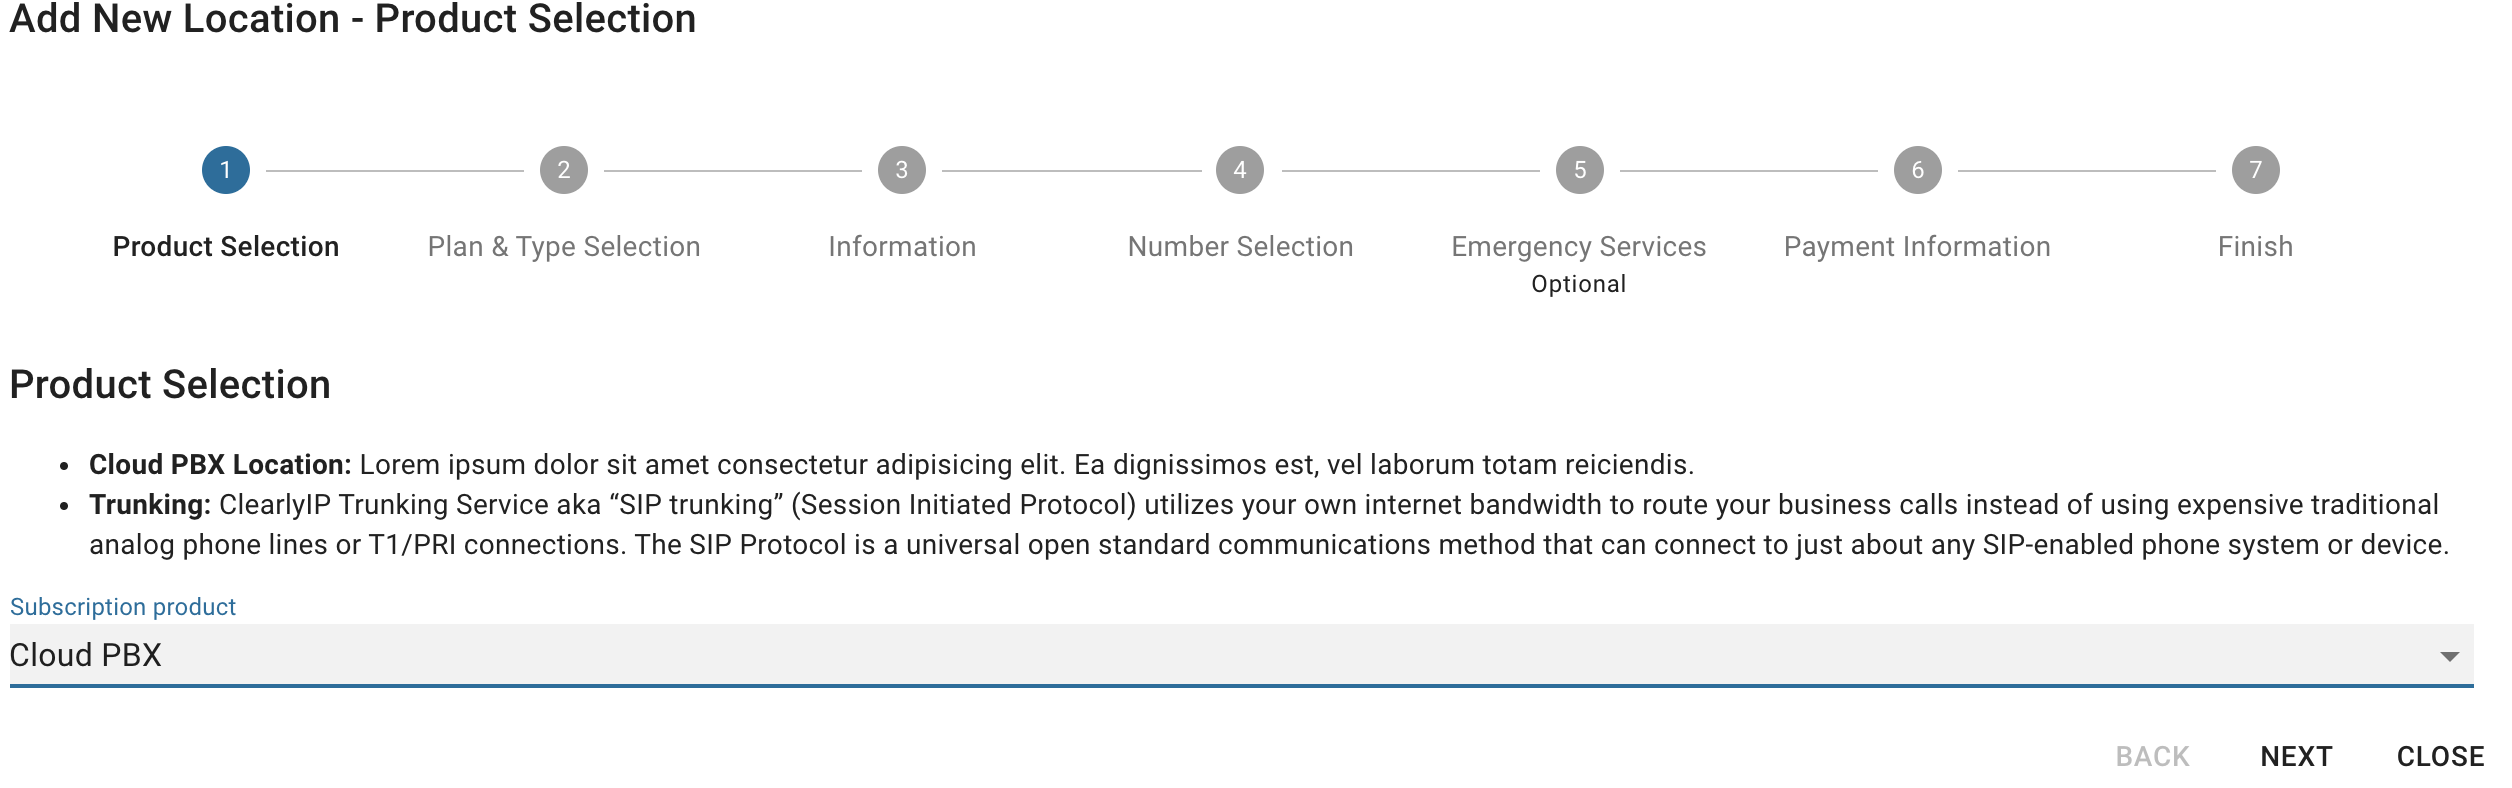 - Pick a Plan Type from a Month to Month, 12 Month or 36 Month agreement

- Define how many Users you will need on the system. A user is easiest to define as an extension on the Clearly Cloud system
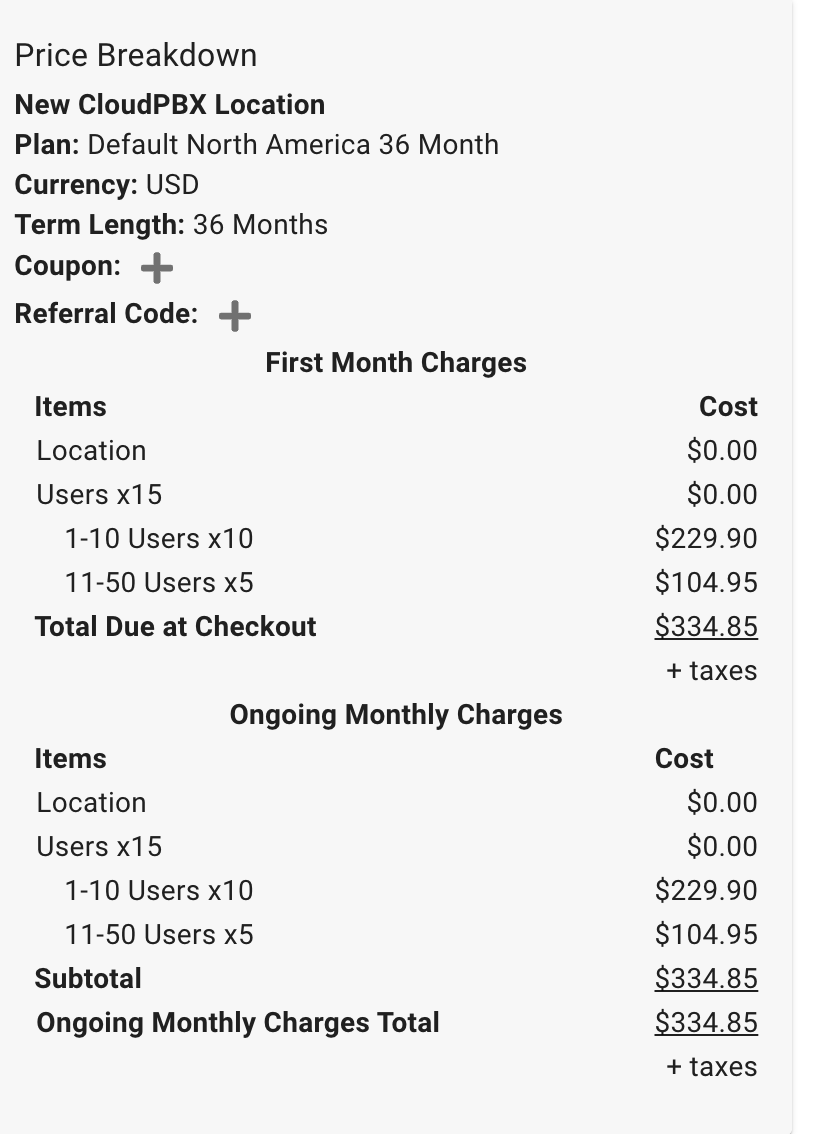
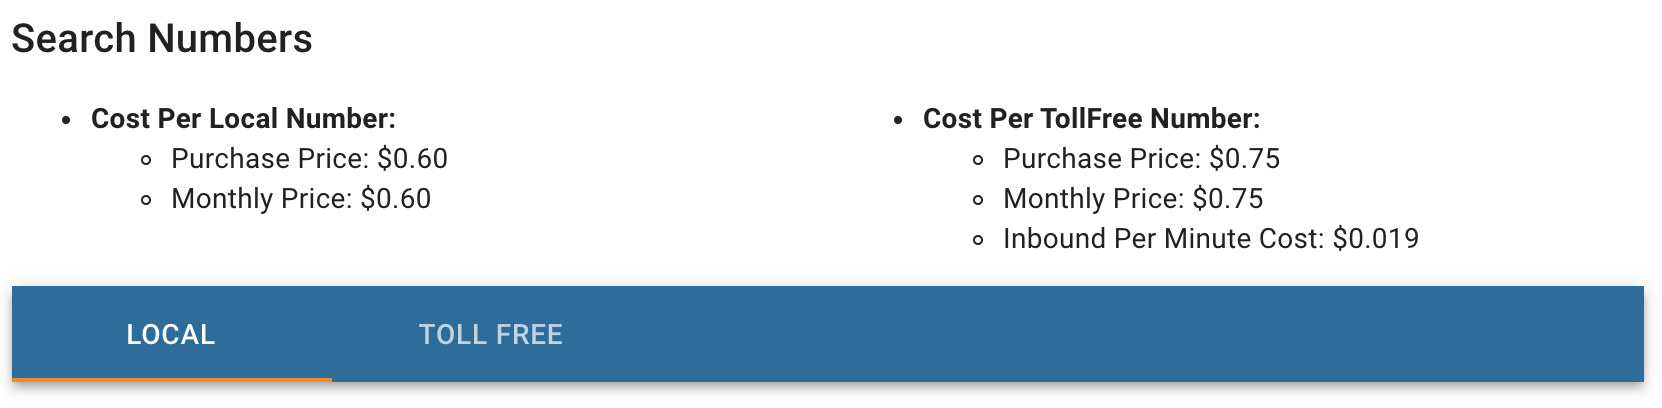
- On the right side in the Shopping Cart section, you will see a breakdown of the cost per User. The more users you add, the cheaper your price per User is, and the longer the Plan term is, the cheaper your cost is.
- Press the "Next" button once you have decided on the User count. You can always add more users later if need be.

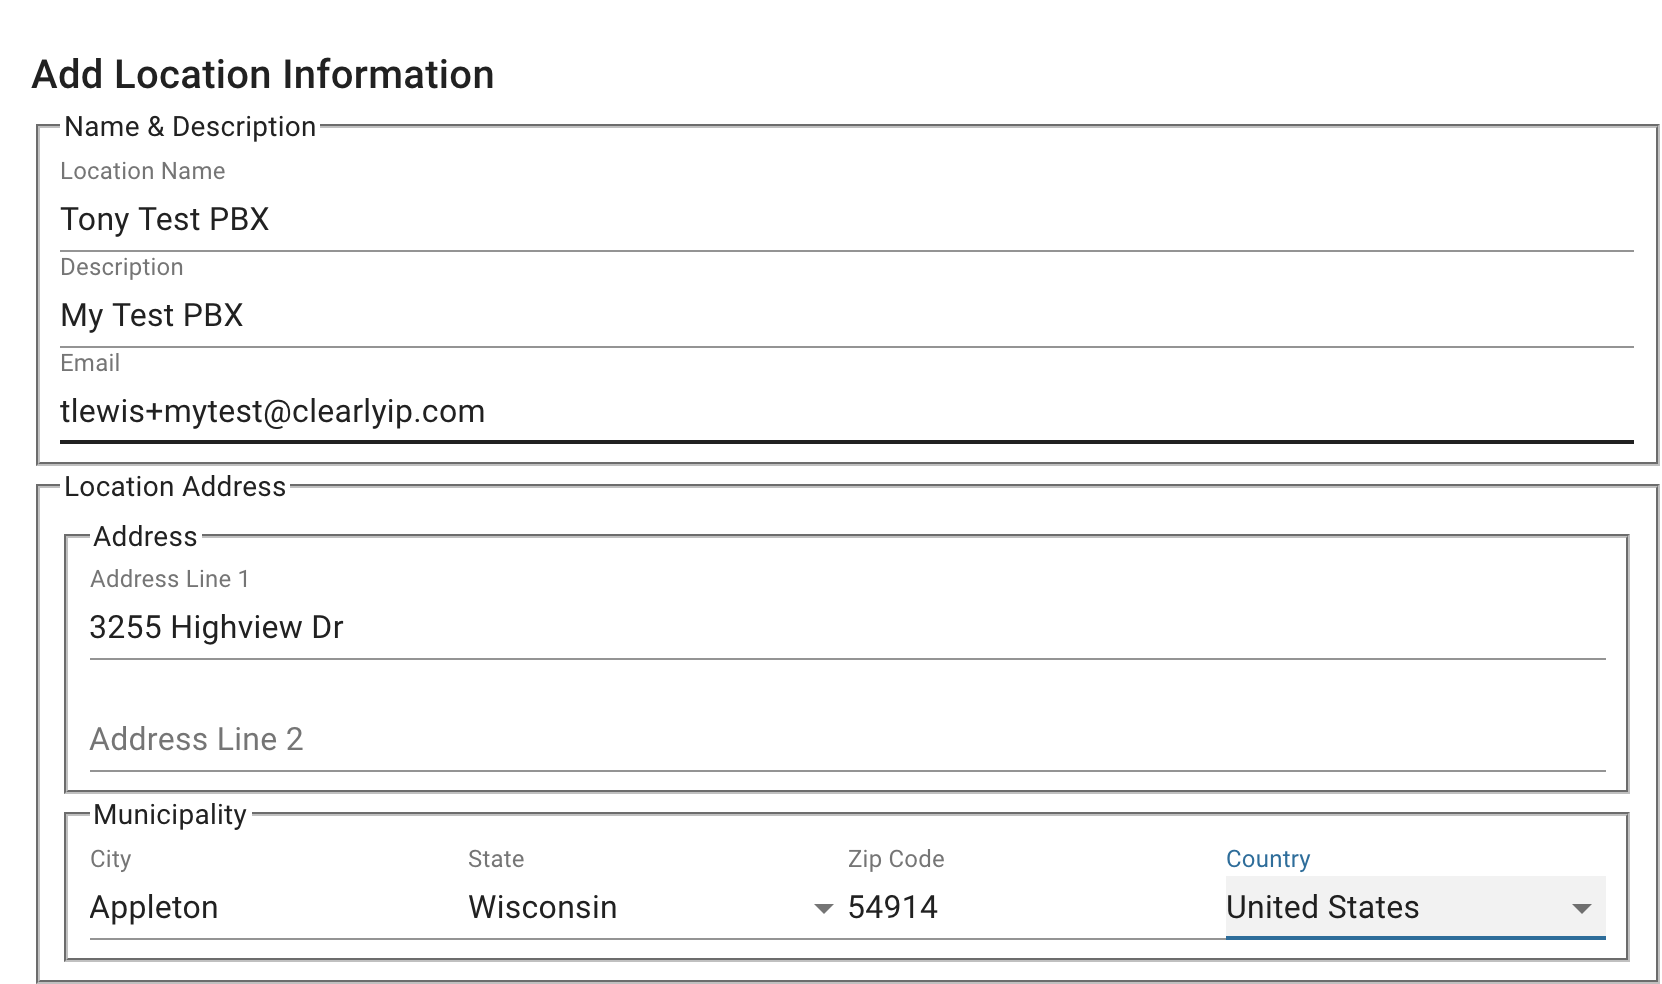
- We now need to gather some information on this new Location and a primary address for taxation rating for this new Location and press the "Next" button
- Location Name - Friendly name for this Location
- Description - Optional additional information to describe this Location for your reference
- Email - Each Clearly Cloud Location created here needs a unique email address we set up for Login to the Clearly Cloud Client level login. Please provide a unique email here that is not already used in an existing Clearly Cloud Location. The User of this email address will receive an automated email from us with their Login URL to the Client Portal for Clearly Cloud along with a temporary password to Login the first time
- Address Information - Provide the physical address for this Location as this is needed for us to figure out taxation rating based on this address.
- The next screen is where we can purchase DIDs or Phone Numbers.
- From here you can buy US, Canada or Toll Free Numbers. For Location numbers pick the Country, State and City you want to search for Numbers in.
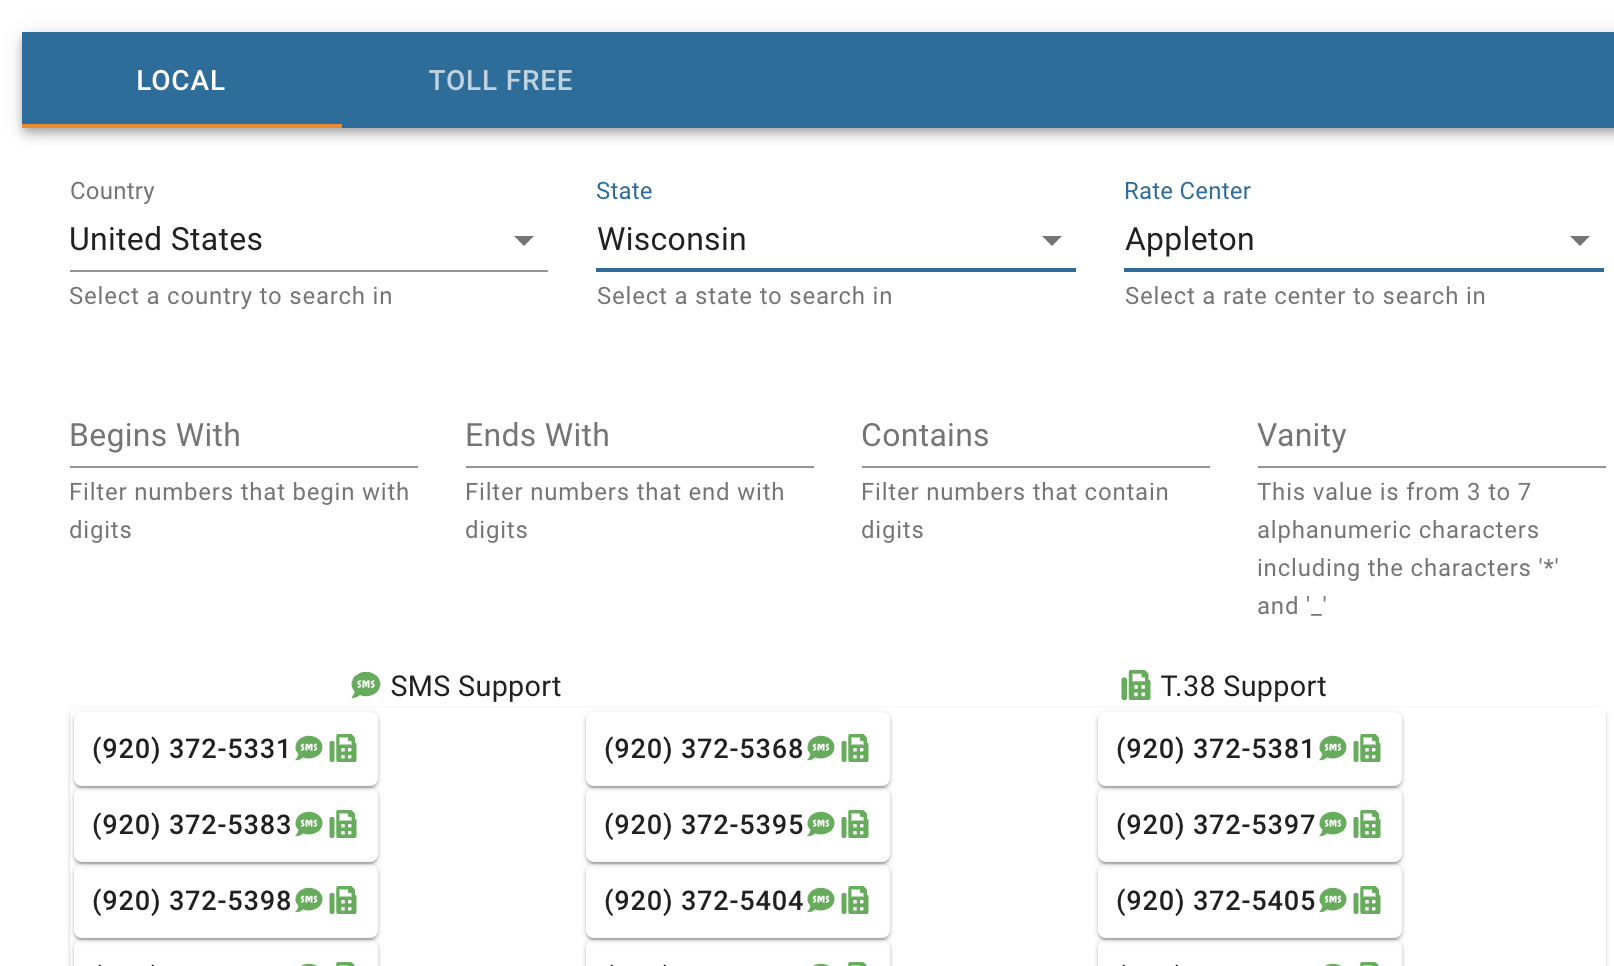
- Click on each number to add them into the shopping cart on the right side
- You can do an additional search to add other numbers and repeat the process above to add them to your shopping cart and press "Next" when done

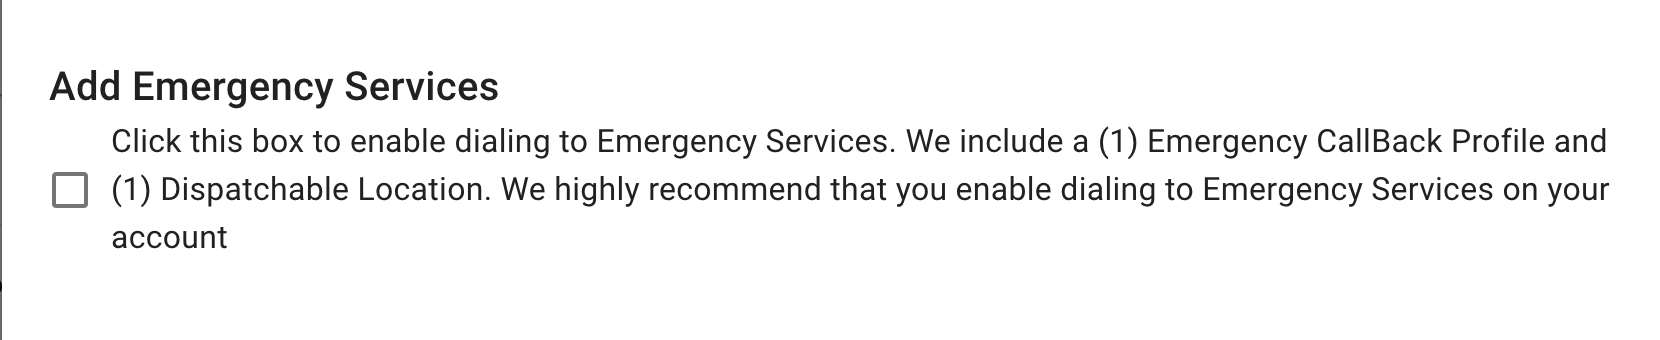
- The final step now is to decide if we want to enable 911 calling and set up at least a single 911 record, which we HIGHLY recommend doing. Check the box in the screen below
- From here, we will define our 911 information and pick which of the DIDs we want to enable 911 for. We can add additional 911 records after completing this checkout process if you need to purchase additional Locations for remote offices or workers.
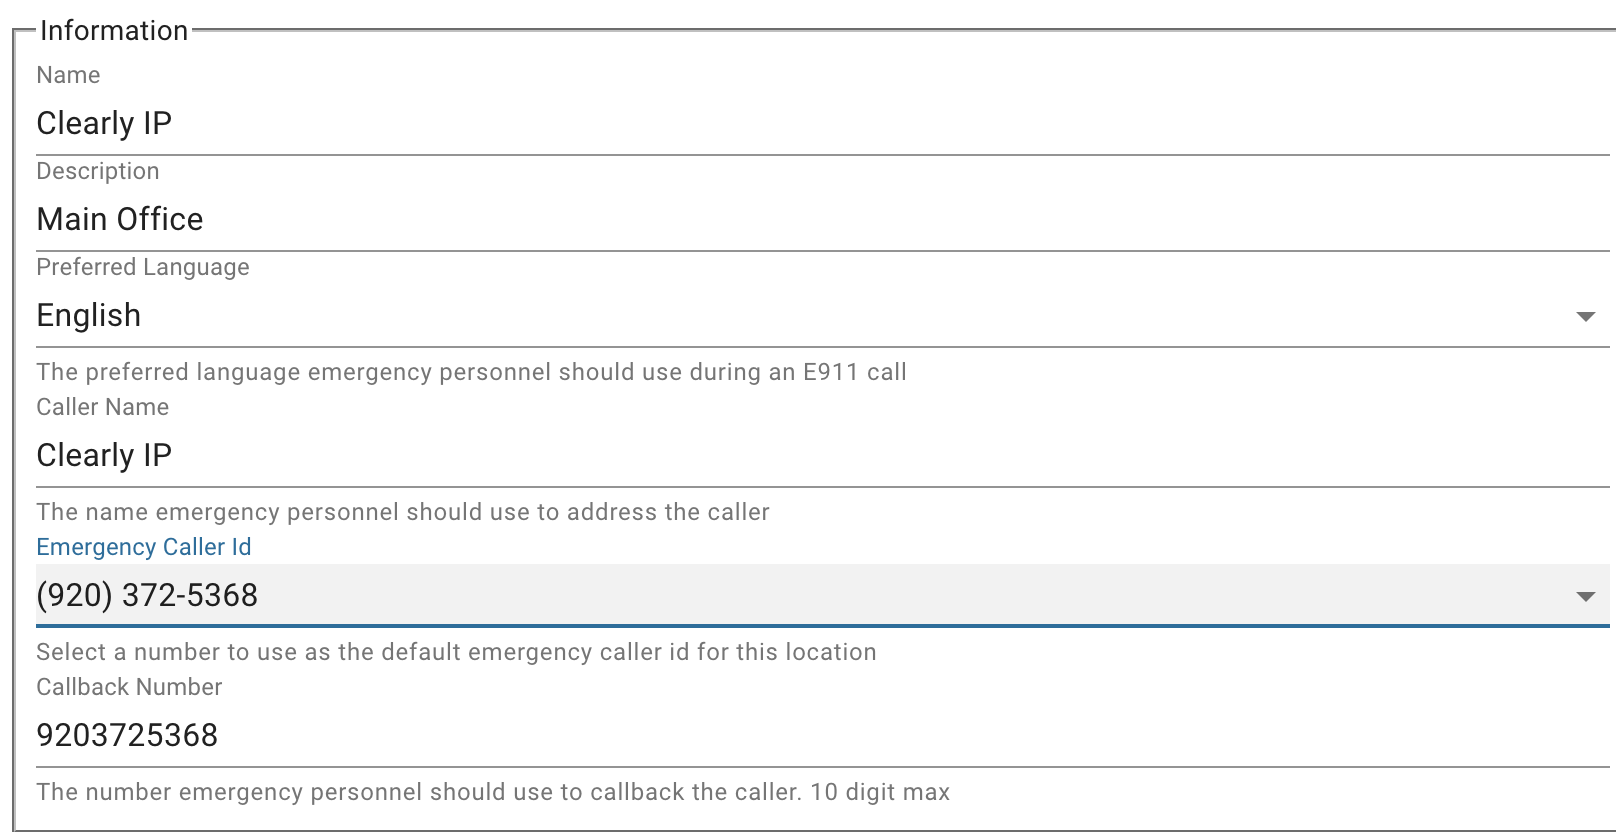
- Now we will provide the Address info for the above 911 information.
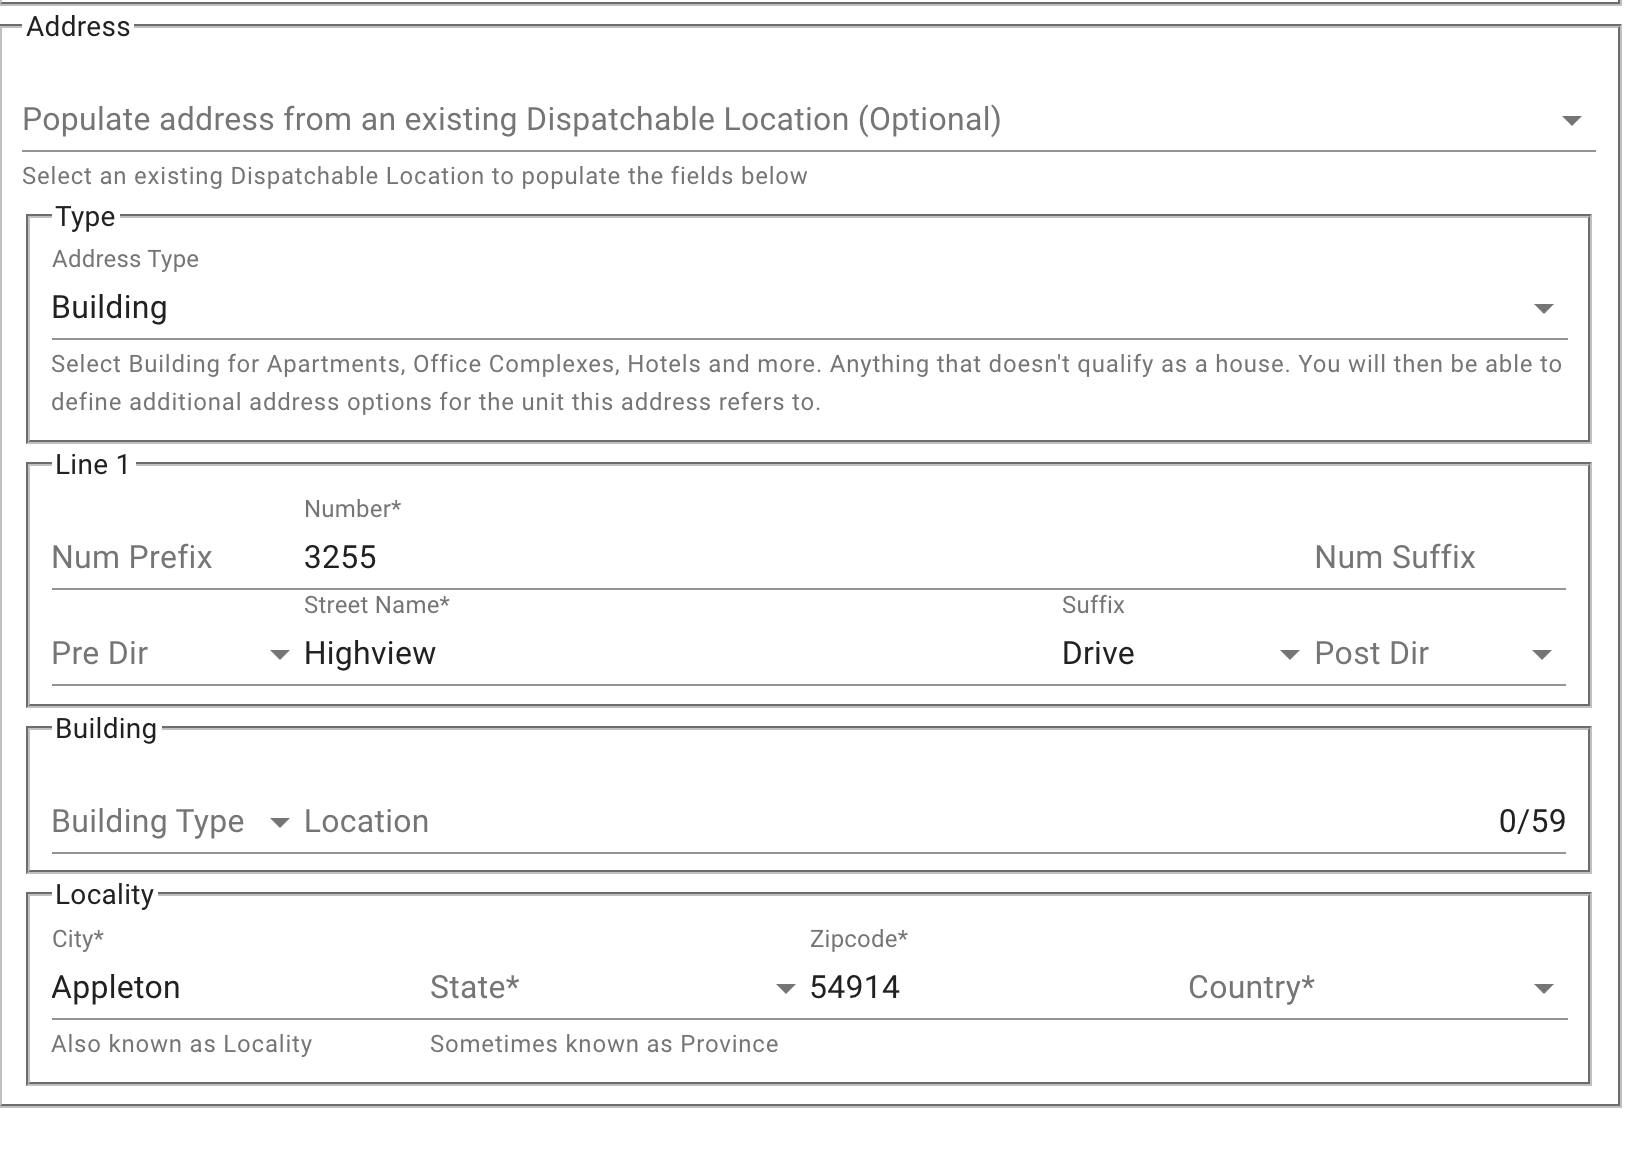
- Press the "Verify" button. The verification system will verify all the Address information is correct by sending the 911 sub system request and having it confirm the information.
- If the information can not be verified, you will need to try and fix the address. If you cannot get the system to accept your information, you can skip this step and contact our support team, and we can resolve this and add it to your system after the fact.
 - If everything verifies correctly, you will now see the "Verify" button replaced with a "Next" button, and we can press that to finish the checkout process.

- If your account already has a Credit Card on file with us or set up with payment terms, you will see this here; otherwise, press the "Add New Payment Method" button to add a credit card and complete the purchase process.
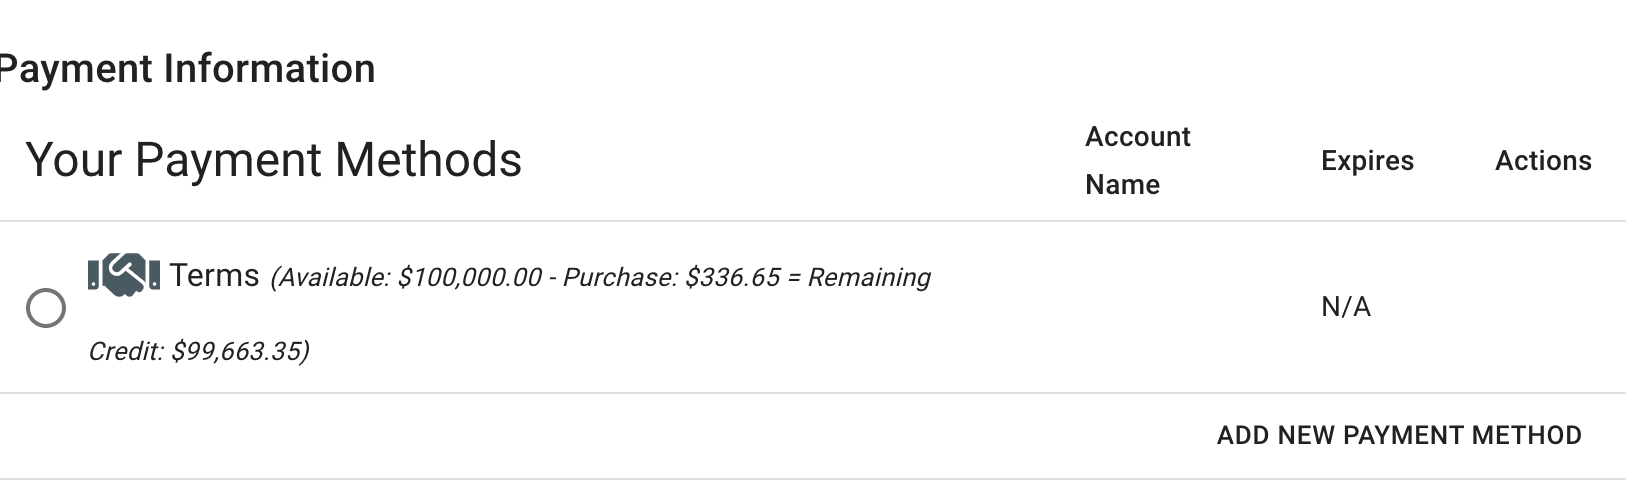
- Press the "Next" button after pricking a payment method
- Final step is to agree to the Terms of Service and Press the "Save" button
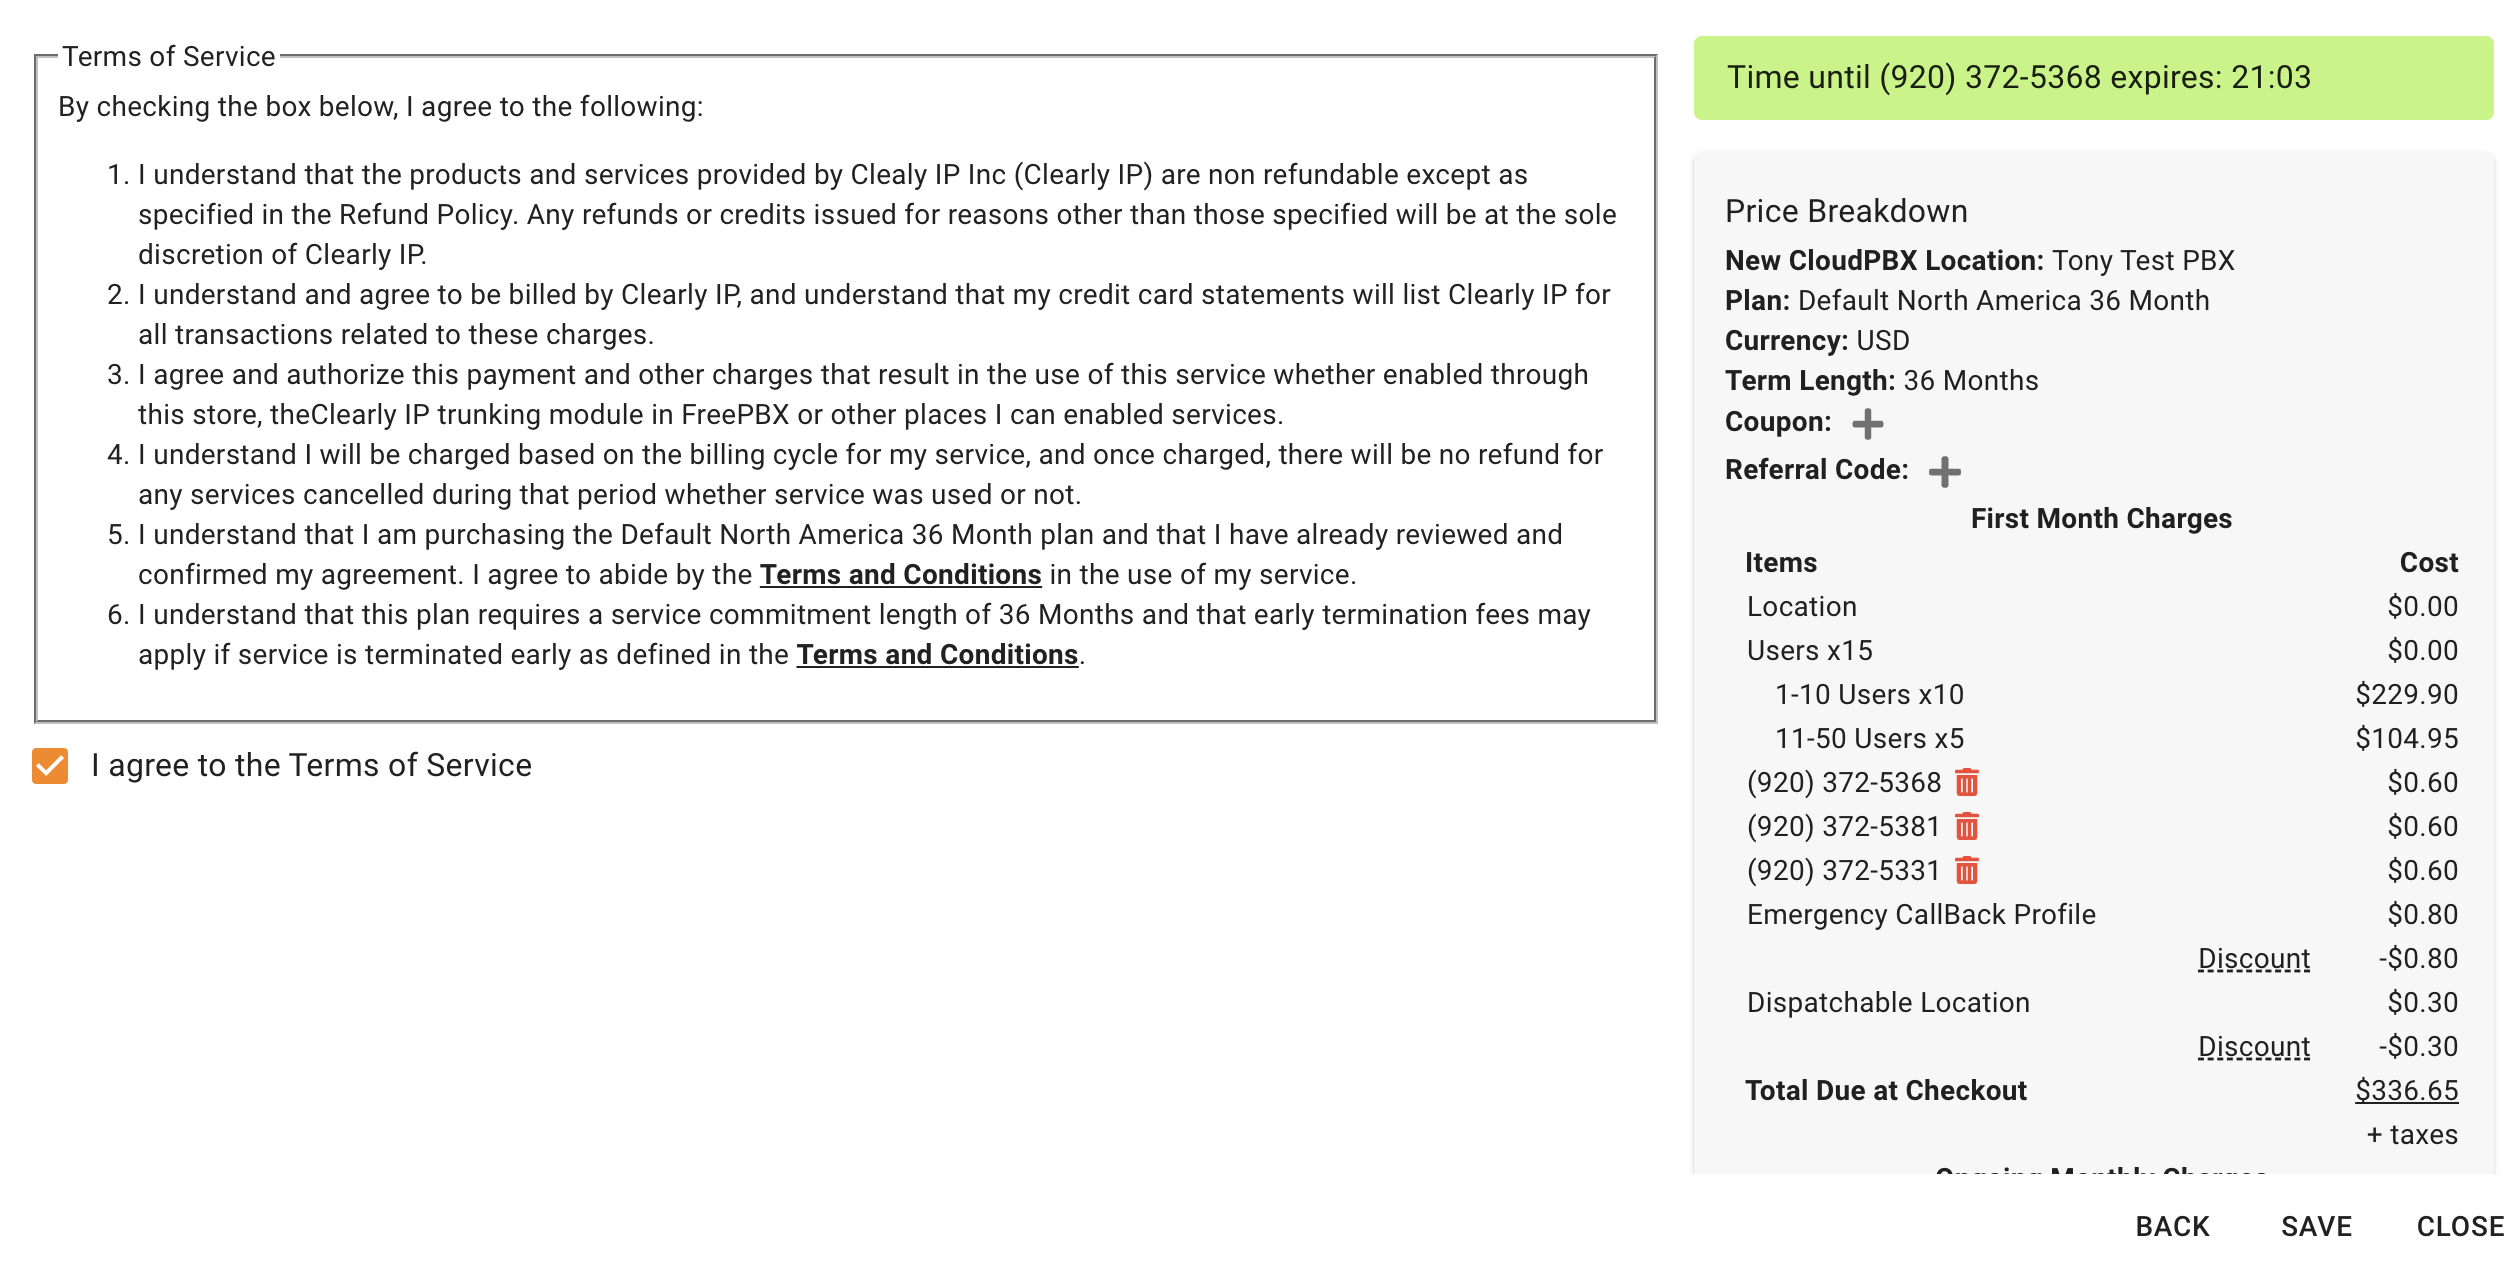
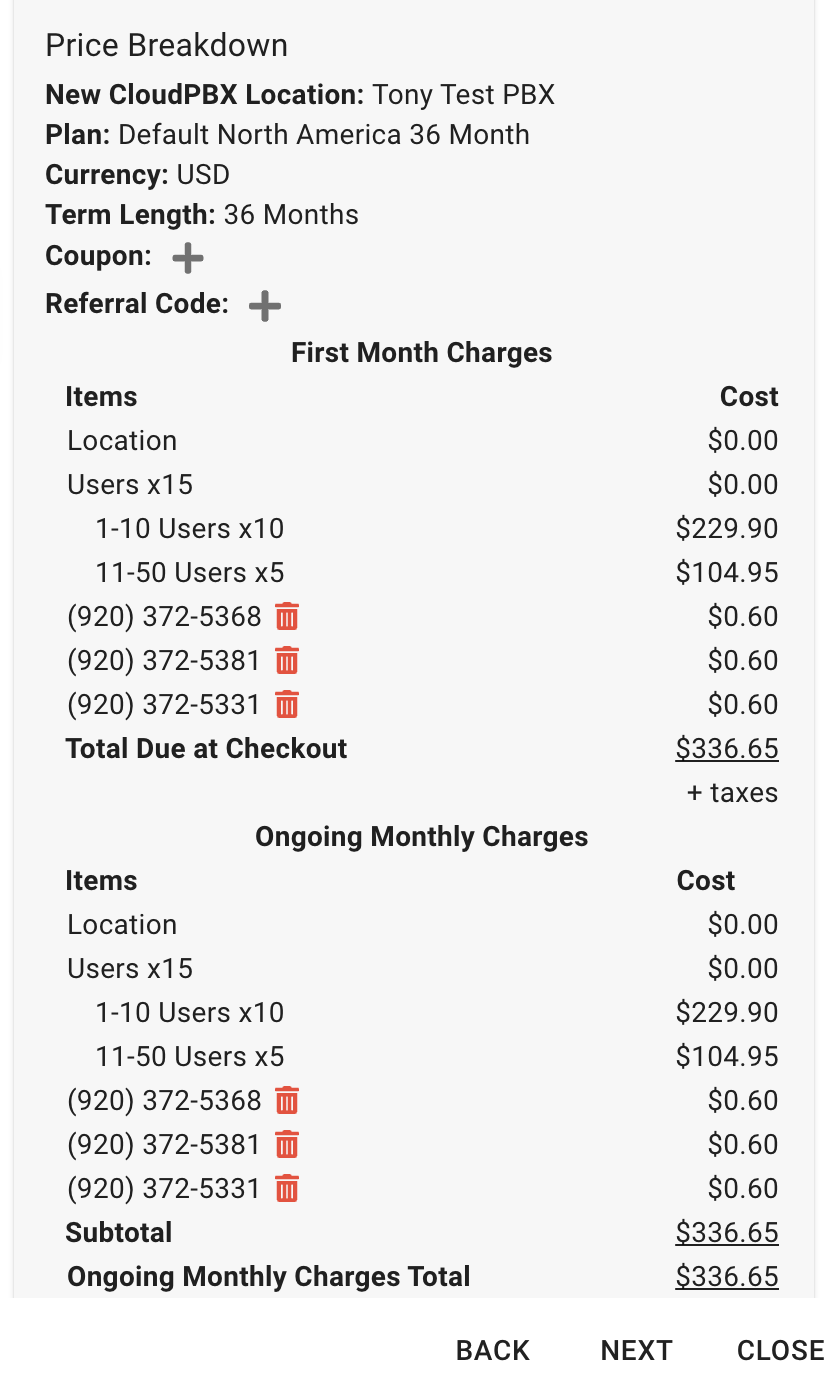
- You will now see a full recap of everything, and you can press the Close button once it appears

- Your new Clearly Cloud PBX is now deployed and ready for you to start configuring it, following the steps below.
Configuring the PBXTo set up the PBX on Clearly Cloud, we now need to log in to the Clearly Cloud system you just created. You will want to note the Client Realm in the top right of your screen once you have logged in as the Client.
 Create Users- Full Documentation on all the User Settings can be found here
- Once logged in at the Client level, we will first want to create our five users by clicking on the Users tab.

- Click on the Add User button

- On the General Tab, we will need to provide the following fields with information
- First and Last Name - Provide the First and Last Name of this User
- Email - This is the Email address we will use for password reset and the username to Login as this User to the CloudPBX WebGUI as an End User and Call Panel.
- Profile - Pick the Default Profile, which for most users will cover everything they need.
- Web Interface Password - Set the password used for this User to Login to the CloudPBX WebGUI as an End User and Call Panel.
- You can use the Generate button to have it generate a random password. This password will be sent to the End User on saving of this User.
- Voicemail Pin - Voicemail Numeric only password for accessing this user/extension voicemail box.
- Extension - What Extension number you want to assign for this User. For our example, we will start with 101 and go up to 105 for the five users.
- SIP Password - The SIP Password that this extension is set up with. If you generate a new one, all devices for this extension will need to be re-provisioned with the new SIP password.
- You can use the Generate button to have it generate a random password. You do not need to know this password as the provisioning system will have the password already, and Clearly Anywhere also does not use this password as you Login with your Email and Web Interface Password from above.
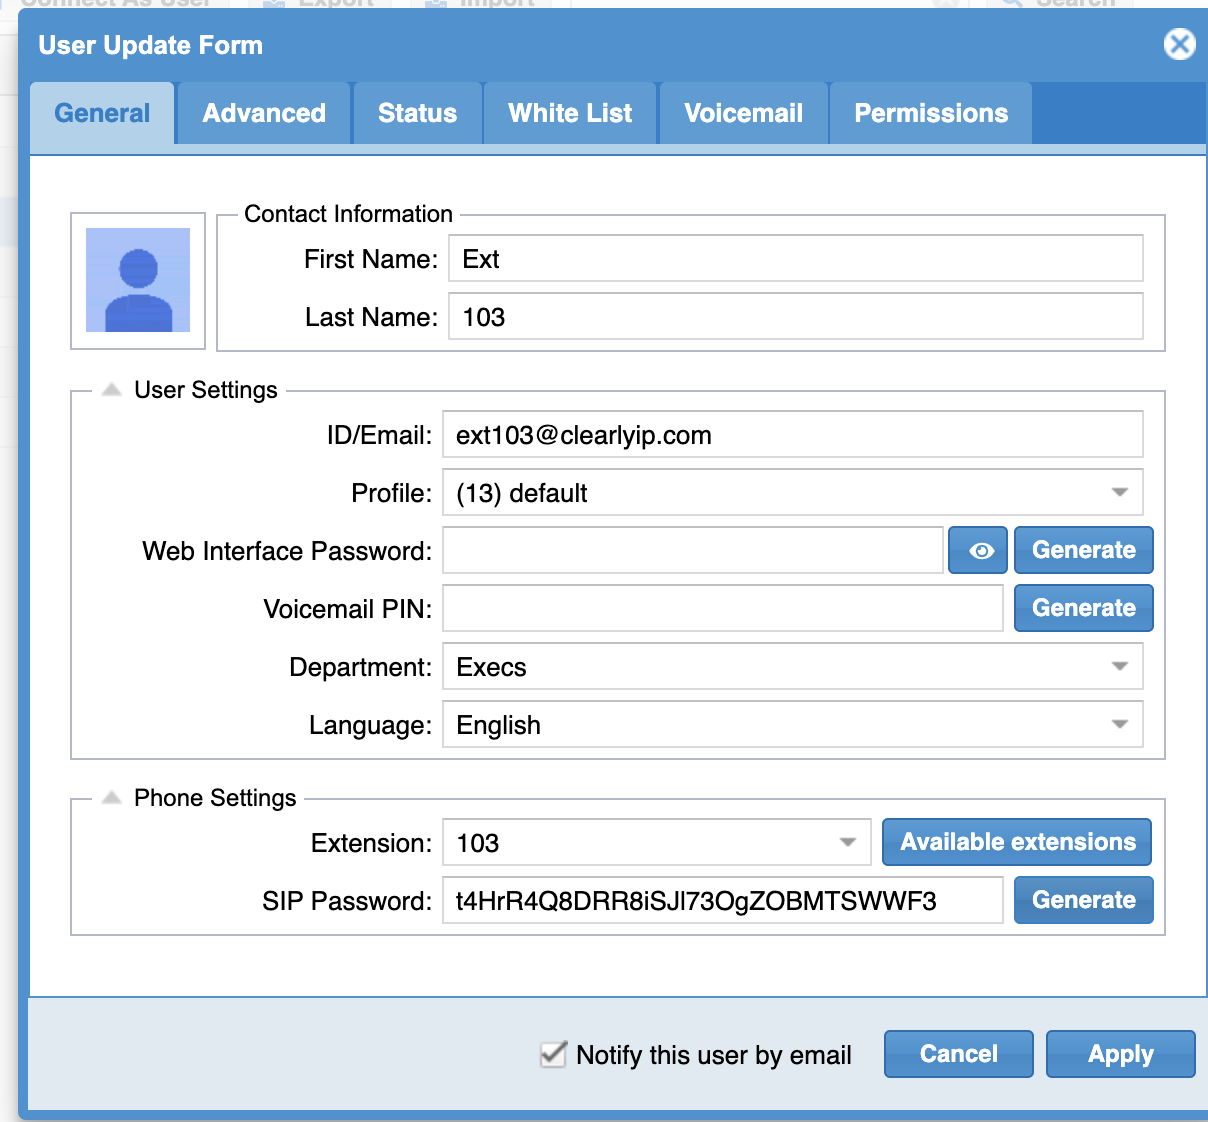
The above fields are all that is required to get a User created. Press the Apply button, and an email will be sent to the User to access the CloudPBX WebGUI as an End User and Call Panel. You can uncheck the option below, and we will not send the User an email with their Login information.
 - Repeat this process for your 4 other extensions now of 102 through 105
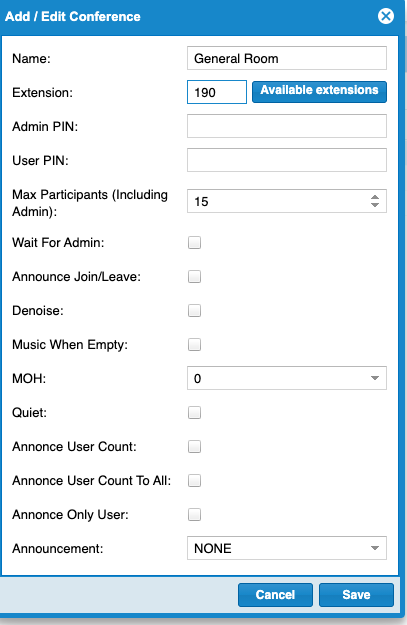
Create General Conference Room- Full Documentation on all the Conference Rooms can be found here
- Click on the Conferences menu Option
 - Click on the Add Conference button

- Press the Save button when done to save your changes.

Create 2 Ring Groups- Full Documentation on all the Ring Groups can be found here
- Click on the Ring Group menu Option
- Click on the Add Group button

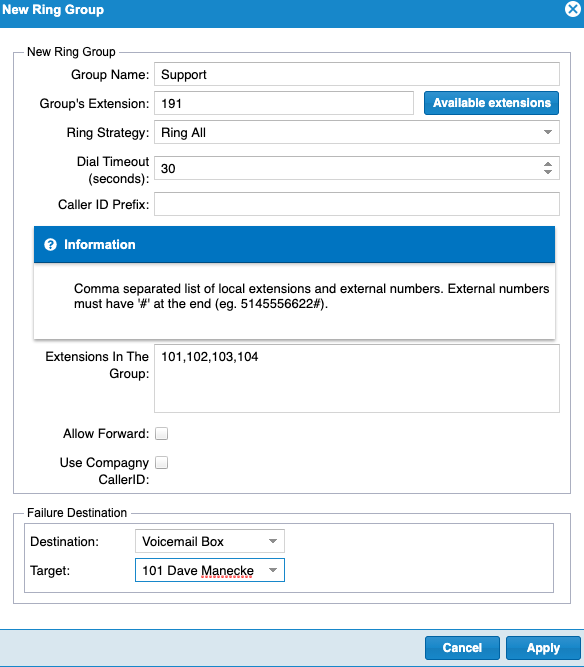
- We will create a Sales Ring Group with 2 of our users in this Ring Group by filling in the following information for this Ring Group
- Group Name - Name this our "Sales" ring group
- Group Extension - What extension number is assigned to this ring group to call it directly from your phone or transfer callers to this Ring Group. We will use 150 for this.
- Ring Strategy - Ring All - Will call all of the Numbers in the List below all simultaneously for the duration of time as specified in the Dial Timeout field.
- Dial Timeout - Set to 30 Seconds so that we ring all the users for 30 seconds, and if nobody answers, we will send the caller to the Failure Destination below.
- Extensions In The Group - We will define Extension 101 and 102 that we created earlier.
- Failure Destination - If nobody answers the call after the Dial Timeout setting above of 30 seconds, we will route the caller here to a Voicemail Box, which happens to be User 102 as they that User is the Sales Manager.
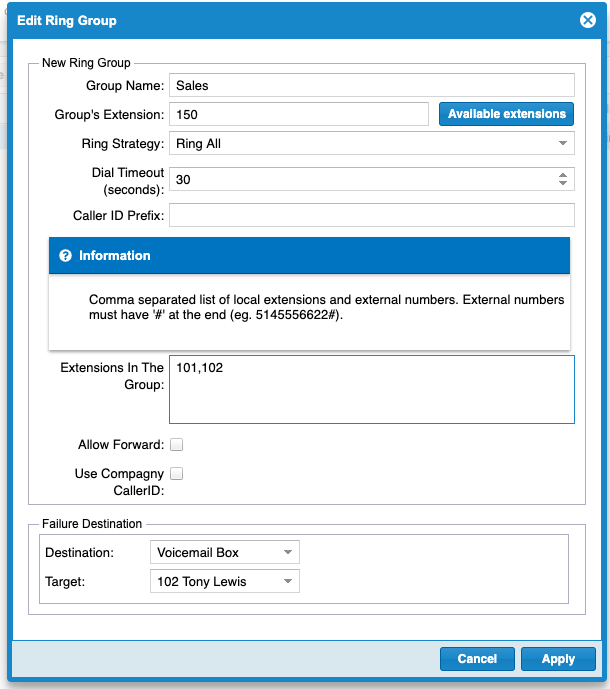 - Press the Apply button to save your new Ring Group

- Repeat the same steps above for your Support Ring Group with the information below
Create 2 Announcements- Full Documentation on all the Announcements can be found here
- Click on the Announcements menu Option

Clicking on the Add Announcement button allows you to upload an audio file that you have previously recorded for your IVR. In our case, we will use the built-in Text To Speech option that will create the Audio file for us by typing out our Greeting we want to have played to callers who reach the IVR. - Click on the Add Text to Speech Announcement button

- We will create 2 Announcements that your IVR will use.
- 1 for our Open Hours IVR
- 1 for our Closed Hours IVR
- Open Hours IVR Announcement
- Name - OpenIVR
- Voice Type - Pick a Language and type of voice. For my example, I am picking en-US-Wavenet-A
- Text To Speech - Here is where we will define our open hours announcement
- Thank you for calling Clearly IP. Our offices are currently open. If you know your party's extension, you may dial it at any time. For the Sales team, press 1, For the support team, press 2, and to hear your options again, press 9.
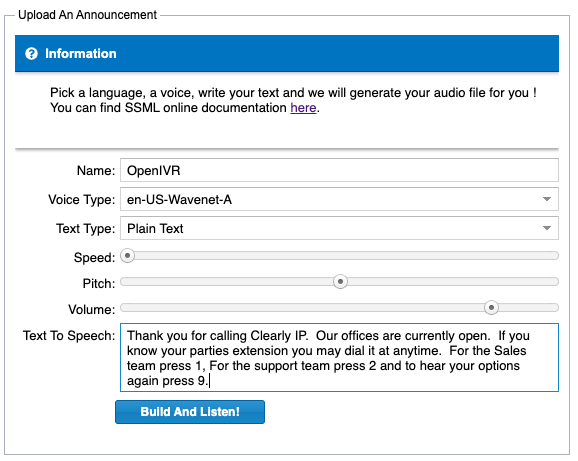 - Press the Build and Listen button. Make any tweaks you want to the Text to Speech or even change the Voice Type. Once you are happy with your Greeting, press the Apply button to save the Audio file.
.

- The file will now be saved in your Announcements list.
- Closed Hours IVR Announcement
- Name - ClosedIVR
- Voice Type - Pick a Language and type of voice. For my example, I am picking en-US-Wavenet-A
- Text To Speech - Here is where we will define our open hours announcement
- Thank you for calling Clearly IP. Our offices are currently closed. Our regular business hours are 8 AM to 5 PM Central Time. If you know your party's extension, you may dial it at any time. For the Sales team, press 1, For the support team, press 2, and to hear your options again, press 9.
- Press the Build and Listen button. Make any tweaks you want to the Text to Speech or even change the Voice Type. Once you are happy with your Greeting, press the Apply button to save the Audio file.
- The file will now be saved in your Announcements list.
- Now that we have our two Announcements created, we can go set up our IVRs to use these new Announcements.
Create 2 Digital Receptionist (IVR's)- Full Documentation on all the Digital Receptionist can be found here
- Click on the Digital Receptionist menu Option

- Click on the Add Digital Receptionist button

- We will create 2 Digital Receptionists here. One for our Open Hours and One for our Closed Hours
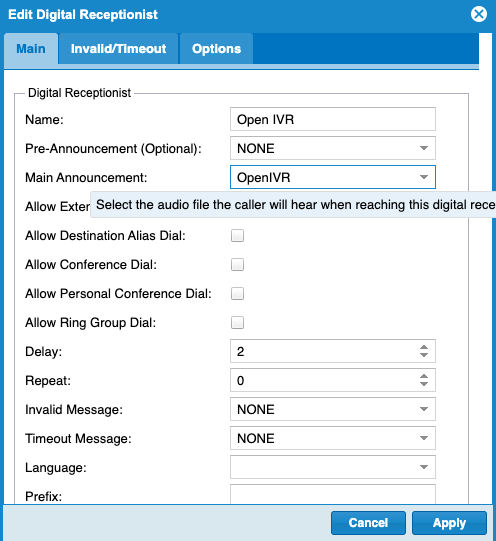
- Open Hours IVR - For our Open Hours IVR, we will set up the following fields
- Main Tab
- Name - Name this IVR something like Open IVR
- Main Announcement - Pick our created OpenIVR announcement we just created.
- Allow Extension Dial - Enable this option. This will allow a caller that knows a Users extension to dial the extension direct while the IVR message is playing to the caller.
- Allow Conference Dial - Enable this option. This will allow callers who know a Conference Room extension number to dial the Conference Room number directly while the IVR message is playing to the caller.
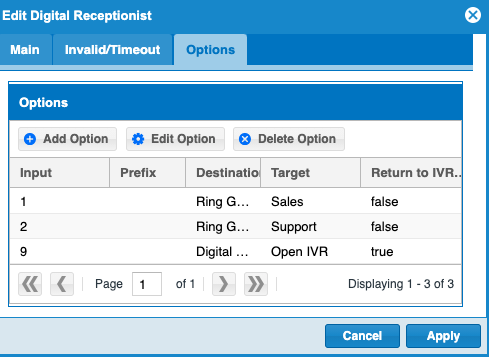
 - Options Tab - Click the Add Option button, and we will add two options to this IVR for Sales and Support Ring Groups.
- Input 1 - Route to Ring Group Sales
- Input 2 - Route to Ring Group Support
- Input 9 - Return to IVR to allow the caller to press 9 to hear the options again
- When done, you should see something similar to this. Press the Apply button to save your changes.
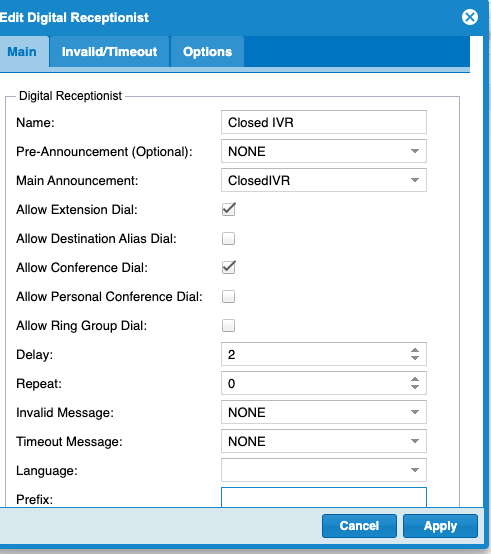
 - Closed Hours IVR - For our Open Hours IVR, we will set up the following fields
- Main Tab
- Name - Name this IVR something like Closed IVR
- Main Announcement - Pick our created Closed announcement we just created.
- Allow Extension Dial - Enable this option. This will allow callers who know a User's extension to directly dial the extension while the IVR message is playing to the caller.
- Allow Conference Dial - Enable this option. This will allow callers who know a Conference Room extension number to dial the Conference Room number direct while the IVR message is playing to the caller.
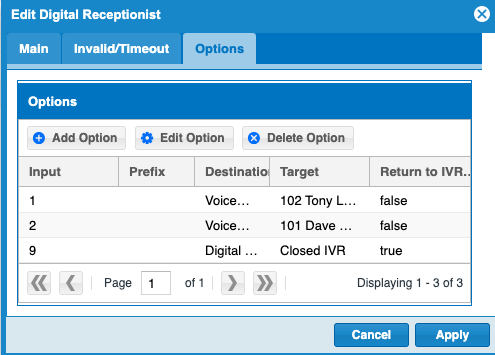
- Options Tab - Click the Add Option button, and we will add two options to this IVR for Sales and Support Ring Groups.
- Input 1 - Route to Voicemail for User 102, who is our Sales Manager
- Input 2 - Route to Voicemail for User 101, who is our Support Manager
- Input 9 - Return to IVR to allow the caller to press 9 to hear the options again
- When done, you should see something similar to this. Press the Apply button to save your changes.
Create Time Condition- Full Documentation on all the Time Conditions can be found here
- Click on the Time Conditions menu Option

- Click on the Add Time Conditions button

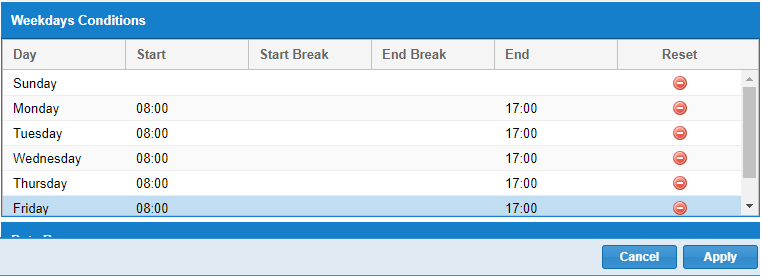
- We will create 1 Time Condition to define when our regular business hours are with the following fields
- Settings Tab
- Name - call this Business Hours
- Conditions True Destination - Since this will match to our open hours, we will set the Destination to be our Open IVR we just created
- Conditions False Destination - Since this will match to our closed hours, we will set the Destination to be our Closed IVR we just created
 Routing Inbound Phone Numbers (DID)Since we purchased three phone numbers earlier, we are now going to set up routing of those three phone numbers 1 Number will point to this Time Condition we just created 1 Number will point directly to Extension 102 as their personal call-in number 1 Number will point directly to the General Conference room we created as a direct Conference number
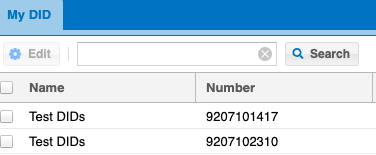
Full Documentation on all the DIDs can be found here Click on the DID menu Option

- From here, you will see a list of all the DIDs you have purchased from the Clearly Cloud store.
- Main DID Setup
 - We will set the following fields
- Name - Name this DID Main Number
- Set Destination - Set to the Time Condition > Business Hours
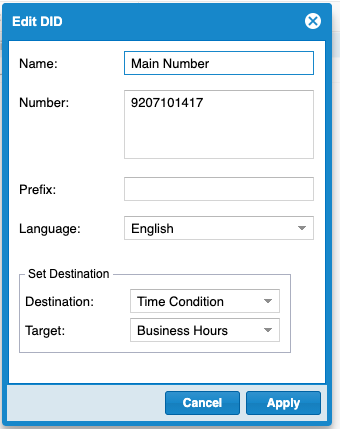
- Press the Apply button to save your changes. If you now call this number from a phone it should route to one of your IVRs based on Open or Closed hours.

- Direct User DID Setup
- Double click on 1 of your DIDs so we can do edit it as the Direct DID for extension 101
- We will set the following fields
- Name - Name this DID Ext 101 DID
- Set Destination - Set to the Extension > 101
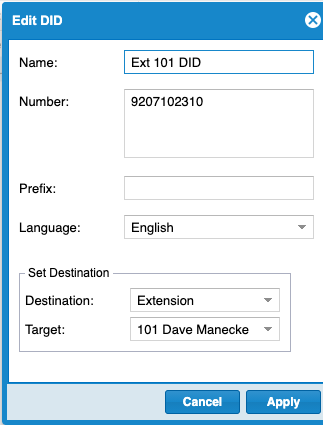
- Press the Apply button to save your changes. If you now call this number from a phone, it should route to extension 101, but since they have no phone configured for 101, yes, it should go to 101s voicemail box.

- Direct Conference Room DID Setup
- We will set the following fields
- Name - Name this General Conference Room
- Set Destination - Conference > General Room
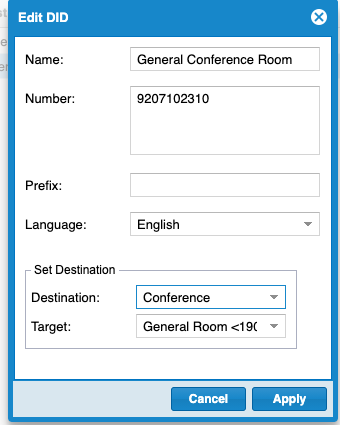
- Press the Apply button to save your changes. If you now call this number from a phone, it should route to extension 101, but since they have no phone configured for 101, yes, it should go to 101s voicemail box.
Configuring Phones
Setting Up Clearly Anywhere |
|
|
| | | |
|