Installing Clearly Anywhere Mobile App
- To set up the Clearly Anywhere mobile phone, you will need to install the Clearly Anywhere mobile app from the IOS or Android Stores.
- Android

- Navigate to the App Store and search for the Clearly Anywhere app
- Once installed you can Login 1 of 2 ways
- QR Code Scan
- Manual Login
- QR Code Scan
- Scan the QR code shown here from your Clearly Anywhere app by clicking on the Scan QR option
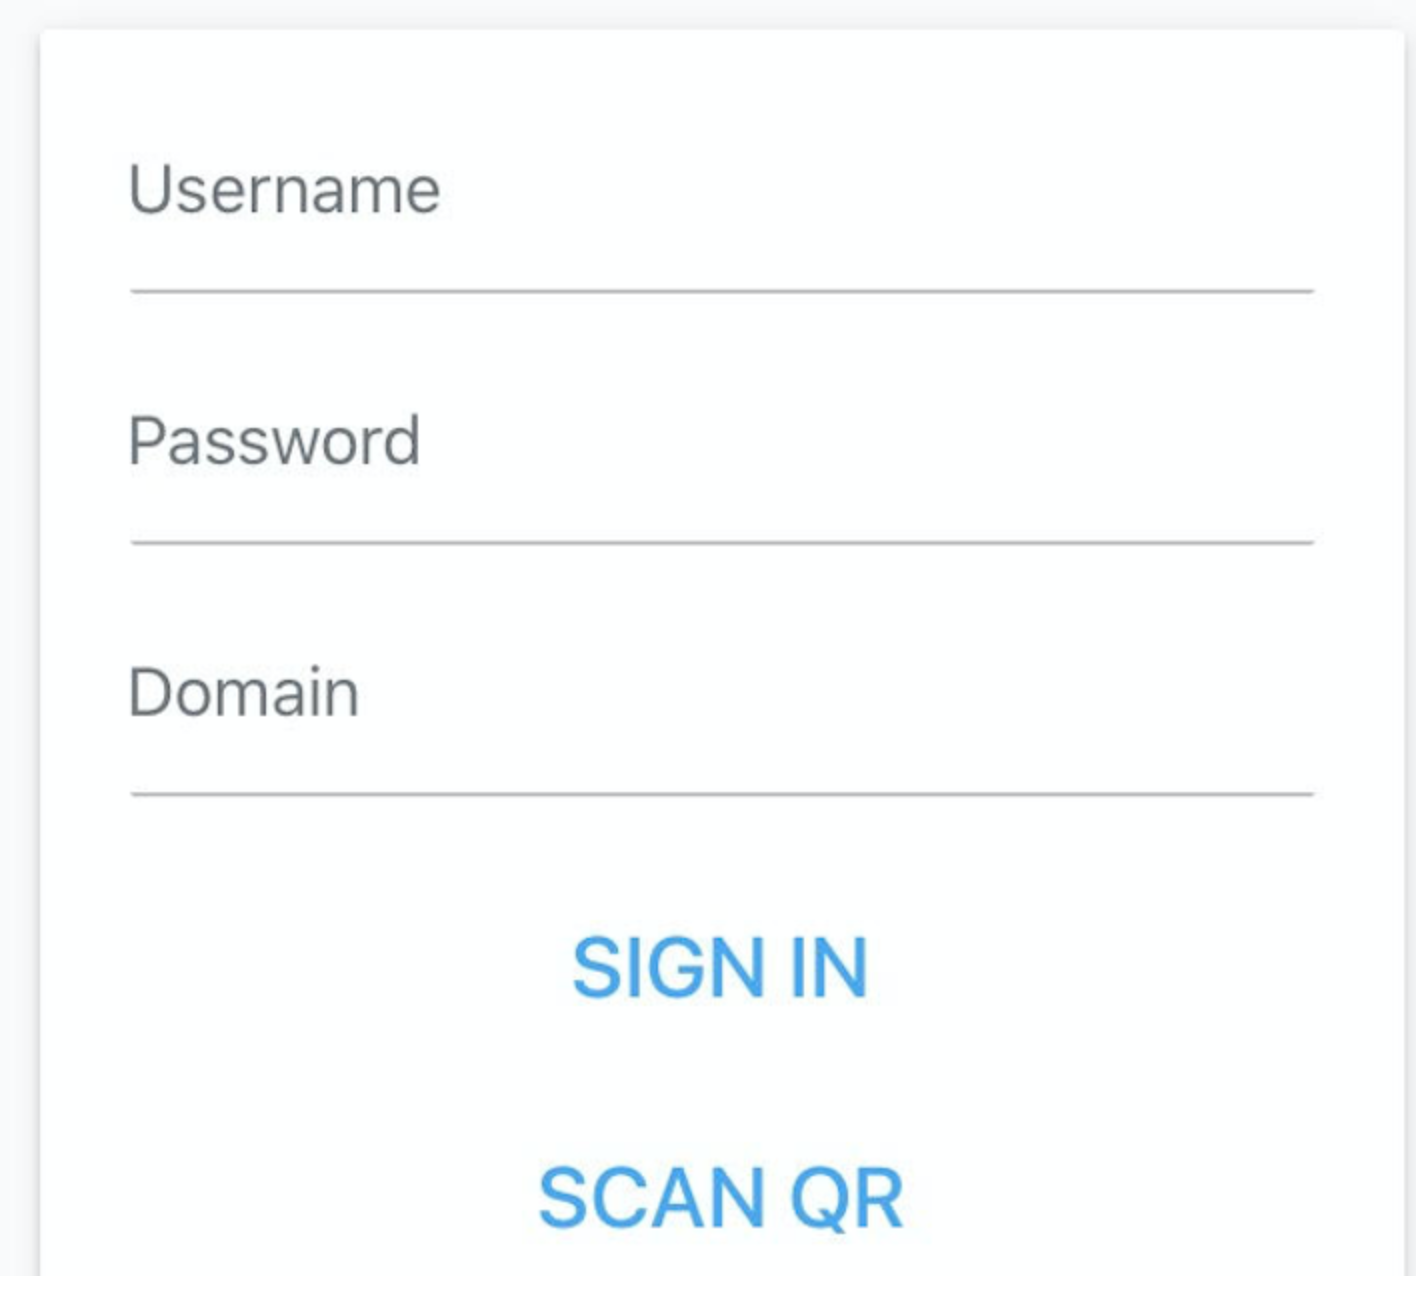
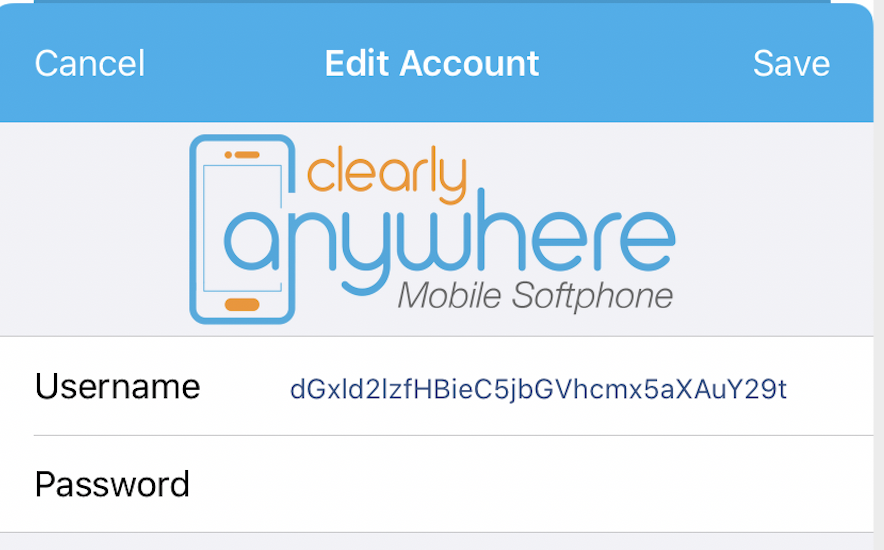
- Manual Login
- Type in the following three fields
- Username - The Username for the User Level login you created when creating each user for the client above. This was the users email address
- Password - The Web Interface Password for the user that you created for each user for the client above.
- Domain - This is the Client Realm for each client that we referenced to take note of when you logged in as a Client into the CloudPBX Web GUI

- Press the Sign In button, and after a few seconds you should be logged in and can start making and receiving calls as that user.
Using Clearly Anywhere Mobile App
Re-Provision Clearly Anywhere
- The app will check in once an hour to your PBX for new or updated configuration information. If you want to force the app to resync the provisioning information, you can follow these steps.
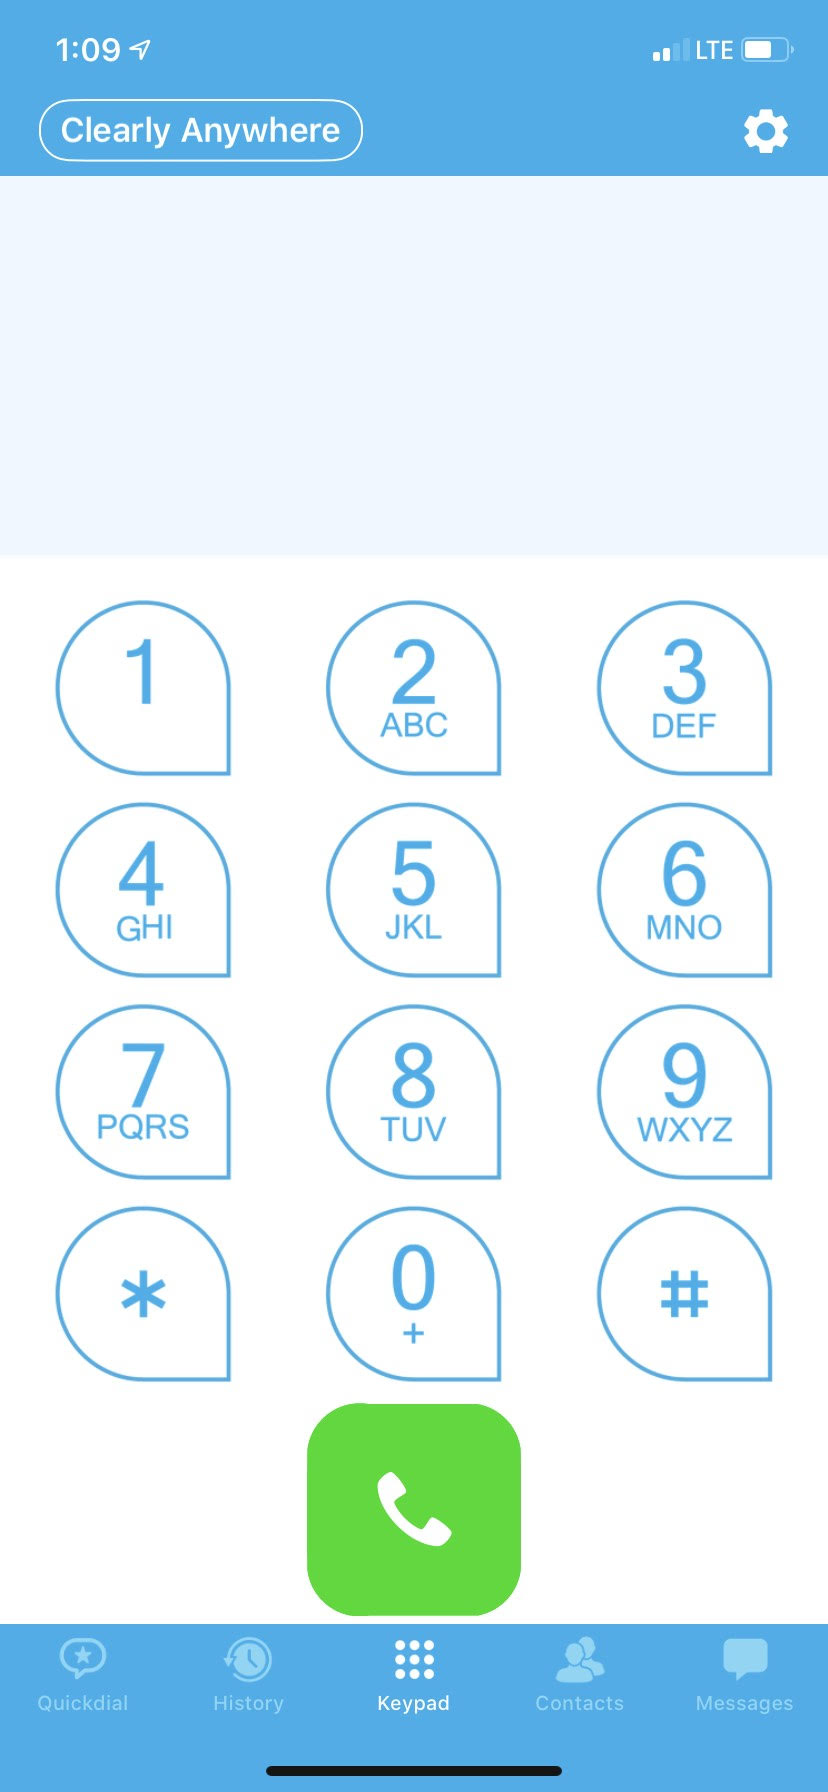
- Click on the Gear Cog in the top right from the Keypad screen
- Click on the Account Setup option
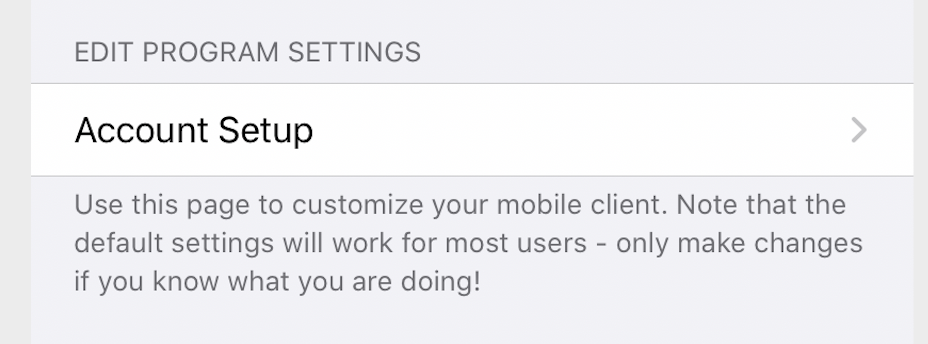
- Click on the Save button, and your Clearly Anywhere app will reach back out into your PBX and get an updated configuration file and apply it.
Quick Dial / Favorites Section
iOS:

Android:

The Quick Dial / Favorites section gives access to all the most important calling features and resources that are available in the Clearly Cloud Call Panel.
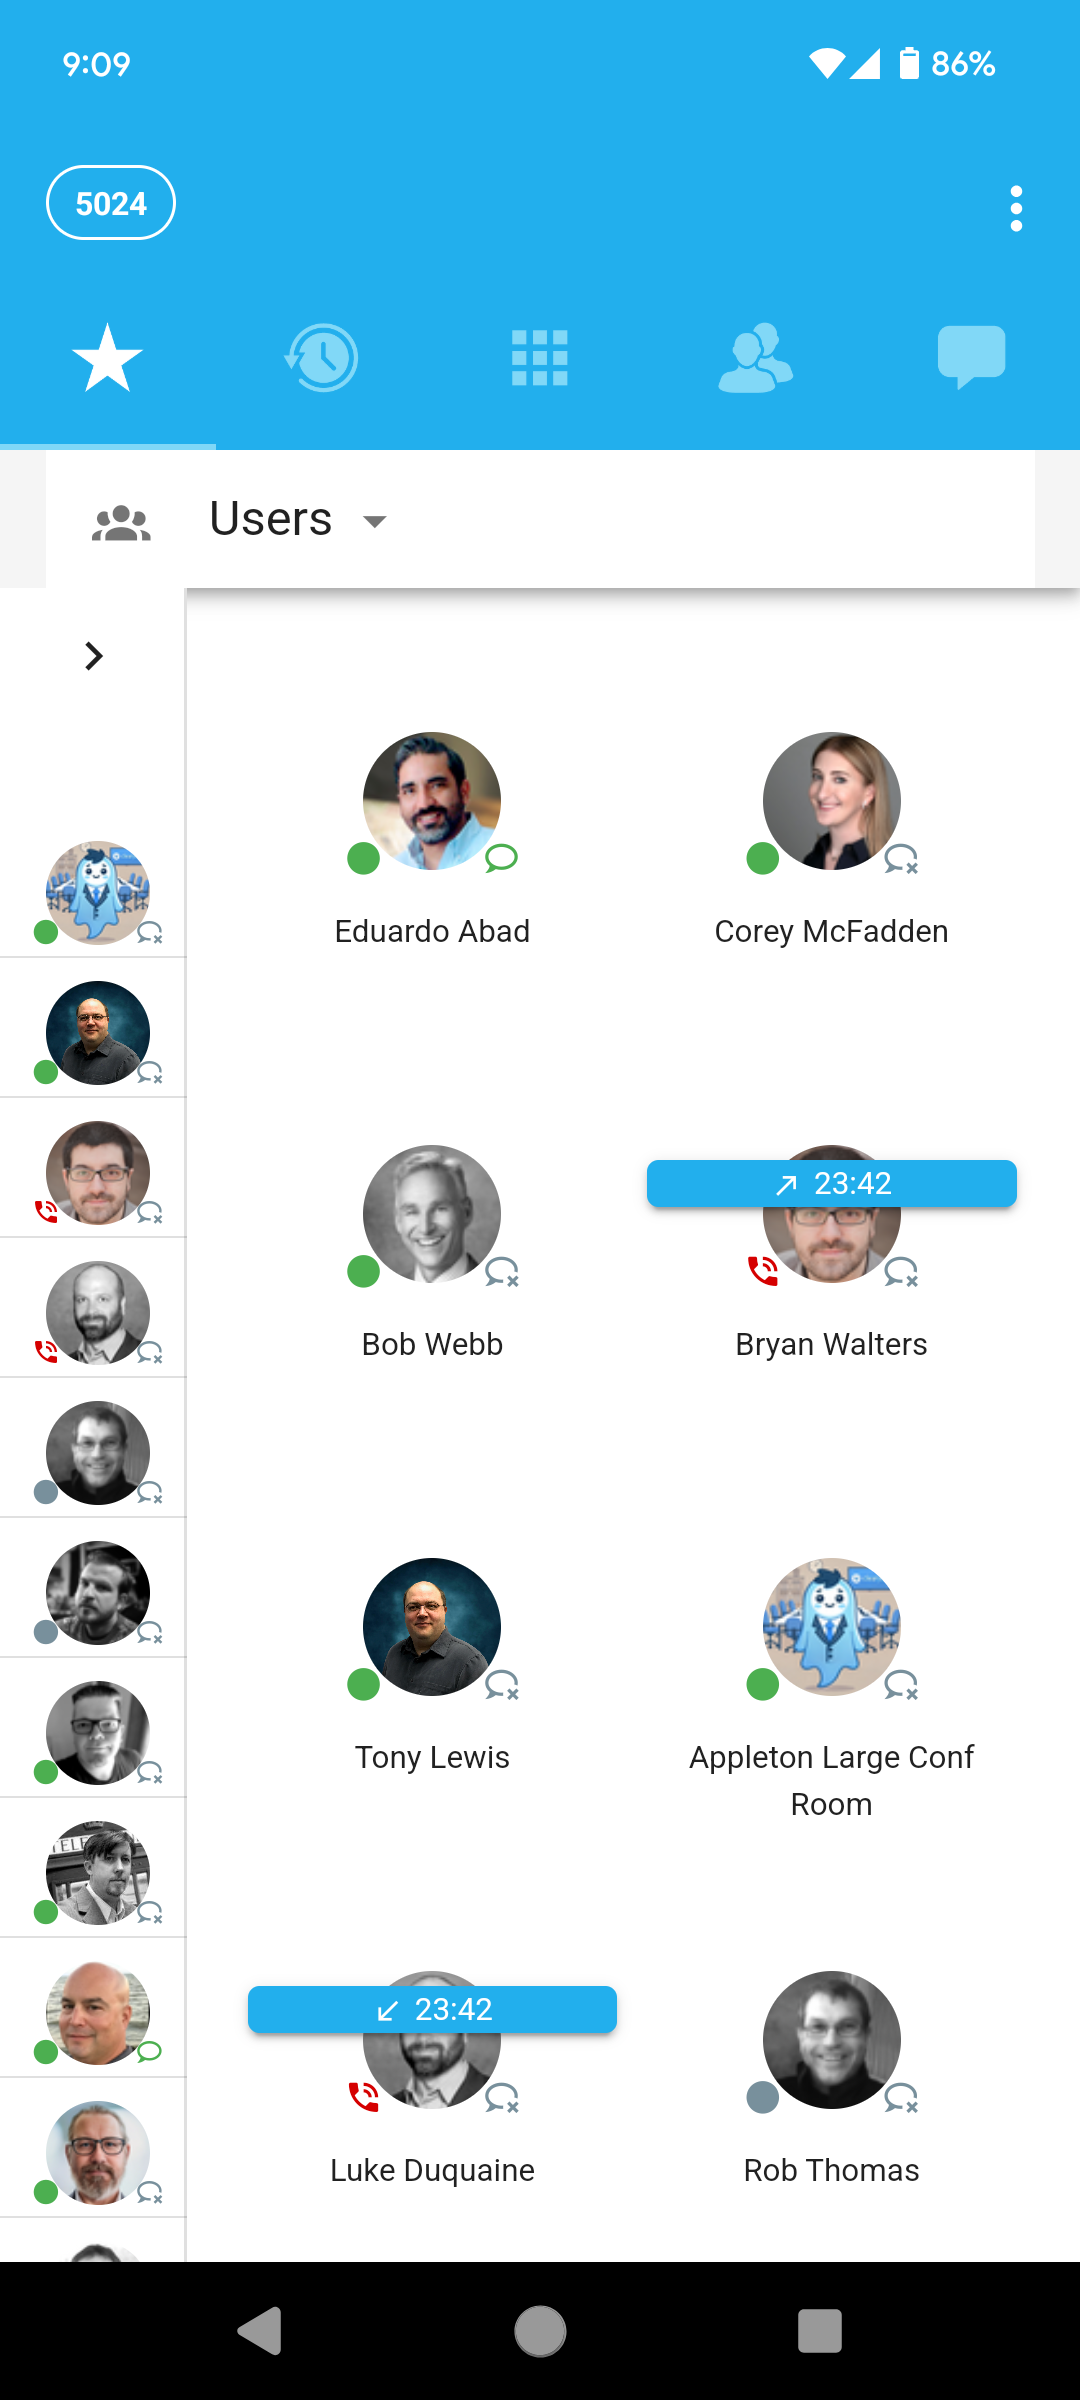
Users panel
By default, the first panel displayed when accessing this section would be the Users panel which allows for quickly dialing other users, view their status, listen to their active calls (if such permissions have been enabled to your user), or start chatting with them.
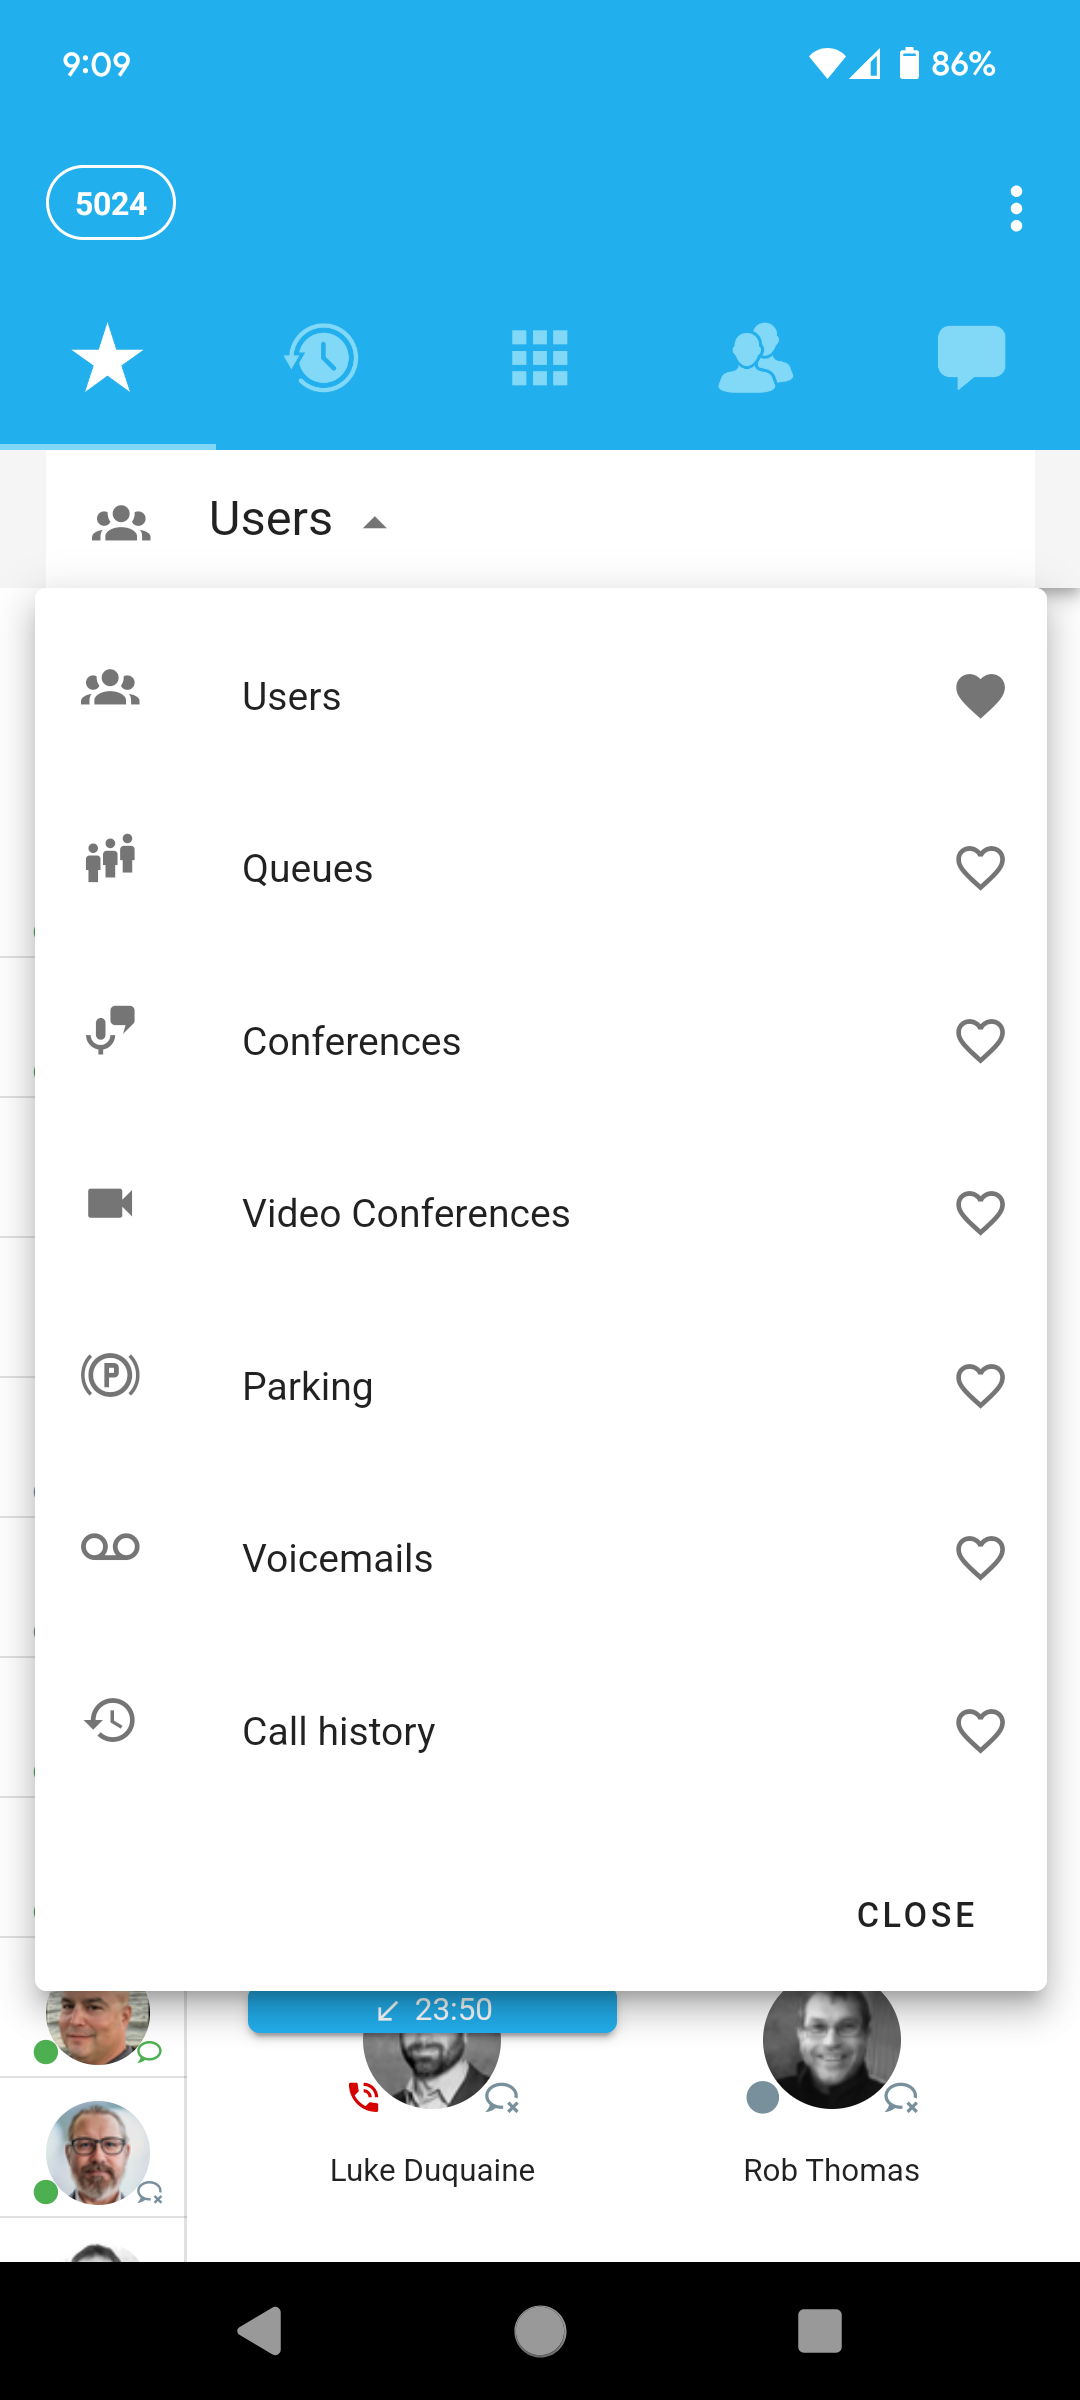
Switching to Other Panels within the Quick Dial / Favorites Section
Touch the Users drop-down menu to be able to switch to ohter panels:
As seen, the available panels are:
- Users
- Queues
- Conferences
- Video Conferences
- Parking
- Voicemails
- Call history
Touch on any of these to access the corresponding panel. You can also touch on the heart icon (❤) to the right of the corresponding panel name to make it the default panel to be displayed whenever accessing the Quick Dial / Favorites section.
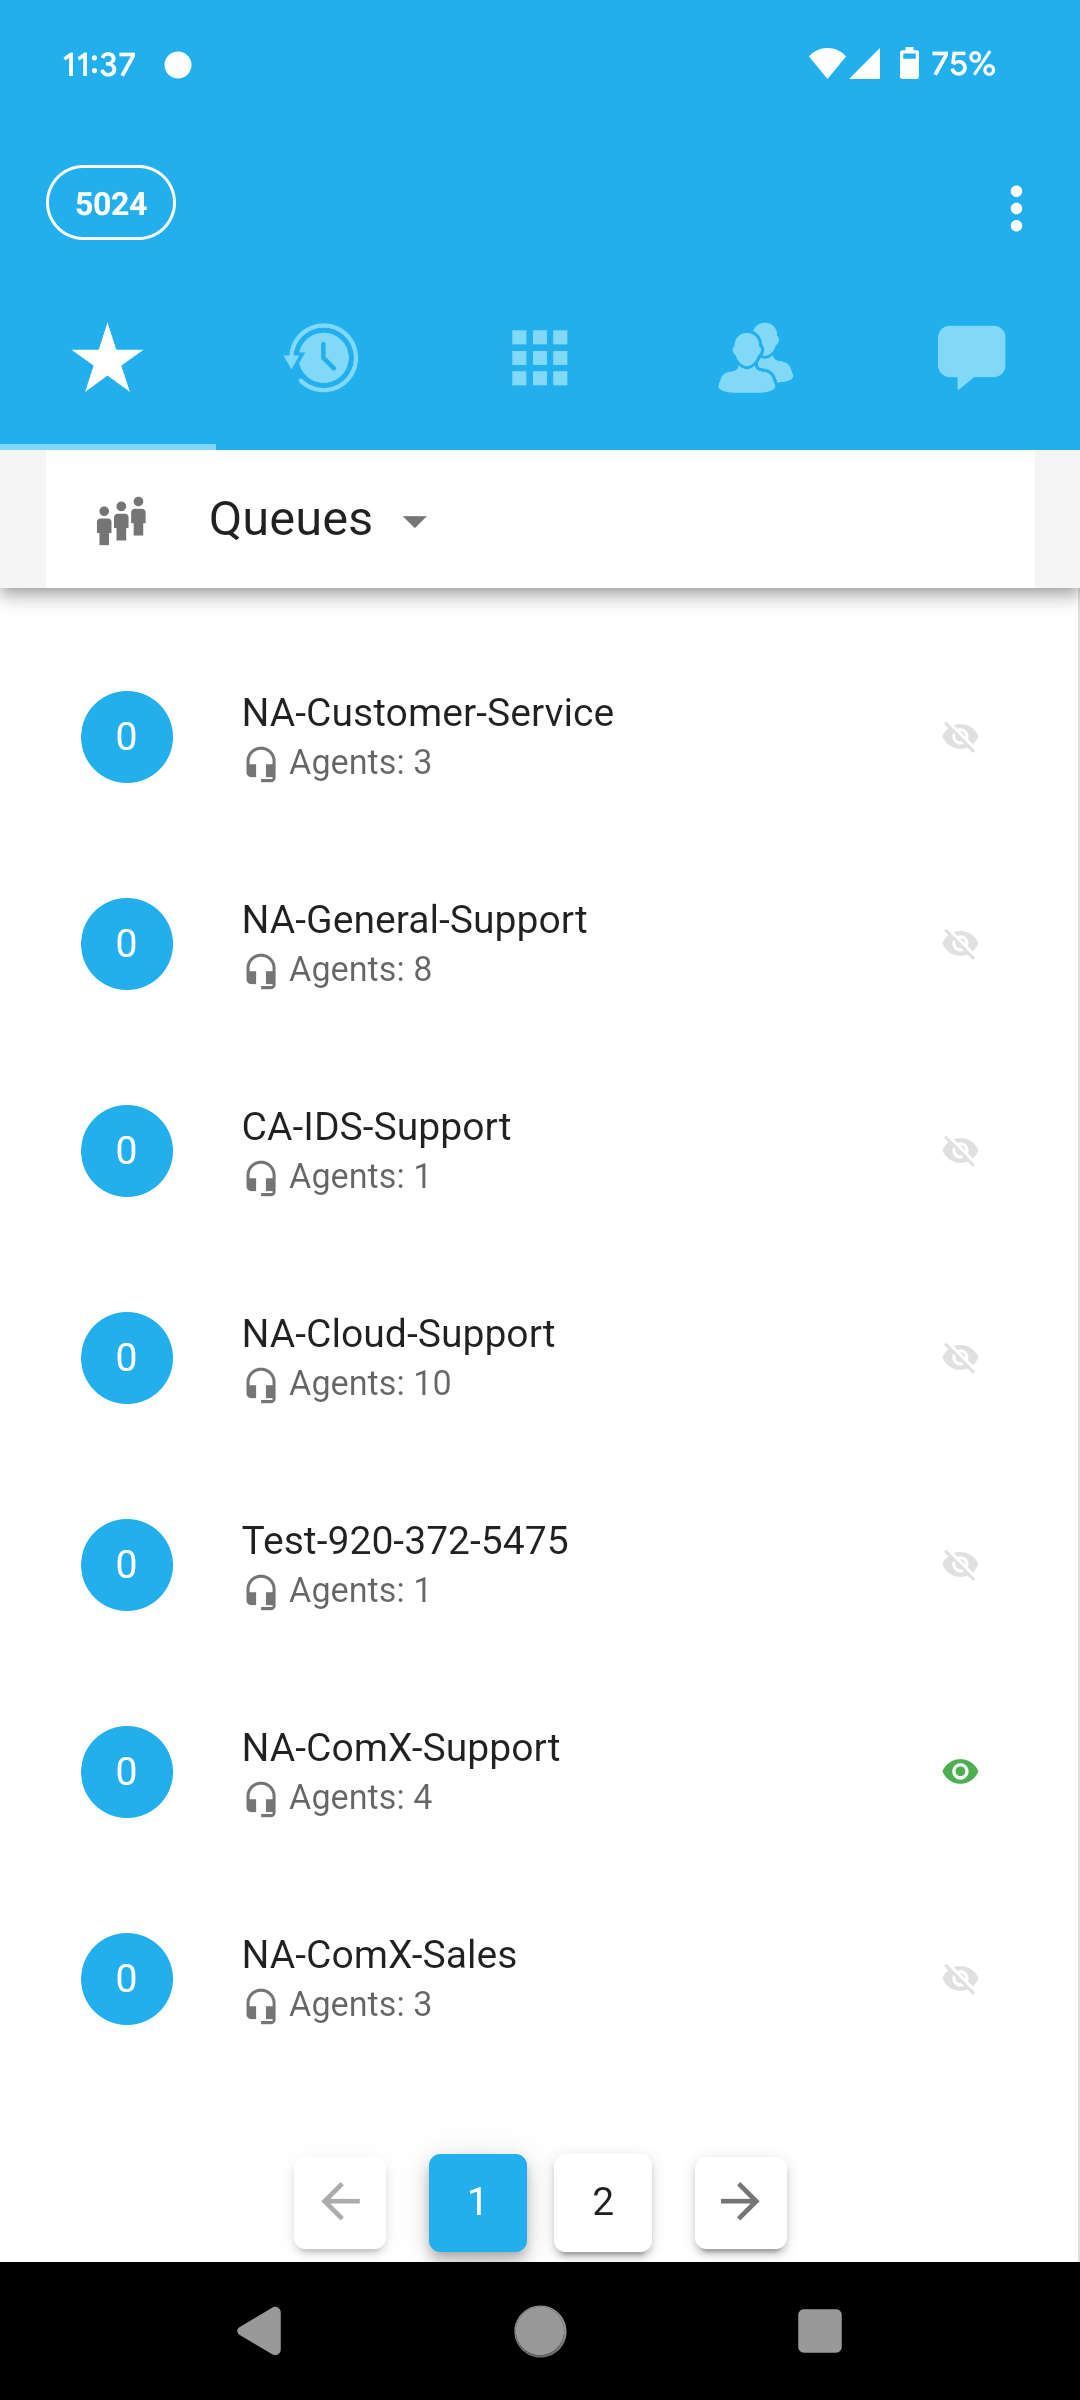
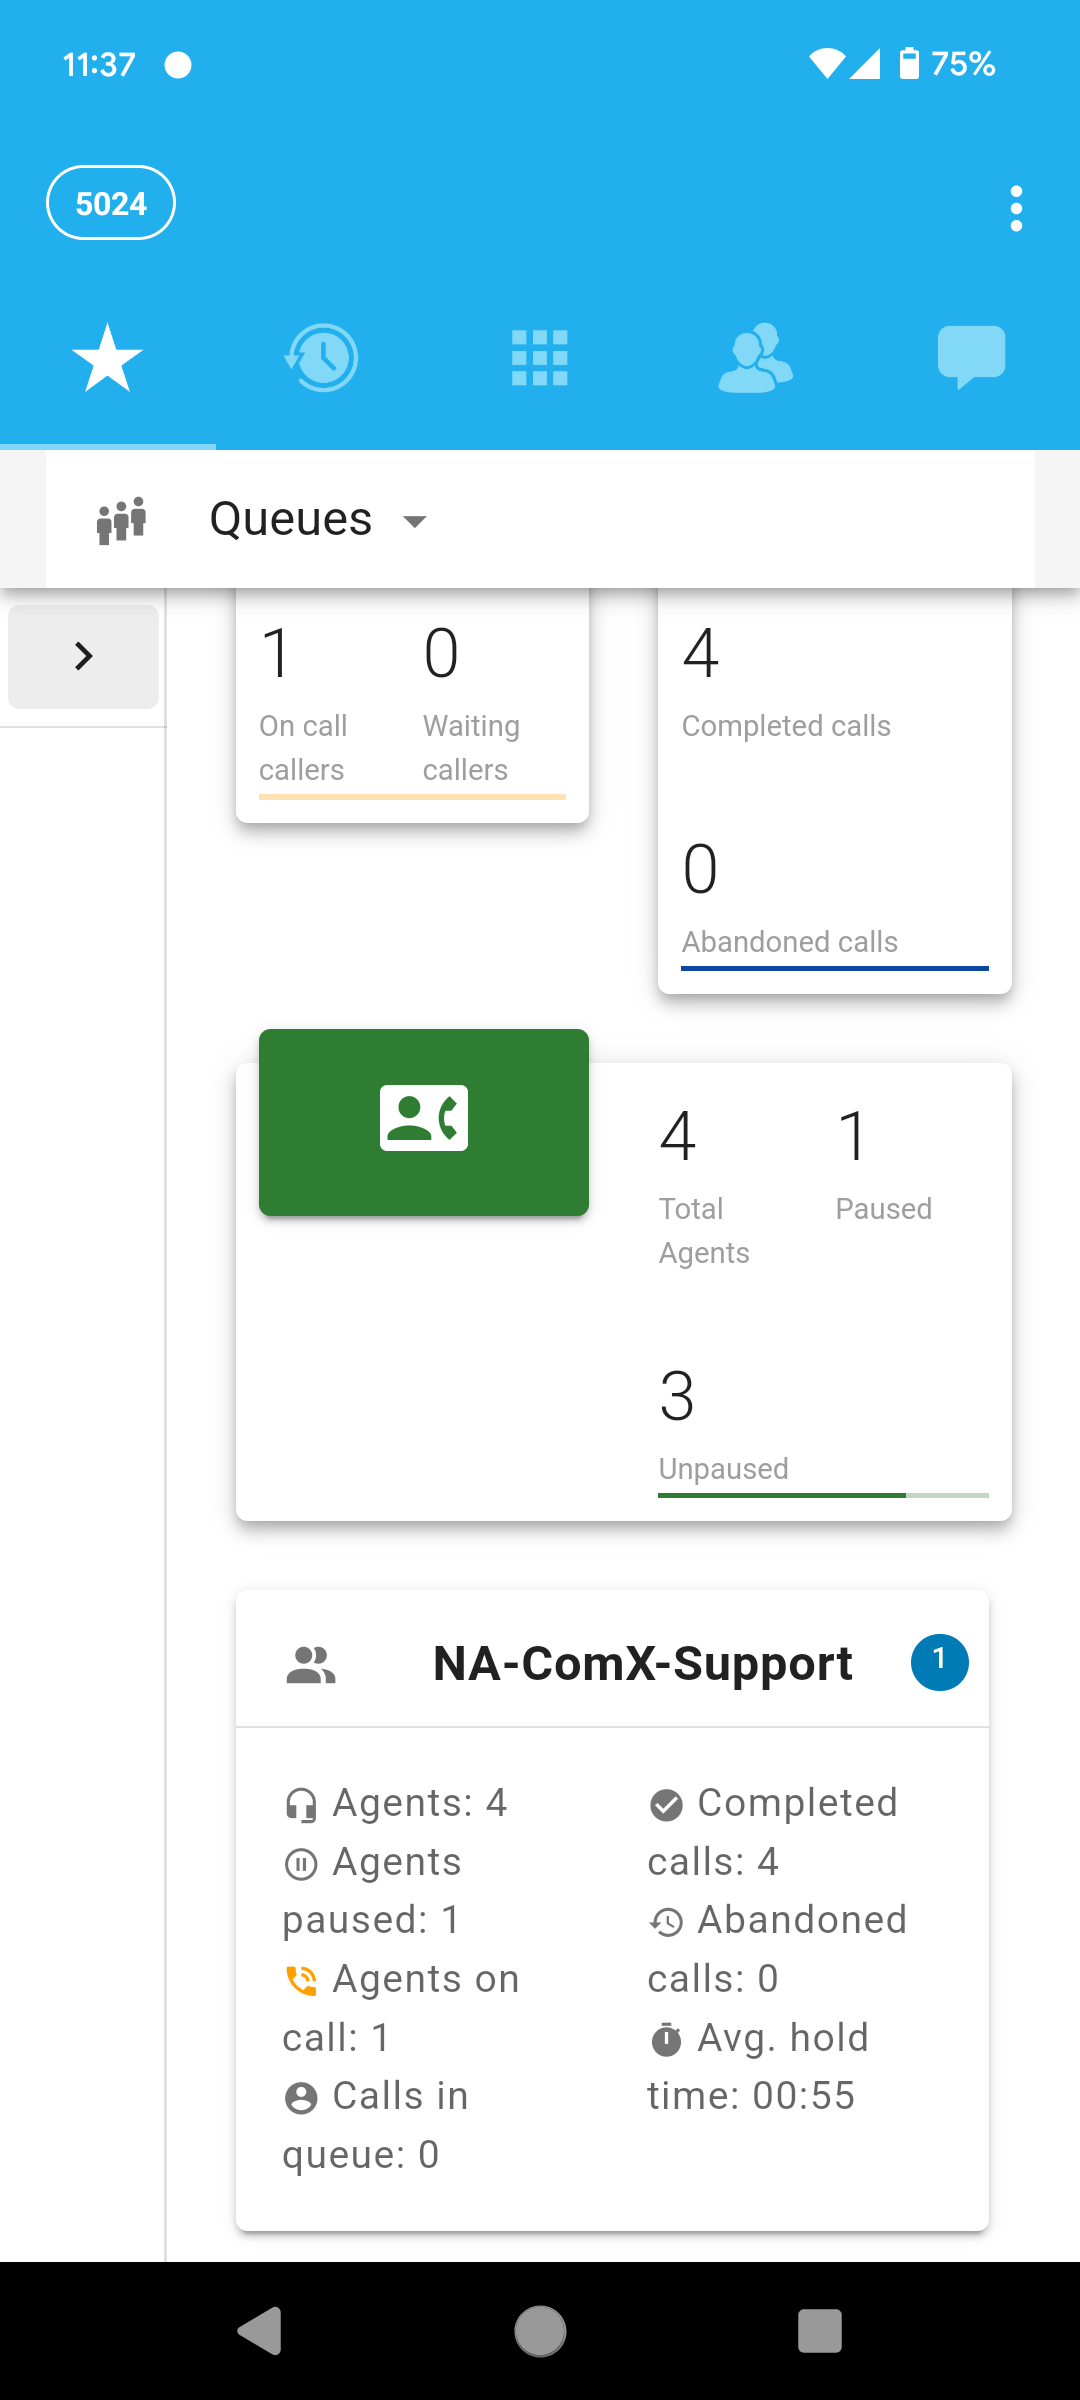
Queues panel
Here you can see statistics and live activity of the Calling Queues in your Clearly Cloud instance.
By pressing on the arrow (>) icon to the left of the screen a menu with all calling queues available to you will get displayed:
Just press on the eye icon (👁) to the right of the name of each calling queue that you want to monitor so that its statistics and live activity will be displayed in the main area of the Queues panel:
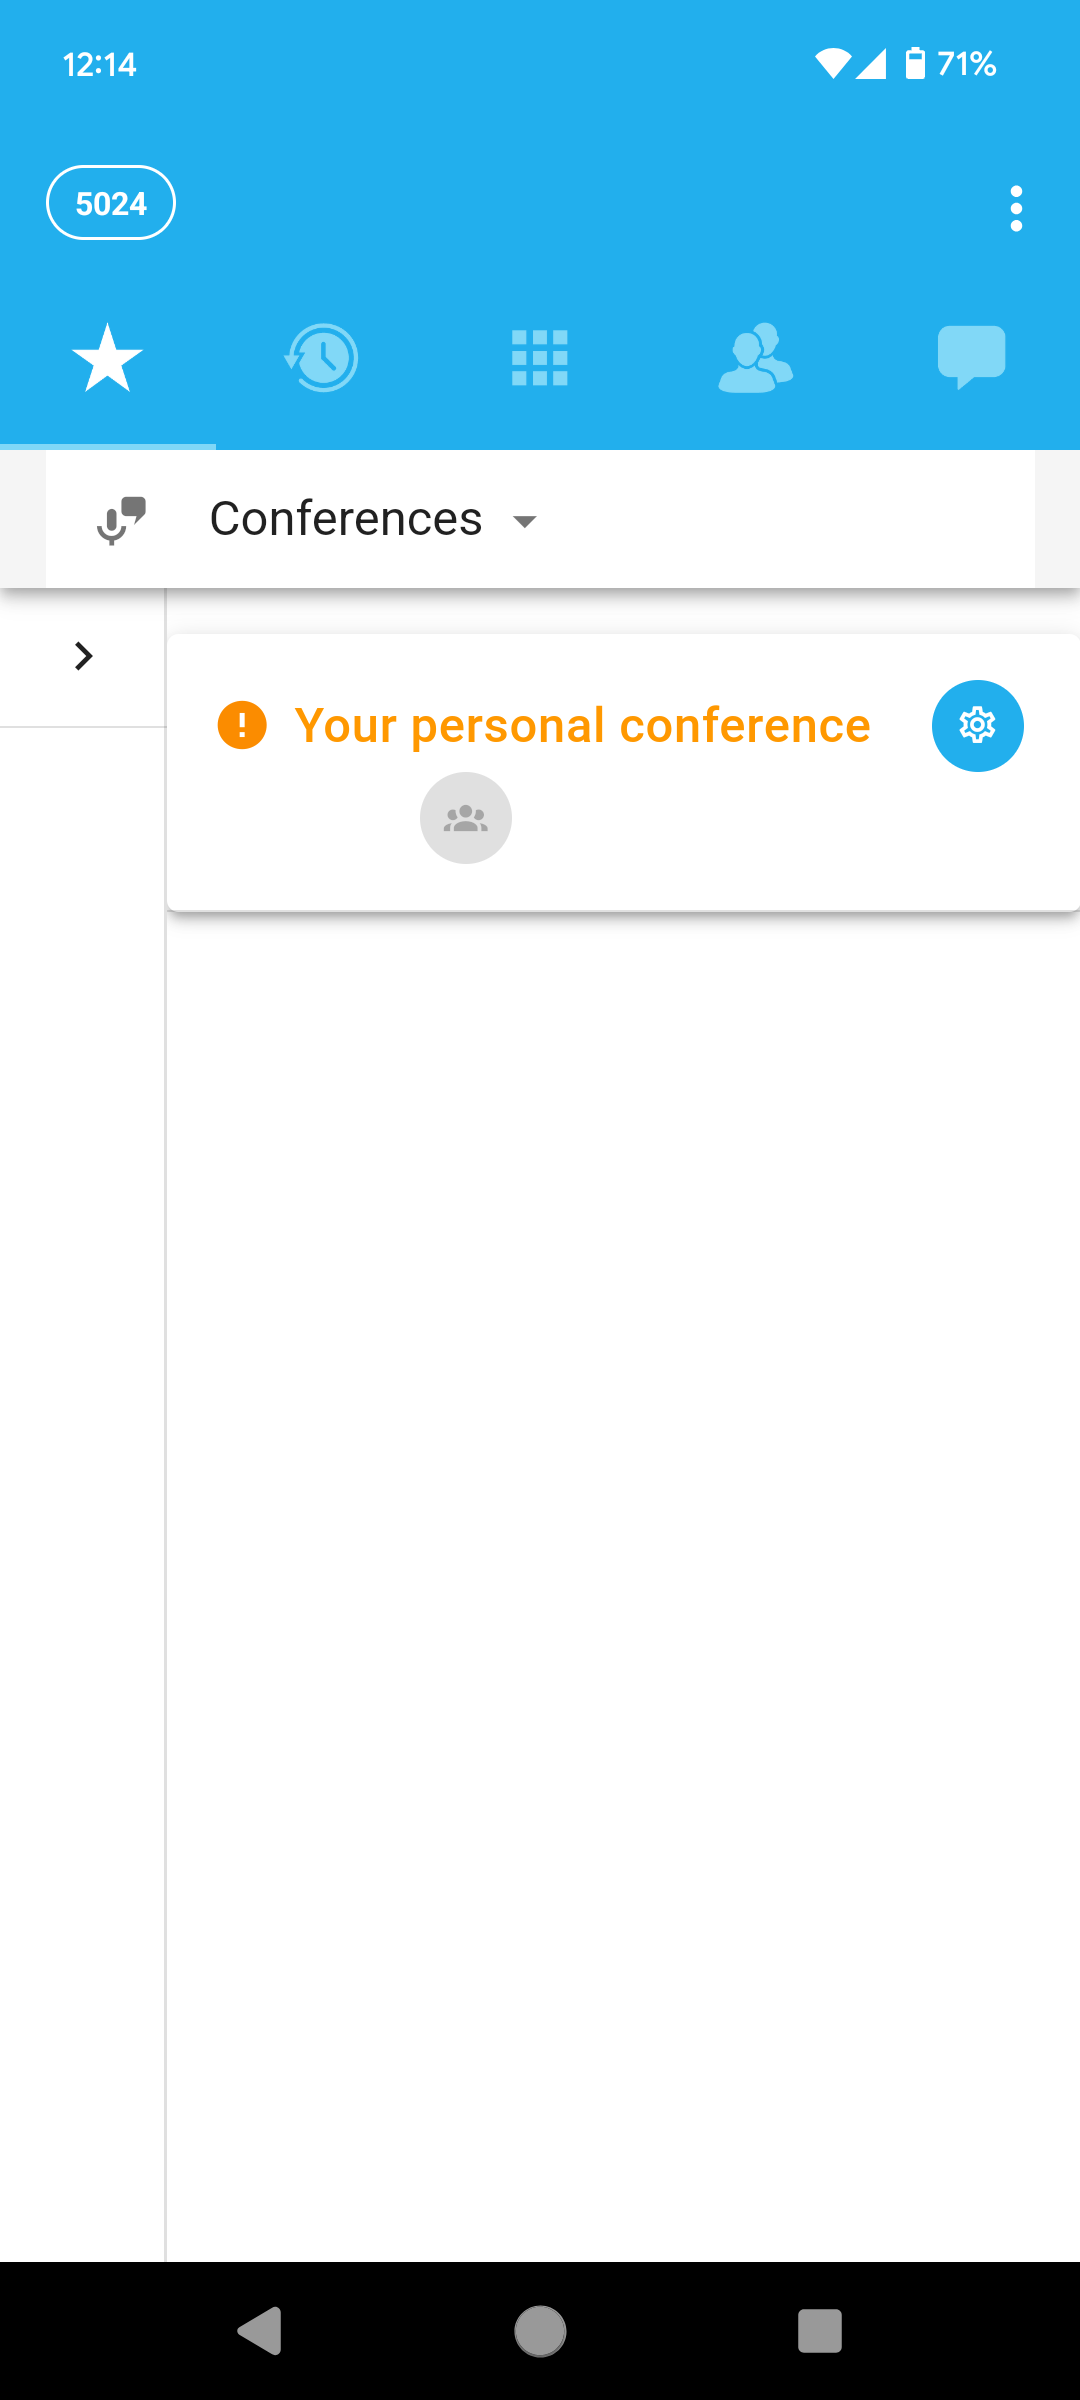
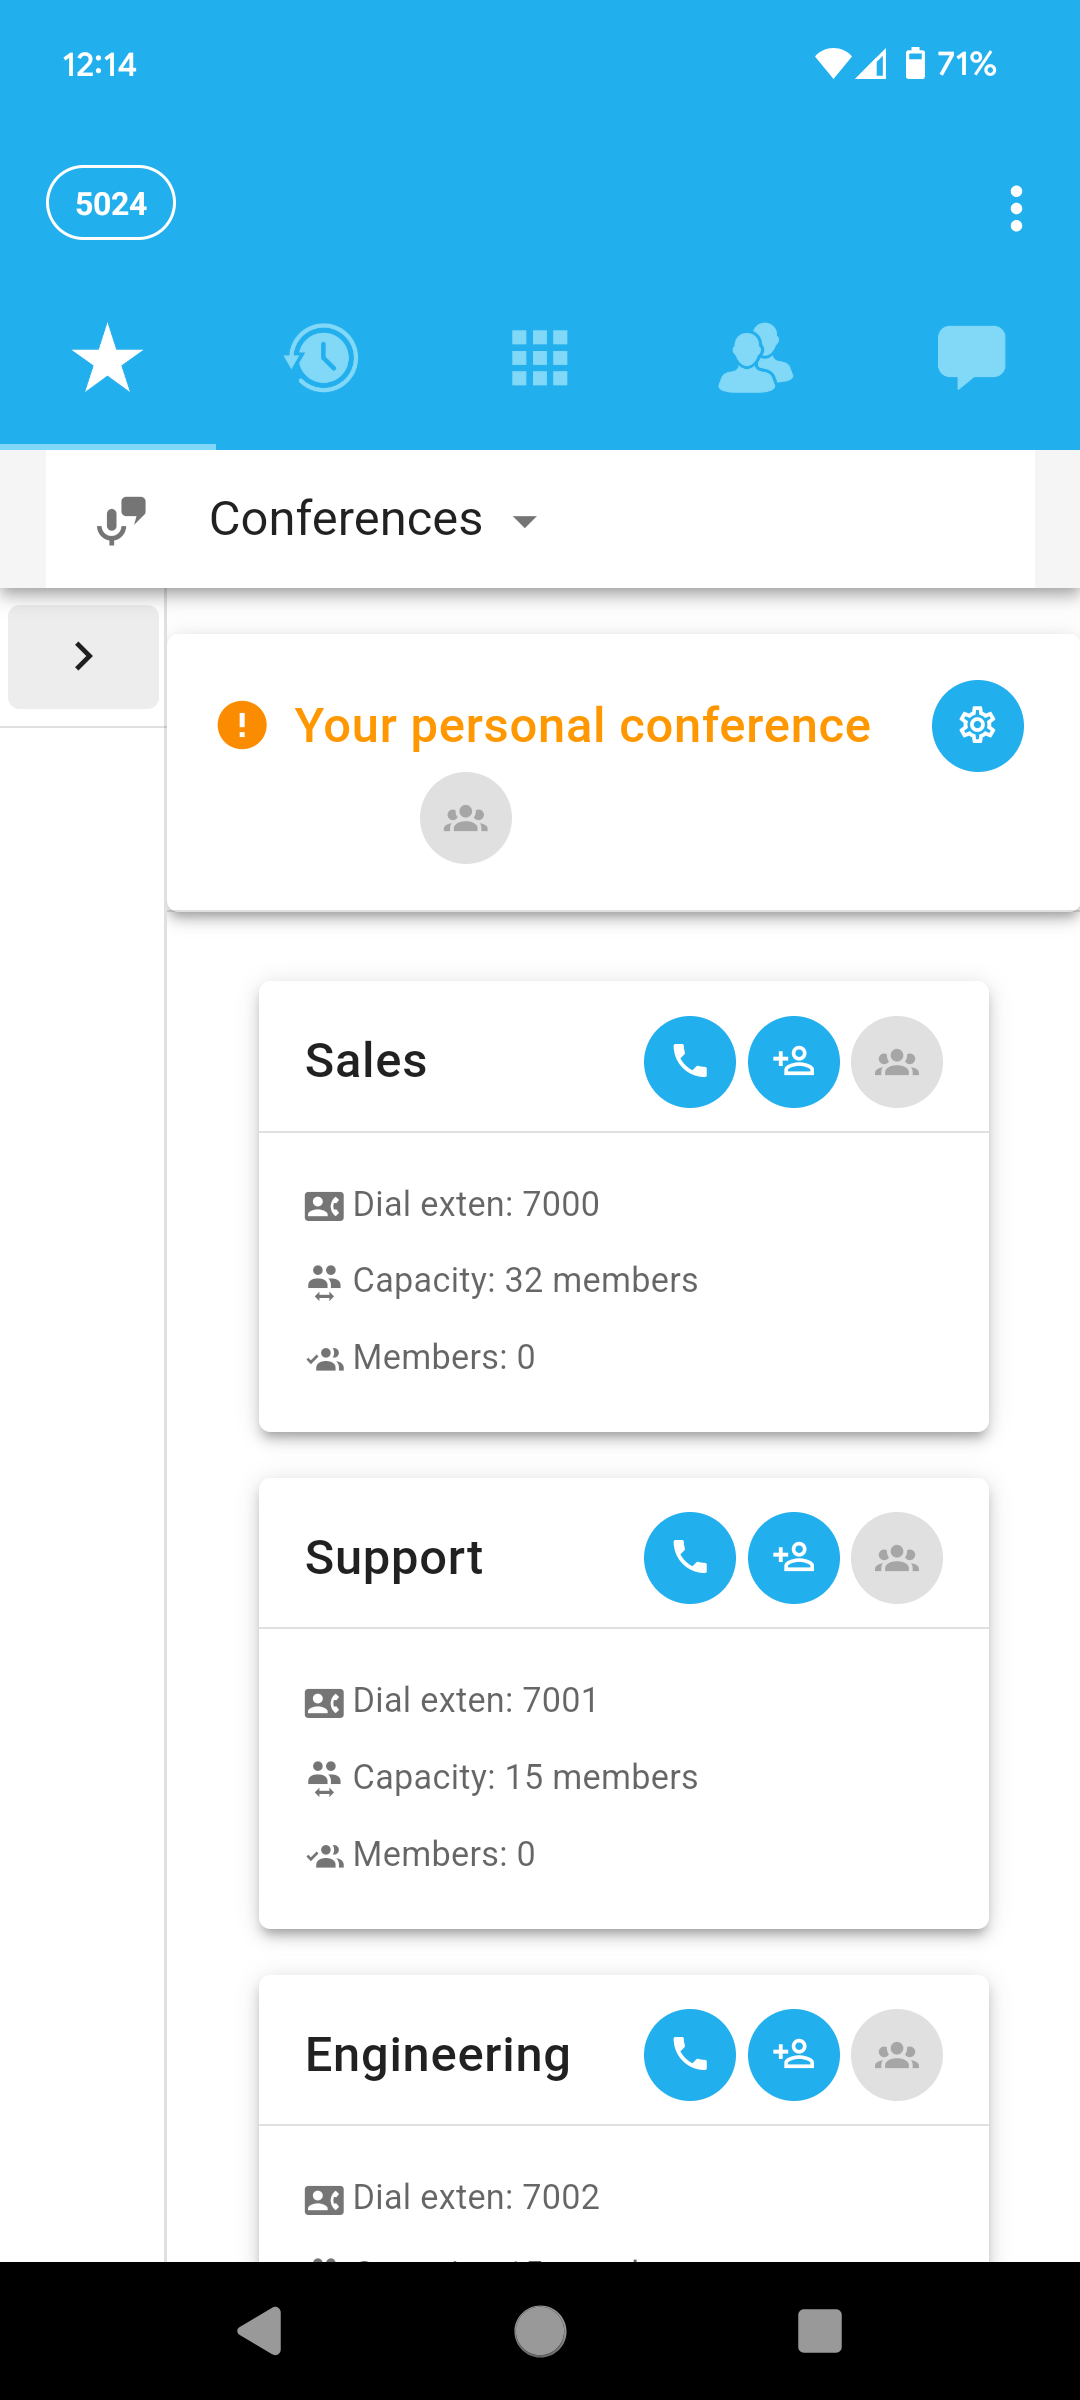
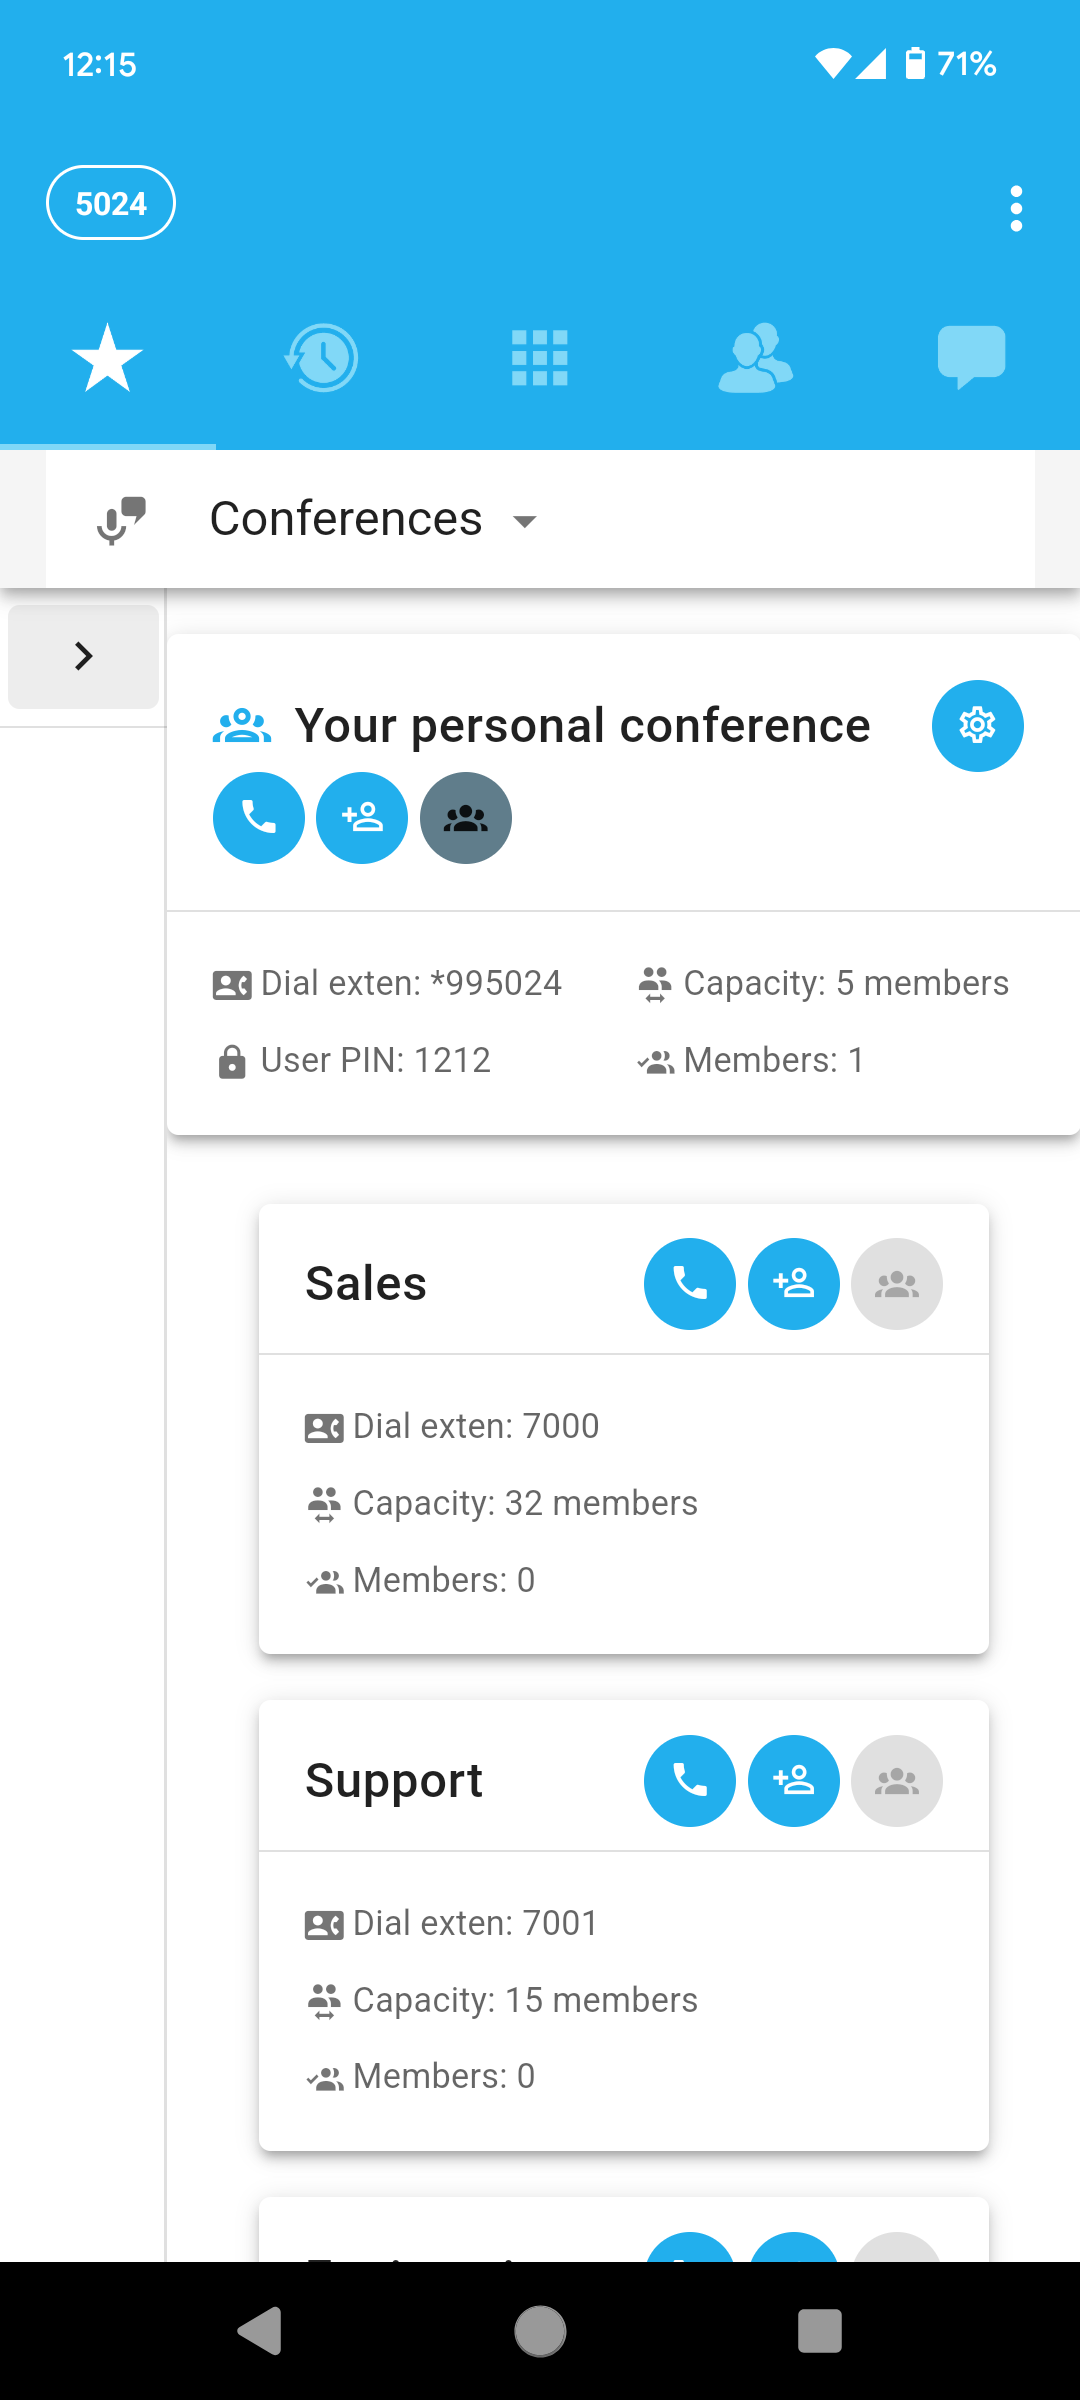
Here you can join audio conferences and see live activity of ongoing conferences, you can manage the preferences of your own personal conference room as well.
By pressing on the arrow (>) icon to the left of the screen a menu with all audio conference rooms available to you will get displayed:
Just press on the eye icon (👁) to the right of the name of each audio conference room that you want to see displayed in the main area of the Conferences panel:
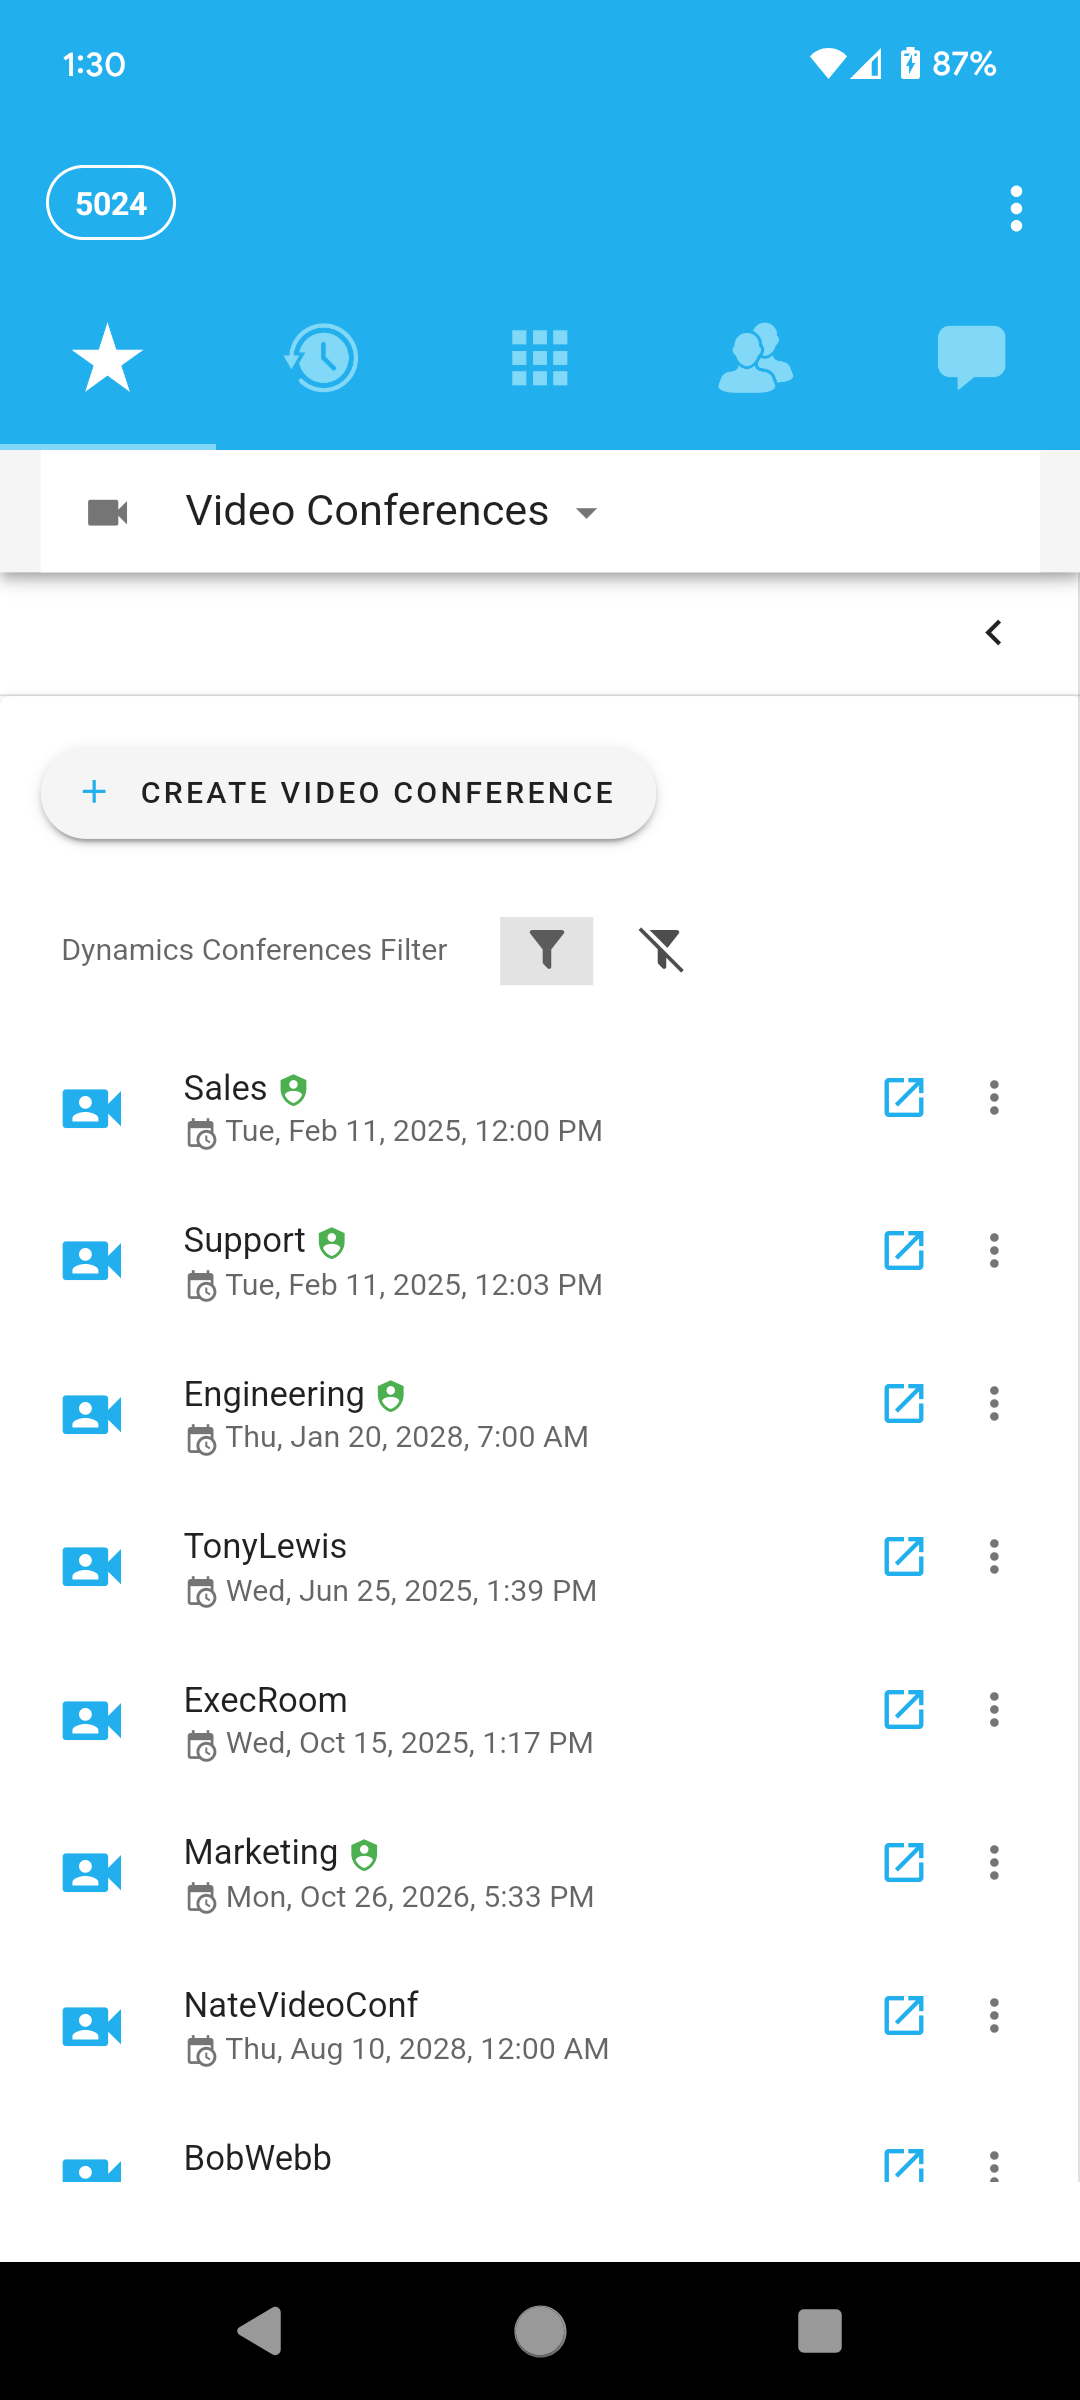
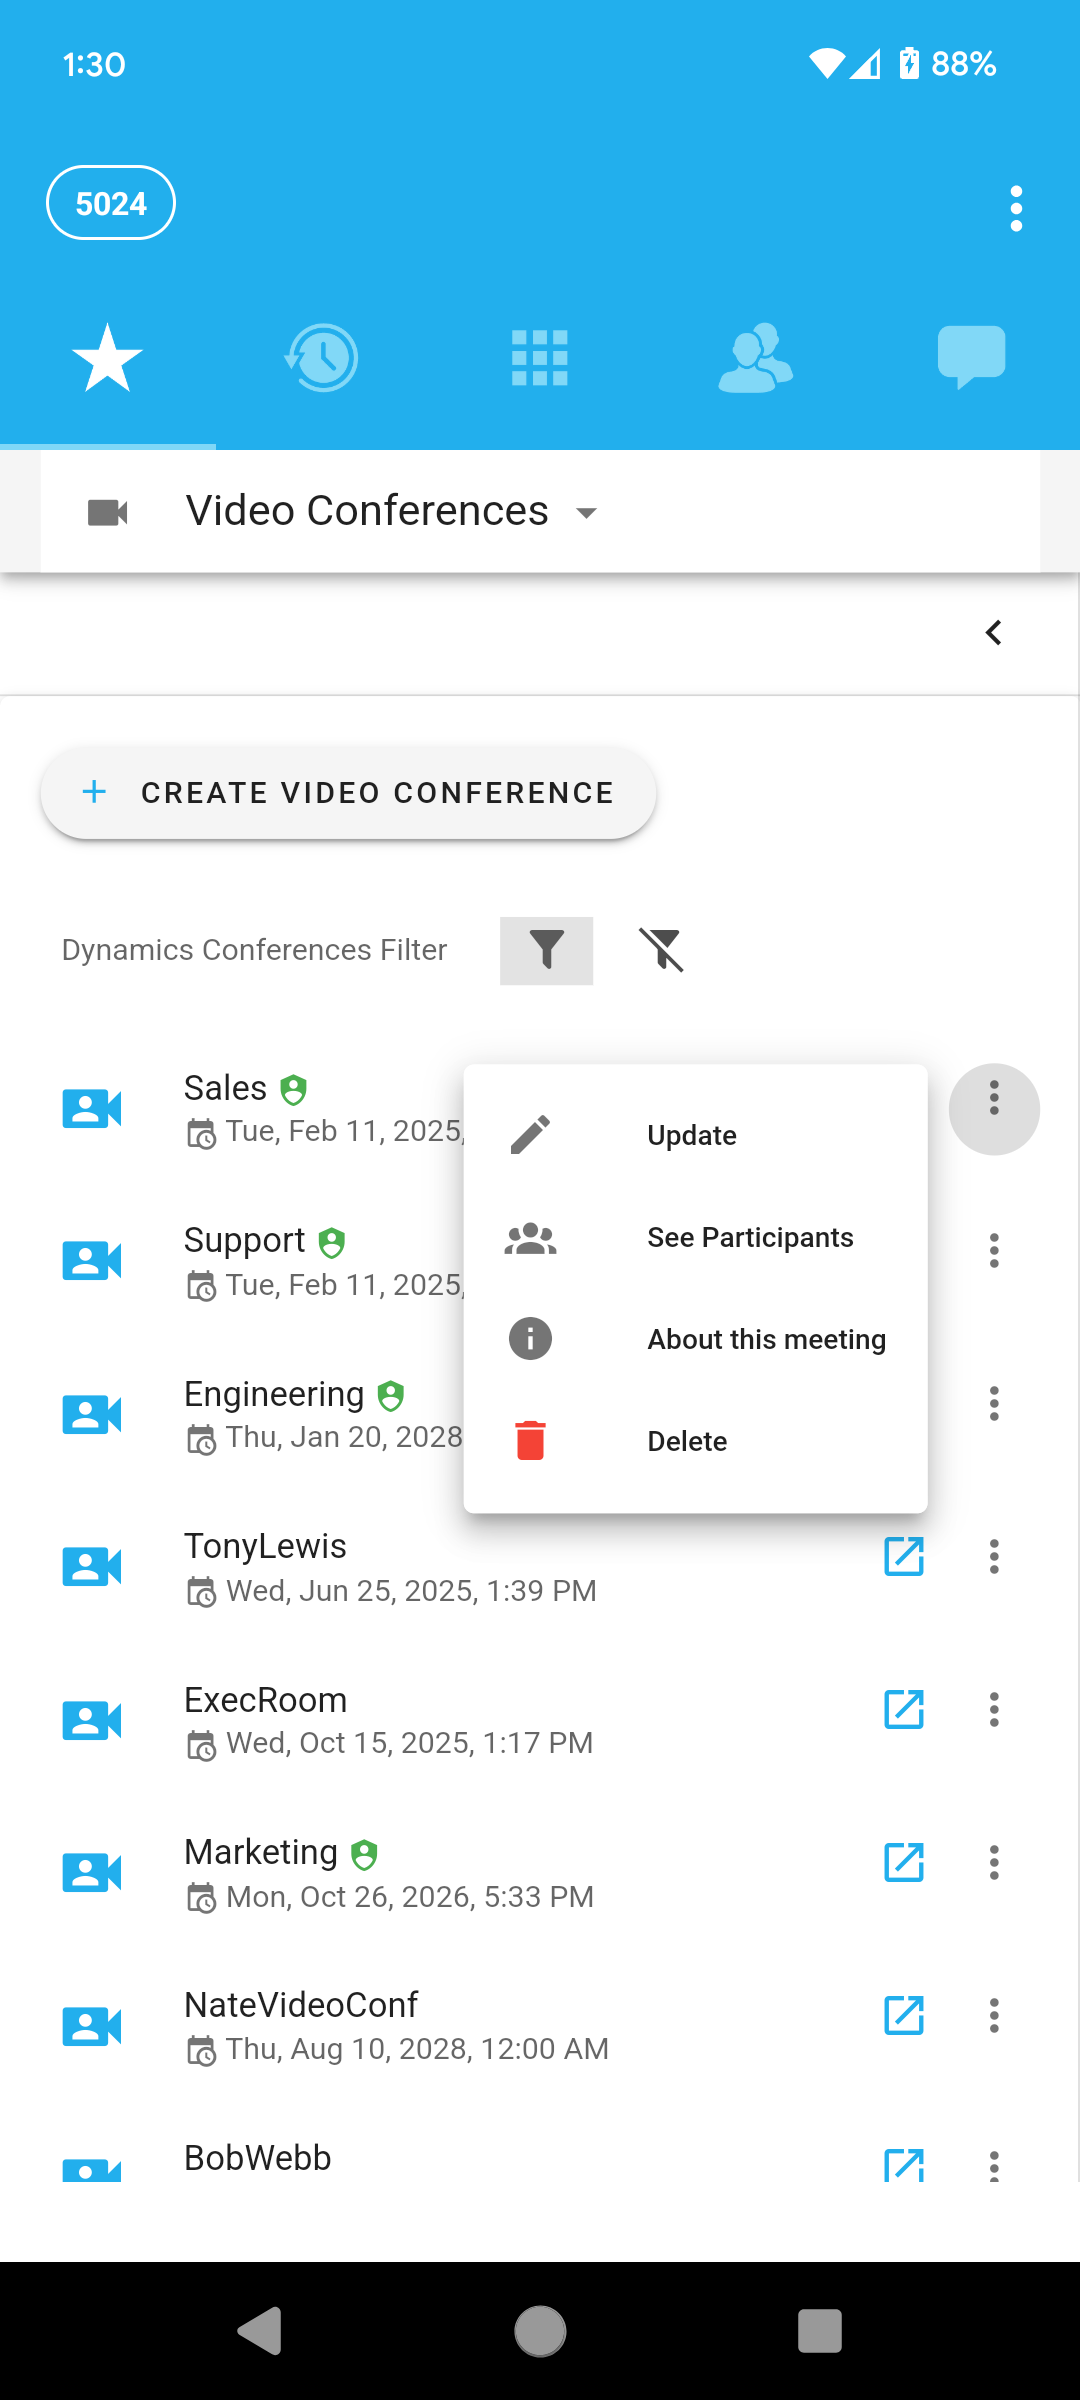
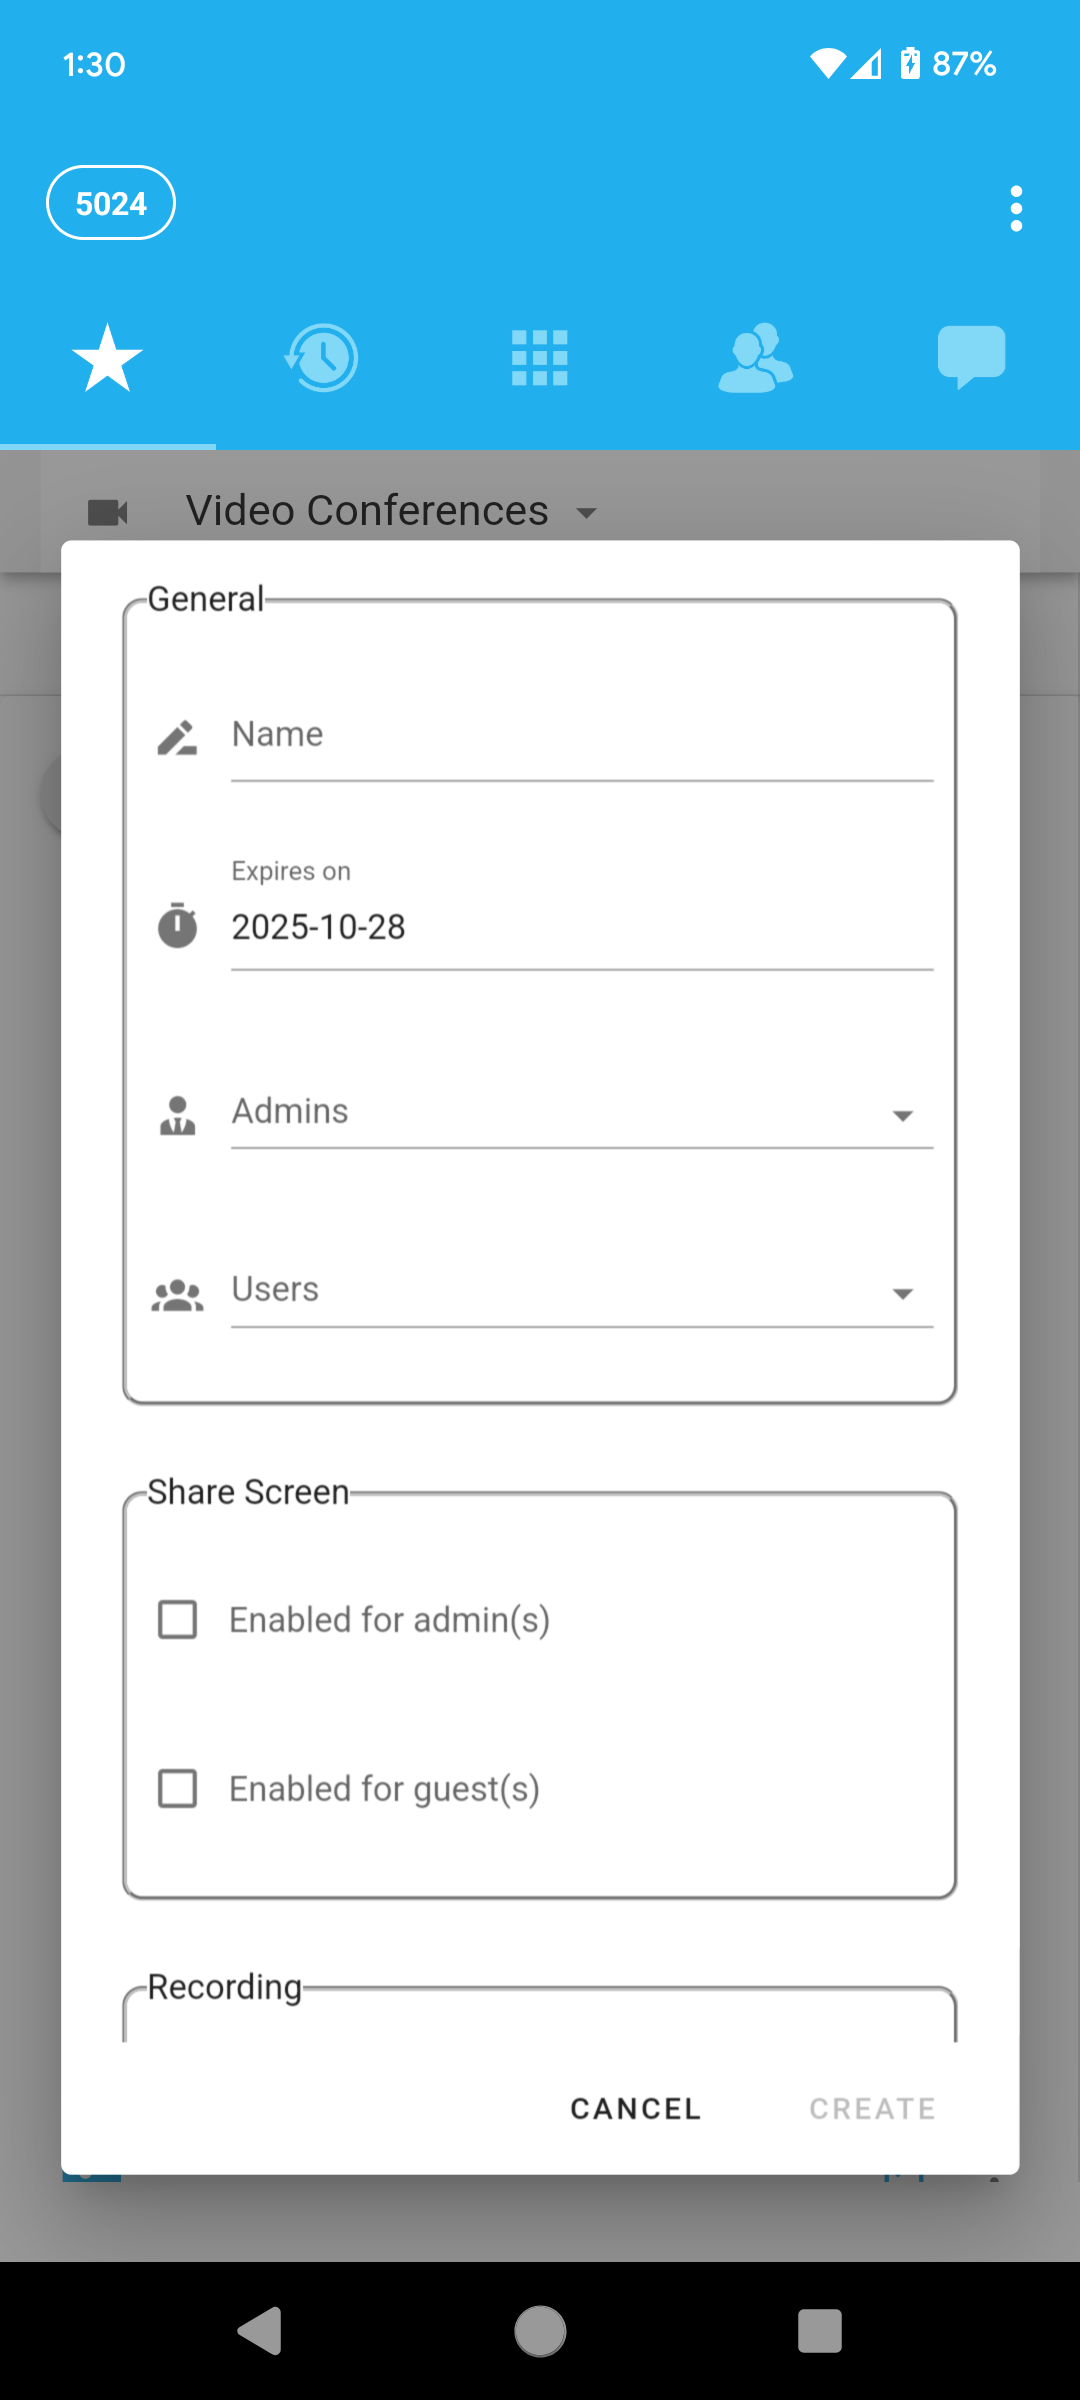
Here you can join video conference rooms already existing in the Clearly Cloud instance and also you are able to create video conference rooms.
Press on the new window icon to the right of the name of an existing video conference room to join it.
For management of existing video conference rooms (update its settings, see participants, delet it), press on the three vertical dots to the right of the new window icon.
For creating a new video conference room, just touch the "+ Create Video Conference" button at the top:
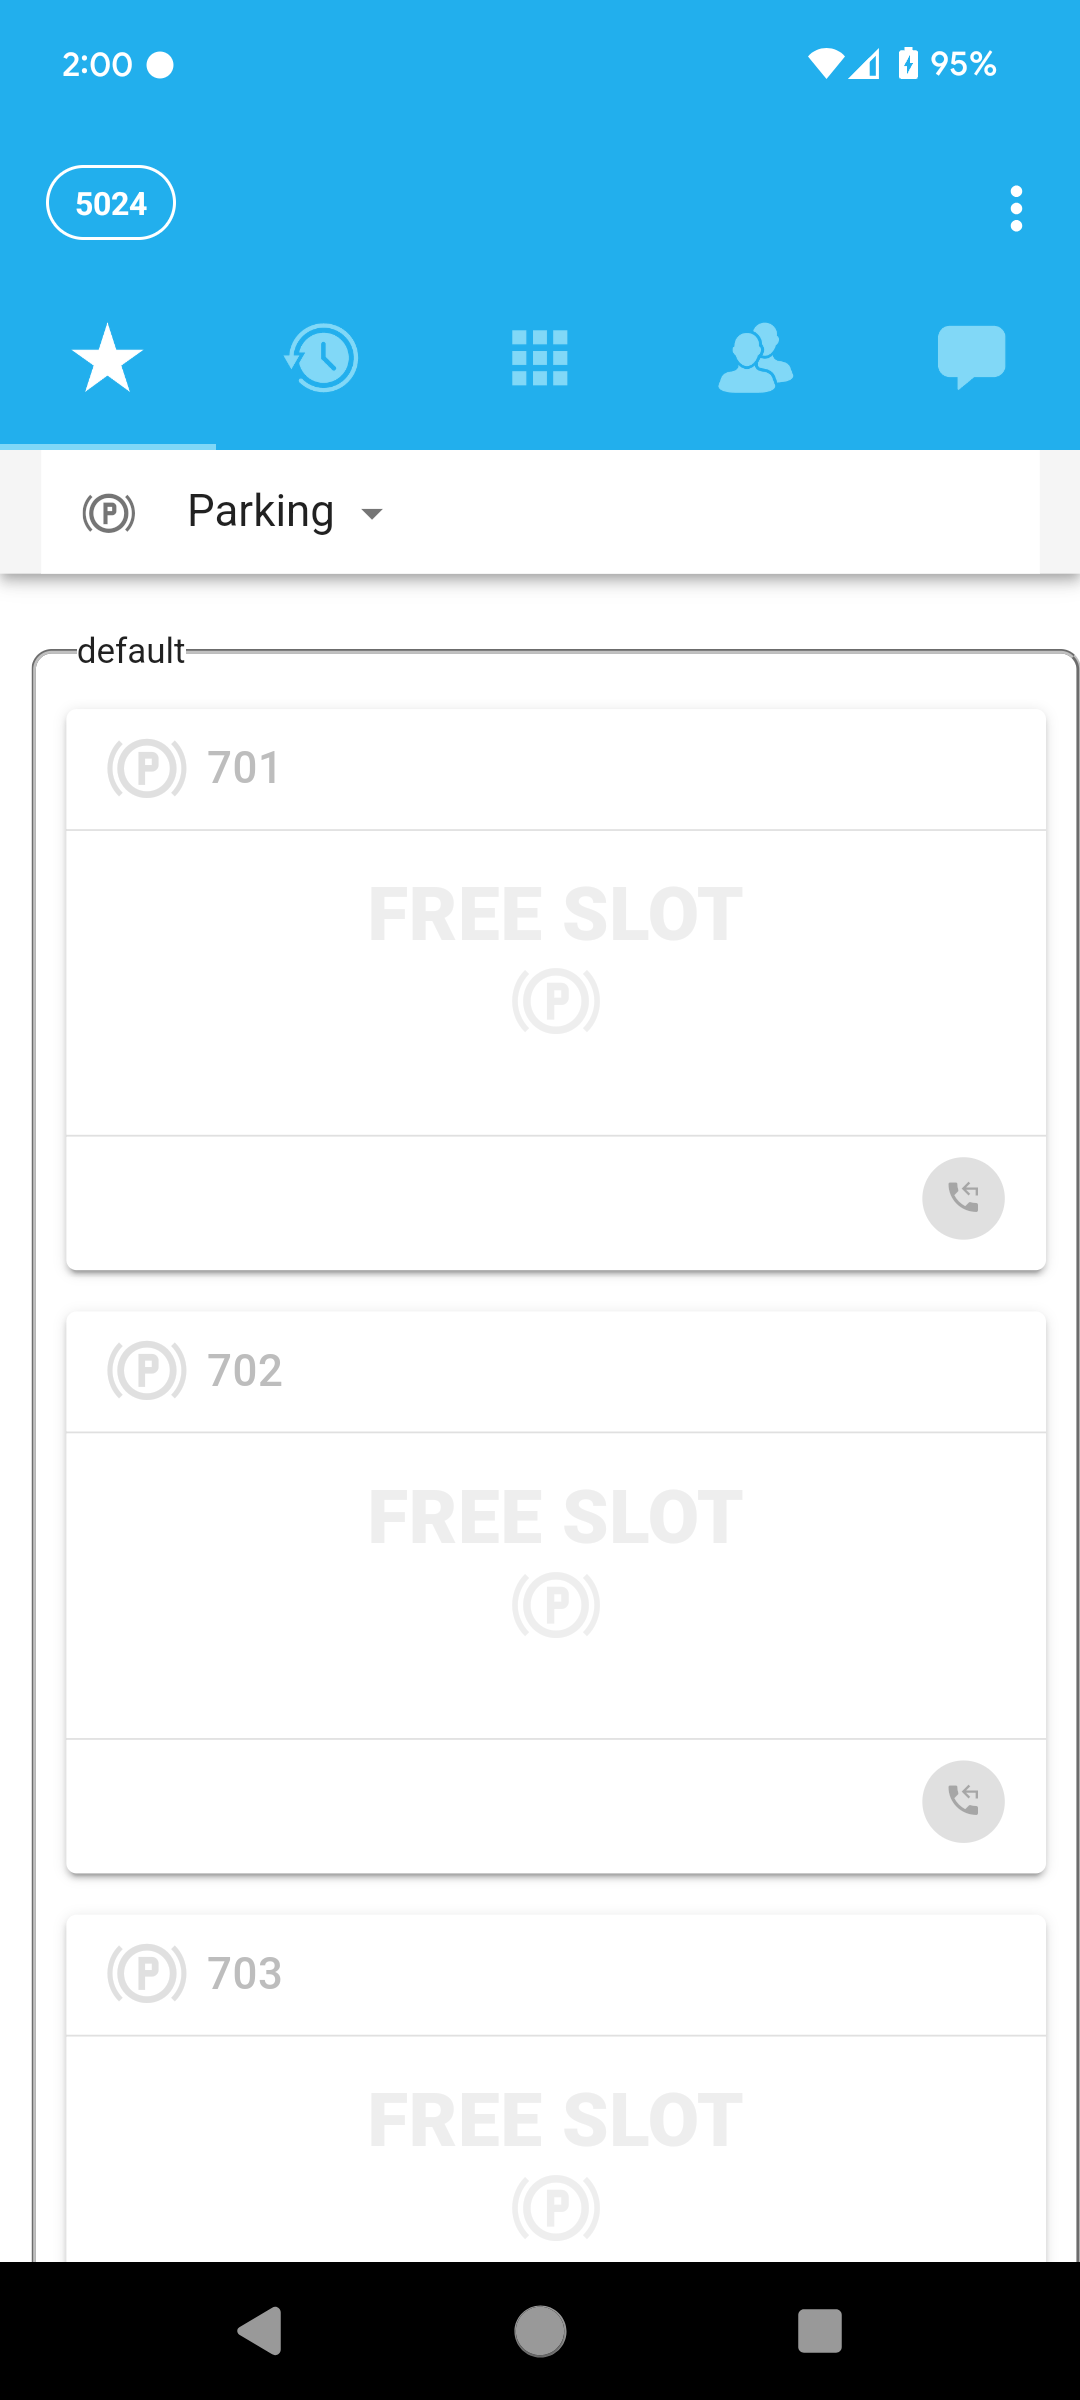
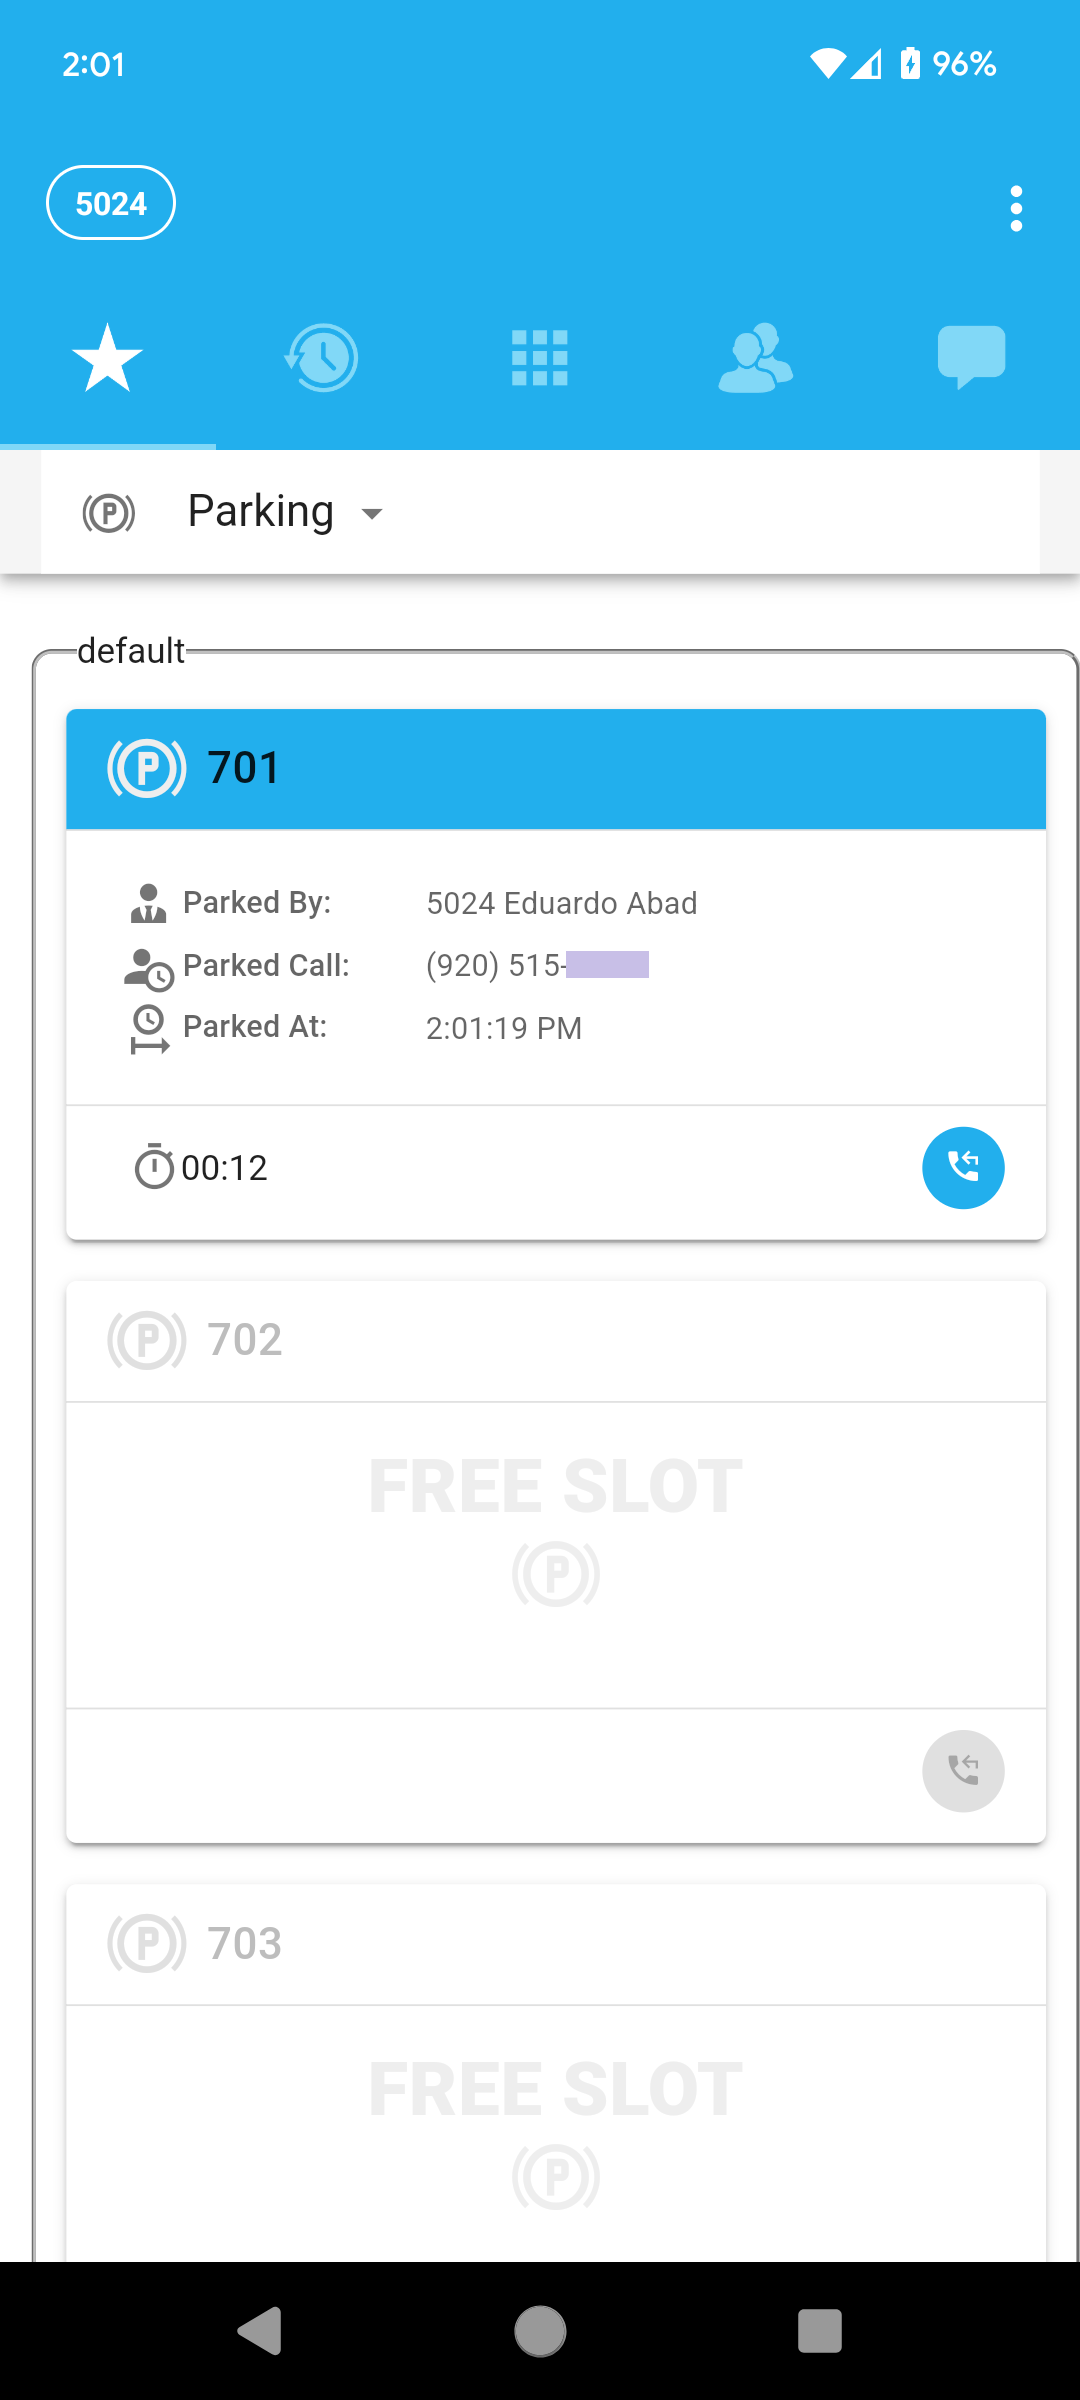
Here you can see and retrieve calls that are currently parked.
Calls currently parked will be displayed as follows, just touch the blue handset icon on the bottom right corner of the parking lot card of the corresponding parked call you want to retrieve in order to dial that parking lot and retrieve that parked call.
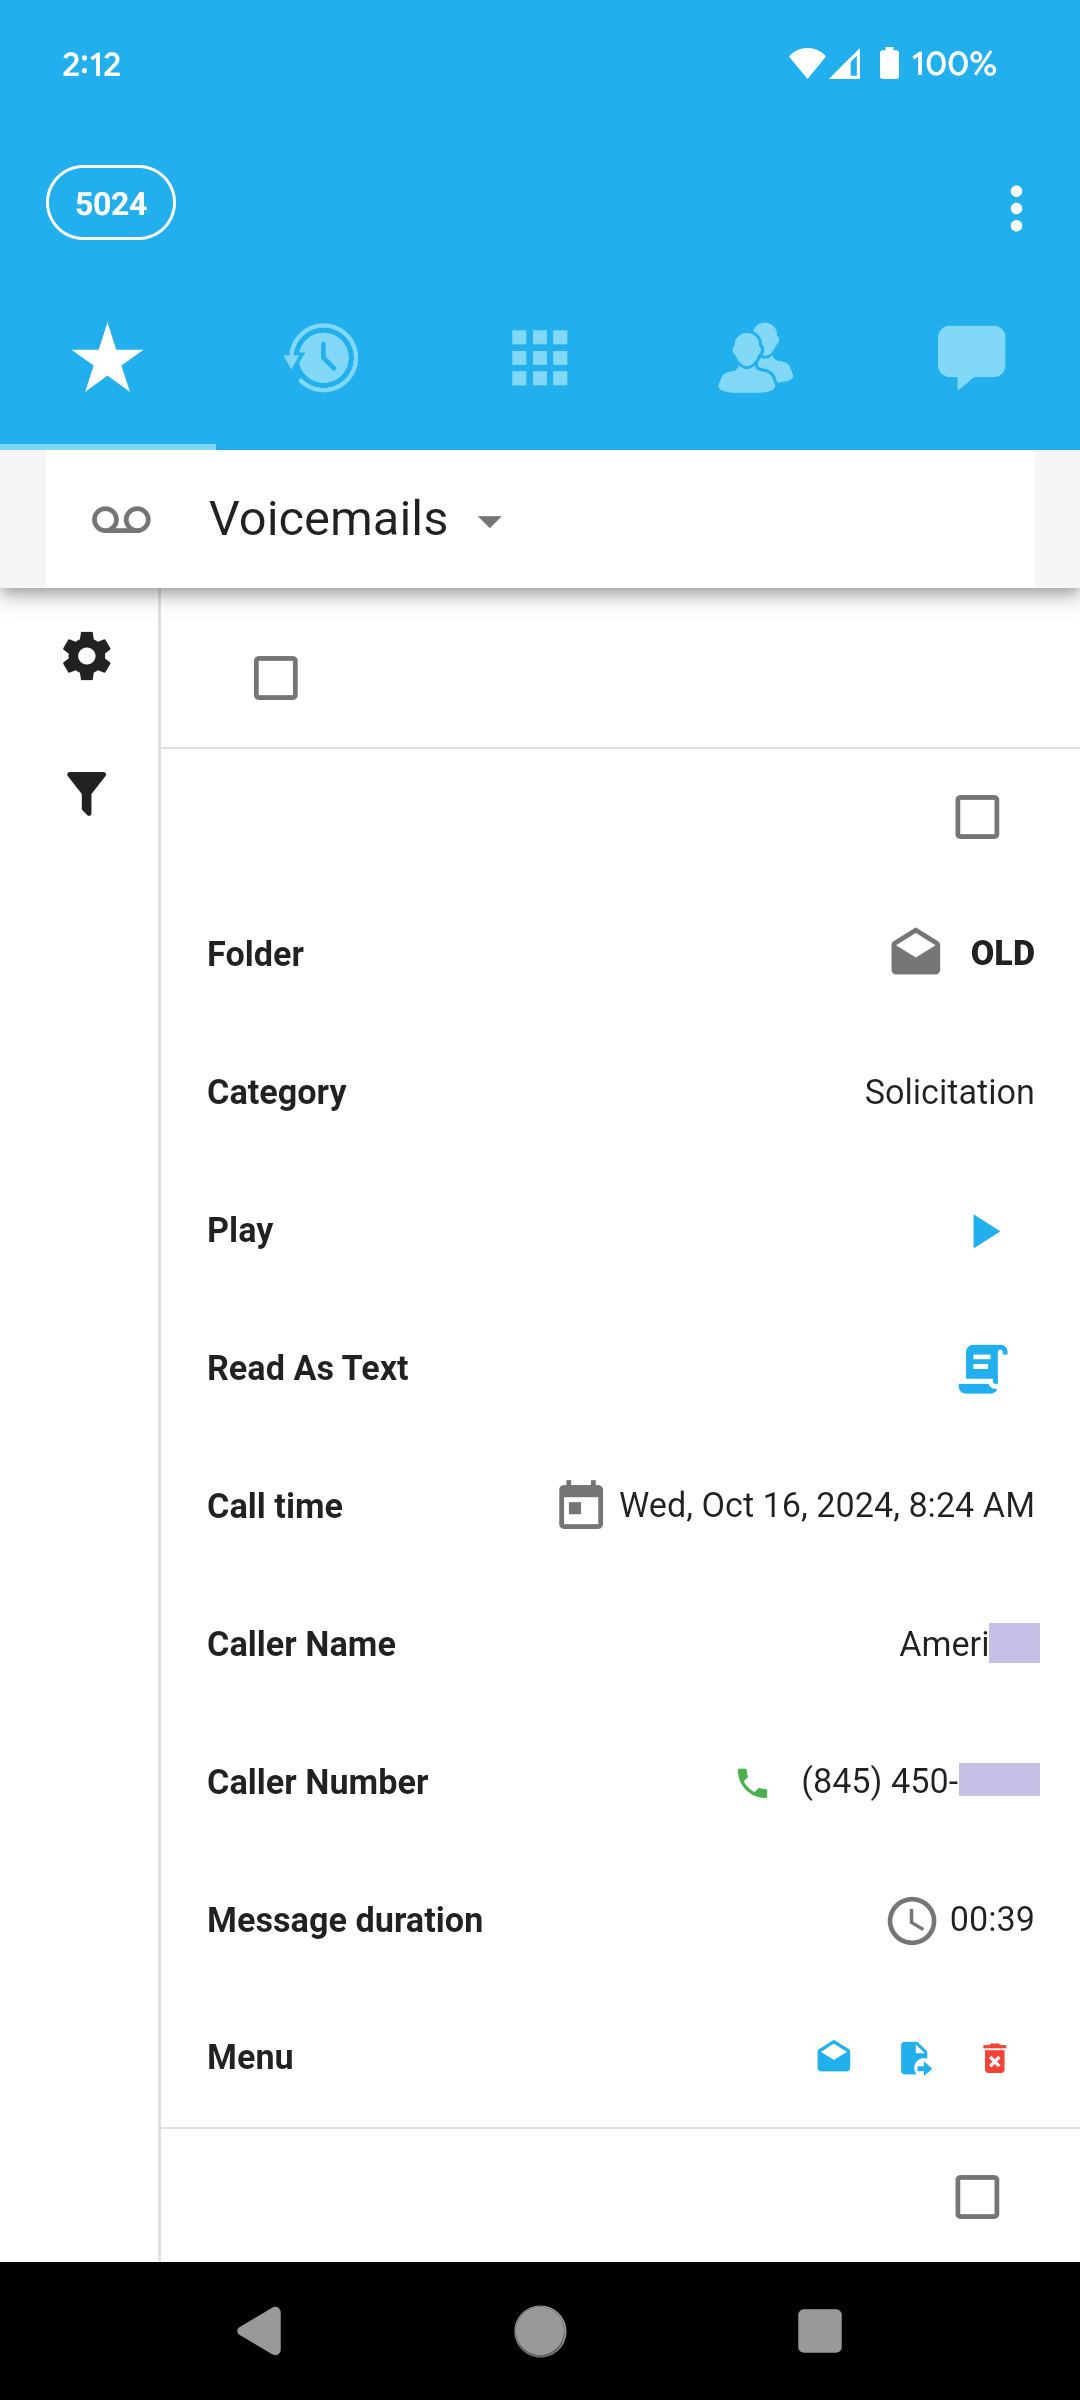
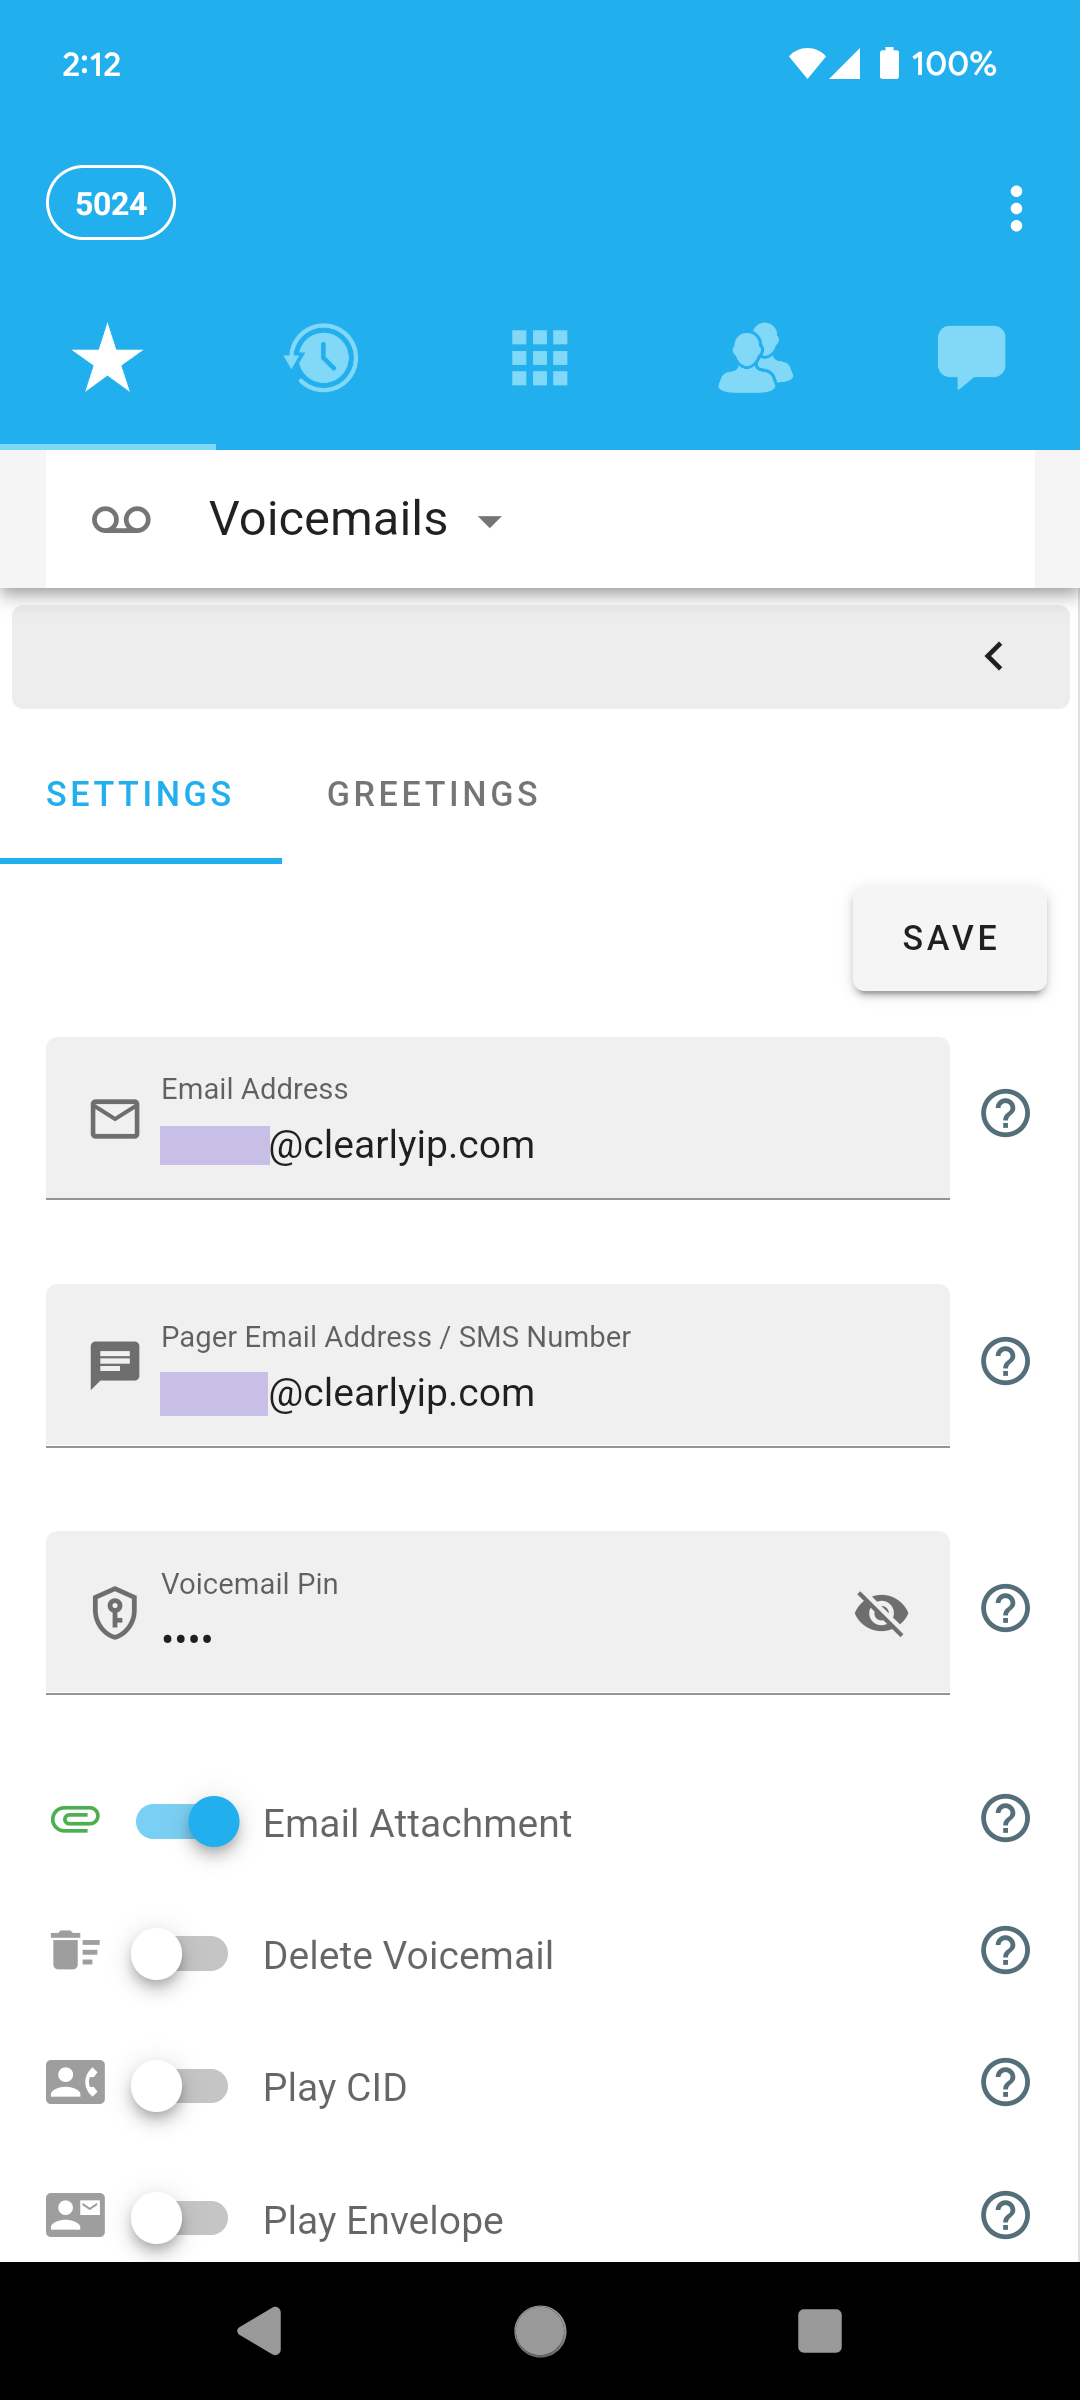
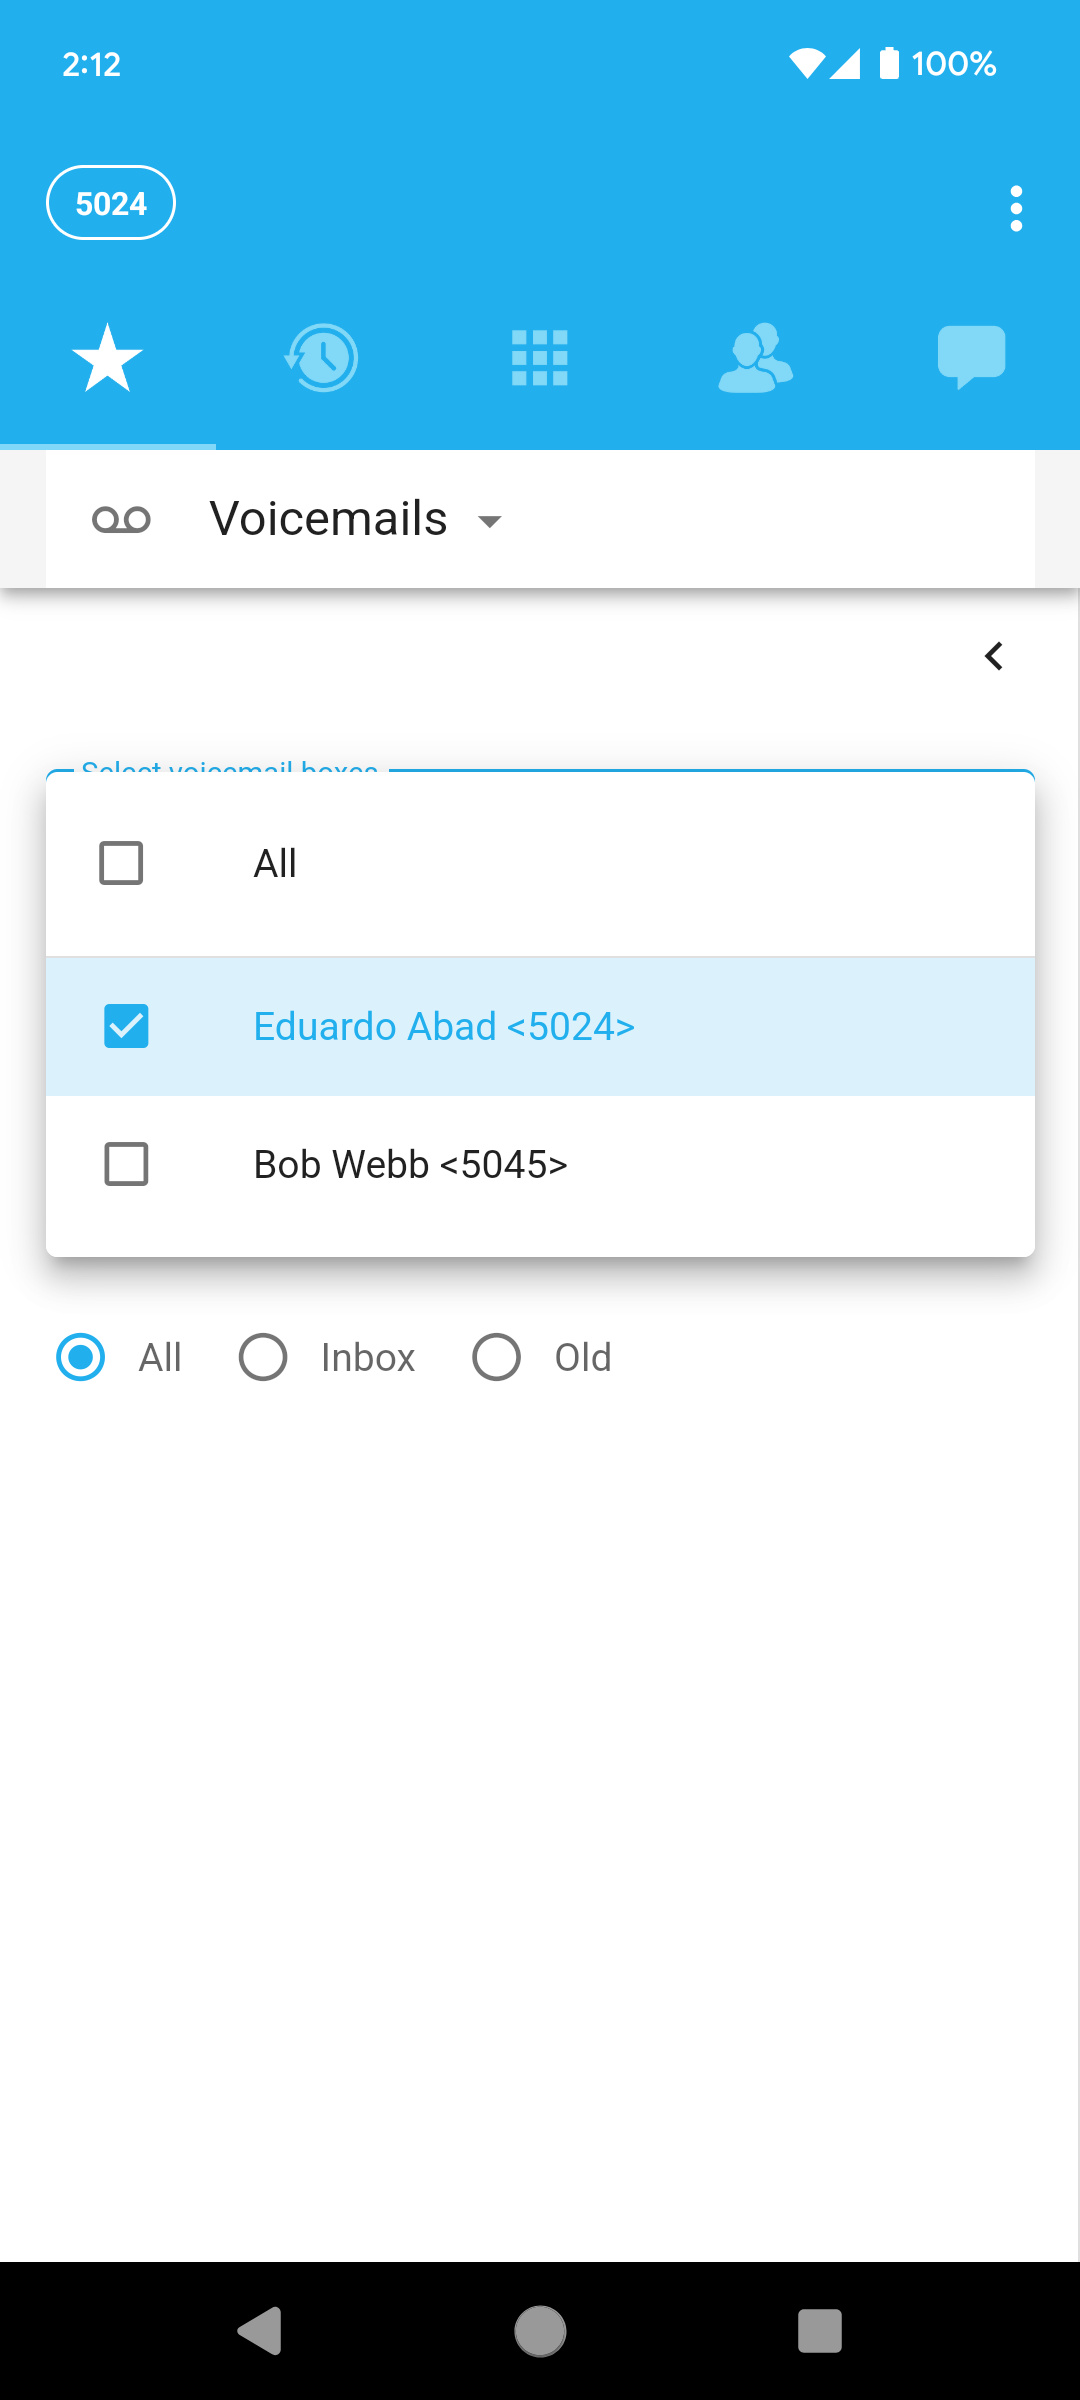
In this panel you can access (hear, read, manage) voicemail messages left to you or to any other voicemail mailbox you are monitoring. You can also manage your different voicemail greetings. Available management actions for the voicemails are: mark as read or unread, transfer, and delete.
The first screen displayed when accessing this panel is the list of voicemail messages in your voicemail mailbox, here you can see the envelop information for each message as well as hear them, read their transcription, transfer them to another user extension or delete them.
Touching on the gear icon (⚙) on the left will bring up the Settings and Greetings menus:
Whereas touching on the filter icon on the left will bring up the Filtering menu where you can select the voicemail mailbox of which user(s) to access as well as other by-date filtering options:
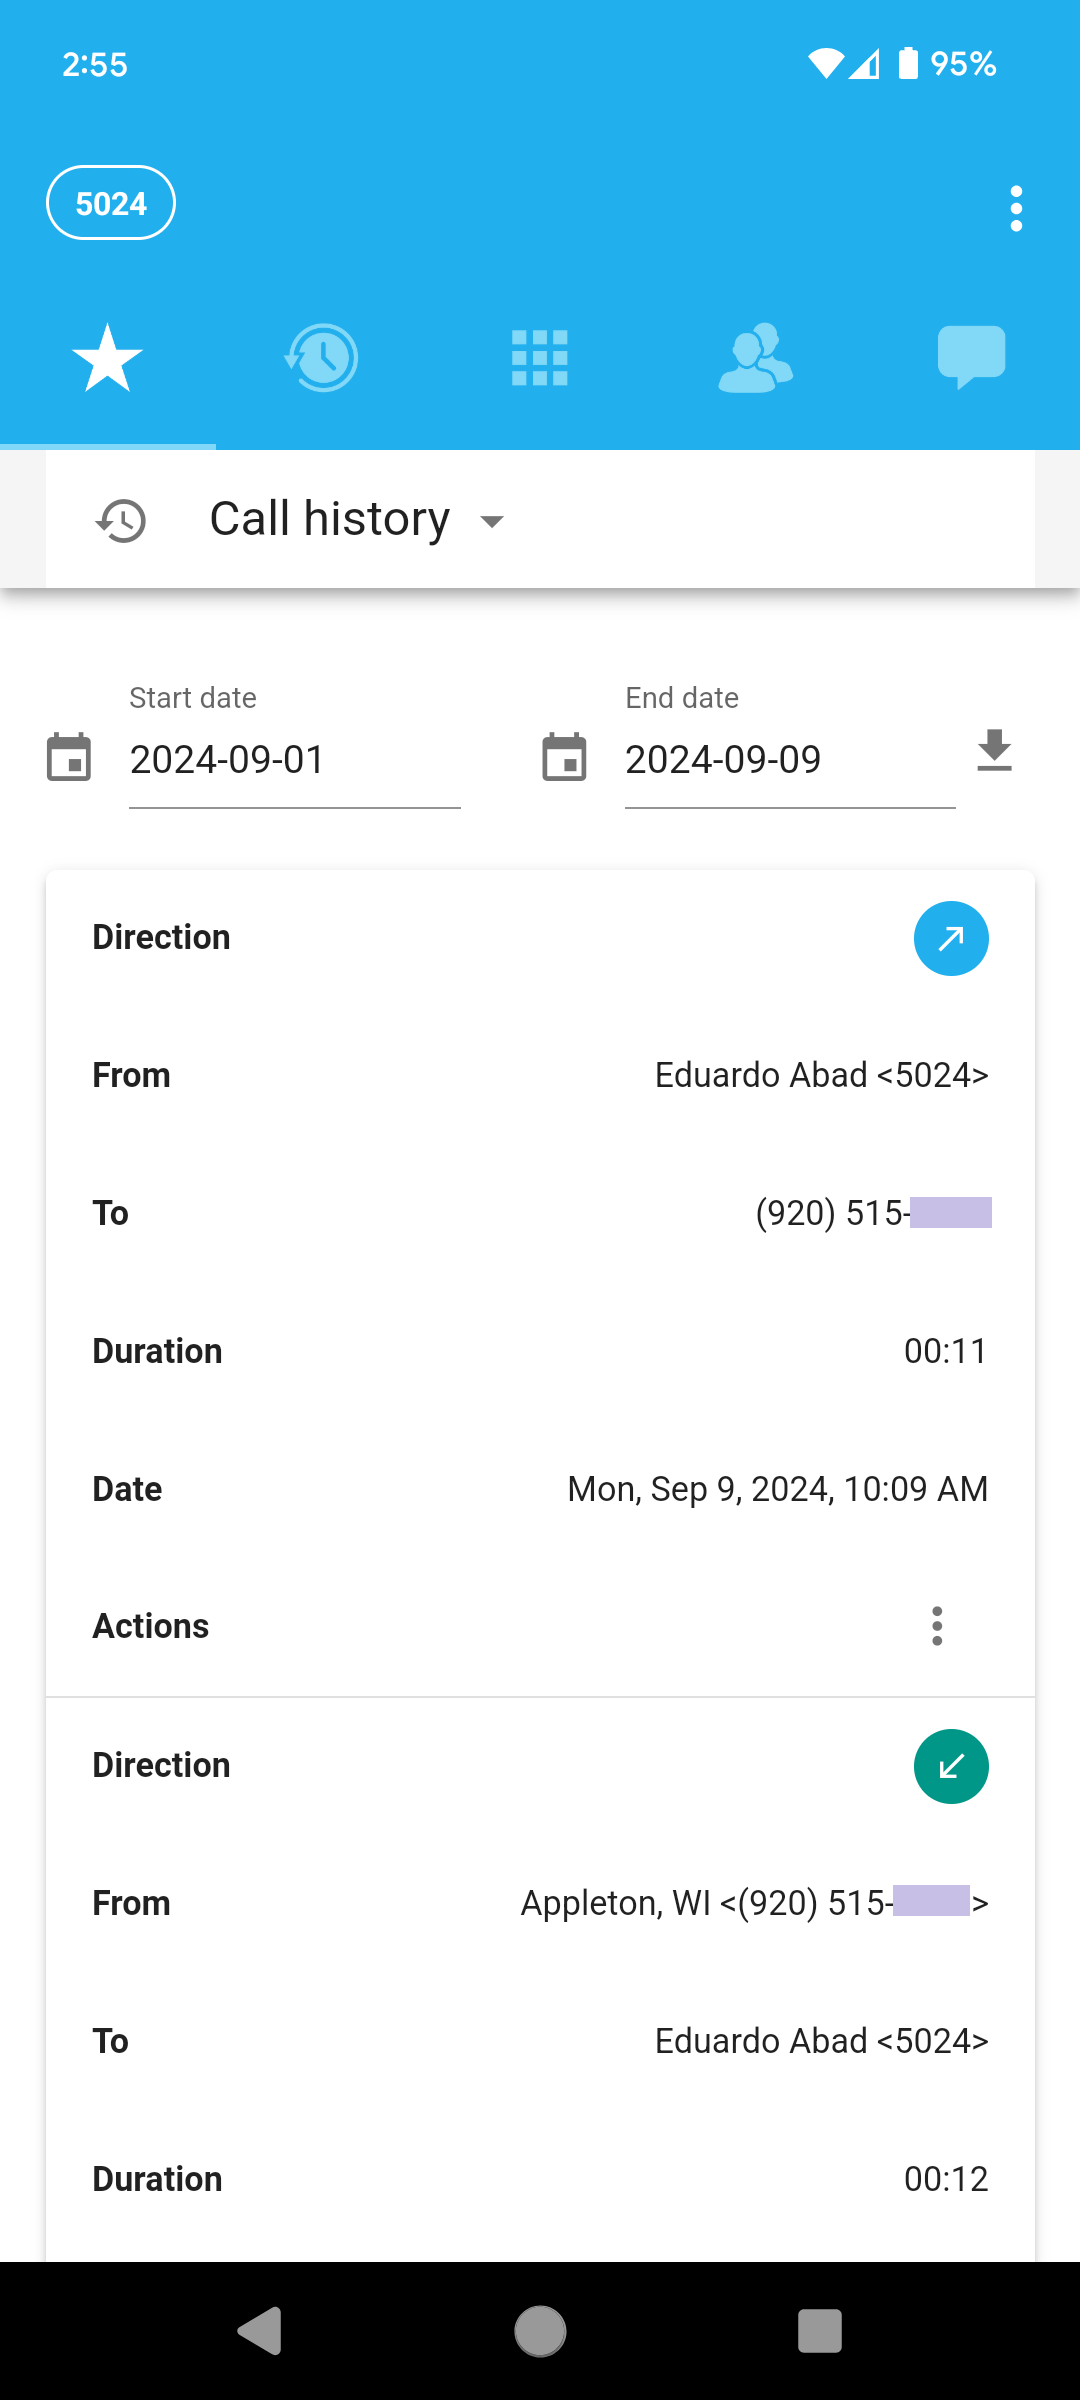
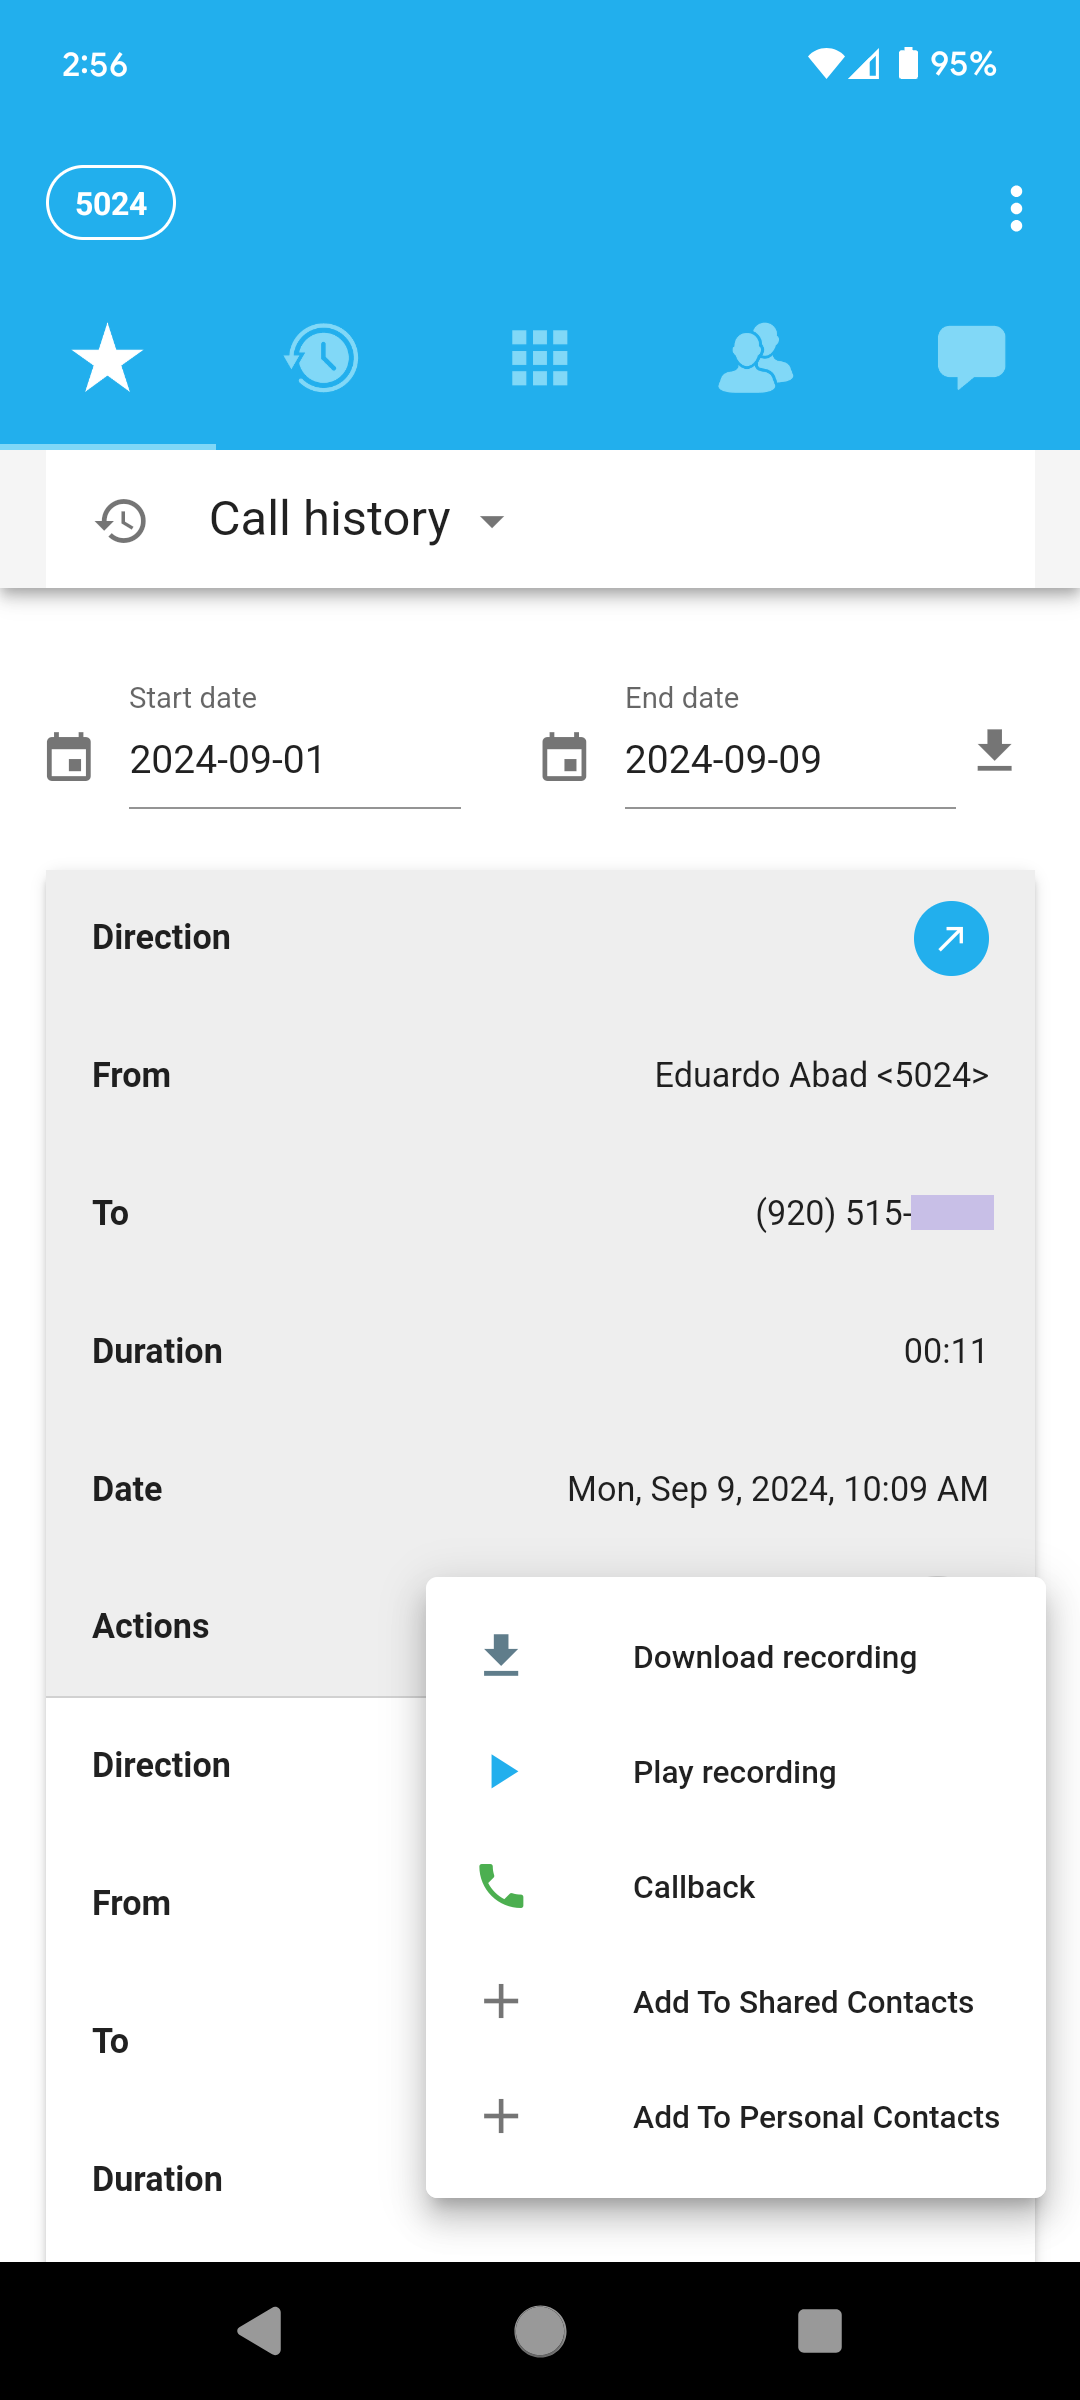
The Call History panel gives access to your own call history logs (CDRs) to see that information but also actions such as hear or download call recording, callback, or add to contacts are available when touching the three vertical dots in the Actions line of each call log entry:
Do Not Disturb (DND)
- DND on your Clearly Anywhere mobile app is not synced to the PBX for DND, which means when you enable DND on your mobile app, it will only enable it for that specific device. This is done on purpose; otherwise, if you enabled DND on your mobile device, it would enable it on all your phones if it was server-side. The most common reason for enabling DND on your mobile is that you may not want calls coming to your mobile when you are near your desk phone.
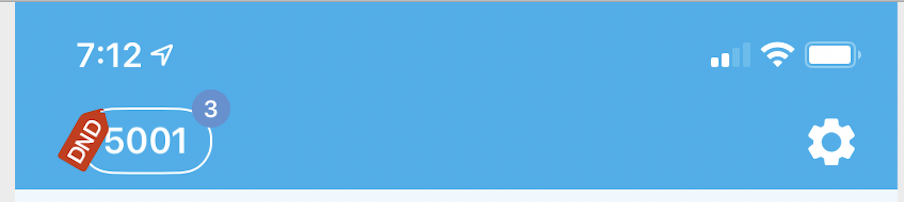
Toggling DND Manually
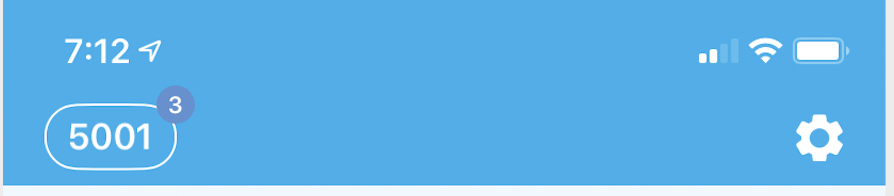
- From the main screen of your app, click on the (Extension) box at the top

- From here, we can see the current state of DND is off.
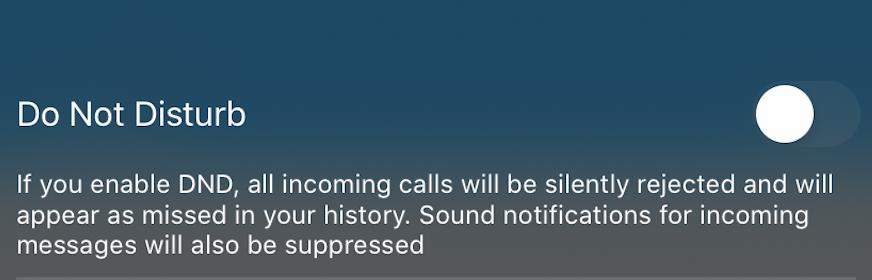
- Click on the toggle slider to turn on DND, and we will see it is now enabled
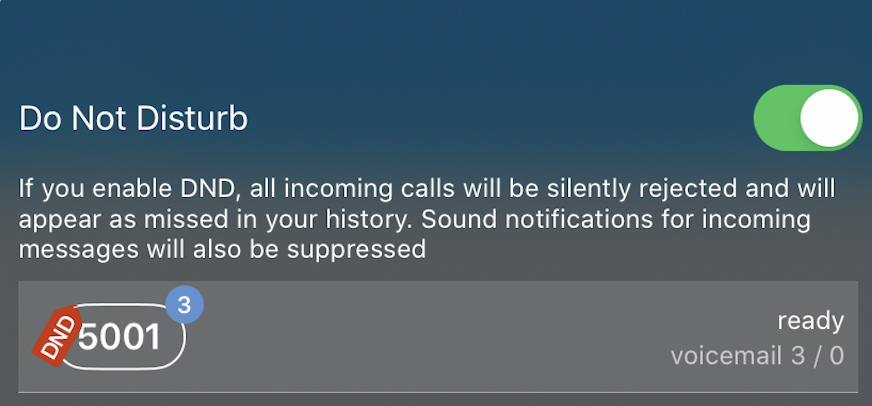
- From the main screen, we can also see DND now shows on the corner of the (Extension) box.
Setting up DND Schedule
- You can optionally set a schedule of when you want DND to be enabled and disabled automatically. If the schedule is set up and you are currently within that schedule period, DND is automatically enabled.
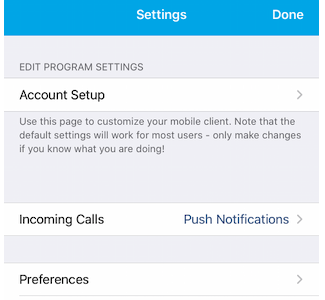
- Click on the Gear Cog on the top right from the dial screen
- Click on the Preferences option
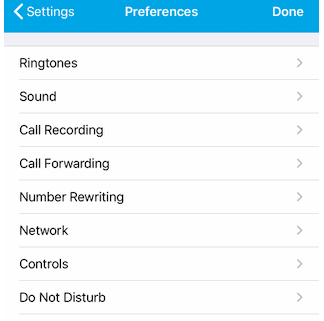
- Pick the Do Not Disturb option
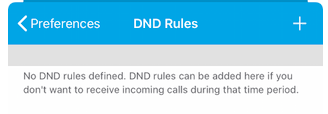
- From here, we can see a list of any DND rules we have already created and add, edit or delete rules. Click on the + icon in the top right to create a new rule.
- From here, we can define what hours and days of the week we want this rule to apply to. You may also add a comment for this rule, describing what its purpose or use is. In our example, we are calling it Business Hours and defining its Monday thru Friday, 8 AM to 4 PM. Press the Add button at the top to save your rule.
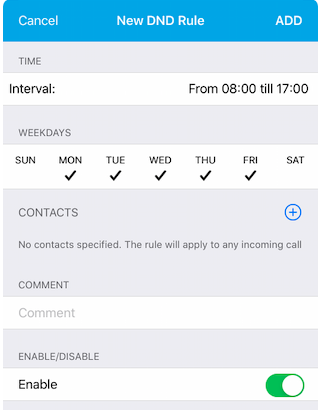
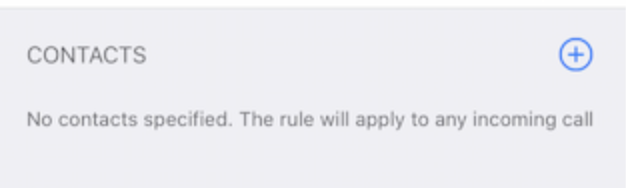
- You can optionally define the rule for specific contacts or phone numbers if you want. For this rule, we are going to leave it for all contacts.
- We can now see our new Rule is Enabled and added.
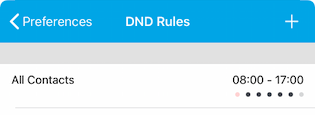
- Below is a screenshot of a second rule I created, but the rule is not marked as enabled, so it's greyed out in the list since it's currently disabled. You can go into any rule at any time and enable or disable the rule.

Video Calling
- The Clearly Anywhere app supports making video calls from 1 Extension to another extension, also known as 1:1 Video Calling. Video calling should work with any other extension on your PBX set up with a Video enabled DeskPhone or Softphone such as Clearly Anywhere.
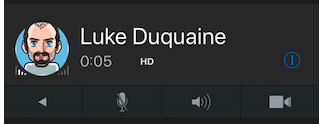
- While on an active call, you can press the Video icon to establish a Video feed with any extension on the same PBX setup for Video, including other Clearly Anywhere users.
- Pick if you want to use the Front or Back Camera

- You can now see the Video of the other caller and your feed
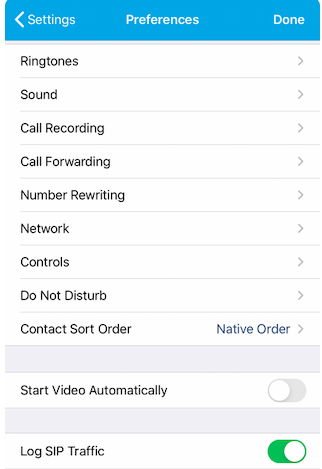
Enable Debug Logging
-
Your Mobile app, by default, does not log anything, and we have to enable logging if prompted by Support to provide logs.
- Click on the Gear Cog in your app.
- Pick the Preferences option
- Activate the Log SIP Traffic button and verify it shows it is active now as shown below, and press Done at the top.
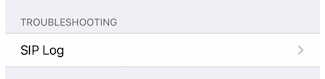
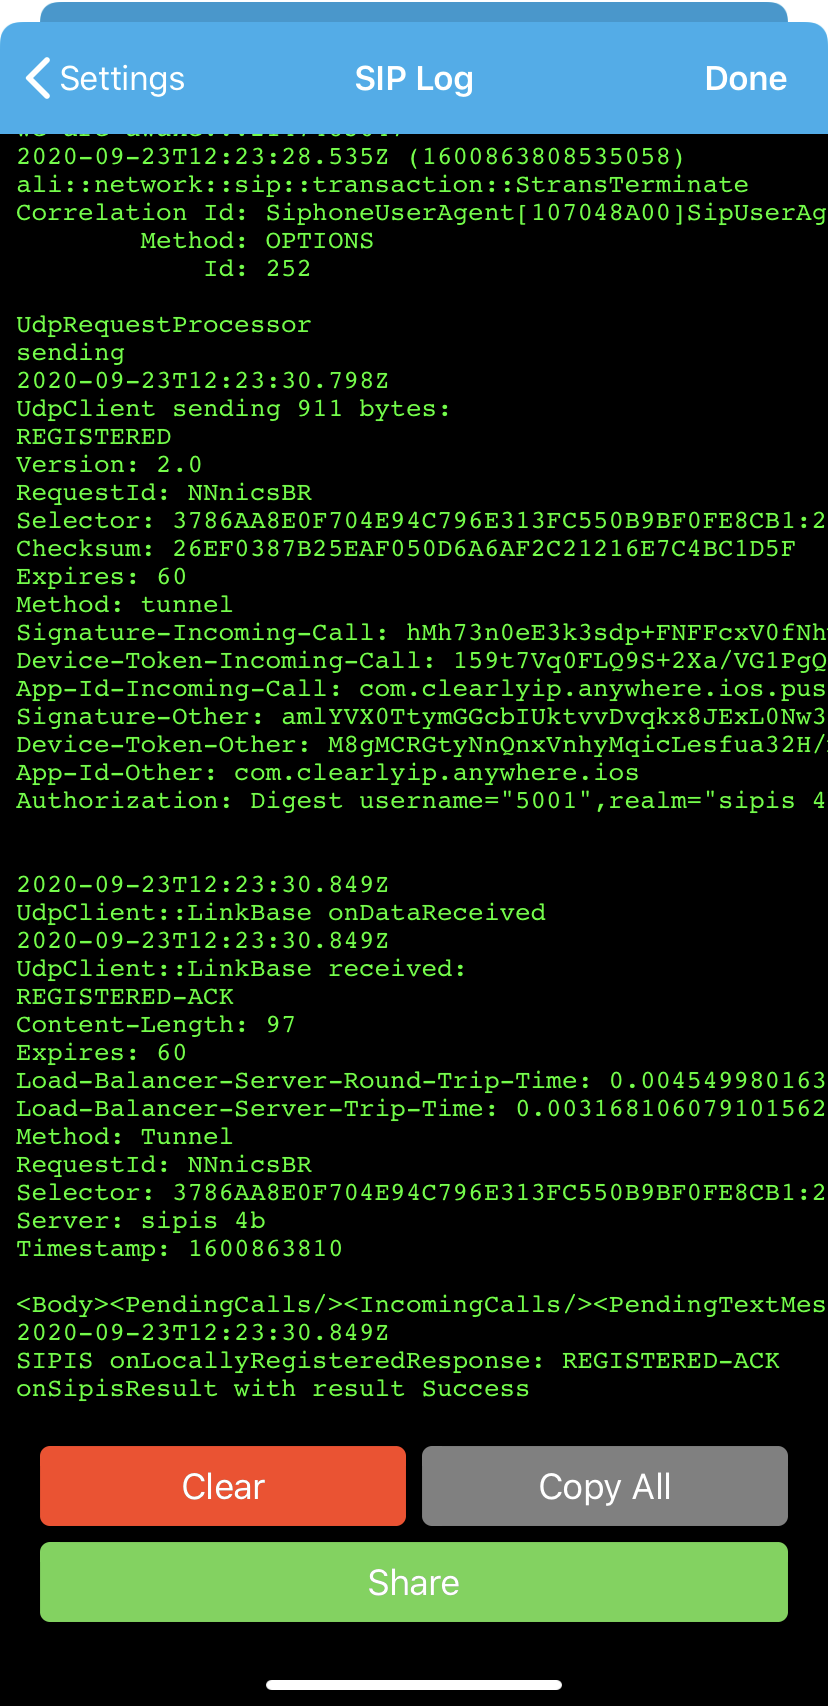
Viewing Debug Logs
- Click on the Gear Cog in your app.
- Click on the SIP Log option
- You can see the full logs and use the share button to email it to yourself or Support.
- Your Clearly Anywhere mobile softphone app supports SMS messaging from most US 48 and Canadian DIDs.
- Please note that to utilize this feature, recent regulations have been instituted by mobile carriers that require Brand and Campaign registrations for SMS send/receive to US and (most) Canadian wireless and mobile users.
- Further information on these changes, and documentation on how to complete this registration process can be found here.
- Note that this process must be completed prior to successful SMS sending from your PBX (whether it is from Desktop, or Mobile softphone applications)
 Uploading ....