Overview
Agent and Client tab will only show up for any Certified Partners or Agents of Clearly IP. This is where you can track all your commissions, view your special signup URL for customers, or create customers directly that allows you to also log in as the customer and manage their account at any time.
The concept of Agent applies in 2 places for Clearly Trunking and Clearly Cloud. You as an Agent, can be the Agent for a specific Trunk or Cloud Location or the Agent for the whole customer. The difference is explained here;
- Location Agent - When you are set as an Agent at the Trunking or Clearly Cloud Location level, it entitles you to receive a commission on that location, but you cannot log in as the customer. For a location to be assigned to you as the Agent, your customer must complete the Location Order/Creation using your custom New Signup URL as defined on your account, as outlined here.
- If your customer creates the location directly at Clearly IP URL without your New Signup URL, the location will not be assigned to you as the Location Agent unless you were marked as the Master Agent for the whole customer, as defined below.
- Customer Agent - When a customer is assigned to you as an Agent, it allows you to log in as that customer without knowing the Customer Login information, manage the Account, and place orders on their behalf as an authorized user on their account. The only way to be set as the Customer level Master Agent is to create the Customer under your account, as outlined here.
- By being the Customer level Master agent, any location they create for Trunking or Clearly Cloud will automatically set that Location to you as the Agent to receive the commissions regardless of what URL they used to order/create the new Location.
- If you have Customers created using the New Signup URL as the Location Agent but you want the Customer to be a a Customer Agent with the ability to log in as the Customer, you will need to have the customer open a support ticket with us at https://support.clearlyip.com request that we move their Customer Account under you as the Master Agent, and we can make that change.
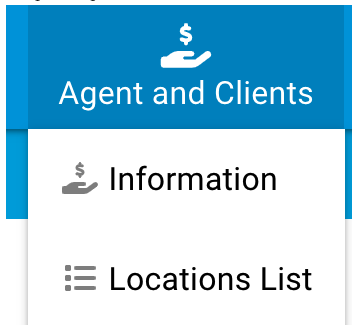
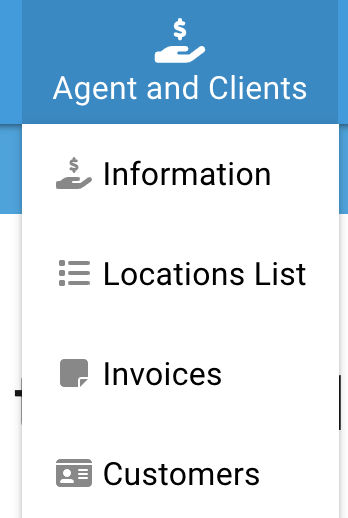
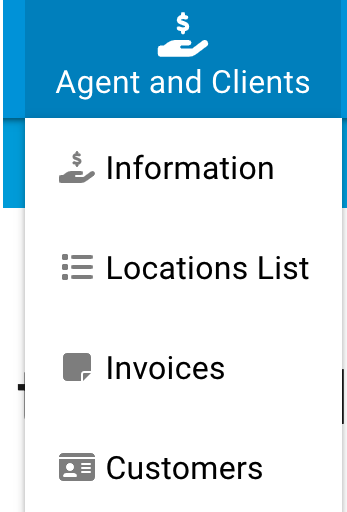
- Navigate to Agent and Clients > Information
- From here, you can view information related to your Agent account with Clearly IP.
- Agent ID Code - A unique code for your account. This code is used as part of the custom Signup URL below.
- One Time Commissions - The commission % you are paid whenever a new order is placed versus the monthly residual commission below.
- Residual Commission - The monthly commission % you are paid monthly for all services related to each location.
- New Signup URL - This is the custom URL that you give to your customers when they want to order/create a new location themselves versus you logging in as them. This will assign you as the Location Agent for that new location. This URL only needs to be used on the initial Location creation to tie the Location to you as the Agent. If you use the Customer Agent option from above, the whole customer is assigned to you as the Agent, and any location they create will automatically be assigned to you as the Agent regardless of the URL they use.

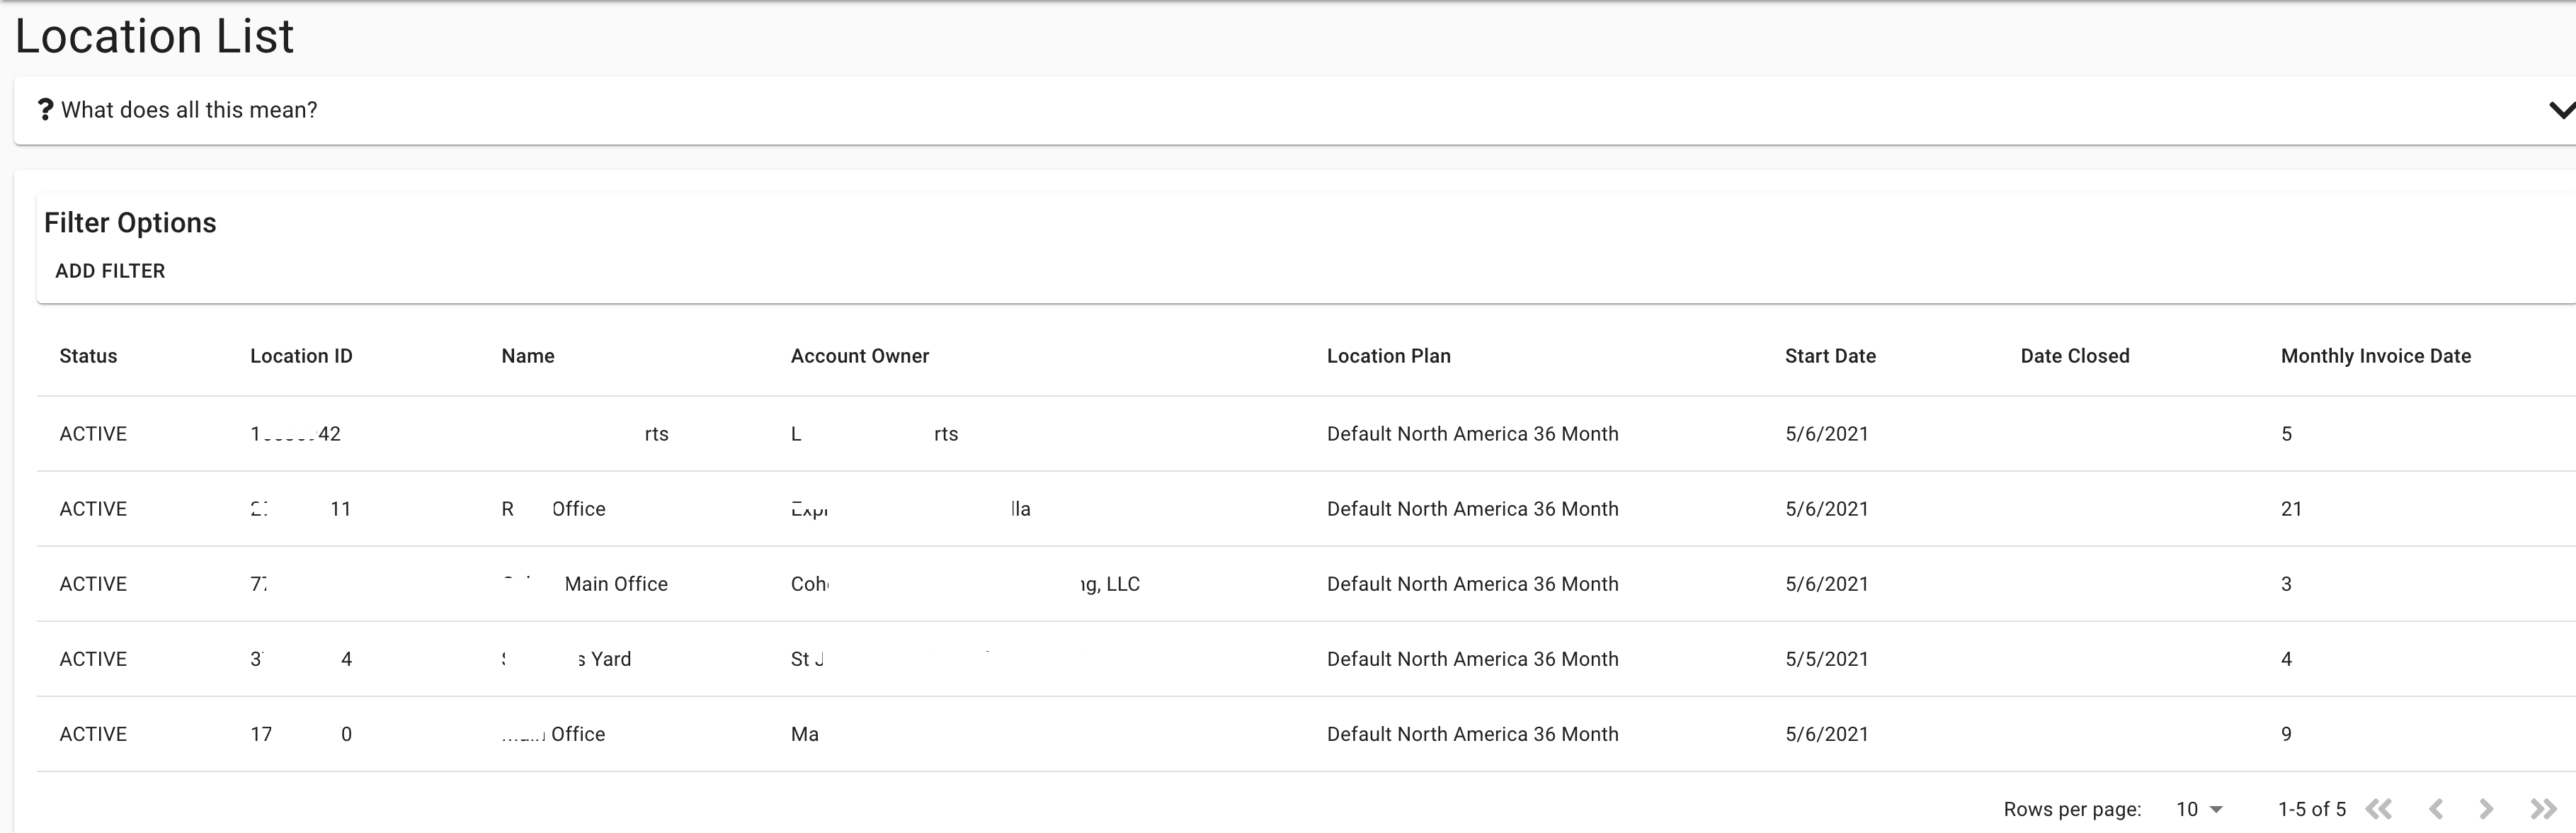
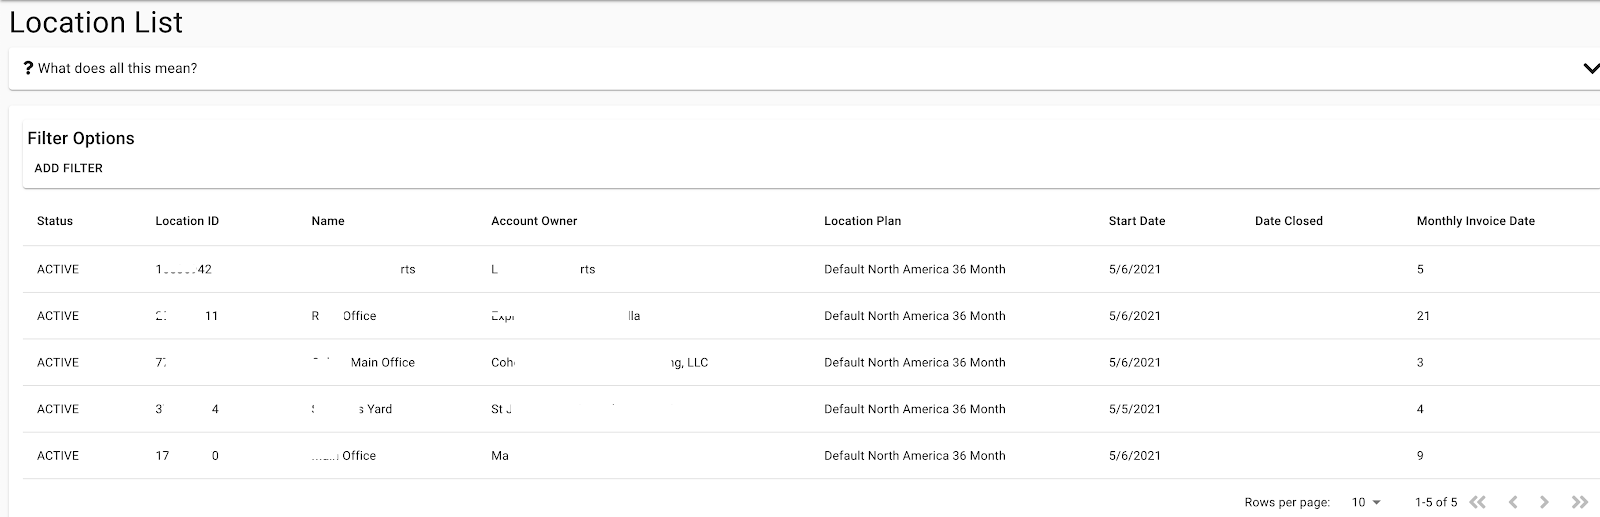
Location List
- Navigate to Agent and Clients > Location List
- From here, we can see a list of all the Trunking or Clearly Cloud Locations that you are being paid an Agent Commission on, and we can view the following fields for each Location
- Status - If the location is Active or Closed. If closed, the location is no longer being invoiced, and no commissions will be paid any more on that location since the location was canceled.
- Location ID - The unique ID we create for each location when the location is created.
- Name - Name of the Location as defined by the Customer
- Account Owner - Customer Name that the Location belongs to.
- Location Plan - What contract plan the location is under, such as Month to Month, 12 Months or 36 Month contract terms.
- Start Date - The date the location was created.
- Date Closed - Date the location was closed or canceled.
- Monthly Invoice Date - What day of each month the location is invoiced on.
Invoices
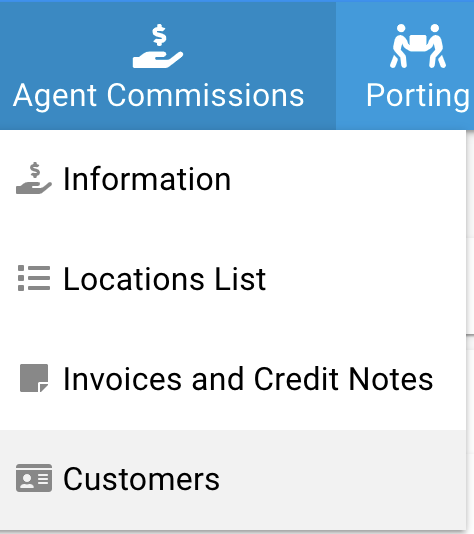
- Navigate to Agent and Clients > Invoices
- From here, you can see a list of all invoices and/or credit notes that were created for all the Locations that you are a Master Agent of. You can also view the commission amount earned on each invoice, along with when the commission was paid.
- Type - If the invoice was for a new purchase or monthly renewal since the commission % can be different on a monthly residual versus a new purchase.
- Invoice # - The invoice number
- Invoice Date - Date the invoice was created
- Customer Name - Name of the Customer for this invoice.
- Service Location Name - The location name the invoice was created for.
- Total Invoice - Total amount of the invoice, including taxes which commissions are not paid on.
- Invoice Payment Date - Date the invoice was paid by the customer. If blank, the invoice has not been paid yet. Commissions are only paid out after the invoice is paid by the customer.
- Agent Commissionable Invoice Amount - Amount of the invoice that is Commissionable. This is the total invoice amount minus any taxes or fees we pay the actual commission off of.
- Total Commission Amount - Amount of commission due on this invoice
- Commission Pay Date - Date the commission was paid from Clearly IP. If blank, the commission has not been paid yet.
- Commission Paid Ref # - The payment reference number on the payment made from Clearly IP to the Agent such as Check # or EFT ID number.
- View Invoice - Link to view the actual customer invoice.

- Agent Commissions are paid out once per month once the amount of total agent commission due has exceeded 50.00. Until the total amount due reached 50.00 the invoices will be listed above with the Commission Amount but the Commision Pay Date and REg # will remain blank.
- The timeline for monthly agent commissions are as followed.
- First week of the new month the Commission is calculated for the previous months commissions. If the amount due in total is over 50.00 you commission will be queued up for payment.
- Once you commission (around the 5th-7th of each month) is queued up you will receive a email from us with the expected payment date and the Payment Reference Number. These same 2 fields will be updated in the list of invoices above for all invoices the payment is being setup for.
- Payment is setup for around the 22nd-25th of each month and will be provided in the email notification above.
Customers
- Navigate to Agent and Clients > Customers
- The customer’s tab will show you a list of all customers that you created direct, and let you log in as the customer with a link. You will not need to know the Login Username or Password, since these are Customers you created under your account and not directly created by the Customer. See the Overview section on the difference between customers signing up with your Agent URL link versus customers you create direct here.
- Name - Customer business name
- Customer ID Number - Unique Clearly IP account number for the customer.
- Type - What type of customer this is. Normally End User, but there may be other types. ClearlyIP controls this.
- Verified - If the account is verified. A non-verified account means they can log in to the store, but their service for trunking or cloud will not work until they call us and verify their identity. Normally this will be set to yes when your agent creates the customer under you since we have a trust factor with you and trust you are adding legit customers.
- Payment Method - A Green Icon means they have their payment method all setup correctly, A Red Icon with the text of "Send Payment Setup Email" means they have not added their Credit Card or ACH information yet. Clicking on the Send Payment Setup Email will send the billing contacts for this customer a email directing them how to Setup there Credit Card or ACH info depending if they are setup as ACH or Credit Card.
- Statement Date - Day of the month that this customer will be invoiced for all their locations with us.
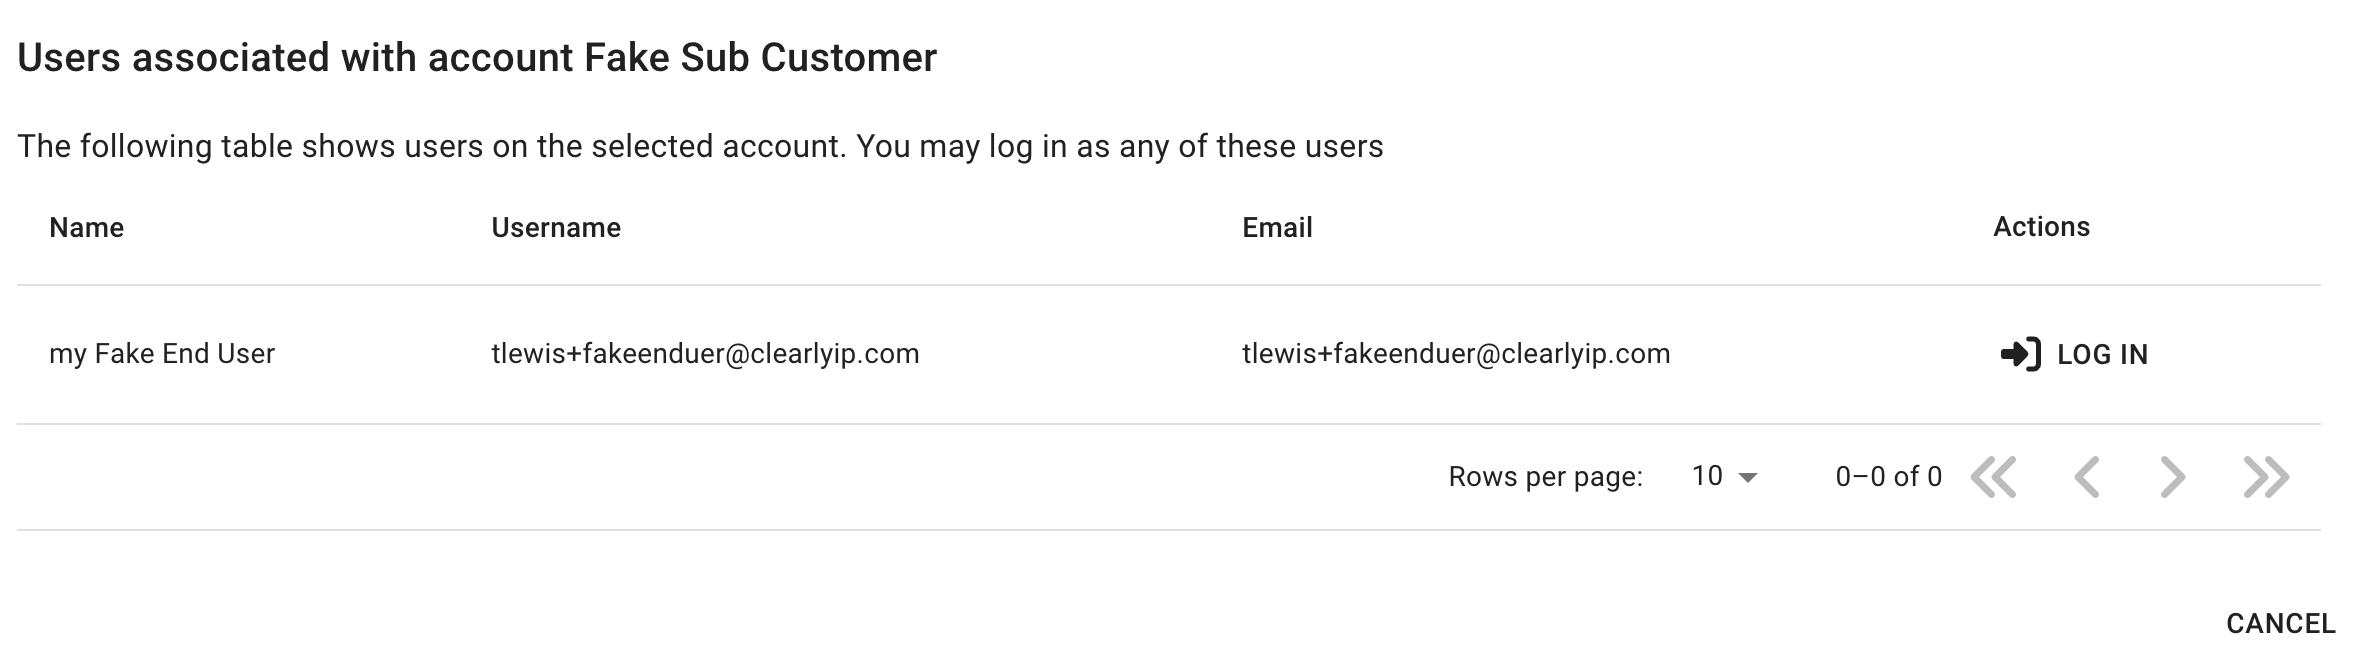
- Actions - Login Options allows you to impersonate login as the customer without needing to know the password of the user. When clicked on it will prompt you to list the users the customer has and lets you pick which user you want to login as.

Creating New Customer under your Partner Account
- To create a new customer that you will be marked as the Master Agent, click on the "Create New Customer Account" button.

- You will need to provide the following pieces of information, and the account will be created, and the customer login will also be active. Share with your customer the Login details, and they can now log in to their account.
- Name and Email - Provide the First and Last name and email of the contact for the Customer you are creating. This contact will become the primary contact and billing contact for this Customer. Once you have created the customer you can impersonate login as the customer and add more contacts if need be.
- Username - Username the Contact above will use to Login. Usually set to the Email address of the Contact but does not have to be the email.
- Company - Name of the Company you are creating here
- Statement Date - What day of each month do you want the recurring charges for this customer to occur at. Please note that if you set this to be less then 15 days from now any purchases for the new Locations you create will prorate the 1st month charges at checkout time at 50%. If the Date is more than 15 days from now it will charge full price.
- Billing Address - Billing address for the customer you are creating.
- Password - What password you want to set this new Contact to have for login to our portal. You can set this to anything that meets atleast 8 characters. You can now share this password with the user for them to login or they can use the forgot password option on login.
- Billing Information
- Payment Method - Depending on what your Partner Account is setup for you can pick between Credit Card, ACH or Customer Send Payment here.
- Credit Card - If you pick this option the customer will need to login or you will need to impersonate the customer and add a Credit Card to the Payment Method for this Customer account.
- ACH - US Customers only. Not valid for Customers without a US Bank Account. Today ACH takes 3-5 days to setup. If you pick ACH here you will not be able to make any purchases for this customer until the ACH account is setup. We suggest if this customer needs immediate purchasing ability you set them up with Credit Card and change to ACH once you have the account setup.
- If you pick ACH you will need to have the Customer Submit our ACH form from here for us to get the ACH setup.
- Customer Send Payment - If your partner account has been enabled to grant customers Payment Terms you can set this option here and the customer will be emailed invoices on each purchase from the store and also each month on the recurring charges. They will be responsible for sending us payment through ACH, Wire or Mailing a Check. If the customer wants to push ACH or Wire for payments to us please email us at customerservice@clearlyip.com for our banking information.
- Credit Limit - When picking Customer Send Payment you will also need to set the customer Credit Limit. Partners are granted a maximum dollar amount Credit Limit they can grant customers. The default for Partners is 500.00 of Credit Limit. If the customer needs a larger Credit Limit please start with the Max Amount you are allowed to set and have the customer submit our Credit Application form here under the Misc Forms section for a increase in the Credit Limit. Make sure to pick the country to see the forms for your specific country on our Legal Page.
- Terms - How many days from date of the invoice the customer is granted as the Due Date before the invoice is considered Past Due. The default is 15 days and you are not allowed to change this. To receive a Terms date of more than 15 days you will need to follow the steps above on submitting a Credit Application above.
- Grace Period - How many days after the invoice Due Date the customer is granted before the system will flag the account for suspension. Starting on the day of the Grace Period the system each day will email the customer for any past due invoices informing them they need to get the invoice paid or risk having the account turned off from making calls for non payment. The default is 15 days and you are not allowed to change this.
- When picking to grant a Customer Send Payment option here please use your judgement to only setup Customers with "Customer Send Payment" method for customers you trust will be paying their invoices as commissions and SPIFFS are not paid to you the Partner until payment is received by us.
How to Impersonate login as a Customer
- Impersonating a Customer that you are the Master Agent for allows you to manage everything in the Customer account as if you were logged in as that user direct.
- Navigate to Agent and Clients > Customers
- The customer’s tab will show you a list of all customers that you are the Master Agent for.
- Under the Action column click on Login Option and pick which user you want to login as for that Customer and click on Login In.
- Once you are impersonating a Customer you will see in the top right 2 profile avatars.

- The Profile on the left is your Master Agent profile and when you click on it, you will see it shows you the Master Agent name and that you are impersonating another account.
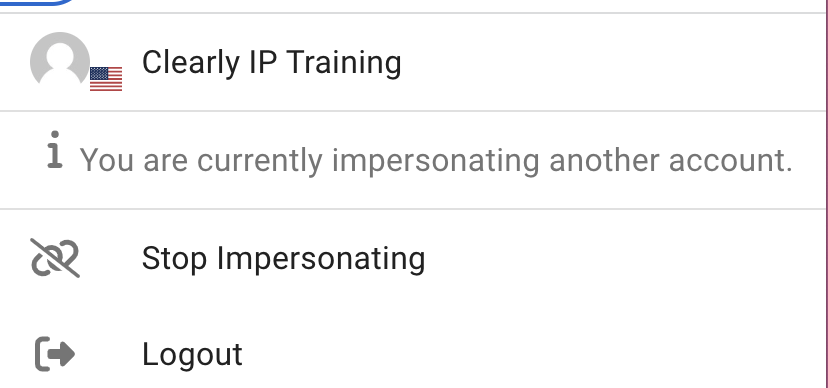
- The Profile on the right is the Customer you are impersonating

- The little chain icon in between the 2 profiles you can click on to stop impersonating and be returned back to your Master Agent account.

How to Change Existing Customer Payment Method
- As the Master Agent you are granted the ability to change a Customer Payment Method including granting the customer Net 15 Payment Terms with up to a 500 default credit limit. Customers themselves are able to change a Payment Method between Credit Card and ACH but they can not change to Payment Terms of Net 15 without contacting Customer Service at customerservice@clearlyip.com
- To change a Customers Payment Method you will need to follow the guide above on how to Impersonate Login as your Customer. Once you have impersonated the Customer click on the Account > Organization menu

- Under the Billing Information widget you will see the existing Payment Method. Click the Pencil icon to edit the Payment Method
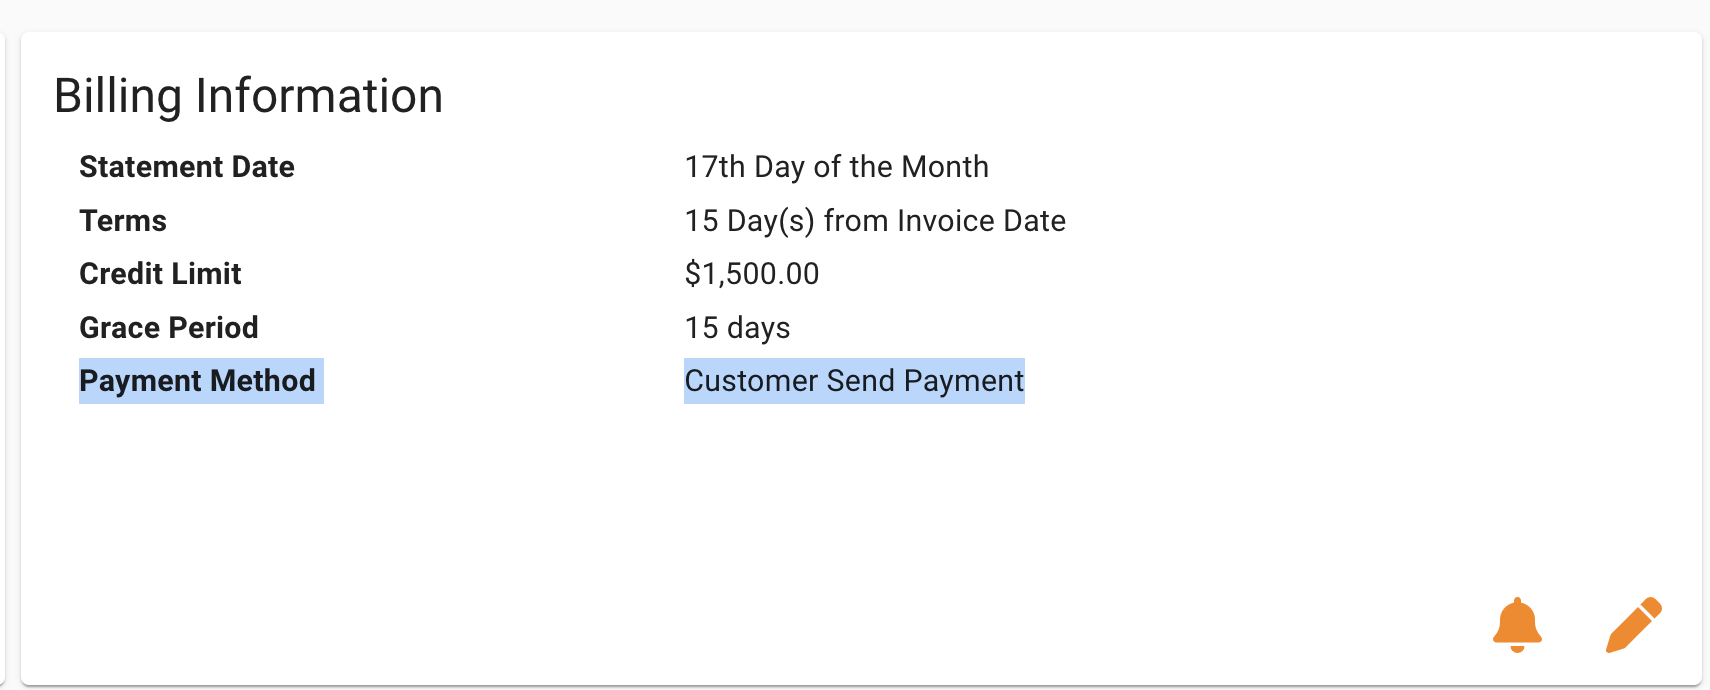
- Billing Information
- Payment Method - Depending on what your Partner Account is setup for you can pick between Credit Card, ACH or Customer Send Payment here.
- Credit Card - If you pick this option the customer will need to login or you will need to impersonate the customer and add a Credit Card to the Payment Method for this Customer account.
- ACH - US Customers only. Not valid for Customers without a US Bank Account. If you pick ACH here you will not be able to make any purchases for this customer until the ACH account is setup by the Customer. We suggest if this customer needs immediate purchasing ability you set them up with Credit Card and change to ACH once you have the account setup.
- If you pick ACH you will need to have the Customer login and setup the payment method as outlined here.
- Customer Send Payment - If your partner account has been enabled to grant customers Payment Terms you can set this option here and the customer will be emailed invoices on each purchase from the store and also each month on the recurring charges. They will be responsible for sending us payment through ACH, Wire or Mailing a Check. If the customer wants to push ACH or Wire for payments to us please email us at customerservice@clearlyip.com for our banking information.
- Credit Limit - When picking Customer Send Payment you will also need to set the customer Credit Limit. Partners are granted a maximum dollar amount Credit Limit they can grant customers. The default for Partners is 500.00 of Credit Limit. If the customer needs a larger Credit Limit please start with the Max Amount you are allowed to set and have the customer submit our Credit Application form here under the Misc Forms section for a increase in the Credit Limit. Make sure to pick the country to see the forms for your specific country on our Legal Page.
- Terms - How many days from date of the invoice the customer is granted as the Due Date before the invoice is considered Past Due. The default is 15 days and you are not allowed to change this. To receive a Terms date of more than 15 days you will need to follow the steps above on submitting a Credit Application.
- Grade Period - How many days after the invoice Due Date the customer is granted before the system will flag the account for suspension. Starting on the day of the Grace Period the system each day will email the customer for any past due invoices informing them they need to get the invoice paid or risk having the account turned off from making calls for non payment. The default is 15 days and you are not allowed to change this.
- When picking to grant a Customer Send Payment option here please use your judgement to only setup Customers with "Customer Send Payment" method for customers you trust will be paying their invoices as commissions and SPIFFS are not paid to you the Partner until payment is received by us.
How to Add Custom Pass Through Charges to Customer
To benefit our Partners and Agents, ClearlyIP has added the ability for select Partners and Agents to add custom add-on charges to their customers’ monthly billing. An Example of this would be to include the Partners charged Support Services (either on a per system, or per User basis). ClearlyIP has made this process easily accessible for our Partners and Agents, and it can be completed directly from within the existing billing portal(s).
To inquire if your Agent or Partner account is eligible for this feature and option, please note you will first need to contact your Account Manager.
Once these services are added, ClearlyIP will be responsible for the collection of these charges alongside their standard monthly service(s) from ClearlyIP (trunking, Cloud, etc.). ClearlyIP will also properly rate and charge the taxation(s) of these items based on services added and remitted as required by law and individual tax jurisdictions. For this convenience, ClearlyIP will keep 15% of these items to account for additional credit card fees, tax compliance(s), etc. The remaining 85% of the charged and collected Custom Pass Through revenue will be remitted to the Partner/Agent. This revenue will be remitted along with their standard monthly commission rates. Commission rates for standard ClearlyIP recurring services will remain the same, as defined by their Partner or Agent Agreement.
How to add Custom Pass Through charges to your customers’ accounts.
- Navigate to your trunking or cloud account
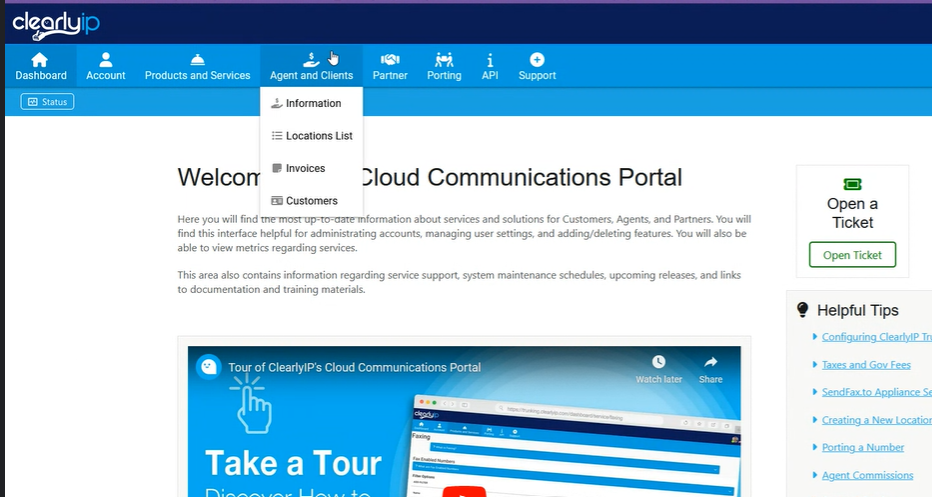
- From the top menu click on Agent and Clients
- Navigate to Agent and Clients > Customers
- The customer’s tab will show you a list of all customers that you created directly, and let you log in as the customer with a link. You will not need to know the Login Username or Password since these are Customers you created under your account as their Agent and not directly created by the Customer.
- Go to the Actions column and login option of the customer you would like to apply the custom charges to
- Actions - Login Options.
- Actions - Login under the contact you wish to impersonate

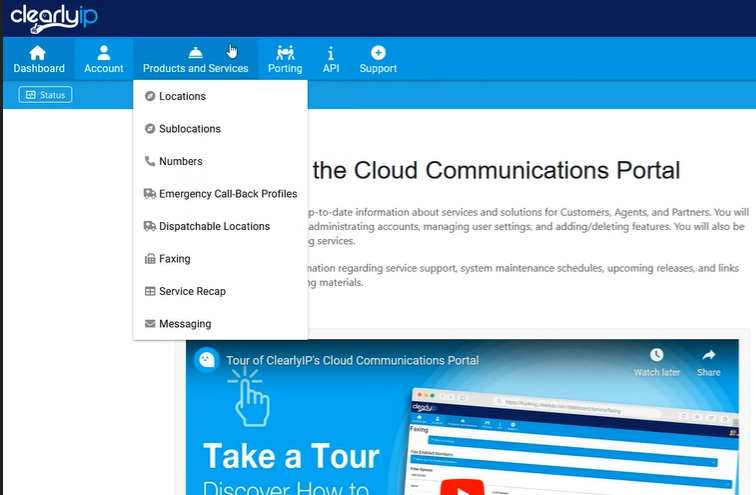
- Once logged in and impersonating the customer, go to Products and Services, and then Locations.
- Click on the binoculars
 for the location you wish to add custom charges to
- Once in that location, scroll down to the bottom of the page, where you can see Add-On Items.
- Click Add Add-On Items
- A window will appear

- Click on the Add New ADD-ON ITEM, and a new window will appear:

- Add the description of the custom item you would like to add to the customer’s monthly billing.
- Add the quantity
- Add the monthly cost you would like associated with this item (per item)
- If you would like to start charging the customer for these services today, make sure to click the ‘Charge Today’ box as indicated below:
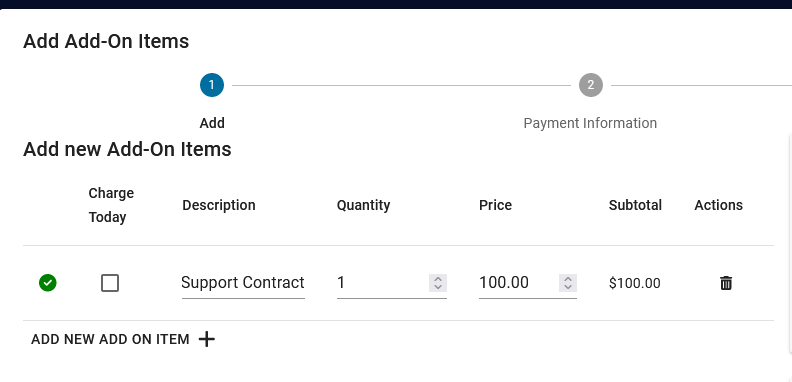
- You can add more than one custom item by clicking the ‘ADD NEW ADD ON ITEM +’ icon as indicated above for additional rows. Note, this will add separate Line Items for each Add-On that will be included on billing statements.
- Click Next
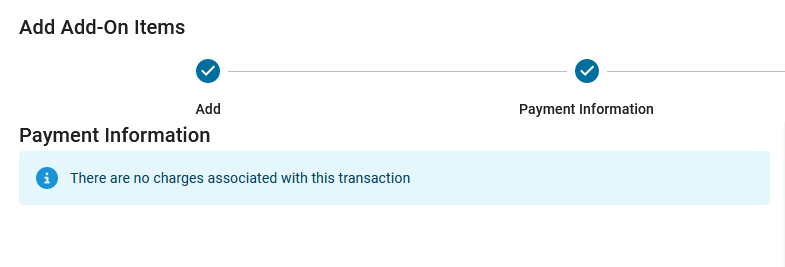
- If you have not clicked on ‘Charge Today’ the next screen will show no charges associated with this transaction.
- Click Next
- You will then review and agree to ‘Terms of Service’ and check the box that you agree to proceed as outlined below.
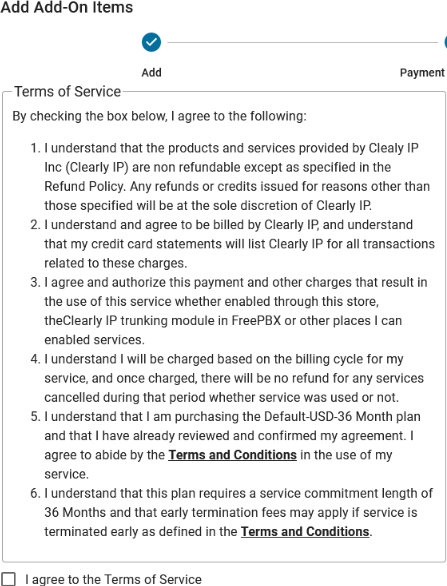
Once you have reviewed, it and the ‘agree box’ has been checked, you will then have the option to click save. The request will be processed, and the item(s) will be added to the next billing cycle and charged right away if that has been selected.
NOTE: Within the wizard process, you will not see relevant taxes calculated for these add-ons. Any applicable service related taxes for these additional items will be calculated monthly, and included within the taxation line items on the upcoming monthly statement(s). These tax changes will calculated and included in the next billing statement. If you chose to ‘Charge Today’ for any additional items, note that applicable service related taxes will not be calculated until the next billing statement.
How to Override Pricing on a item on checkout.
Clearly IP now offers the capacity for Partners/Agents to modify standard monthly charges. This only applies to monthly service items on Clearly Cloud and Trunking Store, wherein Partners/Agents will be able to adjust the pricing of Users, Call Paths, DIDs, and more
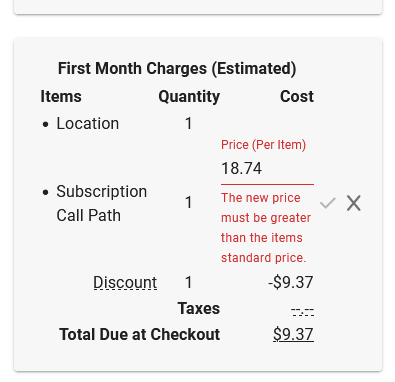
- Note: The new price MUST be greater than the standard list price
- Note: Commissionable percentage rates remain the same on these monthly SKUs, regardless of updated price
- Note: These changes are only available during initial Location and/or Services set up, or when additional Users or Services are being added to existing Locations.
How to do this:
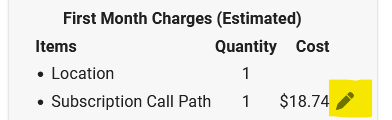
In this example, we are creating a new Trunking Location, and updating the price.
Note on the right hand of the screen where you find the Purchase Summary, you see the ongoing pricing. Items that can be updated during this process will have a 'Pencil' icon for updating. Click it.
Now you will be able to adjust the pricing as desired. Notice the disclaimer that the new price must be greater than the item's standard pricing.
Click on the 'Check' mark once you have updated this pricing.
The below example would be for our
Clearly Cloud Service. Altering pricing for individual users will be handled in the same manner.
 Uploading ....