Overview
The endpoints or devices that are associated with an extension(s) on the ComXchange can be provisioned to register in two ways. Sip phones and FXS gateways can be individually programmed through their own web GUI, or you can can auto provision compatible phones and ClearlyIP FXS gateways with the ComXchange provisioning modules discussed below. Web provisioning is a manual process and will involve logging into each device and programming the SIP information for registering the extension to the ComXchange. Using auto provisioning a configuration file is created on the ComXchange with the information for the device to register with. The device can download the configuration from information received from DHCP or you may in some instances need to enter the provisioning information manually if DHCP is not configurable on the local area network the phones are using for instance if you are connecting directly to a Cloud version of ComXchange.
Web Provisioning
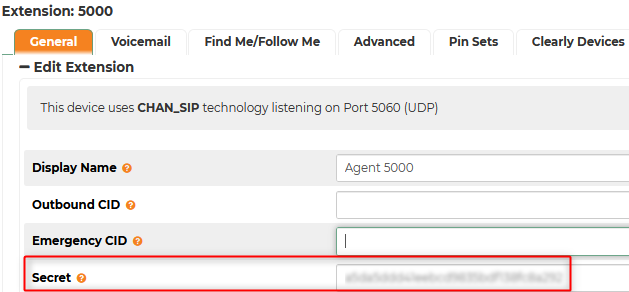
SIP phones and FXS gateways will have their own internal web server where you will be able to log into to manually configure the device to register to the ComXchange. You will need the extension credentials from the ComXchange to enter into the needed fields. as well as the IP address or FQDN of the ComXchange server.
- For Staff Extensions you will need the extension number and the extensions SIP Secret (password)
- Navigate to Core Configuration > Extensions and choose to edit the extension by clicking on the edit action button for the extension
Click in the Secret field to be able to see and copy it
- Guest extensions use the same SIP password for all guest extensions.
- Navigate to Guest Management > General Settings to find the Guest SIP Password
- Note: you can change this password before you begin to provision any guest devices
Once you have this information you will need to enter it into the correct fields on each device. Different manufacturers may use slightly different field names, but in general you will be entering the extension in a field similar to SIP User ID and an Authentication ID field. The Password will be entered to a field similar to Authentication Password. You will also need to enter the ComXchange IP address or FQDN into a field similar to SIP registration Server. Once these are added to the necessary fields, the phone should to register to the ComXchange.
Auto Provisioning
Guest SIP Phones
While there is no auto provisioning tools for Guest SIP phones from the ComXchange, many manufacturers offer services to create configurations or have a tool that can be used to create the configurations to provision the phones. These configuration files can then be uploaded to the /tftpboot directory of the ComXchange using a ftp tool such as WinSCP. The configurations will be available for the phones to download if they are set to use DHCP option 66 etc, which is set in the ComXchange DHCP server by default.
Staff SIP phones
In ComXchange 14 auto provisioning Staff phones can be done for ClearlyIP SIP phones, Yealink T2x - T5x series, Snom D785and D735 models, and Polycom VVX Models [321, 331, 335, 450, 550, 560, 650, 670, 5000, 6000, 7000, 500, 1500]. The ClearlyIP SIP phones will be configured using the Clearly Devices Module and the others will be configured using the ComXchange Endpoint Manager. Both Modules create configuration files for the phones to download which are stored in the /tftpboot directory of the ComXchange server. Some models of SIP phones can be used to add buttons that can control call routing and manage guest features and wakeup calls. Phones configured with these features are commonly referred to as Console phones. Typically, phones will be setup like this for the "Front Desk" or a "PBX - Operator extension", however the buttons could possible be added to other extensions as well depending on the phone model.
Clearly Devices Module
The ClearlyIP SIP phones have their own provisioning tool that can provide some unique features that are integrated into the ComXchange platform. Below will discuss some of the main features of the Clearly Devices Module and explain some of the typical changes that may be important when setting up the phone configurations. For more in depth information about clearly devices see the wiki
Clearly IP Device Module - ComXchange Navigate to Core Configuration > Clearly Devices - Module Settings (note: this will be found in the flyout menu on the right)
Module Settings
- Module Settings - Phone Apps
- This is where you will set the default information about the Clearly Devices phone app that all Clearly Devices SIP phones will use

- Module Settings - Provisioning
- This is where you can find and set information about the Clearly Devices HTTP/HTTPS provisioning server
- You can also upload a default image to be used on the phones

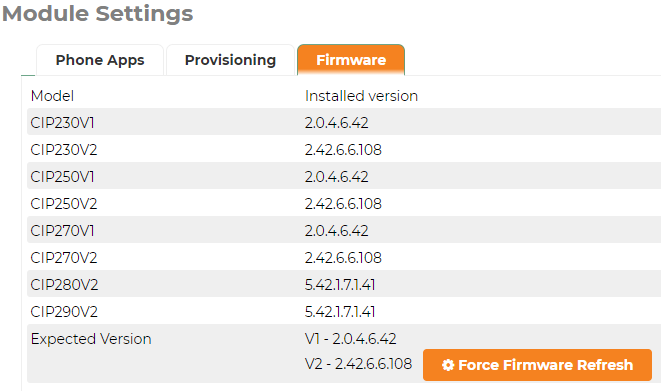
- Module Settings - Firmware
- This is where you can see what firmware version is installed for each model of the phones and expansion models.
- You can also redownload the firmware to the ComXchange
Templates
Navigate to Core Configuration > Clearly Devices - Templates
- Templates are where you define general information that relates to a group of phones
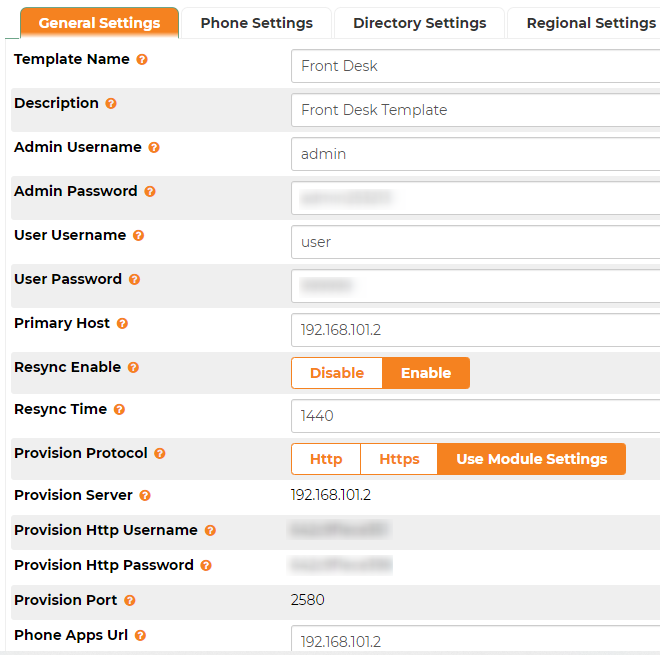
- Templates - General Settings
- The General Settings Tab is where you will set some of your basic phone settings for a group of phones, such as the web GUI login information, the IP address the phones will be registering to and provisioning information for this group of phones if different than the module settings.
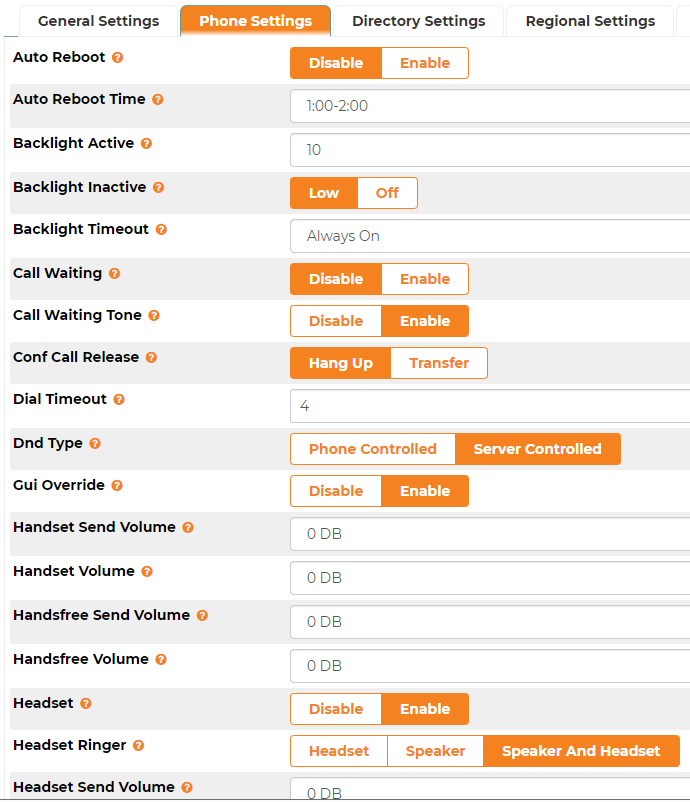
- Templates - Phone Settings
- The Phone Settings Tab is where you can set some general phone functionality options for the phones.
![]()
- Templates - Network and Wifi Settings
- You can configure ClearlyIP phones to connect over wifi by adding the security type, SSID and password.
- Templates - Redundancy
- Here you can define a failover host and SIP port
![]()
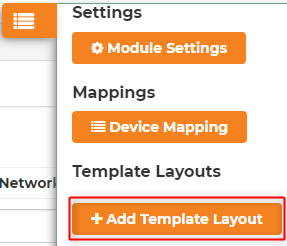
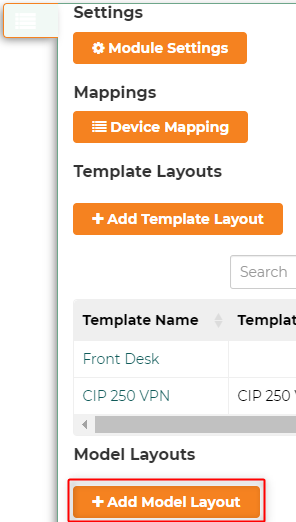
Model Layouts
Navigate to Core Configuration > Clearly Devices - Model Layouts
Model layouts are used to manage settings and keys for specific models of Clearly Devices. To create a new Model Layout Click on + Add Model Layout
Then choose the Model you are working with
![]()
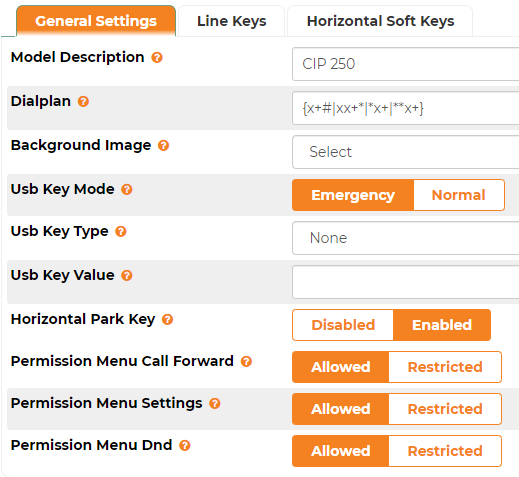
- Model Layouts - General Settings
- The General Settings tab is where you can Specify basic settings for a group of phones of a particular model such as a Dial plan, background image, and permissions.
- Note: If any permissions are set to restricted on the 230, 250, and 270 phones you will need to login with the User and User Password found on the general tab of the Template Layout to use any of the xml apps.
- Model Layouts - Line Keys
- The Line Keys tab is where you program the keys for a group of phones
- You can program keys for many things including BLF buttons for pickup and direct transfer, toggling call routing such as day/night mode and different Clearly Apps
- The Clearly Apps can be used on any ClearlyIP phone and have many different features including the hospitality specific apps for Wakeup calls and Guest management.
- You can find more information on the hospitality apps here Hotel Console Phone Apps
- For more information on non-hospitality Apps see the wiki article on ClearlyIP Phone Apps
- If you are setting up BLF Keys that incorporate extensions such as Queue logins or Find Me Follow Me toggles you can use the extension variable of __sip_user_1__
![]()
- Model Layouts - Horizontal Soft Keys
- The horizontal soft keys can be programmed to do different options as well from different screens such as incoming calls, dialing, and connected calls etc
Mappings
Navigate to Core Configuration > Clearly Devices - Model Layouts
- Mappings is where you will associate an extension with a ClearlyIP phone.
- When creating a mapping you will associate an extension to the device using the device's mac address and assigning the device to a Template and Model.
- When submitted a configuration file is created and available for auto provisioning.
- Once the phone is plugged in and downloads its configuration you can verify the registration by navigating to Reports > Asterisk info - Peers and see if the phone appears with an IP address.
- Rebuilding a configuration.
- After making any changes to a Template or Model of a device that has already been mapped you will need to rebuild the configuration.
- Click on the cogwheel to the right of the mapping to rebuild the phones configuration.
- Rebooting devices
- Click on the power icon to the right of the mapping to send a reboot command to the phone
Endpoint Manager
Navigate to Core Configuration > Endpoint Manager
The Endpoint manager can be used to create configurations for some models of Yealink, Polycom, Snom phones as well as some legacy Aastra phones. The Endpoint Manager is similar to the Clearly Devices Module as you will be able to create templates and configurations for groups of phones that include basic settings and key options. You can associate an extension to a phone using the mac address then assign a template to the extension. This will create the configuration that will be used to auto provision the phone.
Templates
Navigate to Core Configuration > Endpoint Manager - Template Manager (flyout menu)
- Using Templates is an easy way to deploy phones that will have similar functionality such as a front desk phone. Phones based on templates will have the same buttons on the display, dial plan information and any other information added to the template
- Click on Add a new Template
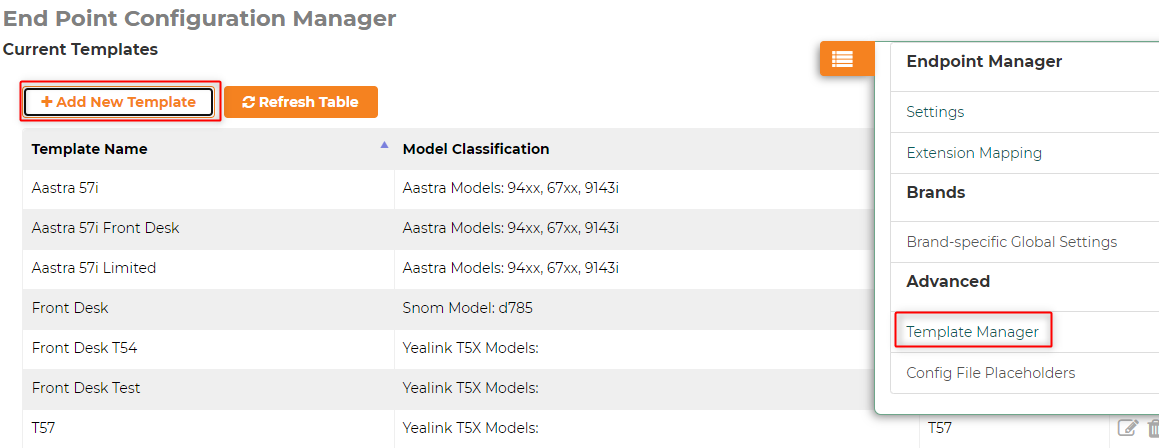
- Enter a template name, then choose the product type and model of the phone
- General Tab
- Make any general changes such as time zone, logo, and GUI passwords
- preferences
- Choose preferences such as missed call log and dial plan entries
- Network
- Allows you to add vlan info for the phones
- keys
- Enter choices for your phone keys such as BLF, speed dial, or an XML browser key for the Guest Management and Wakeup apps.
- Guest Management XML browser value for Yealink: http://192.168.101.2/yl/guestmgmt.php
- Wakeup XML browser app for Yealink: http://192.168.101.2/yl/wakeup.php
- Snom Guest Management and Wakeup keys are available in a dropdown
- If you are setting up BLF Keys for Yealink phones that incorporate extensions such as Queue logins or Find Me Follow Me toggles you can use the extension variable of {$username.line.1}
- expansion
- Enter extra keys if you are using an expansion module
Mapping Devices
Navigate to Core Configuration > Clearly Devices - Extension Mapping (flyout menu)
- Extension Mapping is where you will associate an extension with a phone.
- When creating a mapping you will associate the device's mac address choosing the Brand, Model, and extension to be mapped to along with a Template.
- When you click on the +ADD button a configuration file is created and available for auto provisioning.

- once plugged in the phones should download their configuration and a green power button signifies the phone is registered.
- You can also verify phone registration by navigating to Reports > Asterisk info - Peers and see if the phone appears with an IP address.
- At the bottom or the bottom of the Mapping page there is a place for rebuilding specific configurations or all of them at once.
- If you check the Reboot option when you rebuild the ComXchange will send out a SIP message for the phone to reboot.
Gateway Provisioning - Analog Guest and Staff Phones
The ComXchange Gateway Provisioning module can be used to create configurations for Clearly IP FXS Gateways. Below will discuss some of the common settings needed to done configured when using the Gateway Provisioning tool such as Setting the Gateway defaults, using the Gateway Wizard, and Adding a Gateway. For more in depth information please the Wiki Article on
ComXchange Gateway Provisioning. The ClearlyIP Gateways will use option 66 from DHCP for auto provisioning by default. If you are connecting this to a premise ComXchange on the default IP schema this will be in the dhcp configuration by default.
Default Templates
Each Gateway type has a default template that can be edited so every gateway configuration created will use these settings.
Navigate to Core Configuration > Gateway Provisioning
- Click on the Edit Defaults Button.
- Choose the Gateway template you want to edit.
- Note: the current Clearly IP gateways will have - nr in the name.
- Click on Submit to open the form for editing.
- In this form make any changes that you will want to apply to all gateways of this type
- This will usually concern Provisioning Server, Clock Settings, Interdigit Timeout, and GUI passwords in the Advanced settings, and SIP Server settings in the Voip Trunk Tab.
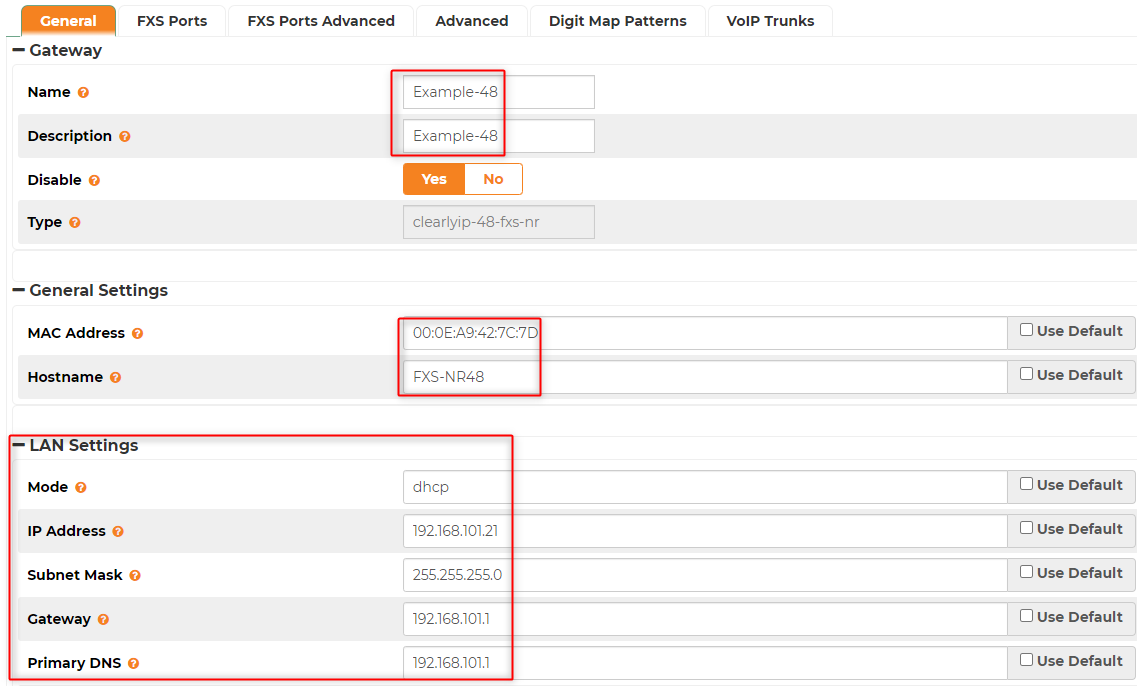
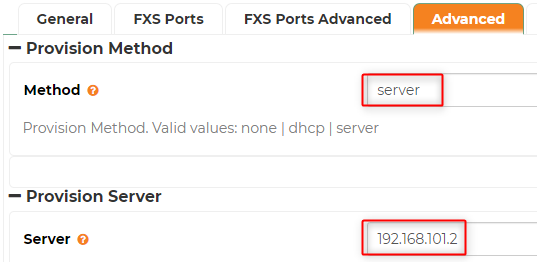
- Nearly every site will need to have these two critical changes made to default templates for each of the gateway models that will be used at this site:
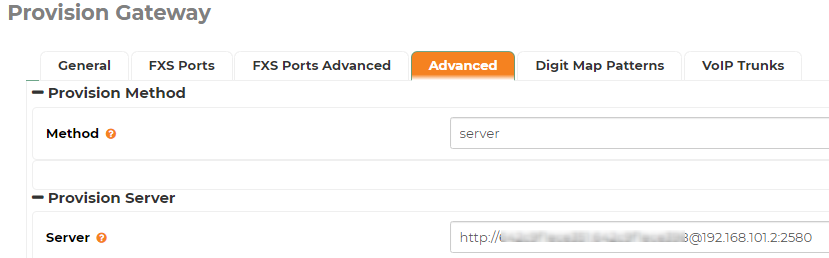
- On the general tab, set the LAN Settings:Mode to static
- On the advanced tab, set the Provision Method:Method to server. Also verify that the Provision Server:Server shows the correct IP for the Comxchange controller (usually 192.168.101.2)
- You may wish to set the time zone also.
- Note: when making changes to a field you can use the hint to see options that can be copied and pasted into the field.
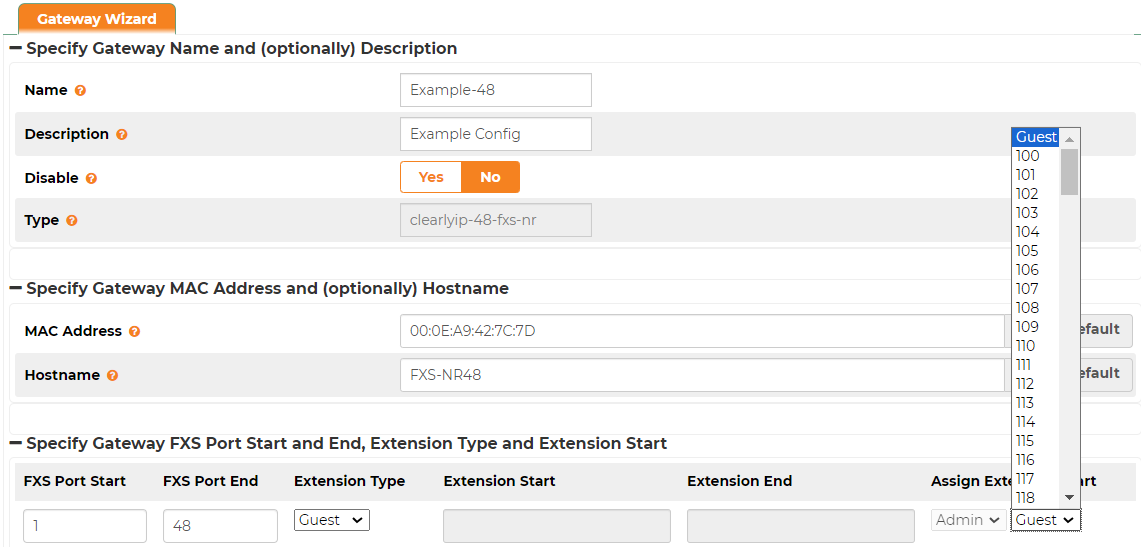
Gateway Wizard
This is a useful form to use if you have ports that are mostly in order and are specifically guest or admin extensions as you can only add the ports of one type in a contiguous range from the database.
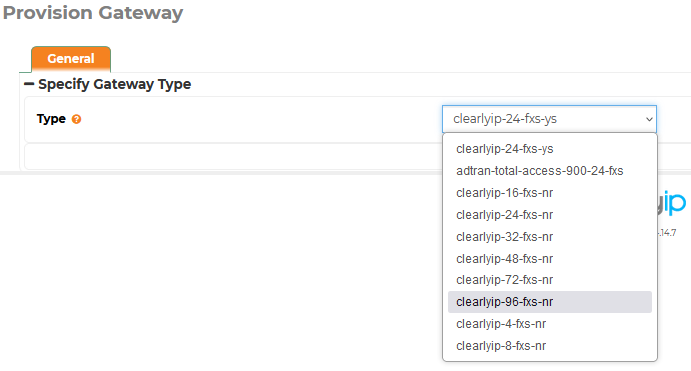
Navigate to Core Configuration > Provision Gateways
- Click on the Add Gateway Button.
- Choose the Gateway Type.
- Click Submit to open the gateway wizard form.
In the Wizard for fill in the following fields, choose the ports and the starting extension.
- Choose a unique name for the configuration.
- Add a description (optional), will default to the name of the gateway.
- You can disable the gateway configuration on creation.
- Disabling a configuration on creation will not create a configuration file in the /tftpboot directory for the gateway to download.
- Disabling a configuration after creation will remove the configuration file in the /tftpboot directory.
- Fill in the Gateways Mac Address (must be unique for each configuration)
- Choose a hostname for the gateway configuration
- Choose the beginning and ending FXS port then choose the Extension type
- Choose the starting extension from the assign extension dropdown
Add Gateway
If you have a mix of guest and staff extensions or extensions that are not in a contiguous order you will want to use the Add Gateway option.
Navigate to Core Configuration > Provision Gateways
- Click on the +Add Gateway button
- Choose the Gateway Type
- Click Submit to create a configuration form
General Tab
- Choose a unique name for the configuration.
- Add a description (optional), will default to the name of the gateway.
- You can disable the gateway configuration on creation.
- Fill in the Gateways Mac Address (must be unique for each configuration)
- Choose a hostname for the gateway configuration
- Make any changes to the network settings (optional)
Note: If the choice is made to use a static IP address you will need to change the Provisioning Method to server in the Advanced tab and verify the Provisioning Server IP or FQDN is correct or the gateway will not download updates
FXS Ports Tab
- Choose the extension from the Admin or Guest dropdown
- The Account / Extension information will be pulled from the database
- Disable any unused ports by unchecking the registration box
- If they are left checked they will use the default information and will continually try to register to the ComXchange and fail

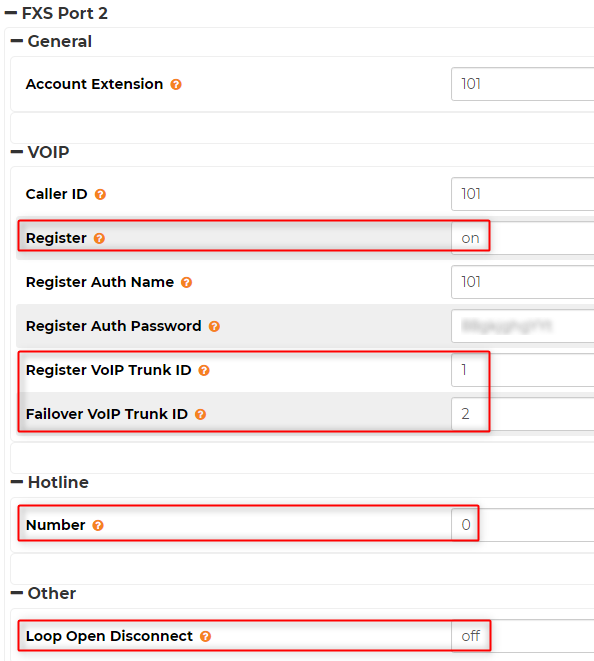
FXS Ports Advanced Tab
Use this tab to make changes to an individual ports.
- You can turn registration on and off, add a hotline number and turn Open Loop Disconnect (Disconnect Supervision) on.
- Register Voip Trunk ID gives you flexibility to have an individual port register to a specific ip address or fqdn and a specific port.
- You can use this if you are using PJSIP for staff extensions that need to register to the gateway or if you need to assign a failover Sip server.
- The Voip Trunk ID directly correlates with the VOIP Trunk number in the VOIP Trunks Tab
- If using a mix of ChanSIP (guest extensions or staff) and PJSIP staff extensions you will need to assign one of the trunks the default port of 5160. Then assign that Trunk ID to the Register Voip Trunk ID for the port
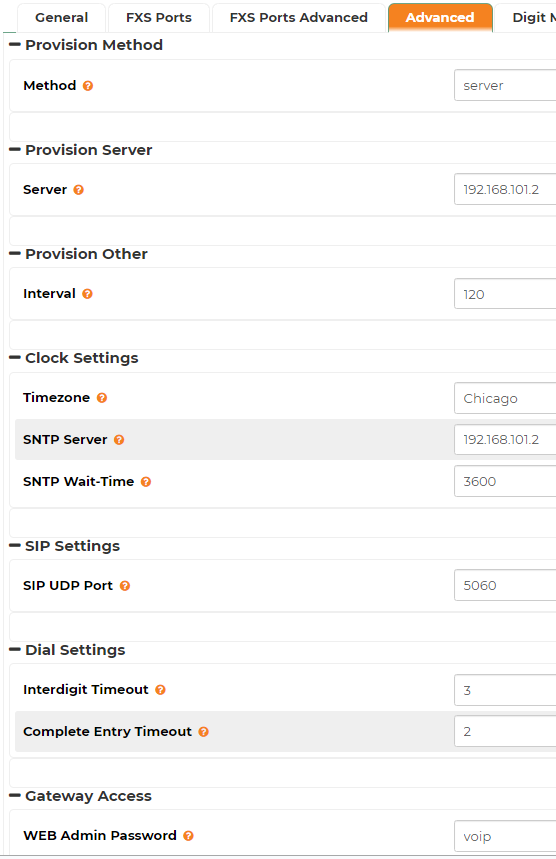
Advanced Tab
In the Advanced tab you can make setting changes for an individual gateway that you may want different than the default template for the gateway. This could include Clock Settings, Interdigit timeout, provisioning method, the interval the gateway looks for configuration, etc.
- Provisioning Method is dhcp by default. You will need to change this to server if using a static IP address
- Provisioning server is the ip address or FQDN of the server that stores the configuration which should be the ComXchange.
- Interval is how often the gateway should look for the configuration in seconds. (120 Seconds by default)
- You can change this to a longer interval after the initial configuration is complete so the gateway contacts the server less often
- Clock Settings are usually changed in the default template but can be changed per gateway configuration
- Dial Settings are usually changed in the default template but can be changed per gateway configuration
- Gateway Access Passwords can be used to change the password from the Admin and Operator's default password
- these are usually changed in the default template but can be changed per gateway configuration
Digit Map Patterns Tab
- You can add or remove digit map patterns per gateway
VoIP Trunks Tab
- VoIP Trunks settings can be changed for individual gateways to provide specific extensions the ability to register to servers and ports that are not in the default template.
- This is where you can set the IP address for the secondary or failover SIP server which can then be assigned to individual ports in the FXS Ports Advanced tab.
- The VoIP Trunk number is the Trunk ID that you will use for the Register VoIP Trunk ID and the Failover VoIP
- The gateways will associate VoIP Trunk 1 with the Primary SIP server in the gateway and VoIP Trunk 2 as a failover server for the gateways in the basic SIP settings. If all of
Note: unconfigured ports will try registering by default. This could cause the gateway to be banned by intrusion detection and will not be able to communicate with the server to get an updated config or to register the ports successfully. It is best to turn off the registration for unused ports or you can whitelist the gateway's IP to keep it from being banned.Auto provisioning to ComXchange in the cloud
When registering to ComXchange in the cloud, you can either set up a OpenVPN connection between the premise LAN (local area network) for you VoIP devices or you can register gateways and phones directly over the internet. In either case if option 66 can be offered from a dhcp server you can auto provision your devices with minimal to no manual configuration in the devices web gui. If you do not have the ability to hand out option 66 you will need to configure the auto provisioning information in each device using the built in web GUI.
Using a VPN
If you choose to use an OpenVPN connection from the premise to the cloud server, the router you use will need to be an openVPN client and should be able to offer up DHCP. The devices can get their configurations using the default protocol of TFTP and or http(s). Also, You should be able to connect to the devices on the premise LAN through the VPN connection going through the cloud server.
Direct Registration and Provisioning Over the Internet
If you choose to have your devices register directly over the internet, creating the configurations for the phones and gateways will be very similar to creating them for an on premise deployment with some changes to how the devices reach the ComXchange for their configurations and to help with possible audio issues. Provisioning over the internet will be done using the http or https protocol depending on which protocol is set up in the Clearly Devices module. The Clearly Devices Module will act as a proxy for the devices to reach the ComXchange and download the configuration for the device. The information for the proxy can be found in the clearly devices module as seen below.
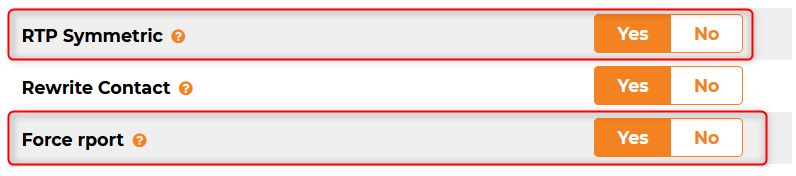
Set up or Verify Rport Nat Settings for Staff Extensions
Using rport means that ComX will ignore the IP in the contact header and SDP media session and send SIP signaling and RTP to the IP address that it received the data from.
Nat Settings ChanSIP:
To enable NAT for ChanSIP extensions. In the extension settings, under the advanced tab, under NAT mode there are a variety of options. The default is No (No NAT). Setting this option to Yes will force the use of the rport parameter and comedia (symmetric RTP).

Nat Settings PJSIP:
The rport settings should be setup automatically for PJSIP extensions and can be verified under the extensions advanced tab
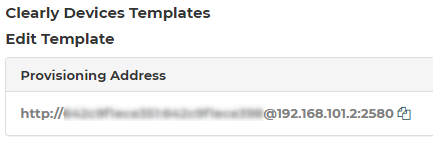
Provisioning FQDN/IP and Credentials
- Navigate to Core Configuration > Clearly Devices and choose a template.
- At the top of the page will be a string with the protocol, username, password, ip address or FQDN, and port number for the devices to connect to the ComXchange to download the devices configuration.
- The format is http://username:password@IP/FQDN.com:port
Provisioning Phones for the Cloud
Different SIP phones will have different fields to enter the auto provisioning information to reach out to the Cloud server to download a configuration. This will need to be setup properly for DHCP option 66 to hand out the Provisioning Address which can be acquired from the clearly devices module as noted above or it will need to be manually added in the web GUI of the phone.
CIP phones
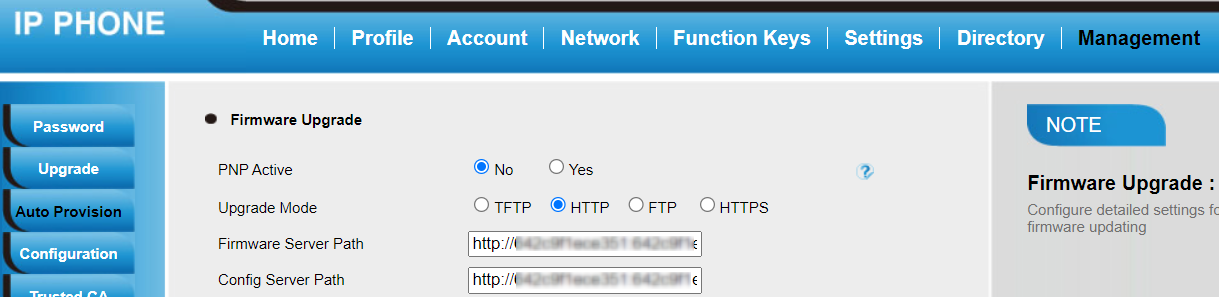
Below is an example of how to manually configure a Clearly IP phone for Auto Provision.
- Log into the web GUI and navigate to Management > Auto Provision
- Set Upgrade Mode to use http or https (depending on your clearly devices configuration)
- Copy and paste the Provisioning Address from Clearly Devices module in both the Firmware Server Path and the Config Server Path
- Click on Save Set on the bottom of the page
The phone should the reach out to the ComXchange cloud server and download any firmware and a configuration if available for the device.
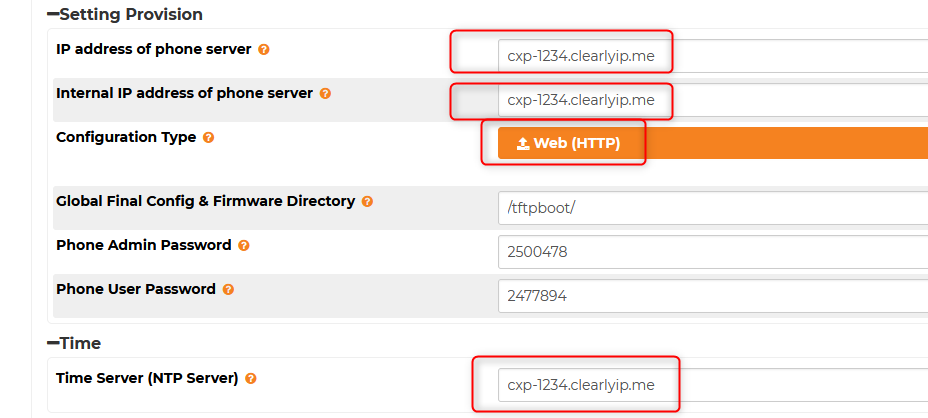
Configuring Endpoint Manager for Cloud
In order to user Endpoint Manager when connecting directly over the internet, some changes have to be made so that the templates are correct.
- Navigate to Core Configuration > Endpoint Manager
- Click on the flyout menu on the right, then click Settings
- In the Settings tab, insert the IP or FQDN of the cloud system in the following three fields:
- IP address of phone server
- Internal IP address of phone server
- Time Server (NTP Server)
- Choose HTTP for configuration type
Yealink Specifics
For Yealinks, editing the settings above changes the SIP registration server and the provision server. However, the registration server and the provision server are not using the same address, so the file that gives the Yealink the provisioning info must be edited.
- Navigate to Core Configuration > Endpoint Manager
- Click on the flyout menu on the right, then click Settings
- Navigate to the Product Configuration Editor tab
- Depending on which model of phone you are provisioning, click the Yealink T4X Models or Yealink T5X Models

- Click Local File Configs
- Click y0000000000$suffix.cfg
- Edit line 29 and add the IP/FQDN and the port of the PBX server after the equals sign (you can find the FQDN and credentials using the directions under Provisioning FQDN/IP and Credentials)
- Insert the username and password on lines 30 and 31, respectively
- When done, press "Save"
![]()
- When finished, navigate to Core Configuration > Endpoint Manager
- Click "Rebuild All" to rebuild the configs for the phone
After pointing phones manually to the provisioning server, they should now provision correctly
Provisioning Gateways for the Cloud
To provision gateways for registering directly to the cloud, the gateway provisioning tool will need to be set up with the Provisioning Method to be server and the Provisioning Server field should contain the provisioning address from Clearly devices as discussed above. You will then have to direct the gateway to get the initial configuration from DHCP or manually provisioning the Auto provisioning settings. There are also a few other settings that may need to be set if in the Gateways Web GUI to help with NAT and Audio issues. Otherwise creating the configurations should be very similar to setting up the gateways for a premise deployment.
Parameters to be set in the gateway Provisioning tool
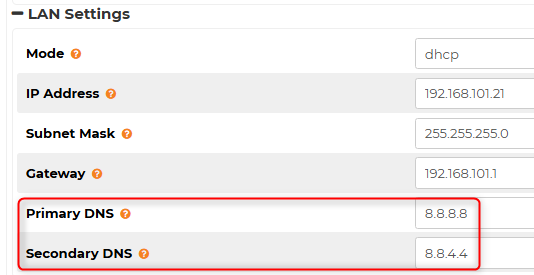
- Navigate to Core Configuration > Gateway provisioning create or edit the template for the gateway.
- General Tab.
- In the General tab set the DNS field to use public DNS server such as 8.8.8.8 and 8.8.4.4 as you will be connecting to the ComXchange with a FQDN.
- Advanced Tab.
- Set the Provisioning Method to server.
- Add the Provisioning Address from the Clearly Devices module in the Server field.
- If DHCP is available to offer option 66 set the option in the dhcp server to point to this provisioning address as well.
- If option 66 is not available find the IP Address of the Gateway and log into the Web Gui with the Admin account and the default password of clearly.
- VoIP Trunks Tab.
- Set the Voip Trunk to use the FQDN of the Cloud ComXchange.
Parameters to set in Gateways Web GUI
You will need to set a few parameters for the gateways through the Gateways web GUI depending on whether the provisioning address can be offered with the DHCP option 66 or not. Also as most of the gateways will be behind a firewall or router and will connect to the internet using NAT, there are a few settings that will help alleviate any audio issues that can occur when the gateways are NATted.
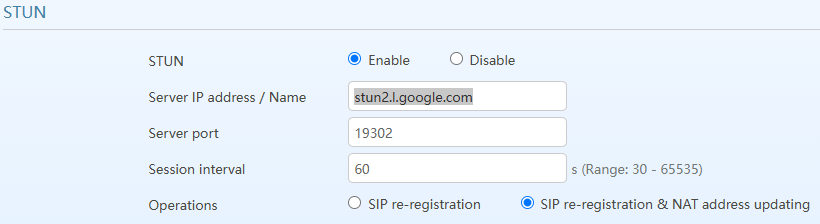
- Navigate to Basic > Network - Stun Server
- Set Stun to enable
- Set the Stun server field to stun2.l.google.com (or other Stun server)
- Set server port to 19302
- Click on the radio button for SIP re-registration & NAT address updating
- Navigate to Advanced > SIP - Request/Response message configuration
- Contact field in Register should be set to External Network IP address
- Via field should be set to External Network IP address
- Navigate to Advanced > System - NAT
- In the NAT traversal dropdown set to Dynamic NAT
- Set SDP address to External Network IP Address
- Navigate to Advanced > System - Management System Type.
- In the drop down choose Auto provision
- copy and paste the Provisioning Address from Clearly devices in the in the ACS URL field.
- Click on Save.
- The Username and Password will autofill.
- You will need to reboot for the changes to take effect and the gateway should now be looking for a configuration based on the Upgrade mode and Upgrade Period.
Verifying Registrations for Endpoints
- Navigate to Reports > Asterisk Info - Peers
PJSIP extensions
- For PJSip extensions you should see the extension registration information under the Chan_PJSip Endpoints heading
- Look for the Endpoint (extension) and verify there is Contact information listed to show it is registered
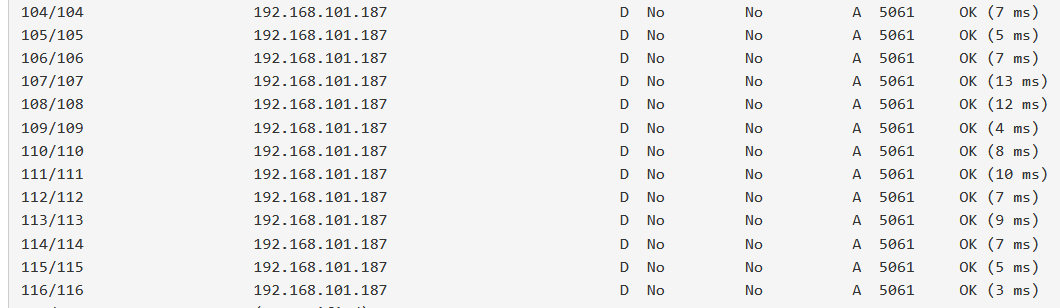
Chan_Sip peers
- For Chan_Sip extensions you should see the extension registration information under the Chan_Sip heading
- Look for an IP address associated with the extension and a status of OK for a registered extensions
- If the extensions are on a gateway you will see multiple extensions associated with the same IP address as seen below
 Uploading ....