| | | |
 Uploading .... Uploading ....
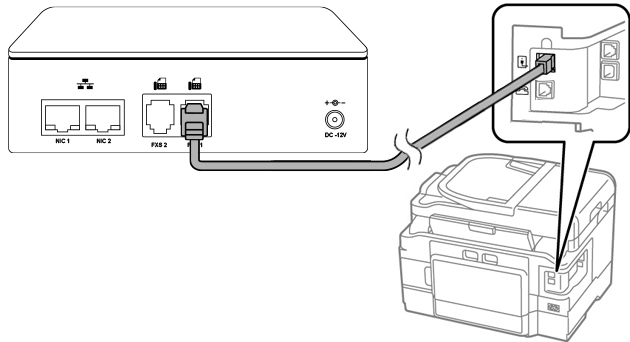
Installation - Once you have unboxed the device you will need to plug it into a power outlet, connect it to your network and plug your fax machine into 1 of the Fax Machine (FXS) ports.
- The SendFax.to Fax Appliance comes with 2 Fax Ports. Port 1 and Port 2. This allows you to connect up to 2 fax machines to each SendFax.to Fax Appliance. Later when we set up routing from Inbound Fax Groups we can pick which port on the device we want to route our faxes too.
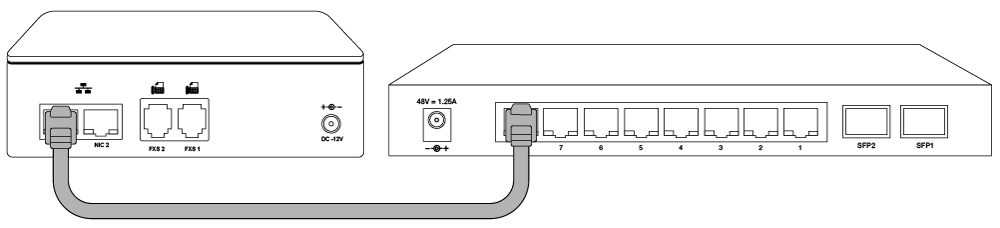
- Plug Network Port 1 into your local network that has access to the internet. This is needed to send and receive faxes. Network Port 2 is setup as a bridge from Network Port 1 to allow you to have Port 2 act as a passthrough switch to let you plug in another device such as a PC or anything else that needs network and where you only have a single network drop.
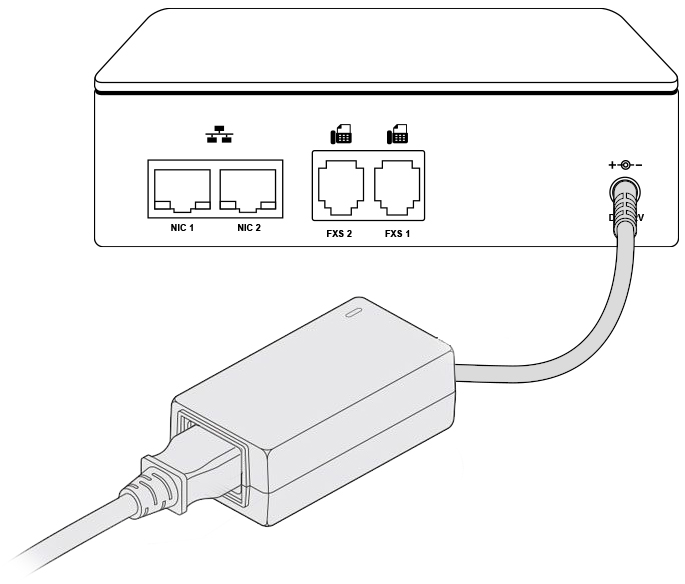
- Plug in the included Power Supply into the back of the SendFax.to Fax Appliance and into a electric outlet or UPS. We always recommend the Appliance be plugged into a UPS.
- The device will now power on and connect to the SendFax servers in the cloud and pull down all their configurations and check if any updates are available and install the updates.
Fax Delivery Flow - Inbound Fax
- A remote fax machine will send a fax to your fax number.
- The fax will be answered by the sendfax.to cloud servers and will convert the inbound fax to a file.
- The remote sending machine at this point will consider the fax sent as our cloud servers have answered the fax and received the fax and all the fax negotiation is completed at this point.
- The sendfax.to cloud servers will now lookup where to send the fax to based on the Inbound Fax Group that is linked to that number.
- It will now deliver the fax via email, the sendfax.too appliance on a specific Fax/FXS port or both depending on what you have setup in your Inbound Fax Group.
- Your sendfax.to appliance will receive the fax file and now make a call to either Port 1 or Port 2 on your sendfax.to appliance and negotiate with your local fax machine the sending of the actual fax file to the fax machine.
- The sendfax.to appliance will attempt to deliver the fax to your fax machine 10 times with a 1 minute wait between retries. In the event we are not able to send the fax to your local fax machine successfully a email of the failure will be delivered to the the email address for your sendfax.to appliance. The email address that is used, is defined on each sendfax.to appliance from the Fax Device Management from the Portal section below.
- Outbound Faxing
- Your local fax machine will send a fax to the sendfax.to appliance when you initiate a fax from your fax machine plugged into Port 1 or Port 2 of your sendfax.to appliance.
- Once the fax is fully received and converted to a file on your sendfax.to appliance, the appliance will use the sendfax.to APIs to talk with our sendfax.to cloud servers to send the fax.
- The sendfax.to appliance will attempt to communicate and send the fax to the sendfax.to Cloud Servers 20 times before giving up. A email alert will be sent to you in the event the sendfax.to appliance is not able to communicate and deliver the fax to the sendfax.to cloud servers. The email address that is used, is defined on each sendfax.to appliance from the Fax Device Management from the Portal section below.
- The Cloud servers will receive the fax along with the fax number to send the fax too and will relay out the fax to the Remote Party.
- In the event the remote party answers the call but is not able to receive the fax in full after 3 retries with a 1 minute wait between retries the sendfax.to service will email you a failure notifications that we were unable to deliver the fax. The email address that is used is defined on each Fax Device from the Trunking Portal Device management section at https://trunking.clearlyip.com.
- If the number we are calling is busy we will try back 10 times to deliver the fax before the email notification will be sent.
Fax Device Web GUI - You can navigate to the Web GUI of your SendFax.to Fax Appliance by opening a web browser on the same network to the IP address of the device.
- You can retrieve the IP address of the device by calling 411 from any phone or fax machine plugged into FXS ports 1 or 2 on the device.
- The default login for the Web GUI is username of admin and password of admin. You can change the password from the Cloud Portal as outlined here.
- Once logged in you should see the main Home page below.
- Home Page
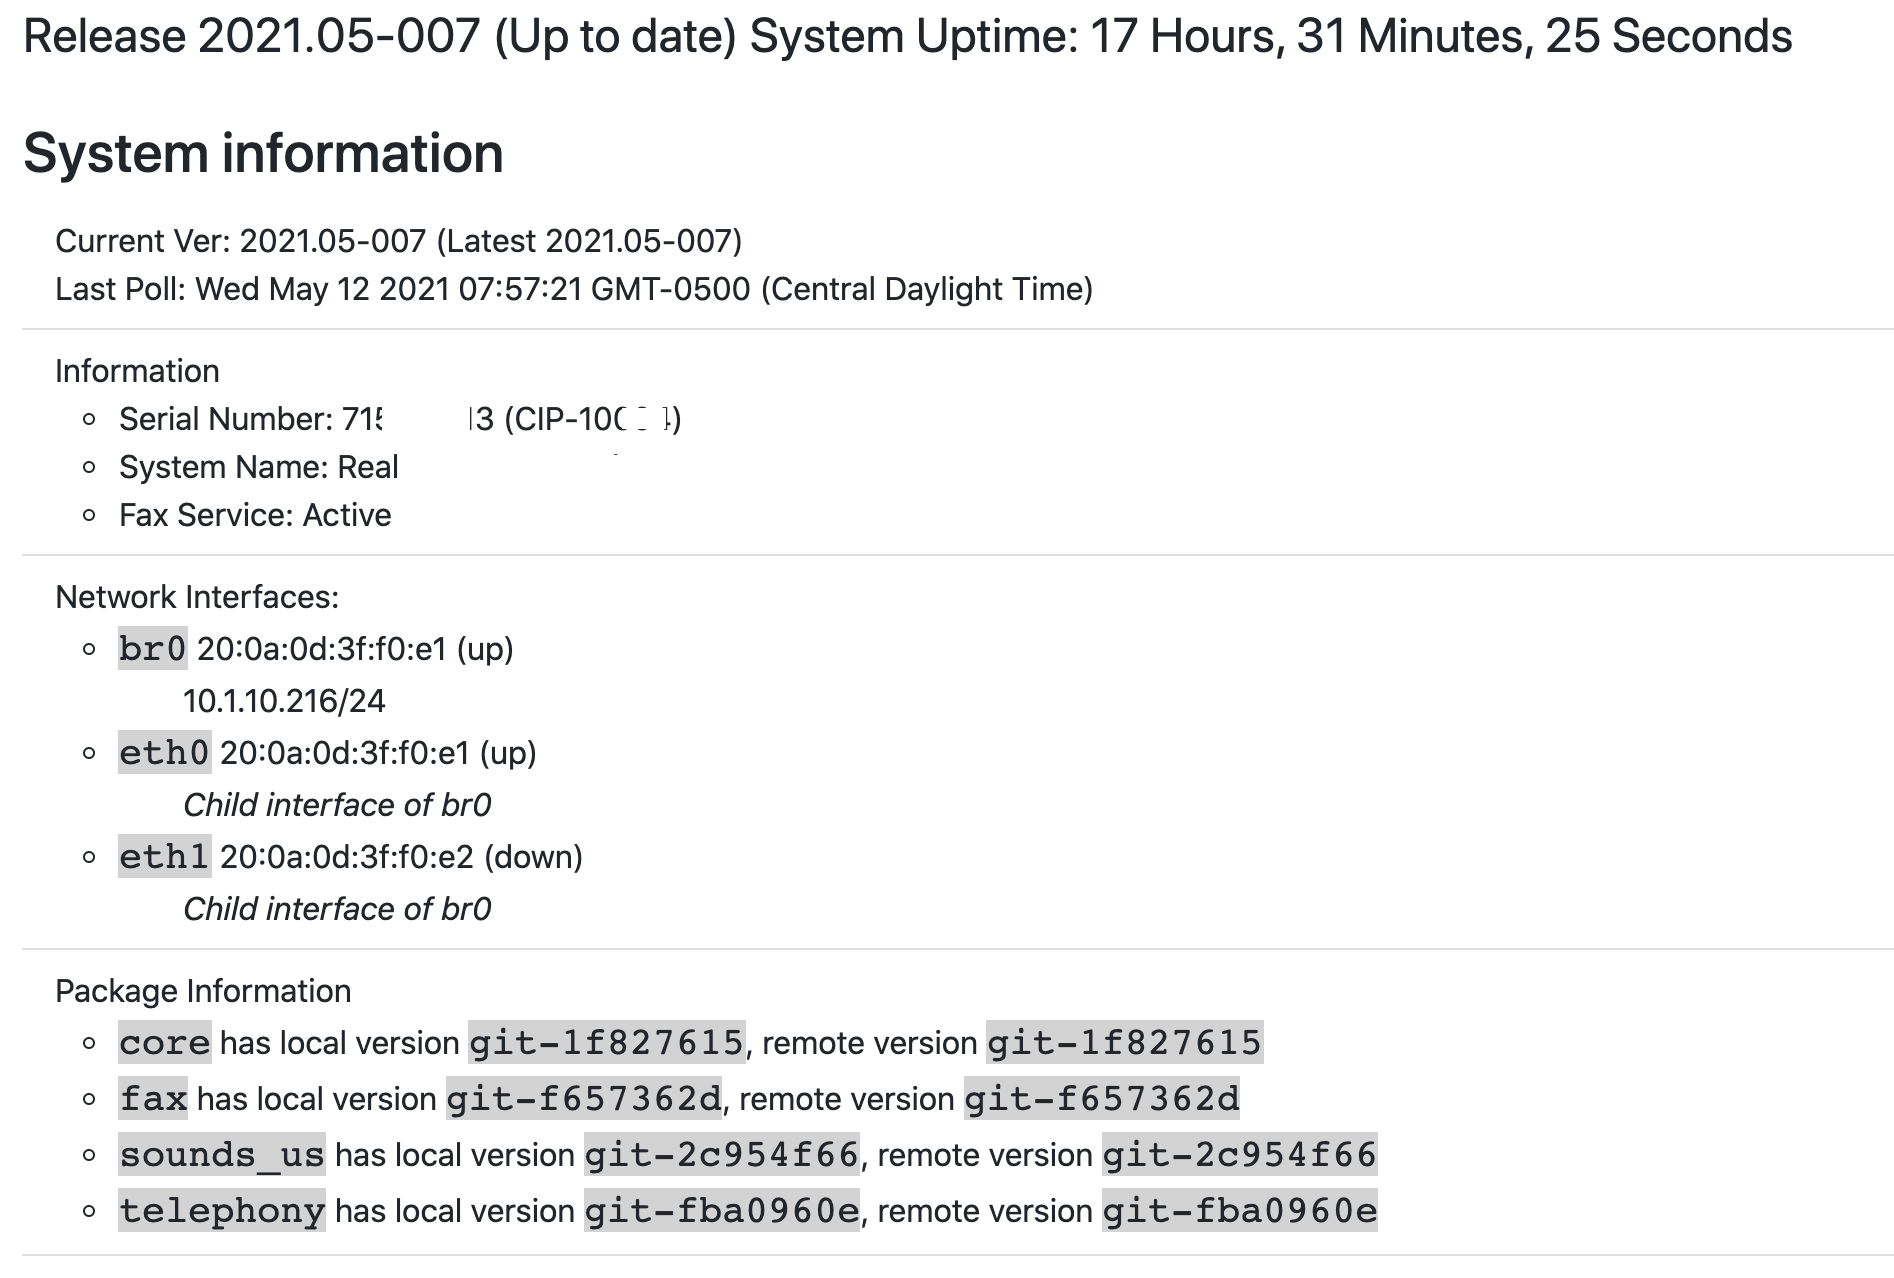
- Current Version - This is the main OS version of the Appliance.
- Last Poll - This will show the last time the device checked in for new inbound faxes from the SendFax Cloud servers.
- Information
- Serial Number - Serial Number of this specific Appliance
- System name - The name you provided from the Clearly Portal for this device at order time. This name can be updated by following this wiki here on Device Management.
- Fax Service - This should show Active that the Fax Service is configured and active on this Appliance.
- Network Interfaces - Will show both Physical Network Interfaces on of the Appliance and the Bridge Interface. You can plug your network into either interface as by default they are setup in bridge mode.
- Package Information - Will show what version fo the 4 packages that make up the Fax Device are currently at. This is used mainly by support team.
- Faxes Page
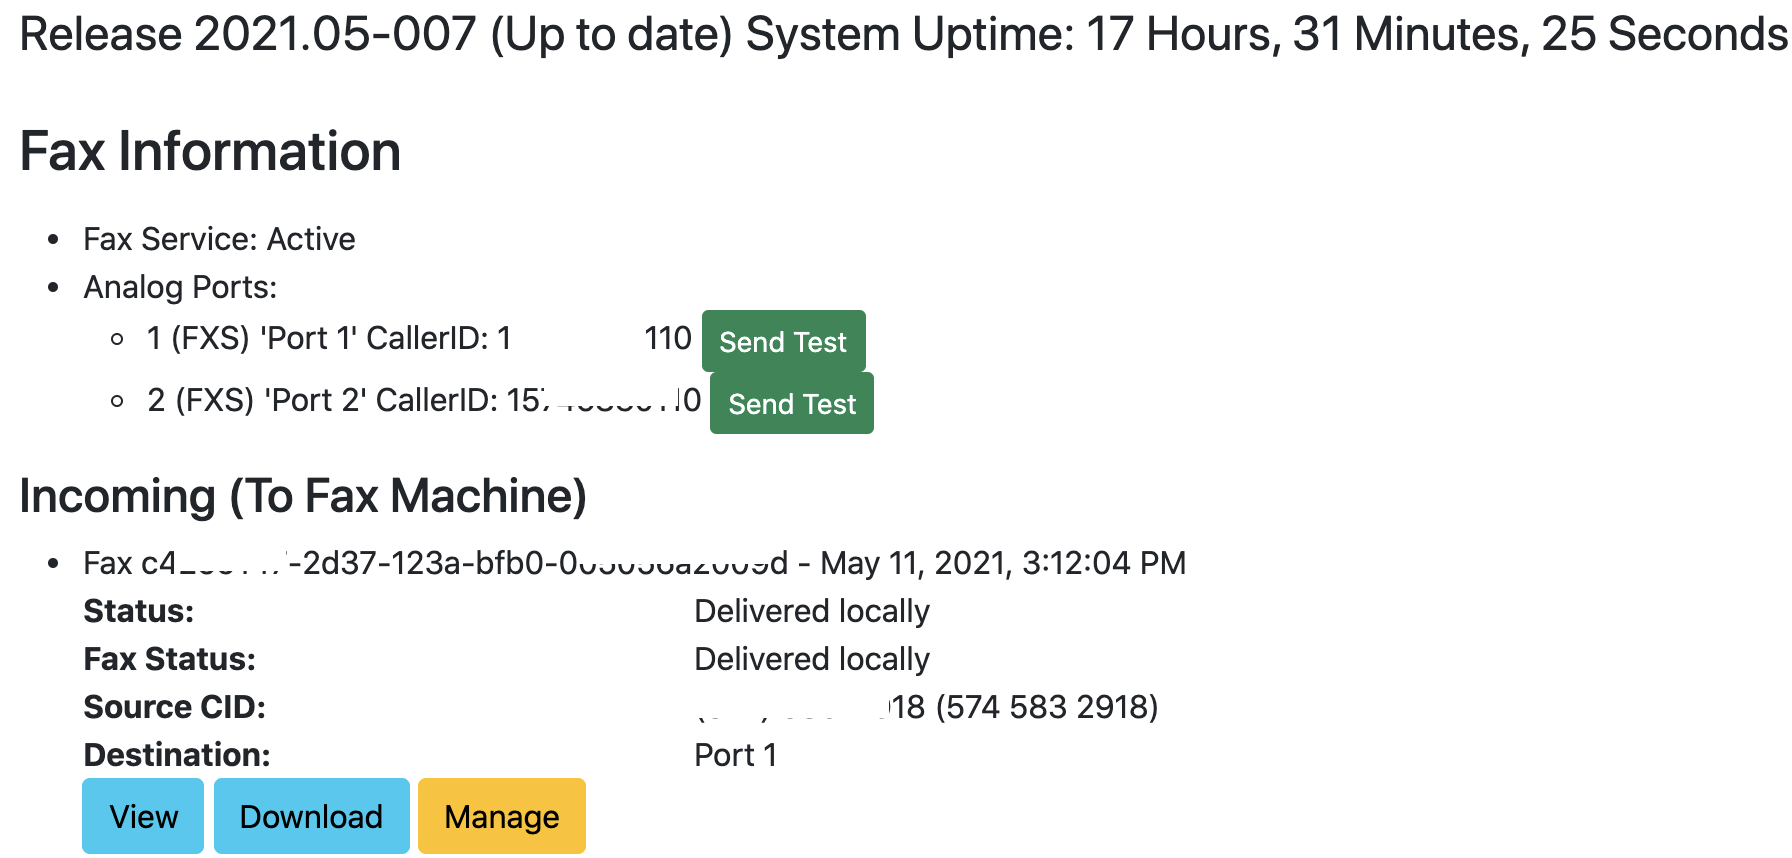
- Fax Information
- Fax Service - Will show if the Fax Service is running and enabled on this device.
- 1 (FXS) - Will show the Name associated with Port 1 and the Caller ID used for all outbound faxes on this port.
- 2 (FXS) - Will show the Name associated with Port 2 and the Caller ID used for all outbound faxes on this port.
- You can click on the Send Text button next to Port 1 or Port 2 to have the Appliance send a test Fax to the fax machine plugged in Port 1 or Port 2.
- Inbound Faxes - Here we can see a list of the last 10 inbound faxes in the last 7 days along with the current status of each of the faxes.
- Status - This is the raw status of the results of the fax.
- Fax Status - This is a human explanation of the Status above.
- For each fax we can press the following buttons
- View - To view in your browser the TIFF file of the fax
- Download - To download a local copy of the actual fax
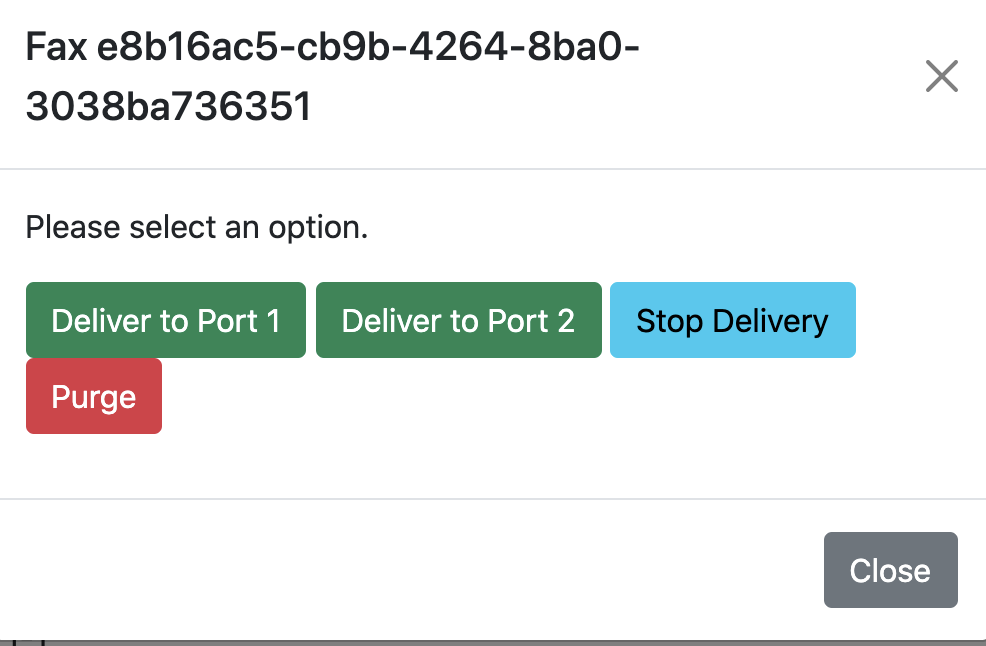
- Manage - Can be used to Delete or resend a fax if you did not receive it or something went wrong with it.
- Deliver to Port 1 - Will resend the fax to your fax machine on Port 1 of the Appliance
- Deliver to Port 2 - Will resend the fax to your fax machine on Port 2 of the Appliance
- Stop Delivery - Will tell the Appliance to stop trying to send the fax to the fax machine on the port that the fax was sent to. This is helpful if a fax machine is down and the Appliance will attempt to redial every minute for 20 minutes to deliver the queued inbound fax to the fax machine.
- Purge - Will delete the fax from both the Fax Appliance and the SendFax.to cloud servers and stop attempting to deliver the fax in the event it has not been delivered yet.
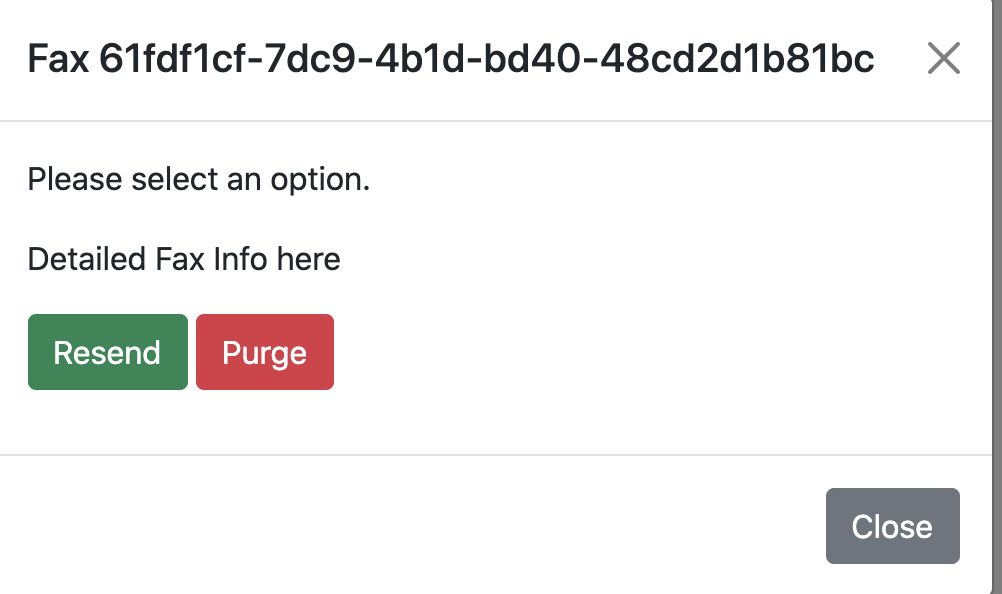
- Outbound Faxes -Here we can see a list of the last 10 outbound faxes along with the current status of each of the faxes.
- For each fax we can press the following buttons
- View - To view in your browser the TIFF file of the fax
- Download - To download a local copy of the actual fax
- Manage - Can be used to Delete or resend a fax if you did not receive it or something went wrong with it.
- Resend - Will tell the Appliance to take this fax and resend it again to the Fax Destination. Mainly used in the event that your Appliance was not able to successfully send the fax.
- Purge - Will delete the fax from both the Fax Appliance and the SendFax.to cloud servers and stop attempting to deliver the fax in the event it has not been delivered yet.
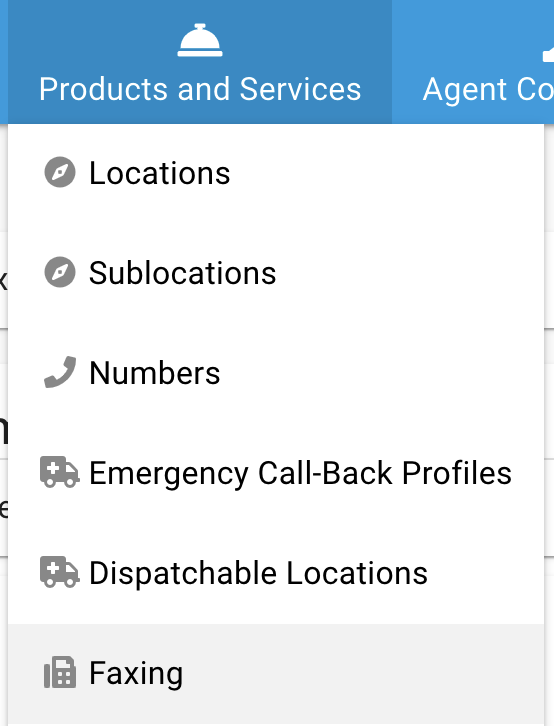
Purchasing SendFax.to Appliance - To Purchase a SendFax.to Appliance to use with the Clearly IP Fax service you will navigate to the Faxing option under Products and Services section of the portal
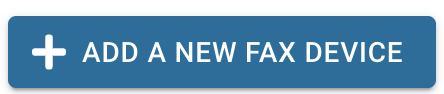
 - Scroll down to the Fax Devices section and click on the "Add New Fax Device" button

- From here you can purchase 1 or more Appliances for any Trunking or Clearly Cloud Location that has been setup with Faxing Service. Review this wiki here on how to setup Fax Service on a Location. The drop down of Locations will only show you Locations that have Faxing Call Paths purchased on the Location.
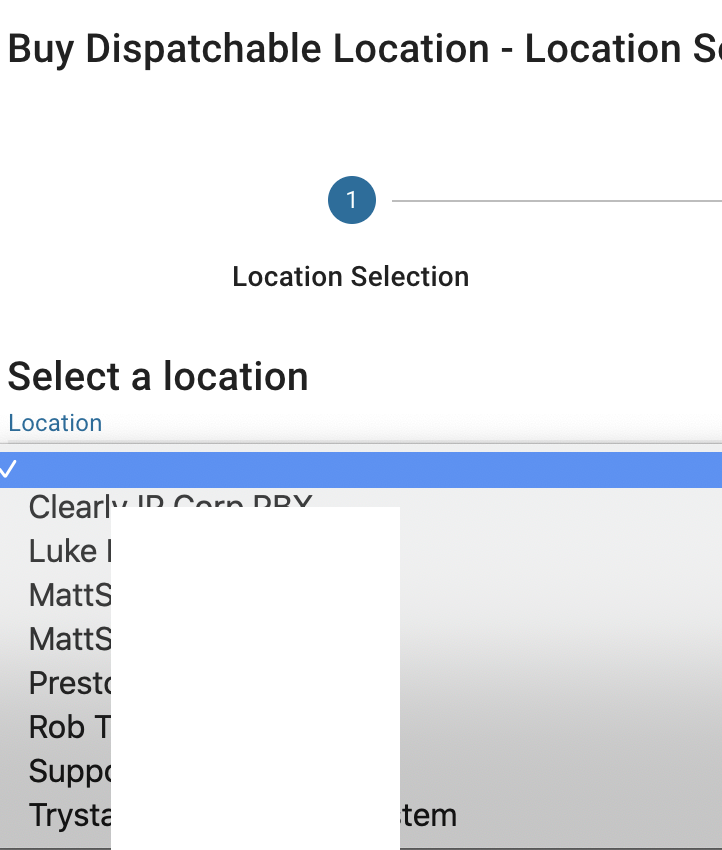
- Once you pick the Location press the Next button

- Click on the the Add A New Fax Device button
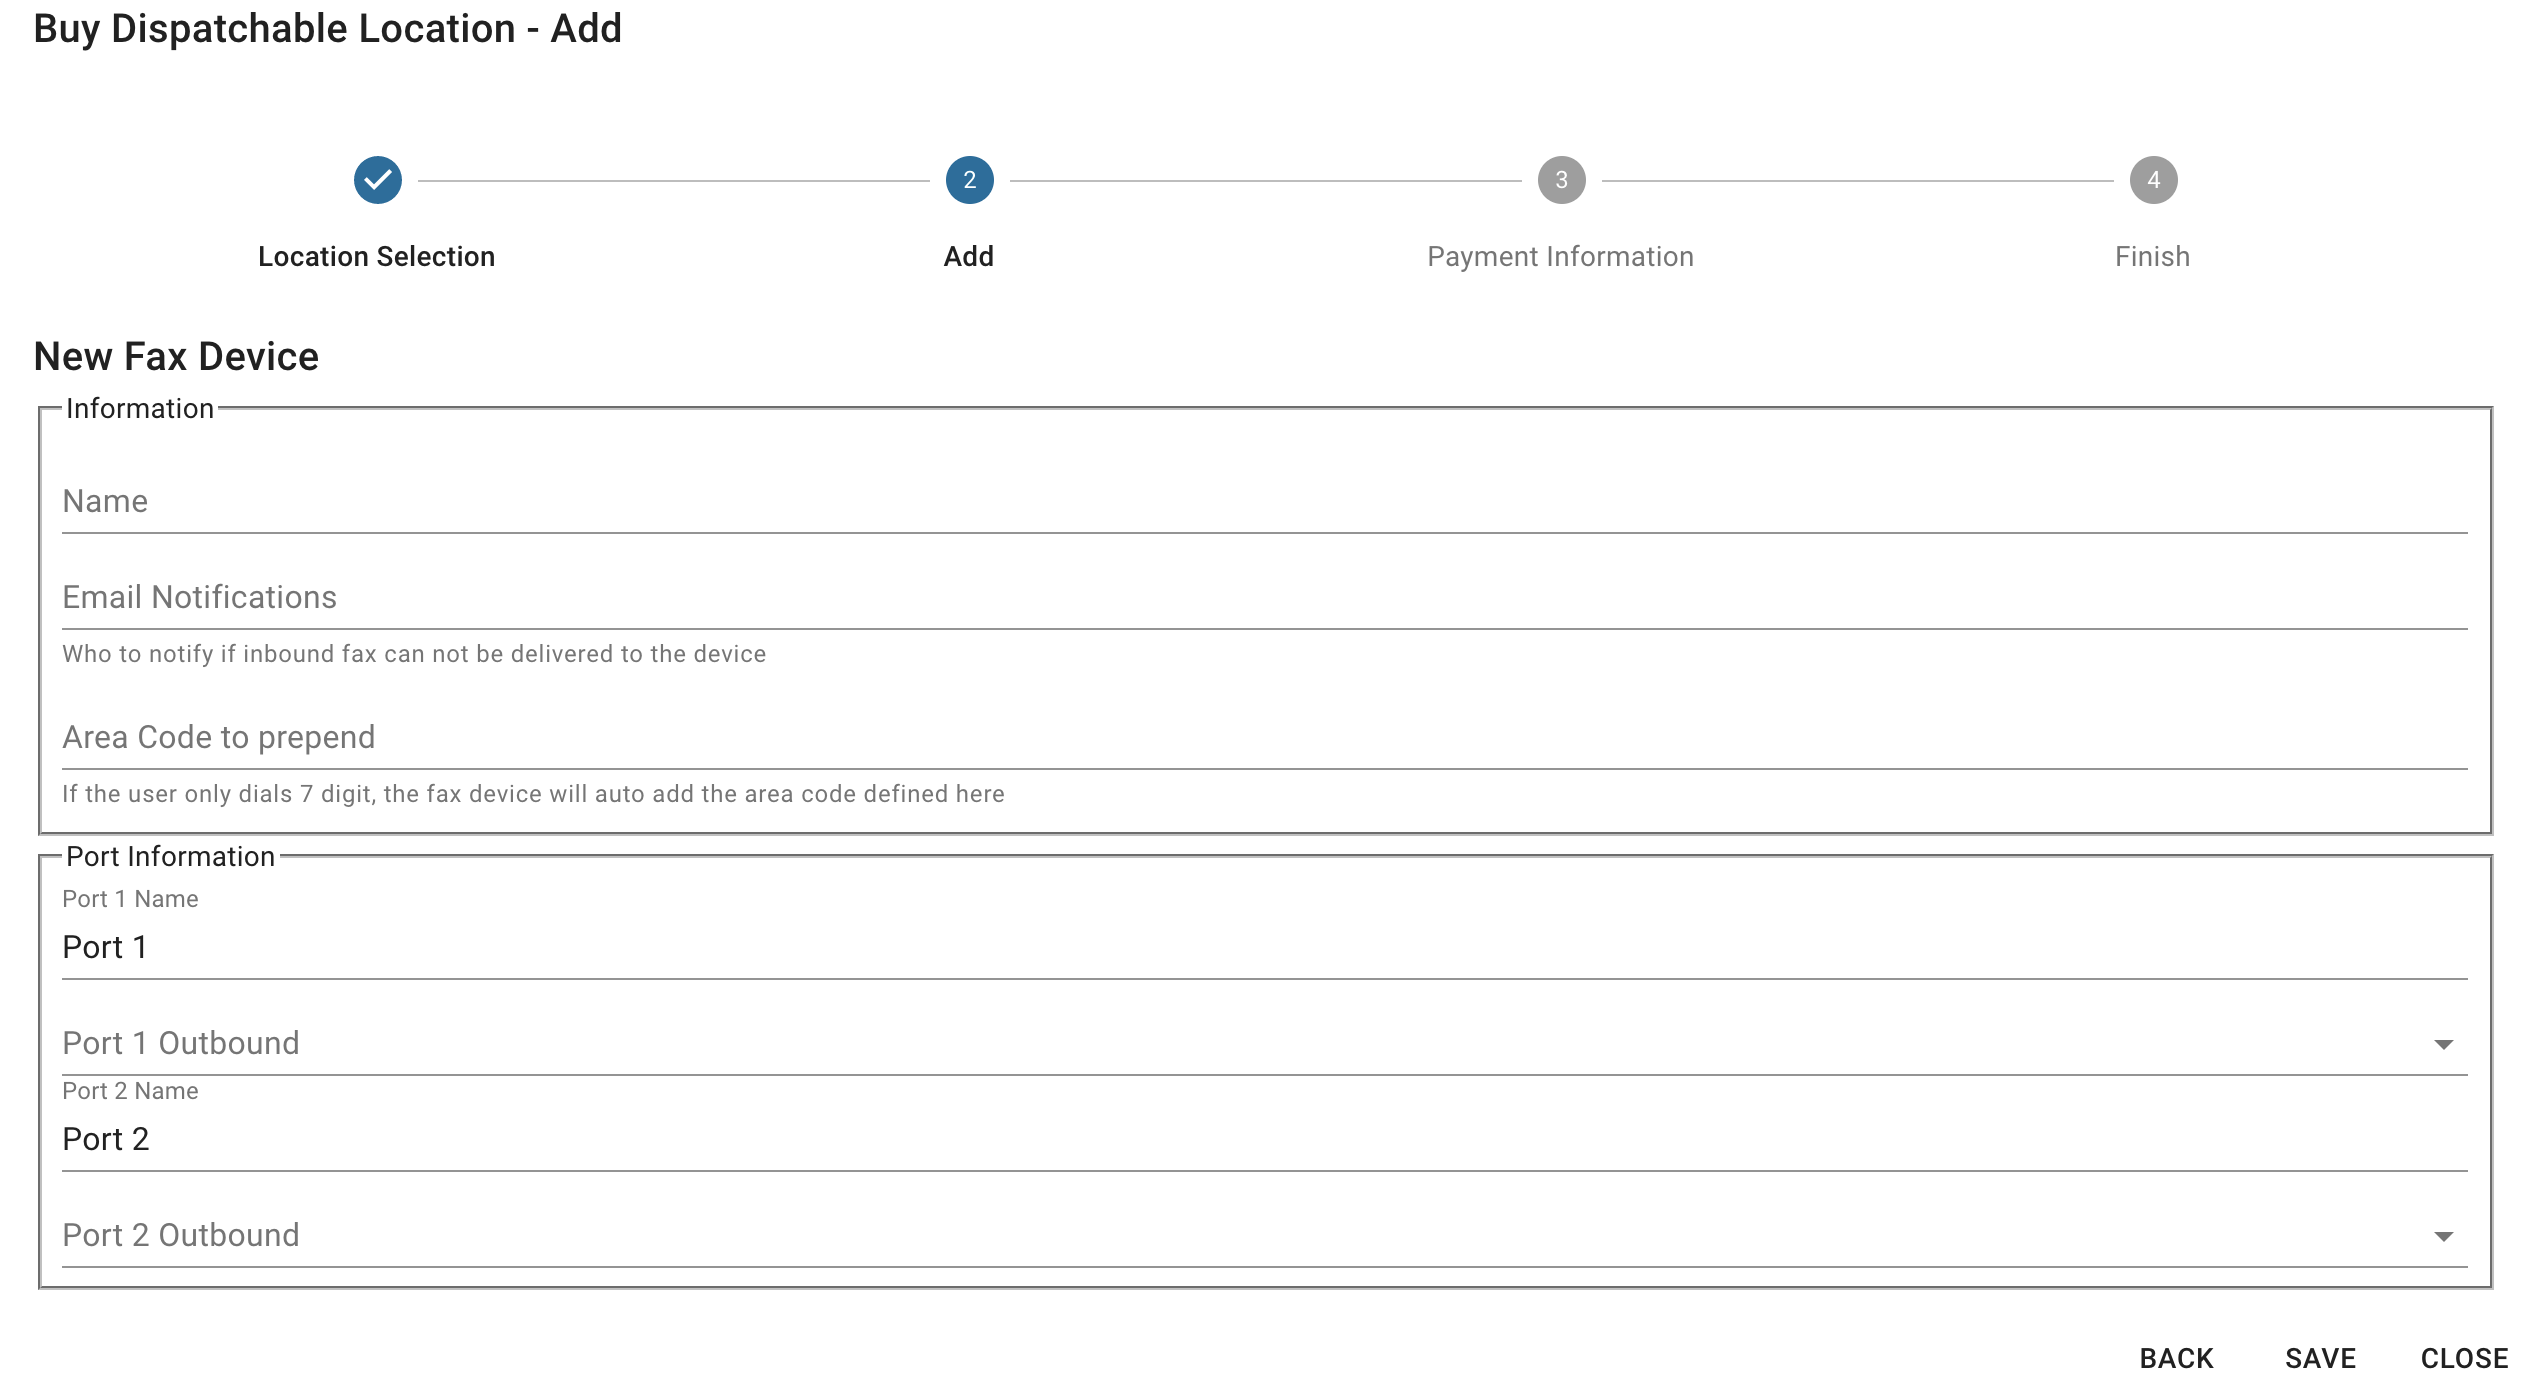
- You can now fill in the information for this device you are purchasing and press save. You have to pick a Caller ID for Port 1 and 2 from available Numbers associated with this Location. You can change this information at anytime in the future if you need to update for example the Notifications Email or the Caller ID you want to use as outlined below in the SendFax.to Appliance from portal section
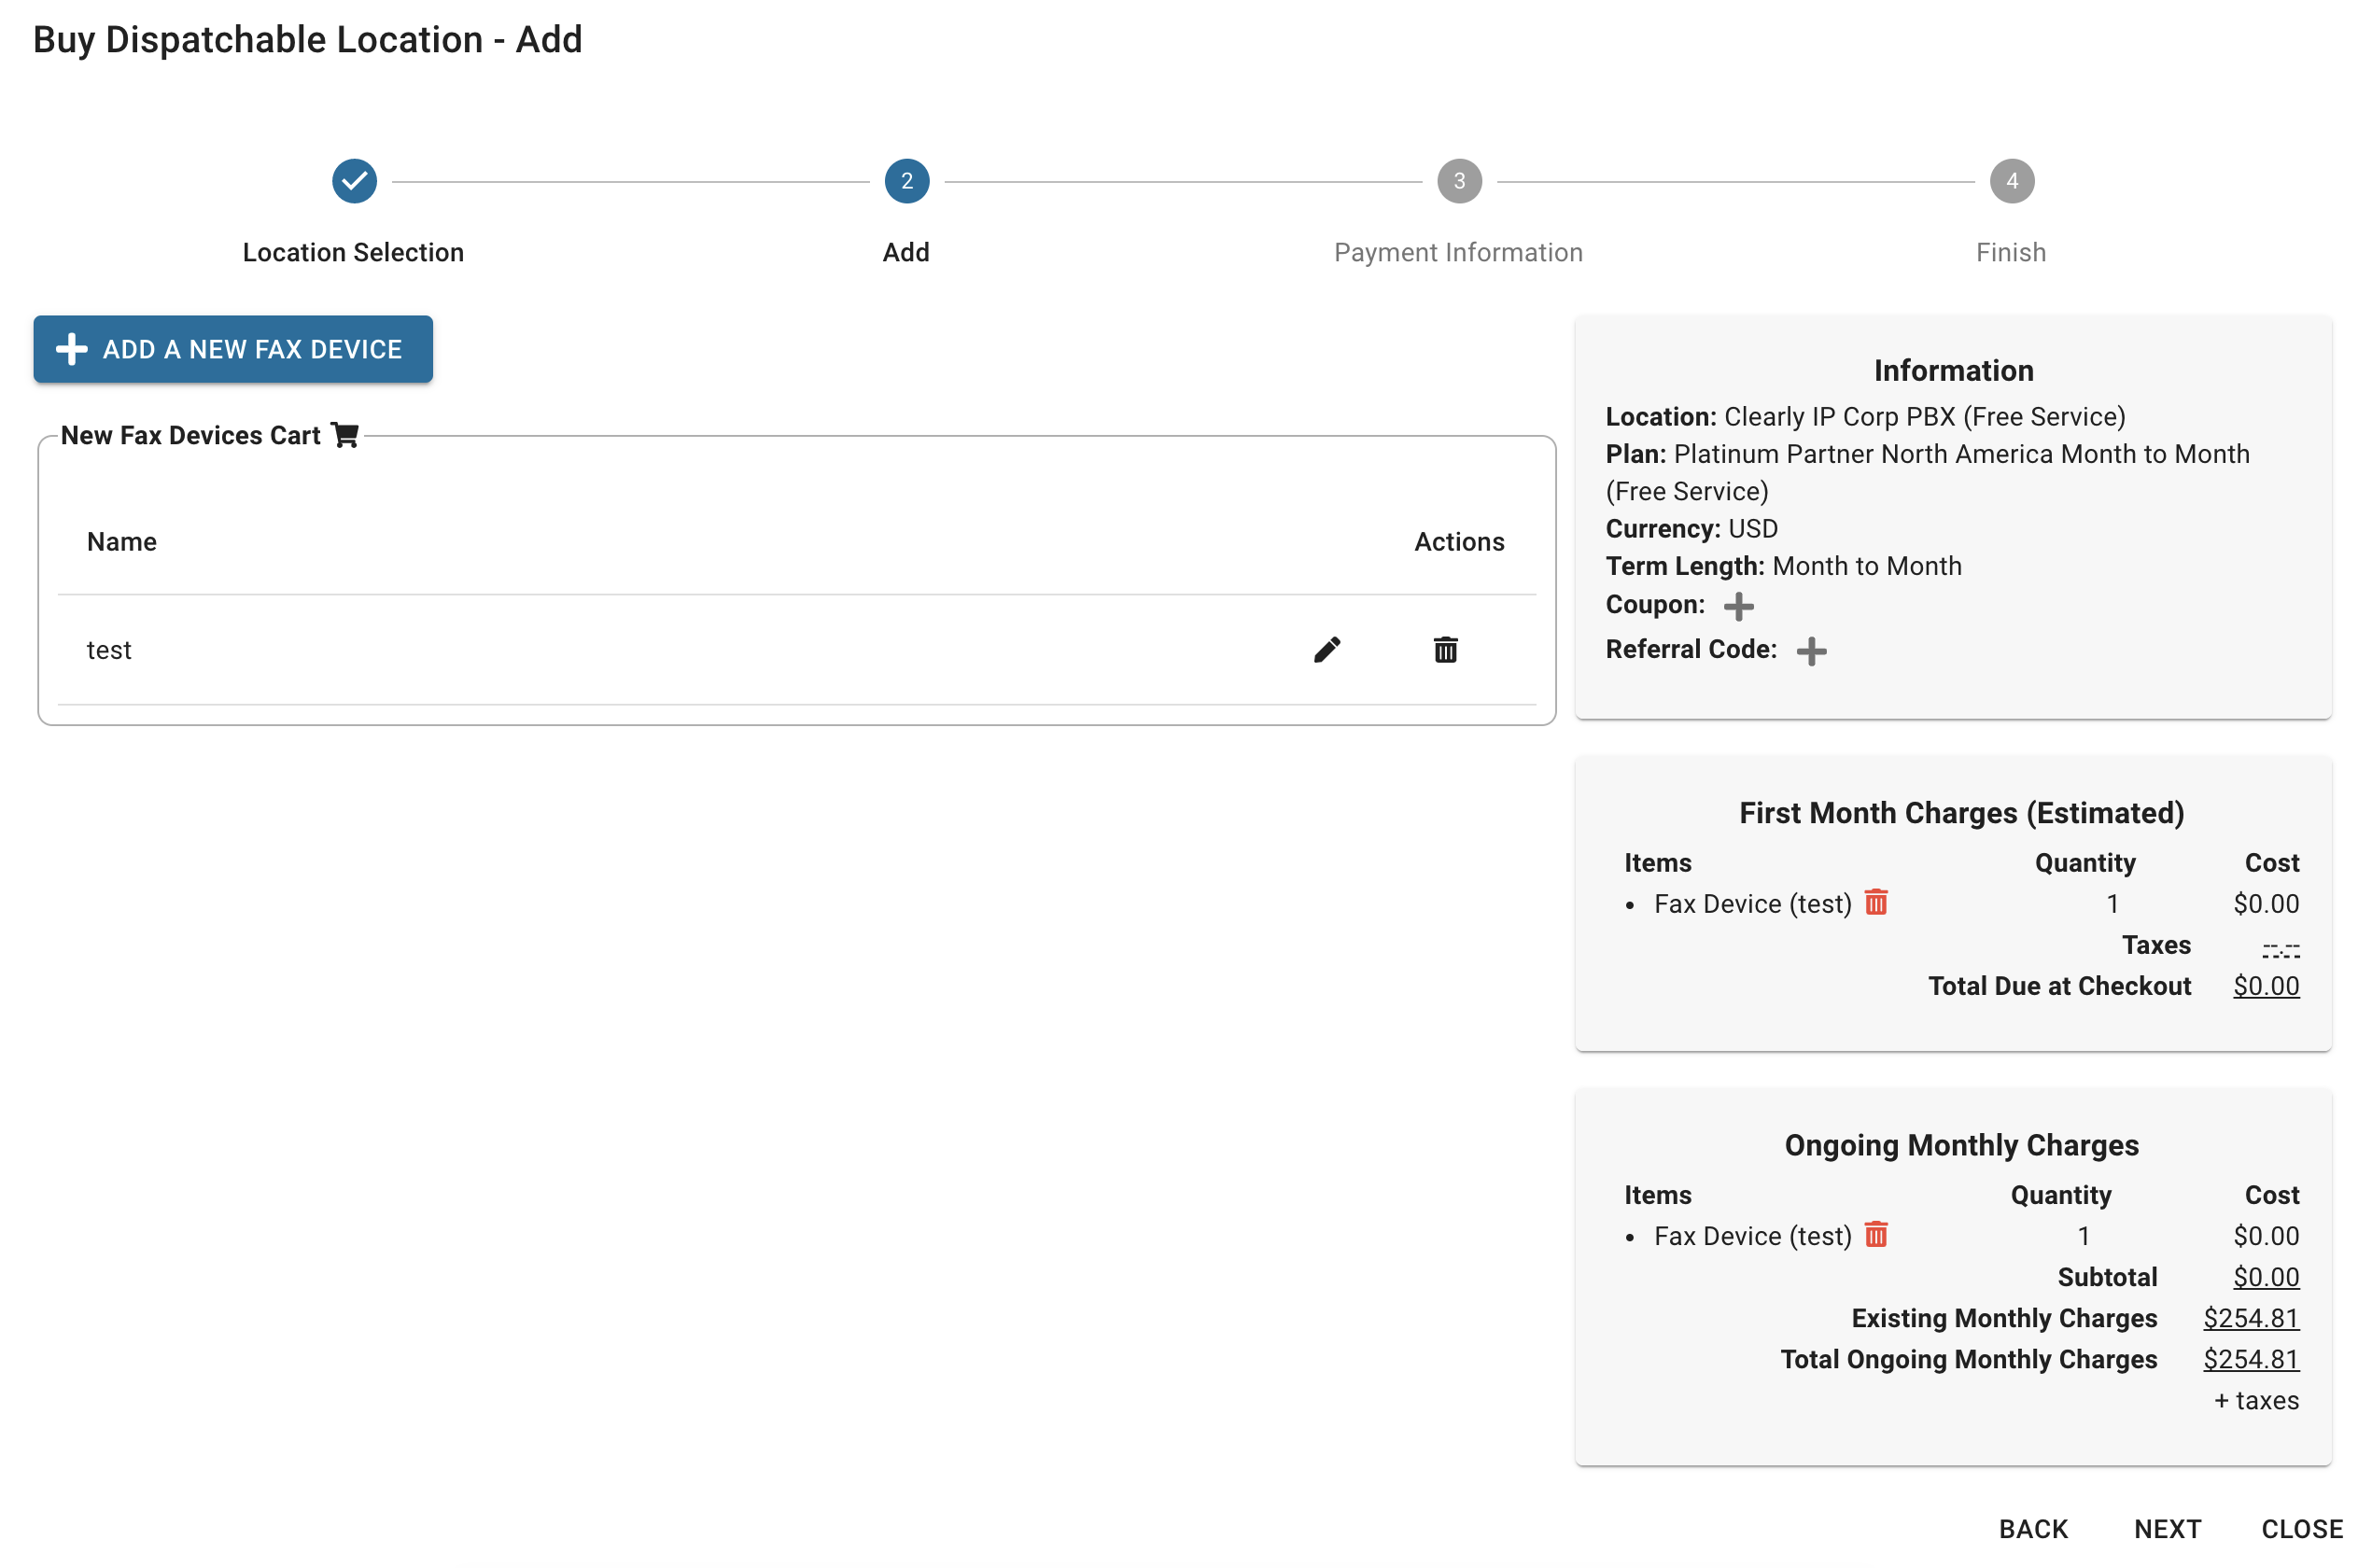
- From here you can add more devices or continue with the checkout process
- You will receive a email with your Invoice for this Order along with Tracking information for the shipment once the Appliance(s) ship. Most orders are processed within 1 business day and are shipped ground to you.
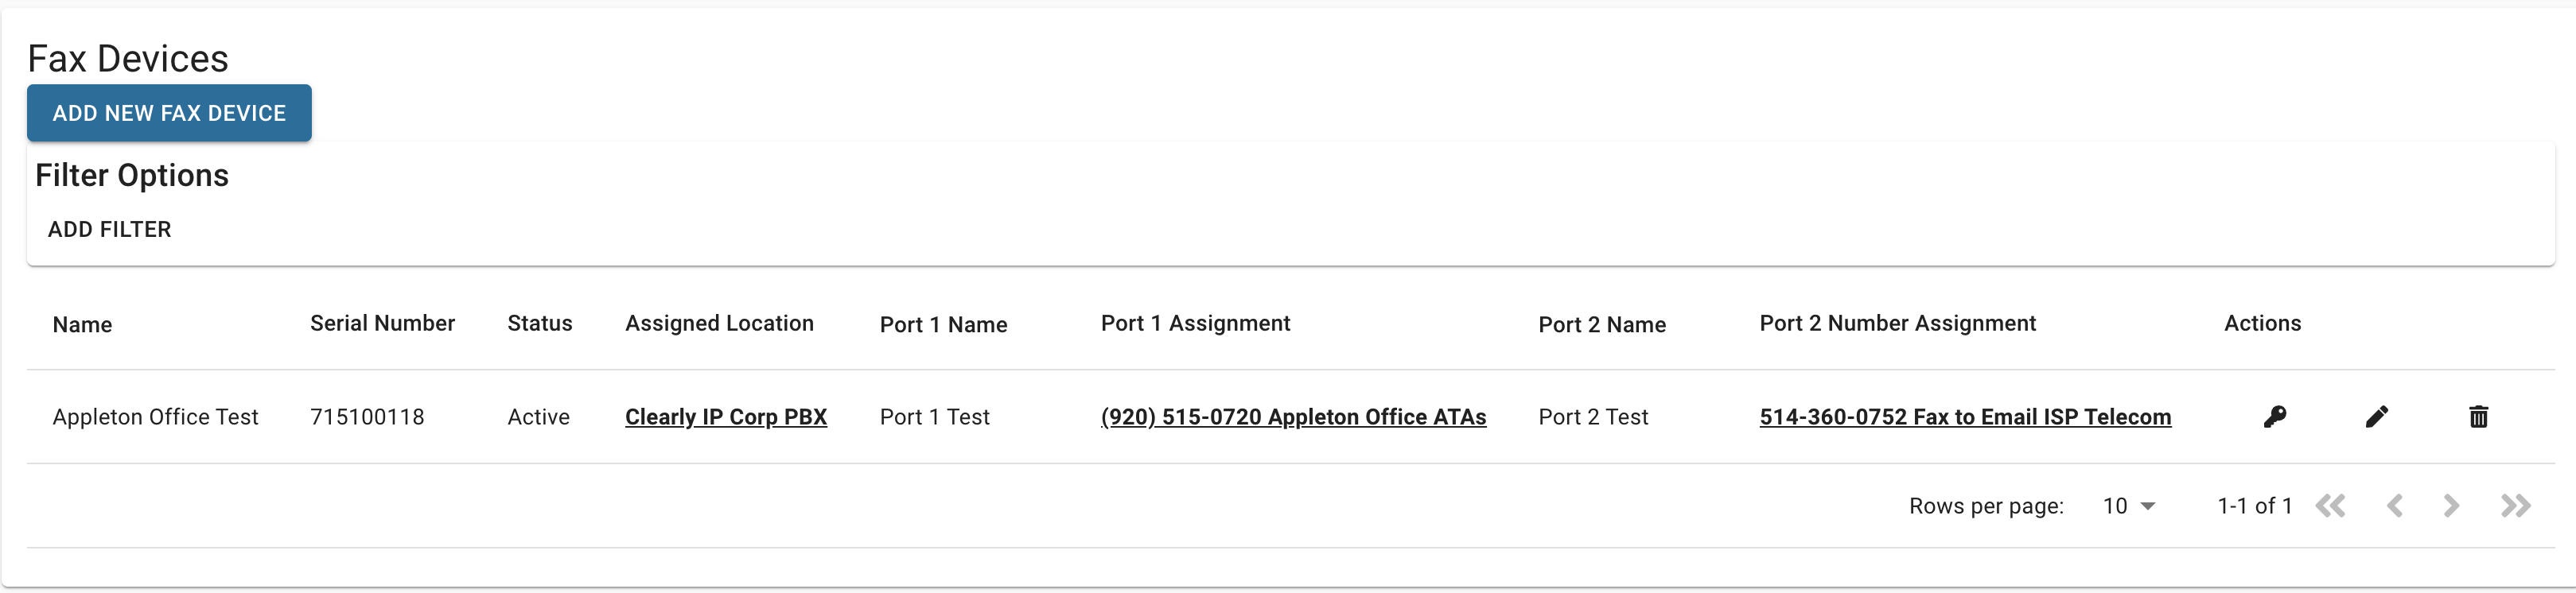
SendFax.to Appliance Management from the Portal - Once you have purchased 1 or more sendfax.to Appliances you can view and manage the Appliance settings from the Faxing section of the Clearly Cloud portal.
- Under Products and Services click on the Faxing option

- Scroll down to the Fax Devices section. We can see a list of all the Appliances associated with your account and what Location they are assigned to. Click on the "pencil" icon to view all the settings related to the Appliance and change and settings.
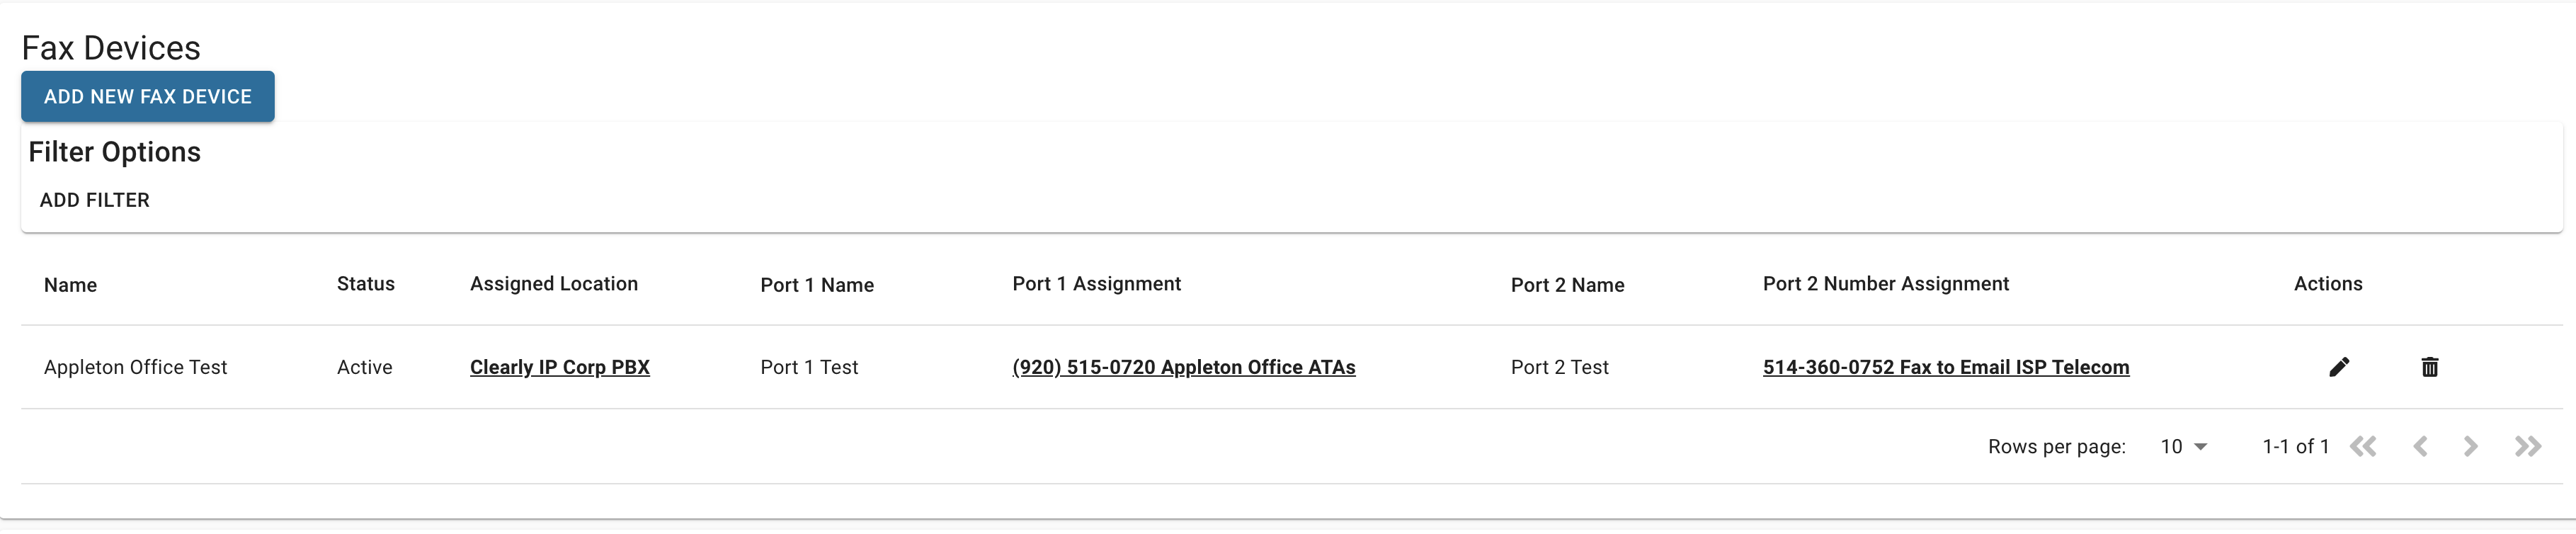
- In order to send a outbound fax from either Port 1 or Port 2 you need to associated the Port to a Phone Number on your account. This phone number will be used as the Caller ID when placing the call. The same number can be used on both ports and on different Appliances on the same Location that the Appliance is assigned to. This Phone Number is only used for outbound faxing and has no bearing on inbound Fax routing of Fax calls to the device. That is handled through the Inbound Fax Group settings outlined below.
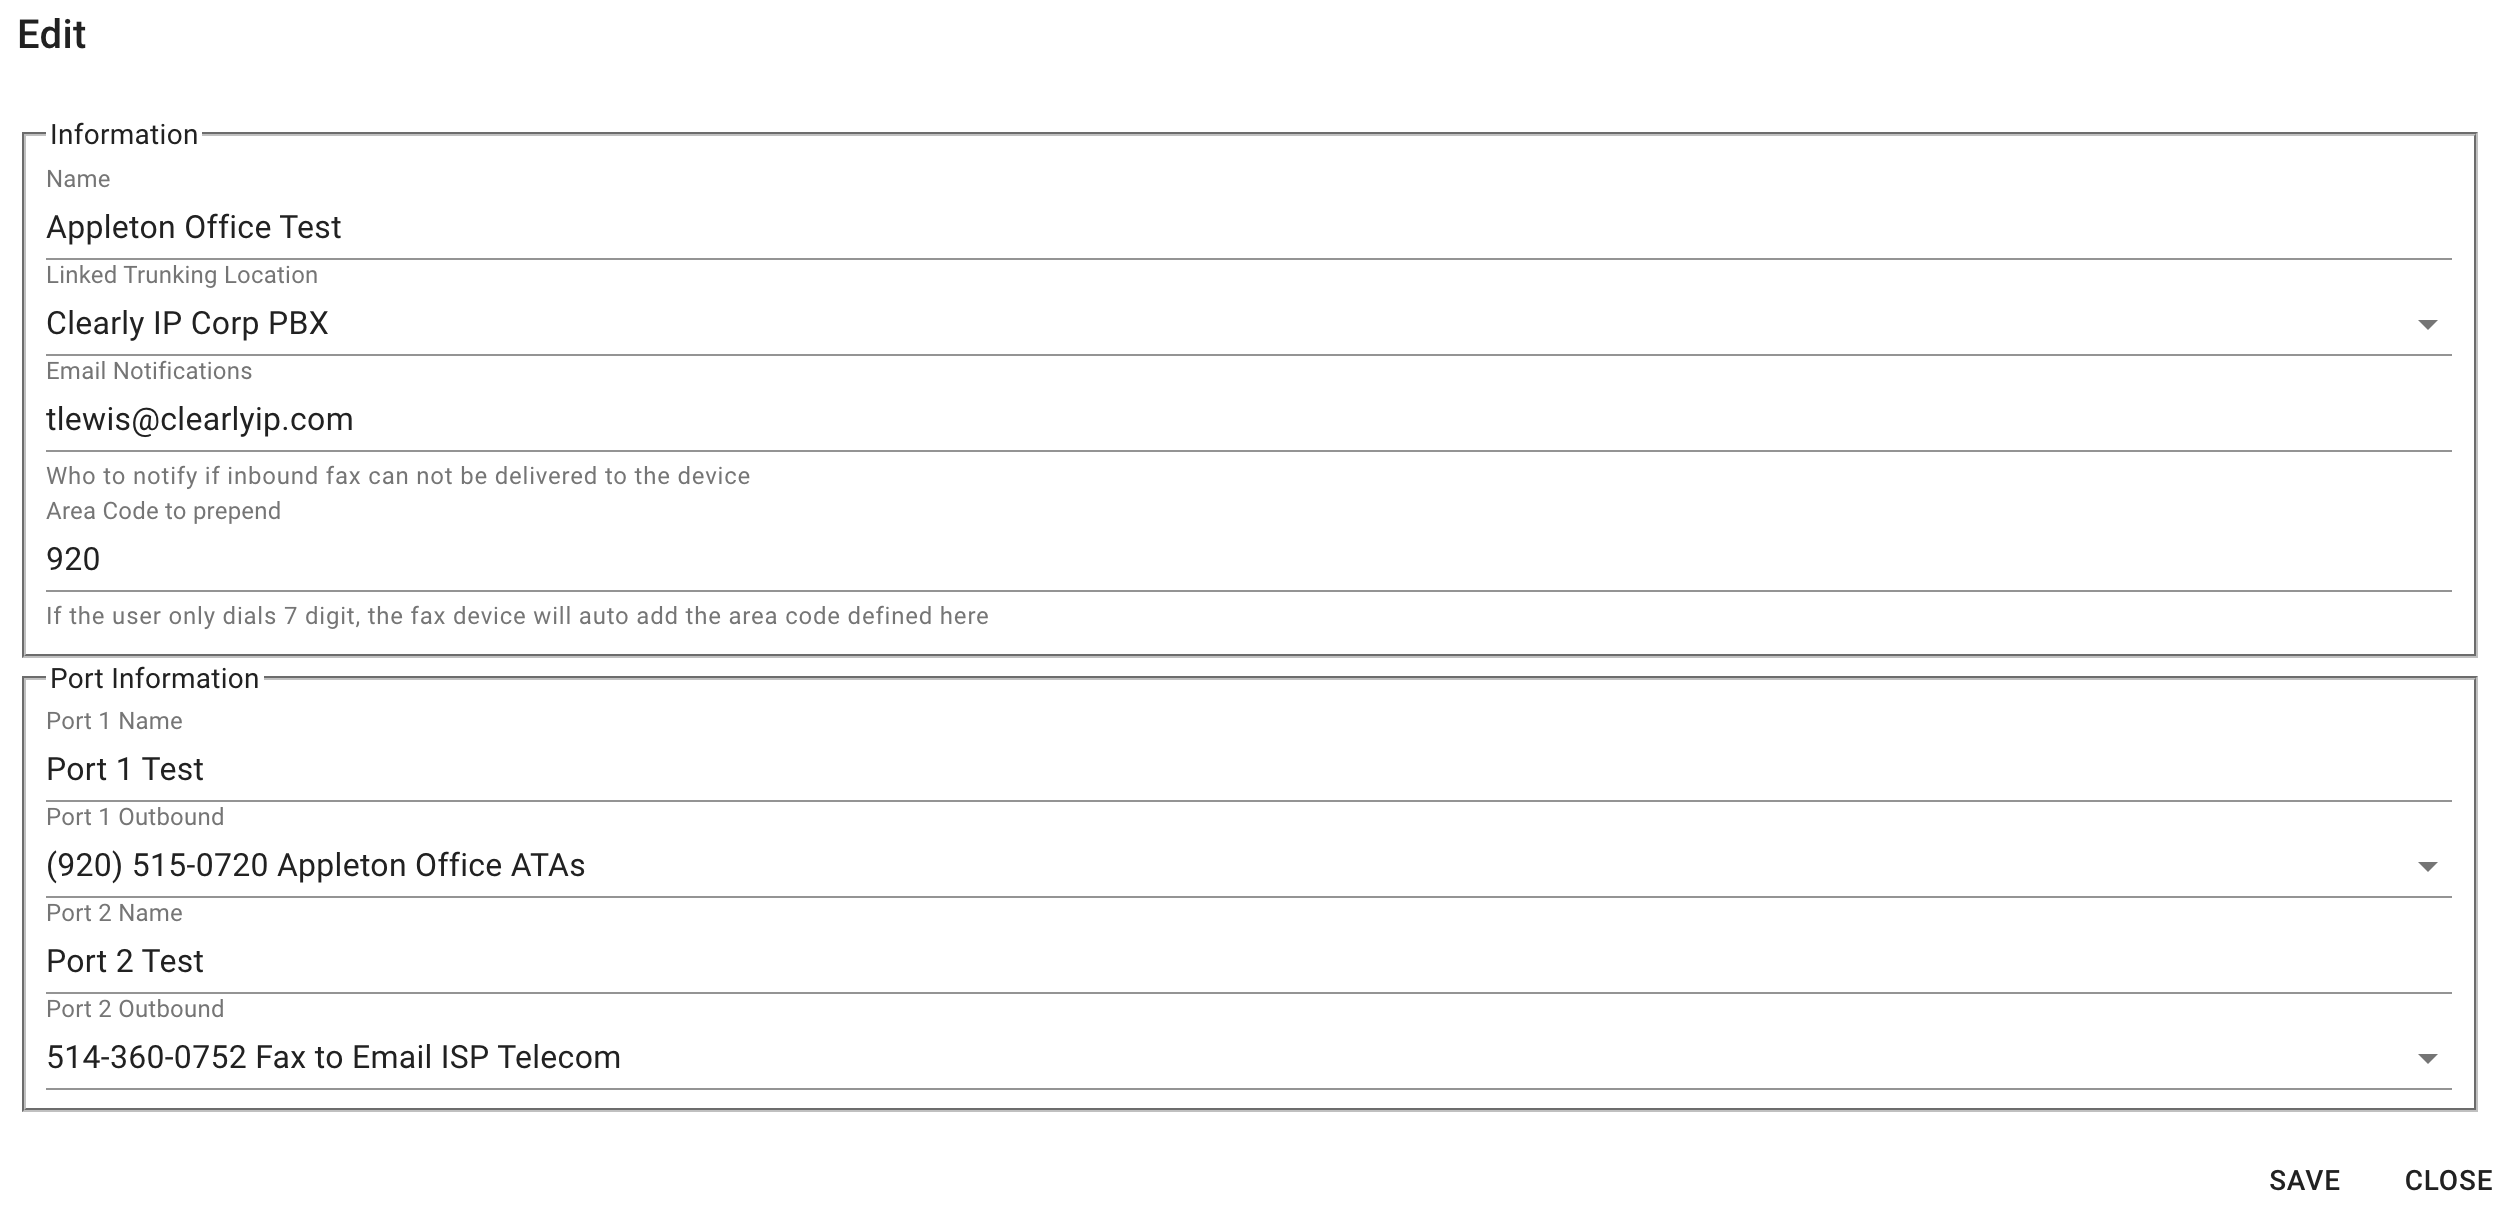
- From here you can set what email address we will notify if the device goes offline or we are not able to deliver outbound faxes for any reason.
- You can also set the default Area Code for the device and that 3 digit area code will be added to any 7 digit number automatically for you. This is useful for users who are use to dialing local numbers as 7 digit still where our service requires 10 or 11 digits by defining the 3 digit area code here anytime you fax a 7 digit number we will automatically add this 3 digit areacode for you.
Changing SendFax.to Appliance Web UI Password - To change the Web UI Username or Password you will need to login to the Clearly Cloud portal.
- Under Products and Services click on the Faxing option
- Scroll down to the Fax Devices section. We can see a list of all the Appliances associated with your account and what Location they are assigned to. Click on the "Key" icon change the Web UI Username and/or Password
- Set the Username and/or password and press Save
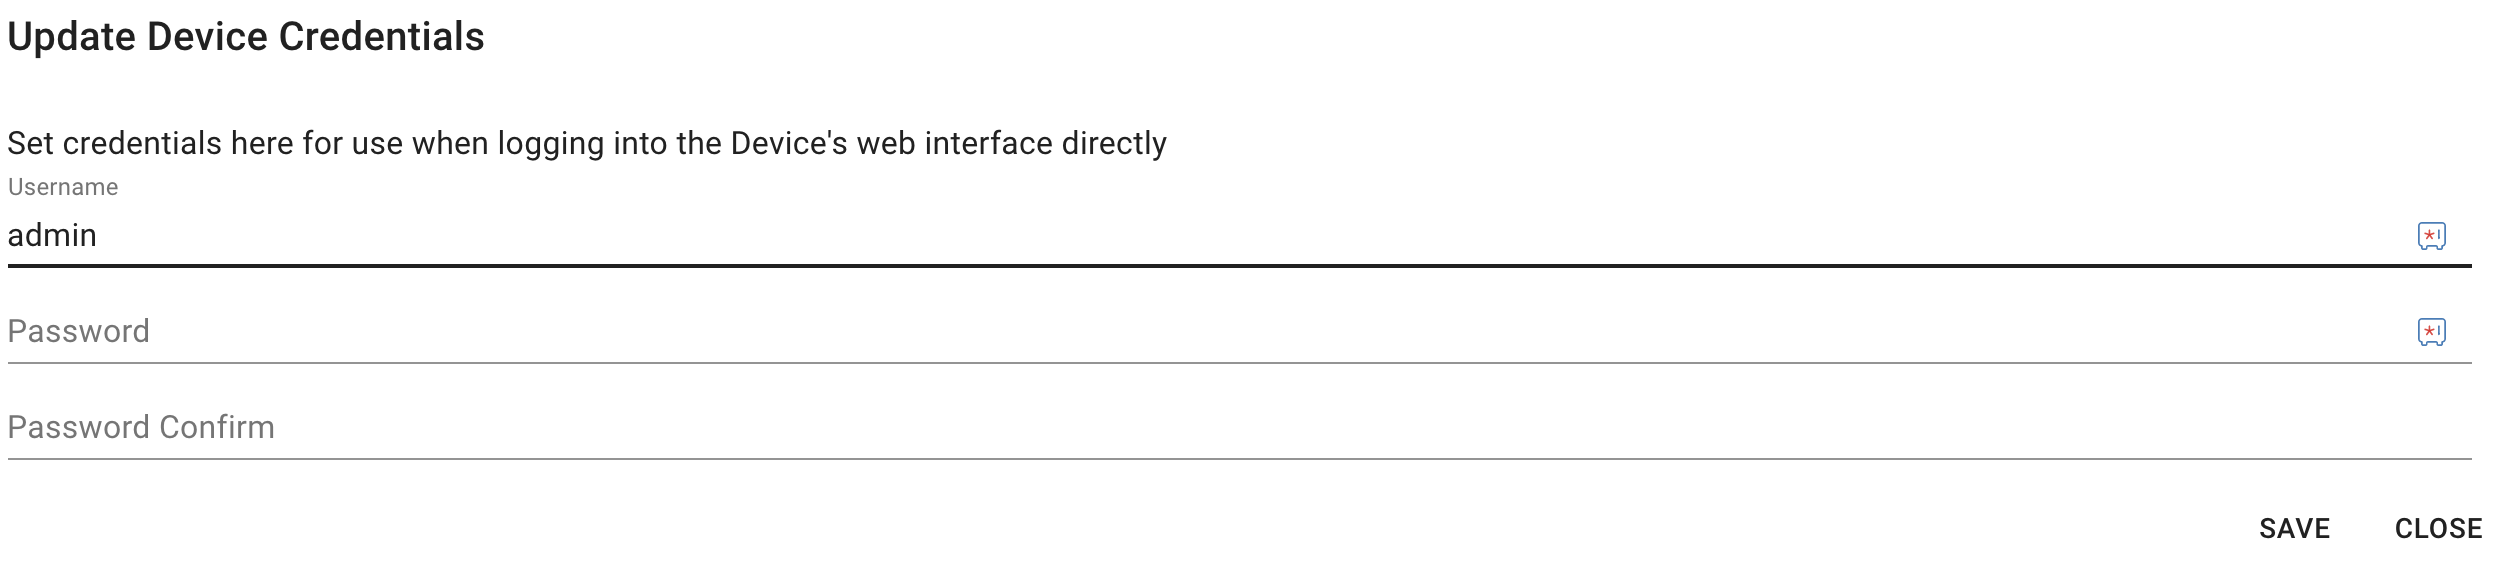
- Your SendFax.to appliance checks in with our cloud servers every minute so within the next 60 seconds the Appliance should update the Username and Password to what you set here.
Setup Inbound Fax Routing Device Status Monitoring - Your sendfax.to appliance checks in every minute with the sendfax.to cloud servers to see if it has any new faxes or changes to the configuration of the device. These checkins are logged so that we can send the following notifications to you if the device stops checking in.
- Delayed Checkin:
- If the device has not checked in for the last 15 minutes you will receive the following emails from us.
- First Email: Hasn't checked in with us for 15 mins.
- Second Email: 2 hours after the first email above reminding you.
- Third and 4th: 6 hours after the previous if the device still has not checked in.
(Total of 18 hours) - Offline Extended Period:
- If the device after 18 hours with the notificatiosn above has still not checked in we mark it as Offline Extended and the following reminder emails will be sent.
- First Email: Hasn't checked in with us in 24 hours which is 6 hours after the last Delayed Checkin email above.
- Second Email: 24 hours after the first
- Third and 4th: 2 days after the previous
- (Total of 6 days). After this we will no longer send you reminder emails.
- Back Online
- If a email was sent above about your device being Delayed you will receive a email once the device is Back Online with us to inform you that its back online.
Fax Machine Recommended Settings Recommended settings for fax machines connected to a SendFax.to Fax appliance: - Baud rate should be set to 14400
- The Fax device can handle faster, but can cause large page count faxes fail if set too fast.
- ECM disabled
- ECM really should not be needed, as it is really the fax machine sending to the fax device, so the public telephone network is not involved, so error correction shouldn't be needed, and is just overhead.
- Fax status report disabled
- The fax status report can confuse customers. If the fax machine sends successfully to the fax device, it will report success, but that doesn't mean that the fax device was successful in delivering it to the actual destination.
|
|
|
| | | |
|