Overview
The following guide should work for all Clearly IP Gateways such asInformation gathering
You will need to retrieve the following information from Clearly IP Trunking portal for the location you want to connect the device to.- SIP Credentials
- Username - SIP Username
- Password - SIP Password
Review this wiki on how to get the above information here Login
Power up the ATA and connect directly to ETH 1 with an ethernet cable. The ATA ships with a default IP address of 192.168.2.240/24 you will need to assign the device you are connecting with an IP address on the 192.168.2.0/24 network to be able to connect- Navigate to the Gateways web GUI by entering the default IP address of 192.168.2.240 in the address bar to get to the login screen
- Log into the web GUI. Default Username is "Admin" and the initial password is in a sticker in the bottom of the device for older devices. If the sticker does not list a Password the device will have a default password of "clearly".
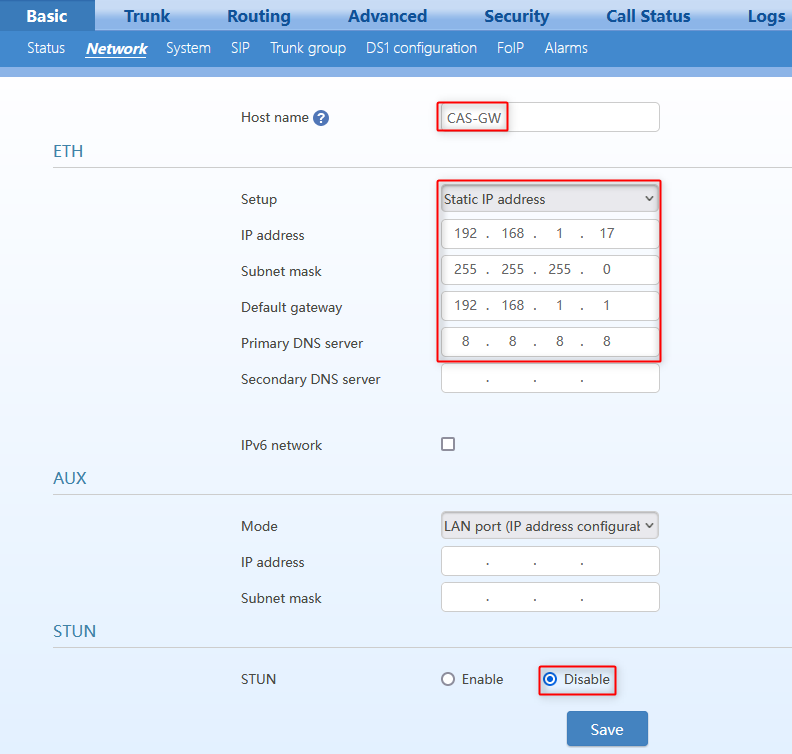
Navigate to Basic > Network to setup the network parameters
- Hostname - Enter a desired Hostname for the ATA
- Setup (IP assignment) - Obtain an IP address automatically or set an static IP
- DNS server - set to Obtained automatically or Specify DNS manually
- Stun - Set to disable
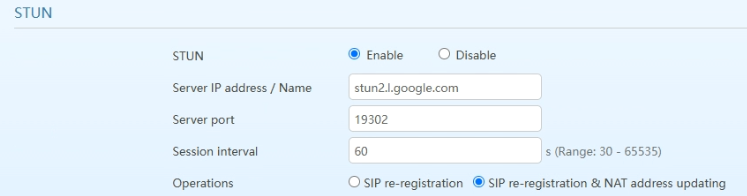
Note: If the gateway is behind a firewall and there are audio or registration issues Stun may need to be enabled using settings
- Stun: set to enable
- Server IP address / Name - The STUN server you want to use. We recommend using a Google STUN server such as stun.l.google.com
- Server Port - The port the STUN server wants request sent to. For Google this is 19302
- Session interval - How often we should check in with the STUN server to get information.
- Operations: Set to SIP re-registration & NAT address updating
SIP Trunk Setup
This section goes over the ATA Settings needed to register to a Clearly IP Trunk
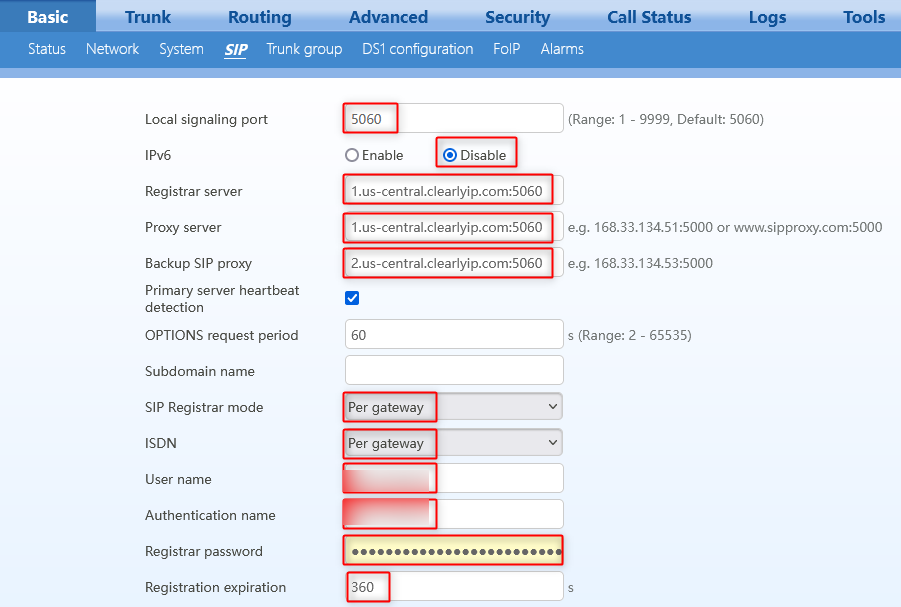
Navigate to Basic > SIP to setup the SIP parameters
- Local signaling port: Leave as is default value 5060
- Registrar server: Enter the domain of the SIP Trunk. In our case it will be 1.us-central.clearlyip.com:5060
- Proxy server: Enter the domain of the SIP Proxy. In our case it will be 1.us-central.clearlyip.com:5060
- Subdomain name: Leave it empty
- SIP Registrar Mode: Set it up as Per Gateway
- ISDN: Set it up as Per Gateway
- User name: This is the trunk username from the Clearly IP Trunking portal
- Authentication name: This is the trunk username from the Clearly IP Trunking portal
- Registrar password :This is the trunk password from the Clearly IP Trunking portal
- Registration expiration: Set to 360 seconds
Optional Parameters
- Backup SIP proxy: Enter the domain of the backup SIP Trunk. In our case it will be 2.us-central.clearlyip.com:5060
- Primary server heartbeat detection: check the box to enable
- OPTIONS request period: set to 60
Leave the settings as default
Codecs Settings
Navigate to Basic > System
- Under the Codec section move the codecs using the arrows from the Enabled codecs box to the Disabled codecs box in order to have them set as follows:
- G.711U/20, G.711A/20, GSM/20, G.729A/20
- Note: Will tell you you need a restart but we can finish the setup
Click on the Save button to have this setting applied.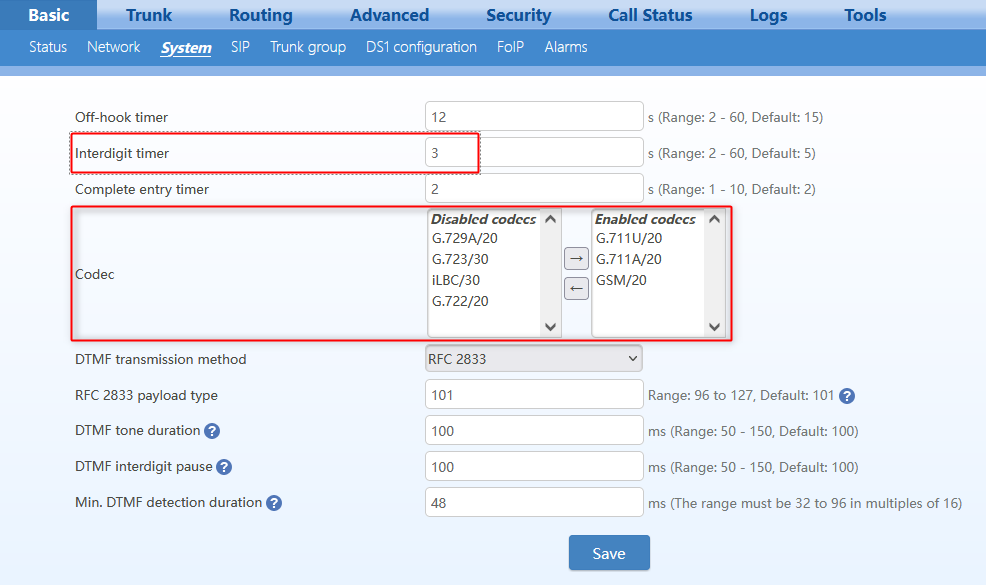
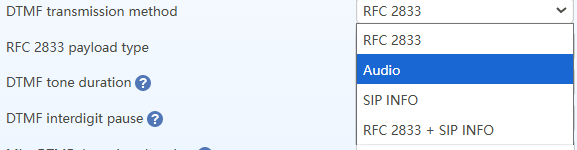
- The DTMF transmission may need to be changed to Audio (Inband) based on the PBX that you are connecting to for the DTMF tones to be received correctly
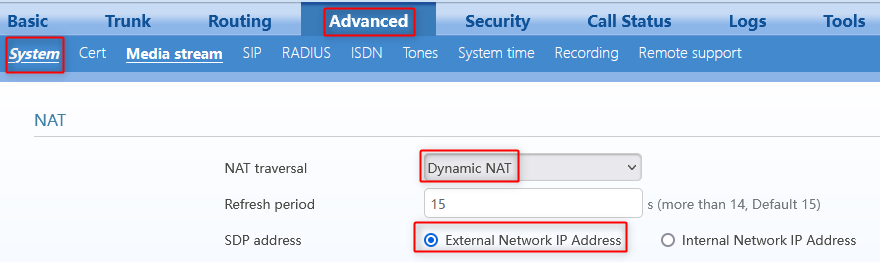
Advanced System Settings - Dynamic NAT
Navigate to Advanced > System
- NAT Traversal: Set to Dynamic NAT
- SDP Address: Set to External Network IP Address
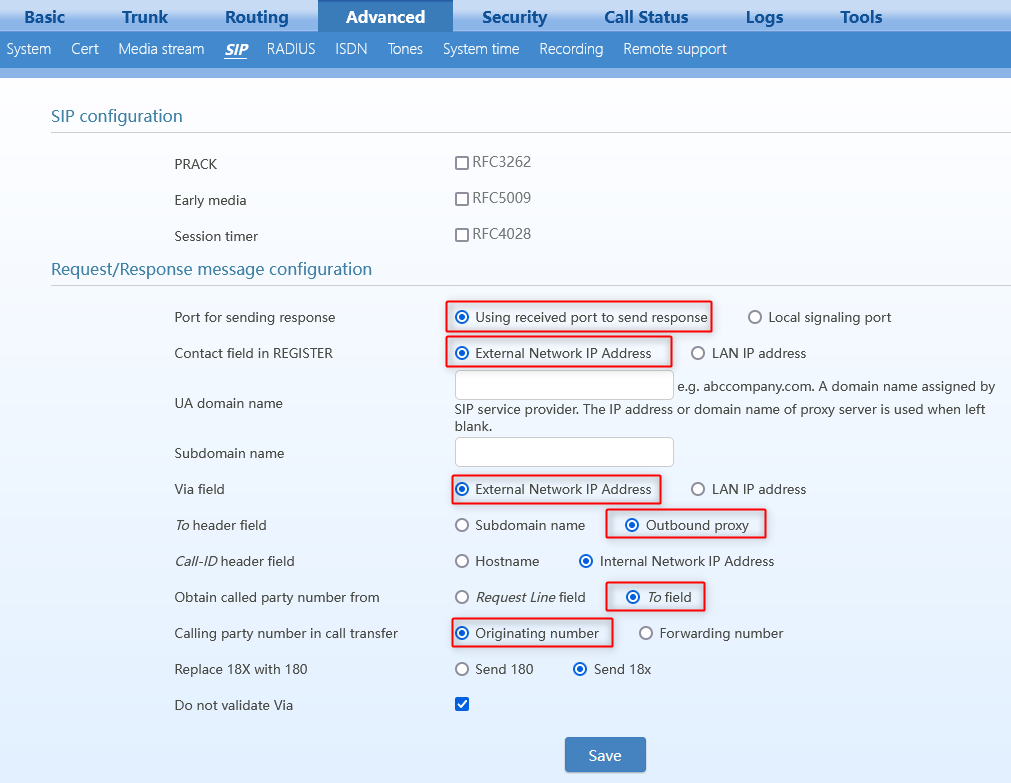
Advance SIP Settings
Navigate to Advanced > SIP and modify the following options:
- Port for sending response Set to using received port to send response
- Contact field in REGISTER Leave Set it to External Network IP Address
- Via Field Set to External Network IP Address
- To header field: Outbound proxy
- Obtain called party number from: To field
- Calling party number in call transfer: Leave at Originating number
Leave the rest of the options as they areNote: If you are using nat behind a router and the contact header IP address is not changing properly. You can add a contact parameter using the xml command:
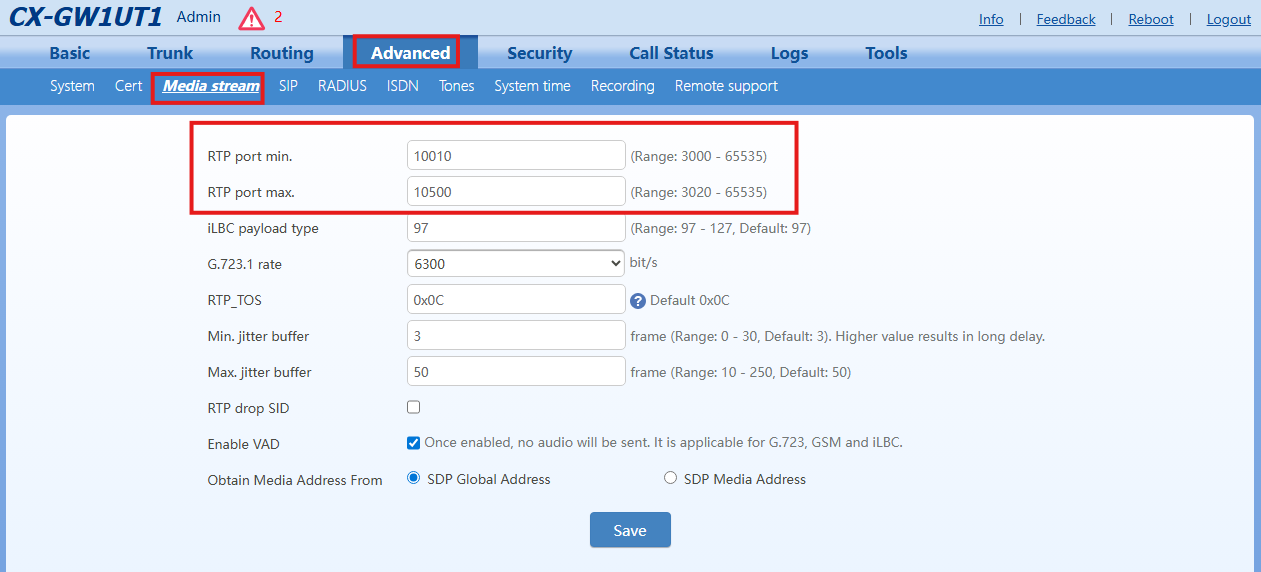
RTP Ports (Audio)
If you need to adjust the RTP port range, go to Advanced > Media Stream and configure it there. We recommend using the range 10010–10500, although the best choice may depend on your network security requirements
Tones
Go to Advanced > Tones and ensure the tones are configured for the country where the Gateway will be operating.

![]()
Save the settings and restart the Gateway to have them applied.
ISDN-PRI Settings
This section goes over an example of the ATA settings to set up an ISDN PRI connection.
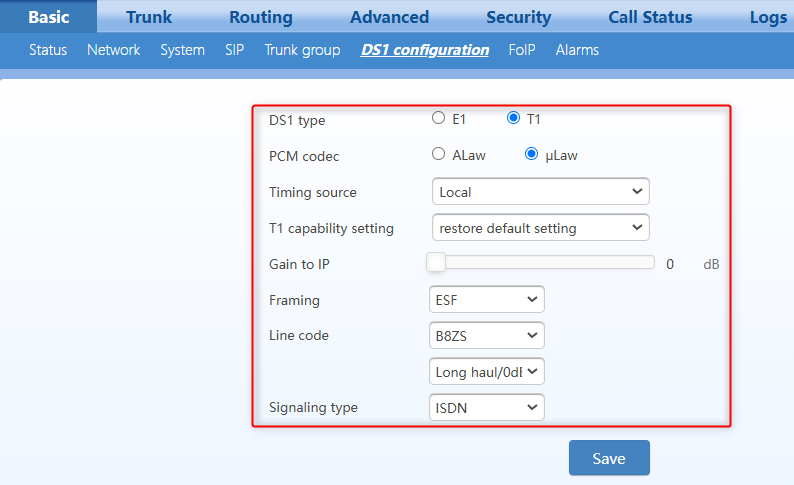
DS1 Configuration
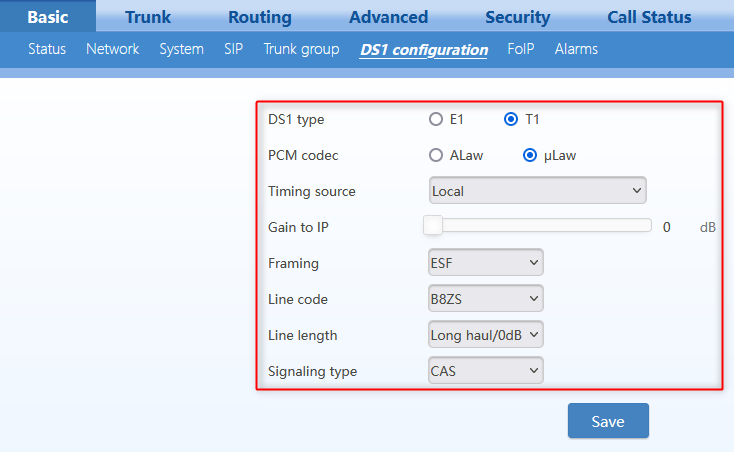
Navigate to Basic > DS1 configuration- DS1 type: Choose T1
- PCM codec: Choose ulaw
- Timing source: Choose Local to synchronize with its local clock or TDM 1 to synchronize its clock to the connected device
- Framing: Choose ESF
- Line code: Choose B8ZS
- Signaling type: ISDN
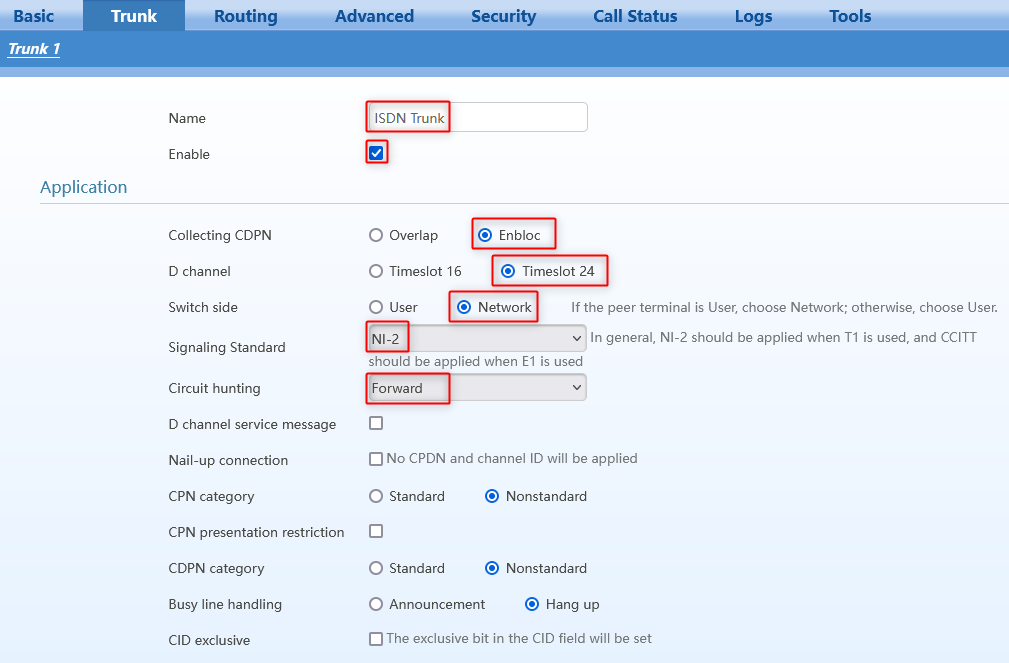
Navigate to Trunk >Trunk 1
- Name: Name the ISDN connection
- Enable: Check the box to enable the connection
- Collecting CDPN: Choose Enbloc
- D channel: Choose Timeslot 24
- Switch Type: Choose network
- Signaling Standard: Choose NI-2
- Circuit hunting: Forward
- The rest can remain default
Routing Table for PRI Trunk
Set up routing for calls to be sent to the ISDN
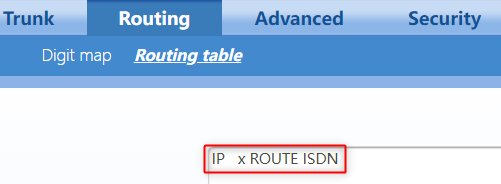
Navigate to Routing > Routing table
Note: It is possible to Manipulate the Inbound and Outbound Called Party Number and Calling Party Number using the routing table.
The CPN manipulation may need to have the SIP Repeater options to be enabled to work from the The Routing Table. If you are looking to replace an outbound CPN with the SIP Repeater option disabled you can use the Digit Transformation option in the Trunk settings
Below are some examples:
NOTE: The following rules MUST be placed above the IP X ROUTE ISDN rule.
Number Manipulation for inbound calls from the IP trunk
Remove all but four digits for a Calling Party Number beginning with 1608773
IP CPN1608773x KEEP -4
remove all but last four digits for the inbound Called Party#
IP X KEEP -4
Replace Inbound called party number with 5555
IP X REPLACE 5555
Replace Inbound called party number with 8033270700
IP X REPLACE 8033270700
Number Manipulation for Outbound calls from the ISDN trunk
Add the digits 1608 to a 7 digit Called Party Number
ISDN xxxxxxx ADD 1608
Add numbers in front of a Calling Party Number
ISDN CPNX Add 1608773
To have some of these options at the same time the routing table would look like this:
IP CPN1608773x KEEP -4
IP X REPLACE 5555
IP X ROUTE ISDN
ISDN xxxxxxx ADD 1608
ISDN CPNX Add 1608773
ISDN xxxxxxx ROUTE IP 1.us-central.clearlyip.com:5060
You can Also use the digit Transformation option in the Trunk Settings
Digit Transformation
When using Digit Transformation to replace the outbound caller ID you will need to remove any entries for CPN in the Routing Table
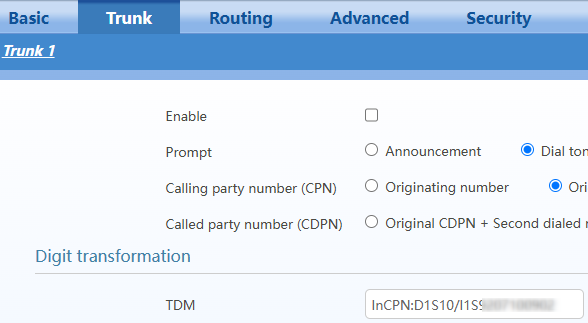
Navigate to Trunk >Trunk 1 > Digit Transformation - TDM
In the Digit Transformation field you can enter InCPN:D1S10/I1SNXXXXXXXXX
- D1S10: delete 10 digits
- I1SNXXXXXXXXXX: insert a new number (replace NXXXXXXXXXX with the CPN you want to go out the trunk).
Setup Inbound Caller ID to be passed through the ISDN Trunk
Select Caller ID options over the ISDN
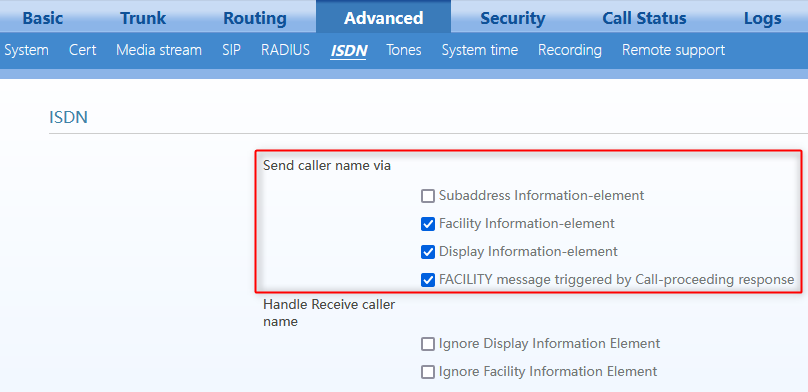
Navigate to Advanced > ISDN
Check the options:
- Facility Information Element
- Display Information Element
- Facility Message triggered by call proceeding response
CAS Settings
ESF / B8ZS DS1 Configuration
This section goes over an example of the ATA settings to set up an ISDN PRI connection.
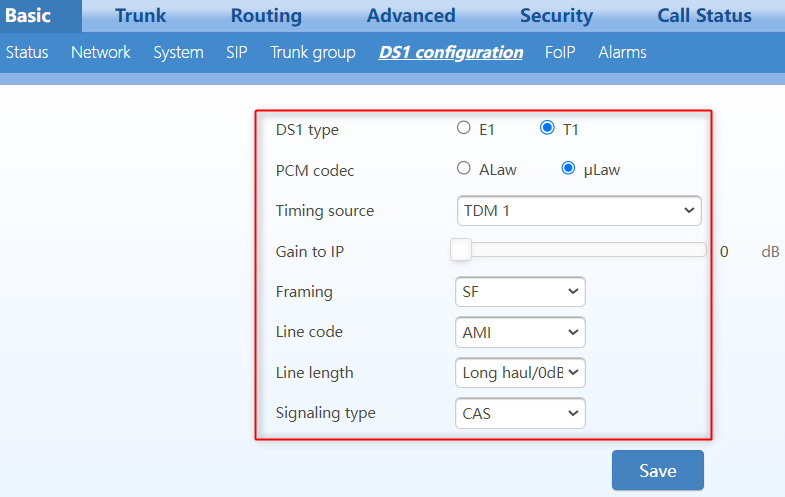
Navigate to Basic > DS1 configuration
- DS1 type: Choose T1
- PCM codec: Choose ulaw
- Timing source: Choose Local
- Framing: Choose ESF
- Line code: Choose B8ZS
- Signaling type: CAS
SF / AMI DS1 Configuration (can be used to connect to some D4 AMI devices such as the Adtran 900 Series)
This section goes over an example of the ATA settings to set up an ISDN PRI connection.
Navigate to Basic > DS1 configuration
- DS1 type: Choose T1
- PCM codec: Choose ulaw
- Timing source: Choose Local
- Framing: Choose SF (may need to use D4 for some devices)
- Line code: Choose AMI
- Signaling type: CAS
Routing Table for CAS Trunk
Set up routing for calls to be sent to the CAS Trunk
Navigate to Routing > Routing table
Trunk Configuration
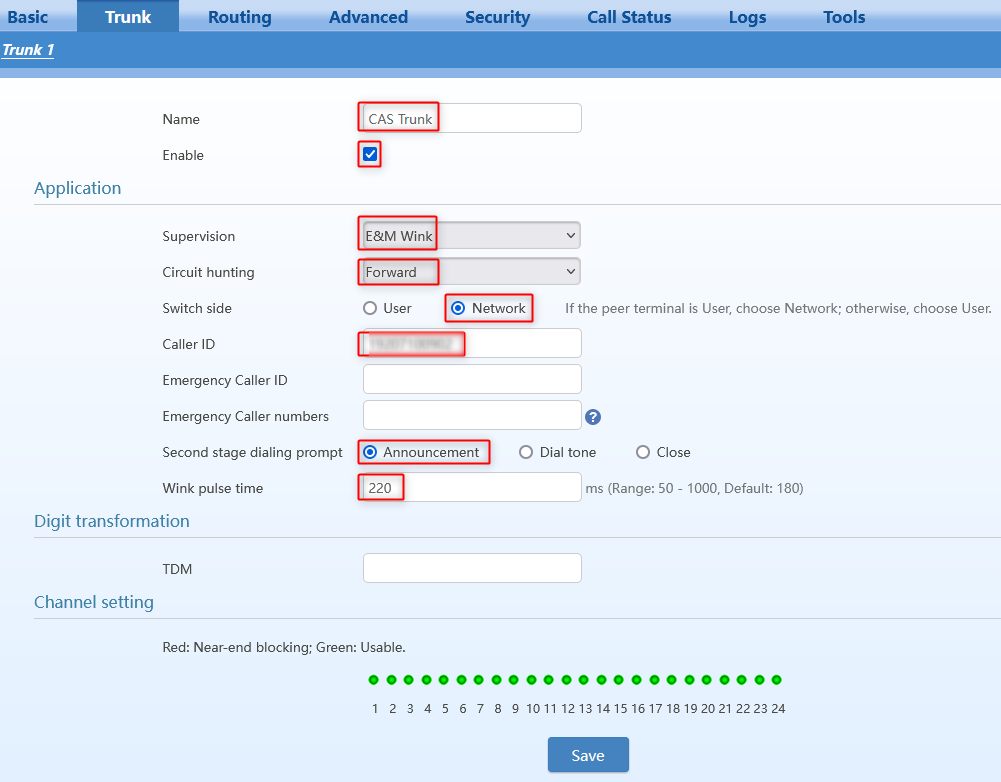
Navigate to Trunk >Trunk 1
- Name: Name the CAS connection
- Enable: Check the box to enable the connection
- Supervision: E&M Wink
- Circuit Hunting: Forward
- Switch side: Network
- Caller ID: Enter the Number of the SIP Trunk
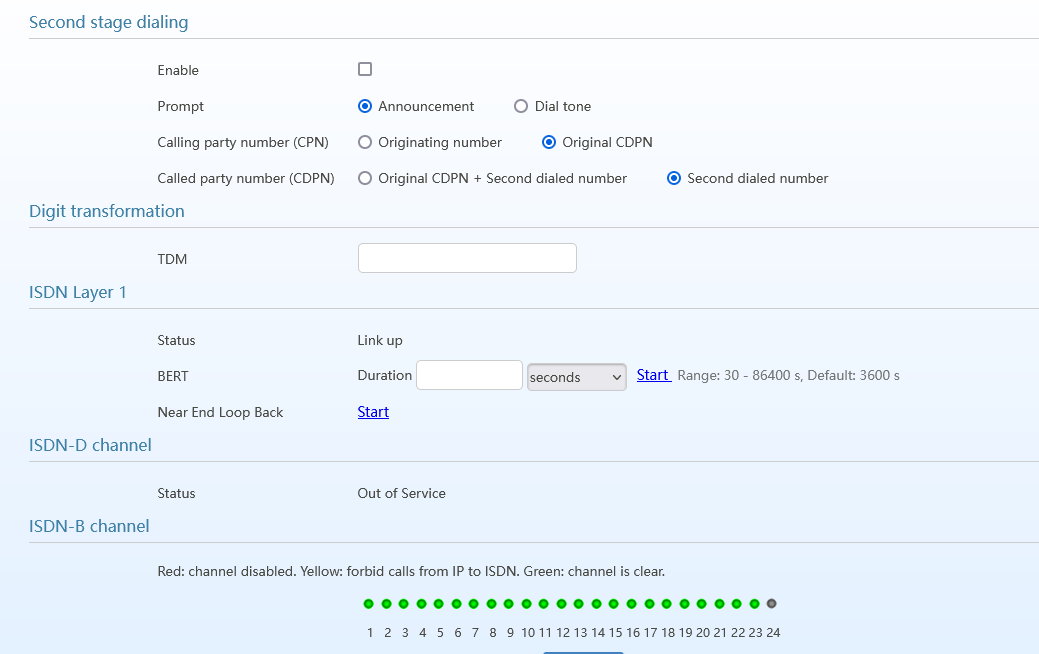
- Second Stage Dialing Prompt: Set to Announcement
- Wink Pulse Time: Can set to match the other end of the connection
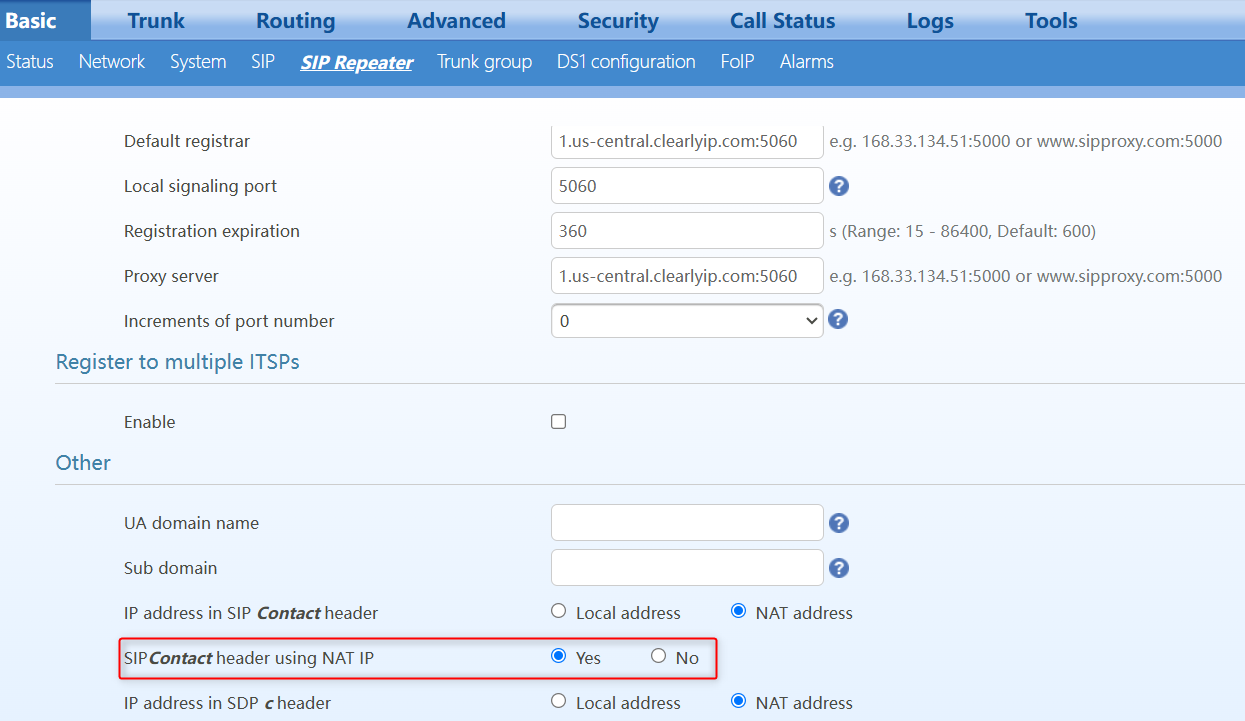
Advanced Settings to manipulate the Contact header behind NAT Using SIP Repeater
If you run into an issue where the Contact header in the Sip registration will not change from using the Internal IP address, you can set the Sip Contact Header using NAT IP Parameter in the Basic > SIP Repeater Registrar Options which may help. The Sip repeater page is only available after you change the Registrar mode to Per SIP trunk in SIP > Basic Settings
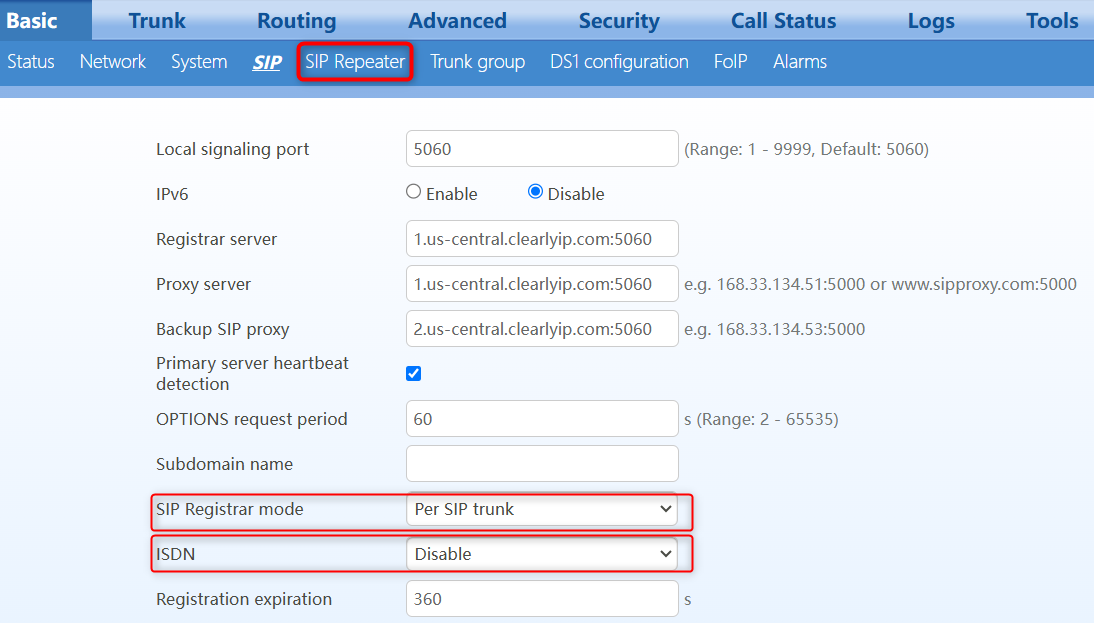
Navigate to Basic > SIP
- SIP Registrar mode: Set to Per SIP trunk
- ISDN: Set to Disable
- Click on Save to enable the the SIP Repeater Page
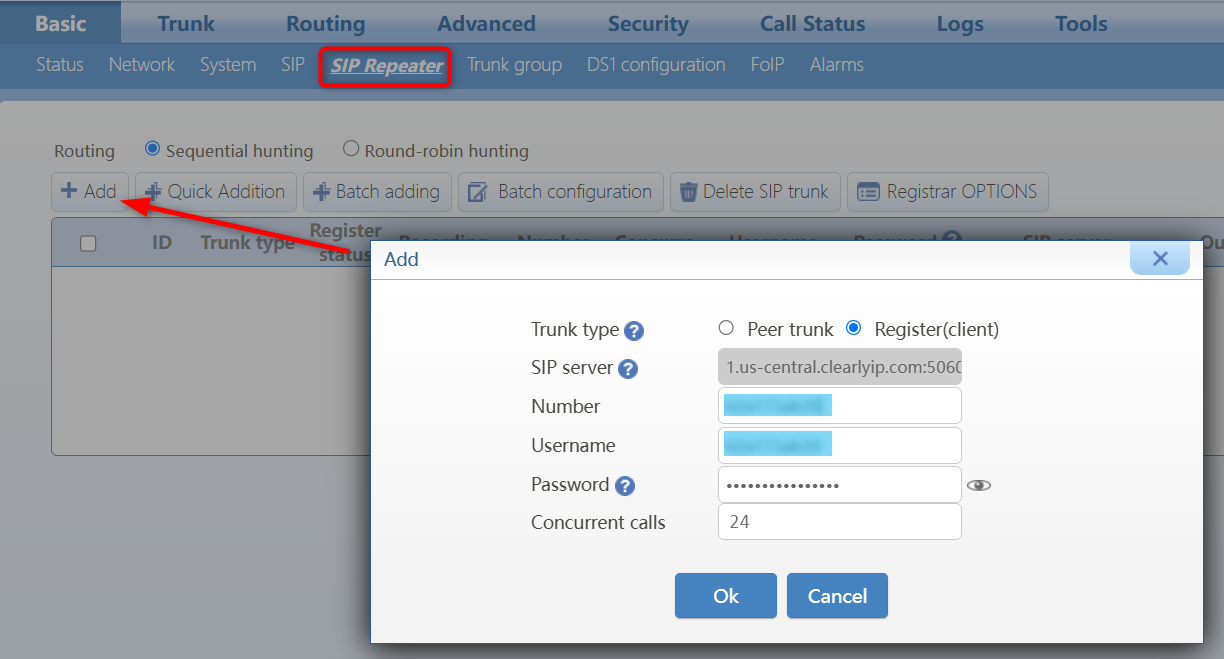
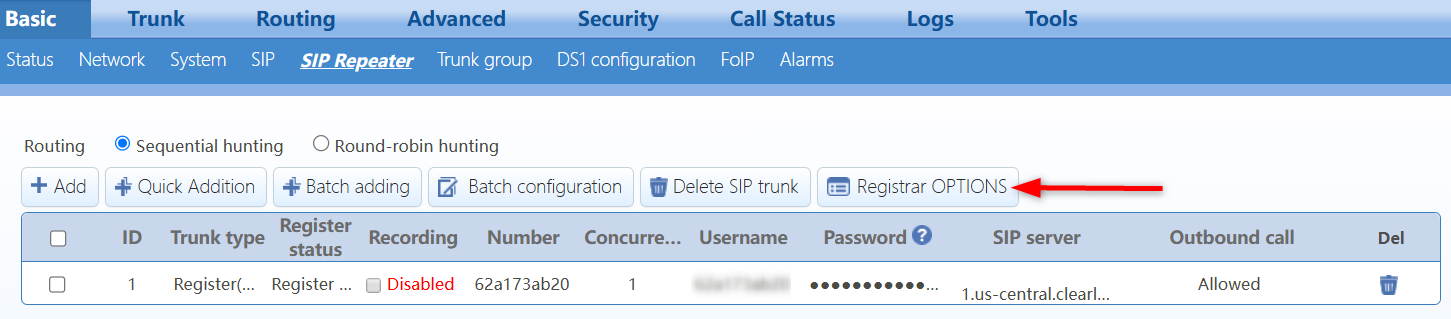
Navigate to Basic > SIP Repeater
Add Registration information for the IP trunk
- Click on the + Add button
- Number: This is the trunk username from the Clearly IP Trunking portal
- Username: This is the trunk username from the Clearly IP Trunking portal Will auto fill when the Number field is filled in.
- Password: This is the trunk password from the Clearly IP Trunking portal
- Click on the Registrar Options
- SIP Contact Header Using NAT IP: Yes
Reboot the gateway for the SIP Repeater configuration to take effect.
 Uploading ....