| | | |
 Uploading .... Uploading ....
Find the IP Address and MAC Address- Press the Check Mark button
 twice. twice.
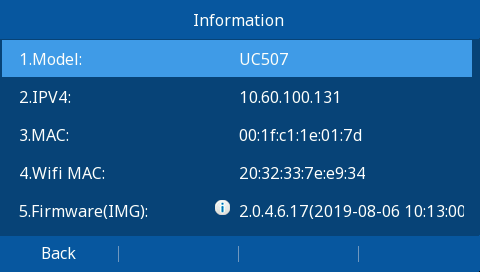
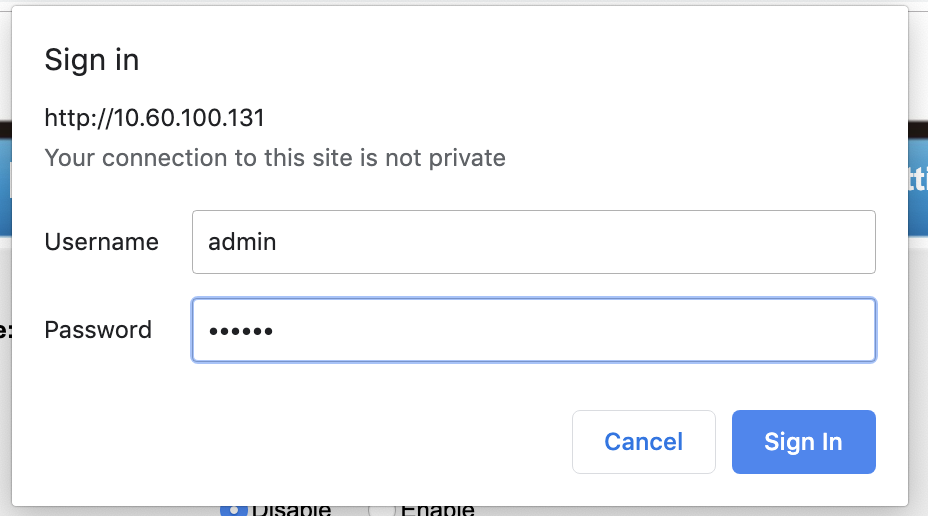
- Open a web browser on your computer and type in the IP address of your phone.
 - Type in the Username and Password of your phone. From the factory the default username is admin and the default password is also admin and press the "Sign In" button. You can also use the user user with default password of 1234, but that is a limited account.
- Log into the Web GUI as outlined above
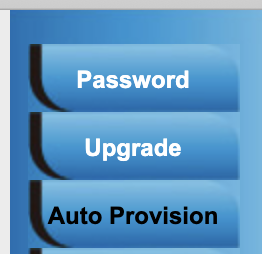
From the homepage of the GUI, click on Management from the options at the top. Then click on Auto Provision from the side menu.

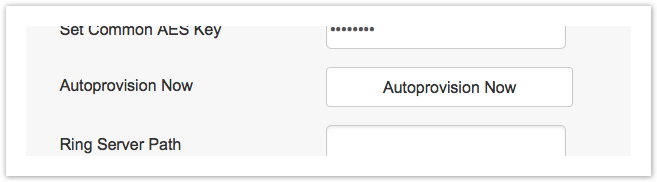
From here, you can toggle the Upgrade Mode buttons and edit the Config Server Path field.

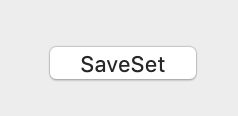
- Scroll down to the bottom and save your changes
- When you are finished, press the Autoprovision Now button and your phone will pull down your configuration files from the URL you defined.
If you are using HTTP or HTTPS for the mode you will need to set the Port Number that your PBX is setup to listen on for HTTP provisioning as shown in the Template Settings of the Clearly IP Devices module Example would be http://10.60.100.5:84 with 84 being the Port Number Important: If you have enabled HTTP/HTTPS/FTP provisioning with authentication, please make sure you include the username and password in the string using the format of https://username:password@IPADDRESS:Port Example would be http://admin:8192939@10.60.100.5:84 with admin being your username and 8192939 being the password you have setup for Provisioning Authentication.
Option 66 or 150 from your DHCP Server - You can use the "Option 66" feature built inside your company DHCP server to auto-provision your Clearly IP phones. This requires the IT administrator to insert the IP address/FQDN of the FreePBX server into the company router, under the "Option 66" parameter of the DHCP settings. This procedure is required only once. Since no configuration is required on the Clearly IP phones, this procedure is beneficial for mass deployments.
- Examples of valid URIs, showing the URL with port would be:
- https://username:password@FQDN:Port
- https://user:pass@192.168.0.1:1443
Factory ResetFrom the Phones LCD Screen- Press the Menu button.
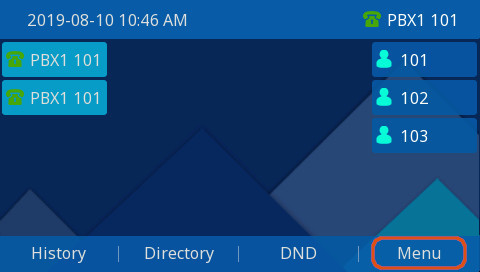
- Use the arrow buttons to highlight the Setting option, then press the Enter button.
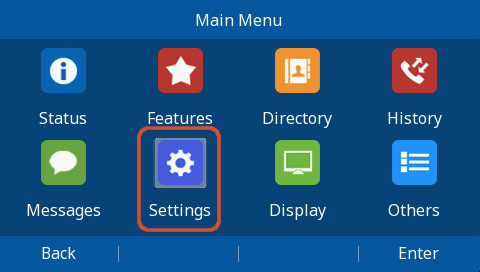
- Highlight the Advanced Setting option and press the Enter button.

- You will then be prompted to enter the password for this device. By default, the password is admin. Use the phone's keypad to enter the password, then press the Enter button.
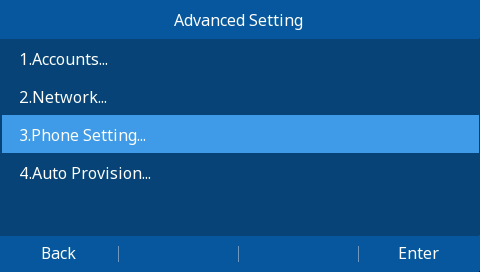
- From here highlight the Phone Setting option and press the Enter button.
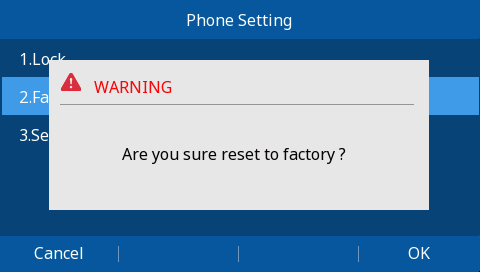
- Highlight the Factory Reset option and press the Enter button.
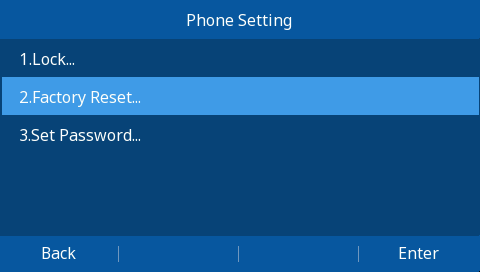
- Confirm you want to Factory Reset by pressing the OK button.
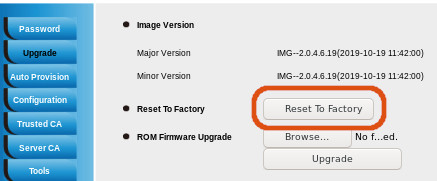
- Login to the Phone Web GUI as outlined above
- Navigate to the Management Section

- Select the Upgrade section in the Left Hand Menu

- Click the Reset to Factory button.
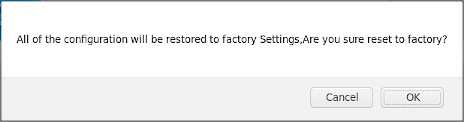
- Click OK to confirm Factory Reset
Factory Resetting without Admin Password- From the Phones LCD Screen
- Press the Menu button on the phone
- Press the # key 3 times in a row
- Press and hold the * key for 10 seconds or more and then release it.
- The phone will now factory reset and after 5 or so seconds reboot itself.
Factory Resetting Boot Looping Phones- Power the phone via AC Wall Adapter.
- Wait for the Green MWI to light
 for at least 3 seconds (it will usually flash once briefly and then stay on a few seconds later.) for at least 3 seconds (it will usually flash once briefly and then stay on a few seconds later.) - Press the # key 3 times in a row
- Press and hold the * key for 10 seconds or more and then release it.
- The phone will now factory reset and after 5 or so seconds reboot itself.
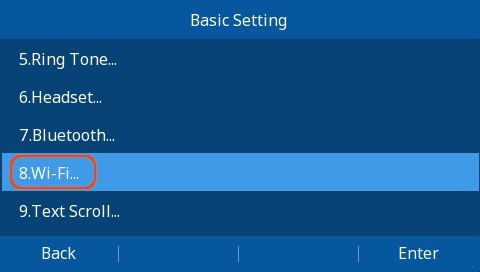
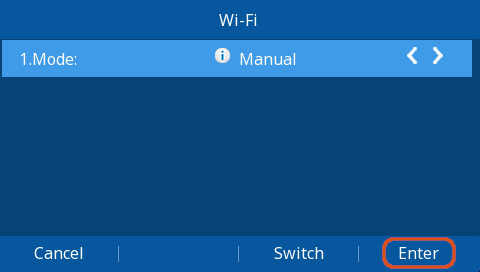
WiFi Setup (CIP 270)- To connect to a wireless network that broadcasts it's SSID, Press the Menu Button

- Arrow to Settings, Press Enter

- Navigate to Basic Settings, Press Enter

- Arrow to WiFi, Press Enter
- Set Mode to Manual, select Enter
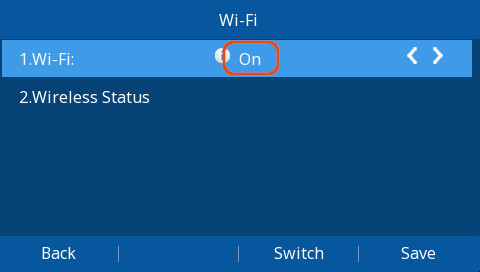
- Set WiFi to on, Select Save
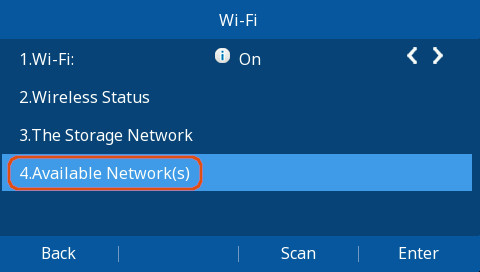
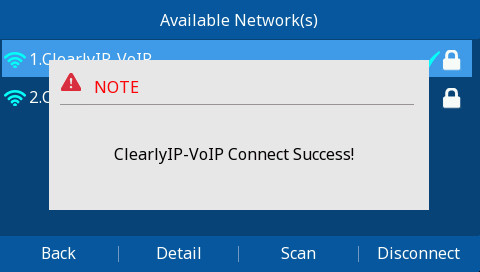
- Arrow down to Available Networks, Select Enter
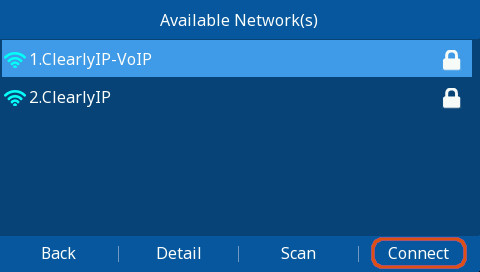
- Select your wireless network and select Connect
- Enter your WiFi Password and Select Connect.

- If entered correctly you should See a green Check next to your network and Get a Success Message
- Login to the Web GUI of the Phone as outlined above.
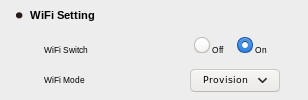
- Navigate to the Network section.

- Select the WiFi Section from the Left hand Menu

- In the Top WiFi section, Set "WiFi Switch" to "On" and "WiFi Mode" to "Provision"
- In the Bottom Provision Mode section, Set the SSID to your wireless networks Name and the Password to you WiFi Networks password.
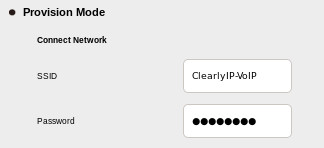
- Click the Save Set at the bottom of the screen to save your Settings.

Bluetooth Setup (CIP 270)- To connect to a Bluetooth Headset, Press the Menu Button
- Arrow to Settings, Press Enter
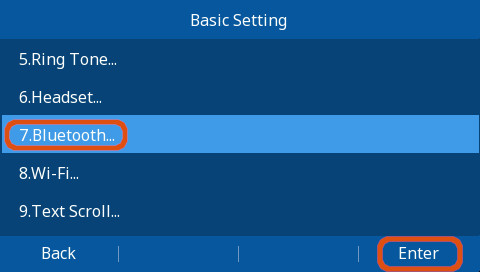
- Navigate to Basic Settings, Press Enter
- Arrow to Bluetooth, Press Enter
- Toggle On by pressing the Switch button
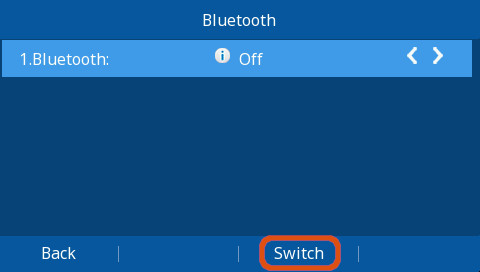
- Save to enable Bluetooth

- You should see a message that Bluetooth was started successfully, if not exit and start over.
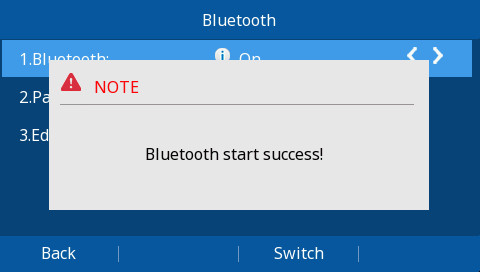
- Bluetooth is now enabled and we can now pair it with a device

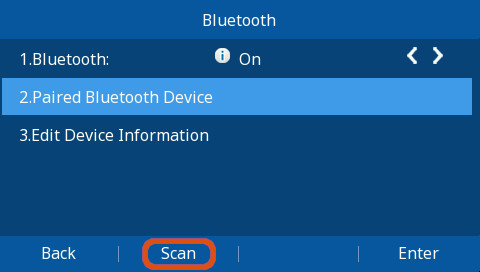
Pairing a Bluetooth Device- Enable paring on your Bluetooth headset
- This will depend on your device, please consult it's manual.
- Go to the Bluetooth config section as in Steps 1-4 Above.
- Scroll down to Paired Device --> Scan
- You should see a scanning message.
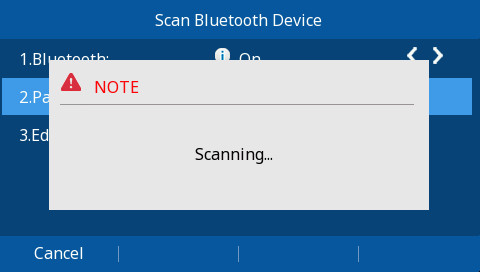
- Once it's done you should see your device in the list, Select your device and hit Connect.


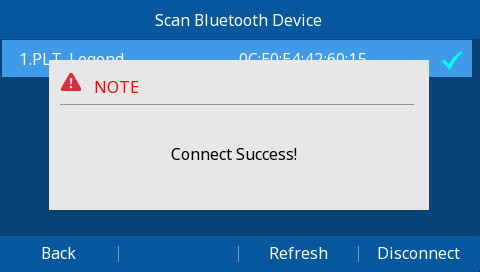
- Once connected Exit out to the main home screen.
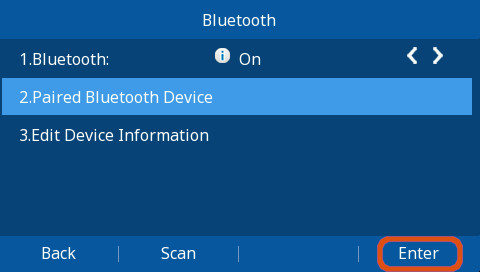
Disconnect Bluetooth Device - Go to the Bluetooth config section as in Steps 1-4 Above.
- Navigate to Paired Bluetooth Device, press Enter.
- Select the device you want to disconnect from the list, and press Disconnect.
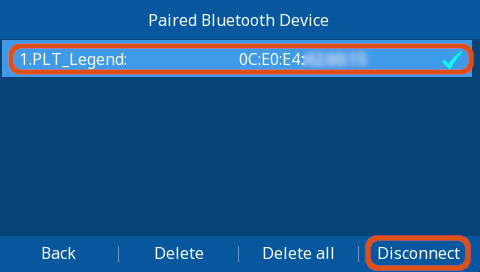
- If you don't plan to ever connect a device again in the future and can use the Delete or Delete All options to purge the device from the Phone
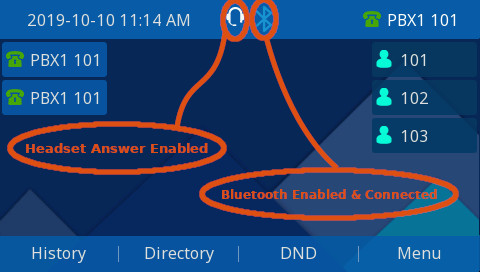
Enable Answering Via Bluetooth Headset.- To answer calls via the Headset, press the headset button on the phone's panel to toggle headset mode.
- You should see status icons as pictured below.
EHS 30 SetupEHS 30 OverviewThe ClearlyIP EHS30 Headset Adapter connects ClearlyIP Phones to supported wireless headsets that have EHS capability. Enabling the Headset to control hook On/Off and talk modes from the headset.
Supported Phones The EHS30 adapter supports the ClearlyIP Phones listed below.- CIP-290
- CIP-280
- CIP-270
- CIP-250
Visit our Supported Headsets wiki for the current list of support headsets.
Included Contents 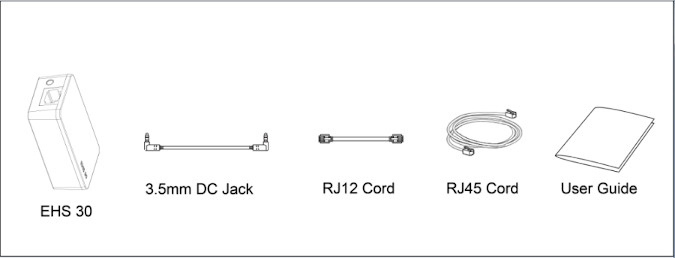 - EHS30
- 3.5mm DC Jack (For Plantronics Headsets)
- RJ12 Cord
- RJ45 Cord
EHS30 Ports and LEDs 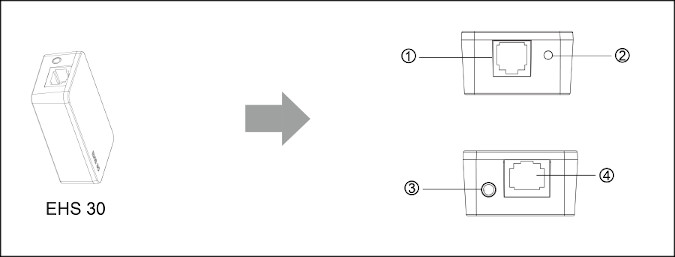 - RJ12 Port for IP Phone EXT/EHS or Expansion Module
- Green Operation LED
- 3.5mm DC Power Jack (For Plantronics Headsets)
- RJ45 Jack (For Jabra Headsets)
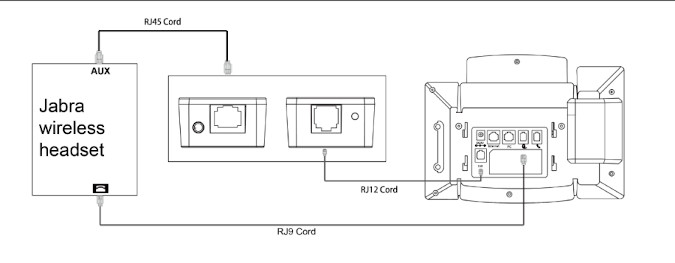
Jabra HeadsetsJabra Cable ConnectionsThe graphic below show the connections between the ClearlyIP phone and Jabra Headset Base.
See detailed instructions below for your Headset Series
Connecting Jabra 92X & 93X Series with EHS30- Connect the included RJ45 cable between the Aux Port on the Jabra Headset Base and the RJ45 port (Port 4) of the EHS30 Adapter.
- Connect the included RJ12 cable between the EHS30's RJ12 port (Port 1) and the EXT/EHS port of the ClearlyIP Phone.
- Connect the included RJ-9 cable the telephone port on the Jabra headset base to the headset port of te ClearlyIP Phone.
- Connect the DC power adapter to the headset's power port.
Your Jabra headset must be setup for DHSG call control. If it's not or set for a different mode like "IQ" or "Auto-detect" the headset may lose audio shortly after going off-hook (Approx. 5-10 seconds) - Put on the headset so you can hear the audio prompts
- Press and Hold both volume button at the same time until you hear "Setup" then release the buttons.
- Press the Talk button repeatedly until you hear "Remote Call Control"
- Press the volume down button until you hear "DHSG"
- Press the talk button to select
- Press and hold both volume buttons at the same time until you hear "Goodbye" and release the buttons
- The headset will reset and update settings, indicated by the white battery icon on the base.
Connecting Jabra 94XX Series with EHS30- Connect the included RJ45 cable between the Aux Port on the Jabra Headset Base and the RJ45 port (Port 4) of the EHS30 Adapter.
- Connect the included RJ12 cable between the EHS30's RJ12 port (Port 1) and the EXT/EHS port of the ClearlyIP Phone.
- Connect the included RJ-9 cable the telephone port on the Jabra headset base to the headset port of te ClearlyIP Phone.
- Connect the DC power adapter to the headset's power port.
Your Jabra headset must be setup for DHSG call control. If it's not or set for a different mode like "IQ" or "Auto-detect" the headset may lose audio shortly after going off-hook (Approx. 5-10 seconds)
On the Jabra headset base's LCD GUI:- Click Settings Icon
- Phones Settings
- Desk Phone
- Setup Desk Phone
- Confirm
- Manual
- Select DHSG
- Press ">" Several Times
- Press "X" and the Jabra will reboot
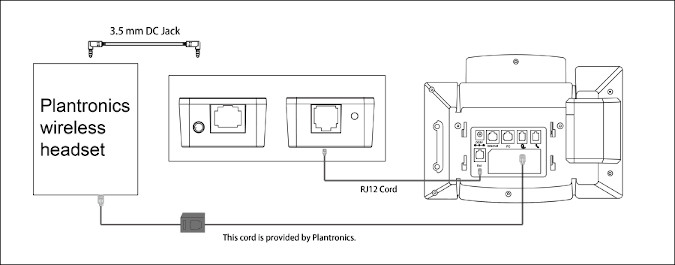
Plantronics HeadsetsPlantronics Cable ConnectionsThe graphic below show the connections between the ClearlyIP phone and Plantronics Headset Base.
See detailed instructions below for your Headset Series.
Connecting Plantronics CS5XX Series with EHS30- Connect the Plantronics headset base to the RJ-9 headset port on the ClearlyIP Phone using the telephone interface cable provided by Plantronics
- Connect the RJ12 cord between the EHS30's RJ12 port (Port 1) and the EXT/EHS Port on the ClearlyIP Phone
- Connect the included 3.5mm DC Power Port (Port 3) of the EHS30 to the headset lifter/EHS cable port on the Plantronics headset base.
- Connect the DC power adapter to the headset base station's power port and connect it to a power outlet.
Connecting Plantronics W7XX Series with EHS30- Connect the Plantronics headset base to the RJ-9 headset port on the ClearlyIP Phone using the telephone interface cable provided by Plantronics
- Connect the RJ12 cord between the EHS30's RJ12 port (Port 1) and the EXT/EHS Port on the ClearlyIP Phone
- Connect the included 3.5mm DC Power Port (Port 3) of the EHS30 to the headset lifter/EHS cable port on the Plantronics headset base.
- Connect the DC power adapter to the headset base station's power port and connect it to a power outlet.
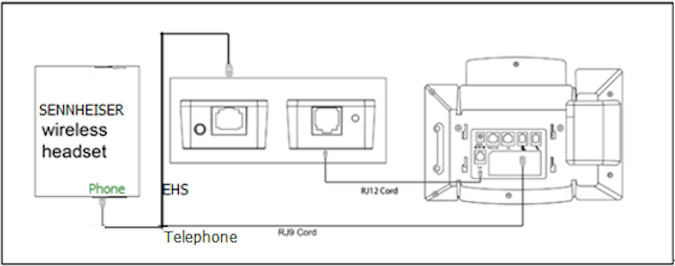
Sennheiser headsetsSennheiser Cable ConnectionsThe graphic below show the connections between the ClearlyIP phone and Sennheiser Headset Base.
See detailed instructions below for your Headset Series.
Connecting Sennheiser SD Series with EHS30- Connect the Green end of the Y-Shaped EHS Cable provided by Sennheiser to the phone port on the Headset base
- Connect the end of the Y-Shaped EHS Cable labeled "Teletphone Headset Port" to the headset port of the ClearlyIP Phone
- Connect the end of the Y-Shaped EHS Cable labeled "EHS Adapter" to the RJ45 port (Port 4) on the EHS30 Adapter
- Conenct the included RJ12 between the EHS30 Adapter's RJ12 port (Port 1) and the EXT/EHS Port of the ClearlyIP Phone
- Connect the DC power adapter to the headset base station's power port and connect it to a power outlet.
Updating the EHS30's Firmware
|
|
|
| | | |
|