This module is available for ComXchange version 17.
The Emergency Alerts Module is used to configure emergency call notifications and dispatchable location information. When a call is routed out an outbound route designated as an “Emergency Route” type, the ComXchange will need to be configured to notify a responsible party at the hotel that an emergency call was placed and also provide information about the extension that placed the call. Depending on the E911 mode chosen, a notification can be in the form of a call, a page, a SMS message, an email or a combination of them. The notification call initiated from the ComXchange to alert the staff that an emergency call was placed is available in all modes and will be reported on as a successful acknowledged call or failed notification call that was not answered. The call will play a message that will include the information of the extension that placed the emergency call and will request the person that answered press “1” to acknowledge they received the call.
The emergency call that is placed to the carrier must also provide dispatchable location information for the caller that can be received by a PSAP (Public Safety Answering Point) to help deploy emergency services to the correct place which would include the hotel’s address and the callers room number, etc. The information that is conveyed will depend on the E911 mode that is being used and the carrier’s E911 capabilities.
Emergency Alert E911 modes
There are three E911 modes that can be used in the ComXchange, you will choose the one that works best with your Carrier.
- Caller ID mode - 911 information is sent to the psap using a CallerID
- Caller ID mode can be configured to send out geolocation information and the extension number as an address line 2 location
- Generic PIDF-LO mode – 911 dispatchable location information is sent to the PSAP using a geolocation header and a configureable address line 2 contained in the SIP invite
- ClearlyIP Trunking mode – 911 dispatchable location information is sent to the PSAP from the Clearly IP Trunks using a combination of dispatchable location information from the emergency CallerID Prefix and Suffix combination and can also include configurable address line 2 information contained in the SIP invite
Caller ID Mode
Caller ID mode will be used when the carrier can only relay dispatchable location information using the Caller ID from the call that was placed. In this mode a specific DID is needed for each dispatchable location. The carrier will associate the location information with that caller id which will be provided to the PSAP. In the ComXchange the caller ids will be configured in the Emergency CallerID field for each extension or outbound route. There is also a Tab to configure notification calls and an email from the ComXchange to notify the staff that an emergency call was placed.
Caller ID mode does provide a way to send out a single geolocation header within the sip header along with the option of sending the extension number as an address line 2 location appended to the geolocation header.
Configure CallerID mode
Navigate to Admin > Emergency Alerts
General Settings
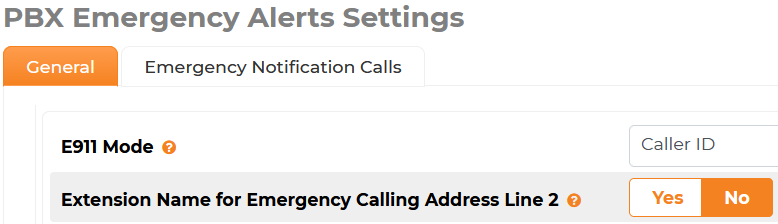
Choose the E911 mode of CallerID
Submit and Apply
Extension Name for Emergency Calling Address Line 2
Applicable if using a Geolocation header provided by the carrier
Note: If using a geolocation header there are more options available for Address Line 2 information if you choose to use the E911 mode of Generic PIDF-LO.
- No – If there is a geolocation header set in the notification tab the header will be sent out in the SIP Invite with no extension information.
- Ex: Geolocation: <https://test-17.911stafftest.com/locations/111111/TestHotel1>
- Yes - This option will send out the extension number appended to the geolocation header as an address line 2 location.
- Ex: Geolocation: <https://test-17.911stafftest.com/locations/111111/TestHotel1-geolocation?loc=7103>
Emergency Notification Call Settings
Configure the notification call to alert the Staff that an emergency call was placed from the PBX
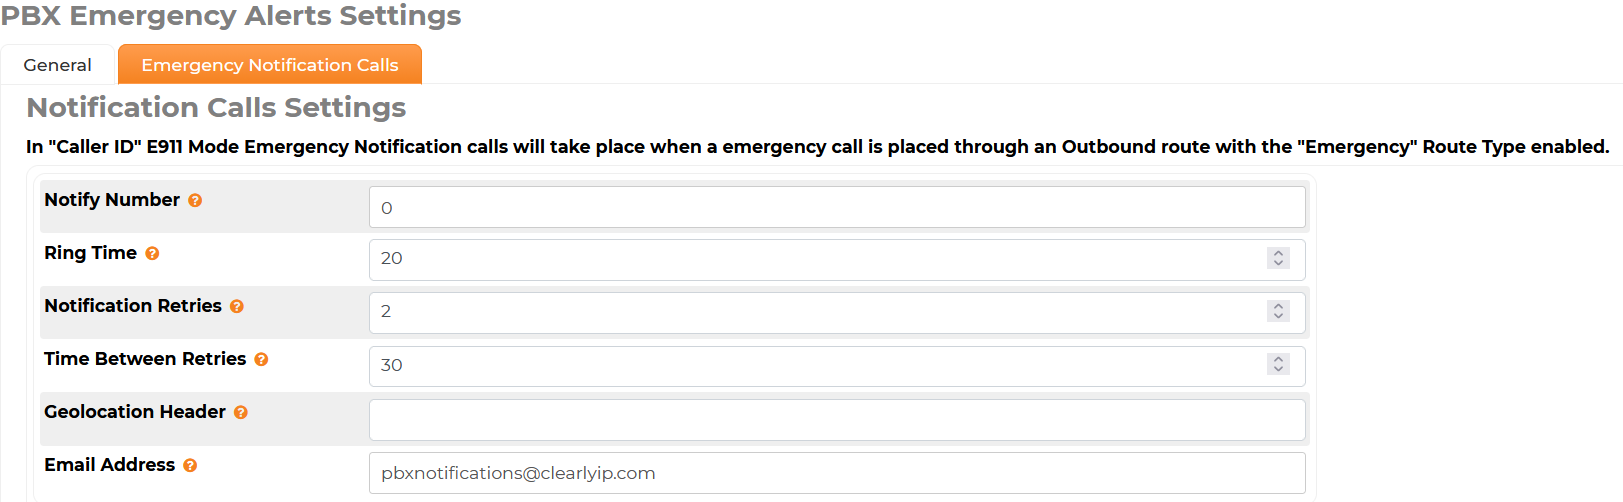
Click on the Emergency Notifications Calls tab
![]()
- Notify Number: Enter the number the notification call should be sent to from the PBX
- This can be an extension, a ring group etc.
- Ring Time: Set the length of time the notifcation call should ring the Notify Number
- Notification Retries: How many times should the PBX attempt a notification call if it goes unanswered or the caller does not acknowledge they received the call by pressing “1”
- Time Between Retries: Enter the number of seconds the PBX should wait until attempting a retry
- Geolocation Header: Enter a http(s) reference URI provided by the carrier that will be sent as a geolocation header within the emergency call’s SIP Invite
- Email Address: Enter the email address recipient for the emergency notification email
ClearlyIP Trunking Mode
ClearlyIP Trunking mode will be used when using Clearly IP trunks for Emergency Calls. When using ClearlyIP trunks the 911 dispatchable location information is sent to the PSAP using a combination of call back and dispatchable location information. The Callback information is associated with a Caller ID Suffix from the Call-Back Profile and the Caller-ID Suffix associated with the Dispatchable Locations. Dispatchable location information can be further refined by adding address line 2 information per extension.
When using ClearlyIP Trunking mode emergency notifications can be delivered in the form of a call, an SMS message, an email, a page, or a combination of them.
Before configuring the Emergency Alerts Module you will need to set up your Trunking Location, Call Back Profiles, and Dispatchable locations in the Trunking Portal. You can find information on setting them up by following this article https://kb.clearlyip.com/trunking/Buying-Service.html Once they are created setup the trunks in the Clearly Trunking module following the steps in this article https://kb.clearlyip.com/comxchange/ComXchange-Trunk-Configuration.html#Clearly_Trunking_Overview After the trunks are installed the Emergency Alerts can be configured.
Configure ClearlyIP Trunking mode
Navigate to Admin > Emergency Alerts
General Settings
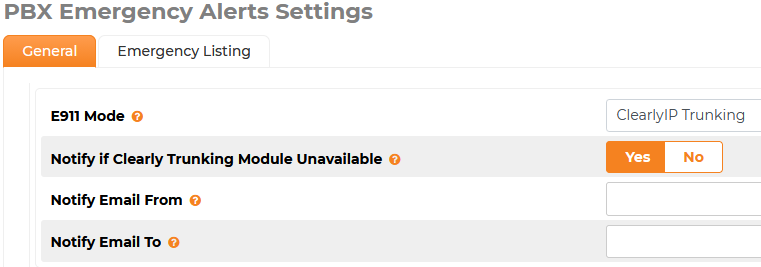
Choose the E911 mode of ClearlyIP Trunking
Submit and Apply
- Notify if Cleary Trunking Module Unavailble: Choose Yes if you want to be notified if the Clearly Trunking Module becomes unavailable or uninstalled
- Notify Email From: Enter the from email address if Clearly Trunking Module becomes unavailable.
- Notify Email To: Enter the recipient email to be notified if Clearly Trunking Module becomes unavailable
Emergency Listing Configuration
Call-Back Profiles
The Call Back Profile is how the 911 center is able to know the Caller ID of who is calling them and where they can call back. The Call Back Profile is auto filled by the Clearly Trunking API and contains a Call Back Phone Number and Company Name that is configured in the ClearlyIP Trunking Portal. For information about configuring the Call Back Profile see the KB article link here
https://kb.clearlyip.com/trunking/Buying-Service.html#Emergency_Call-Back_Profiles

- Name: Name for the Call-Back Profile pulled from Clearly Trunking
- Description: Description for the Call-Back Profile pulled from Clearly Trunking
- Caller Name: CallerID name the name emergency personnel should use to address the caller pulled from Clearly Trunking
- CallBackNumber: The number emergency personnel should use to callback the caller if needed pulled from Clearly Trunking. It should be configured with the number to be called back to talk to a live person at the site.
- Outbound Caller ID Prefix: This will be used for the Outbound Emergency CallerID and will be the prefix part to the dispatchable locations Caller ID suffix pulled from Clearly Trunking. Together the prefix and suffix form the Emergency Caller ID for outbound emergency calls used by Clearly Trunking to send the dispatchable location to the PSAP
- You can program more than one Call-Back Profile if you have multiple buildings and need to configure a Call back to different destinations
Note: the callback number should not be directed to an IVR it should be configured to go to a destination that can be answered live.
Dispatchable Locations
The Dispatchable Location tells the 911 center where you are physically located. The dispatchable location is auto filled by the Clearly Trunking API and contains the address that was added for the Emergency Dispatchable location. For information about configuring the Dispatchable Location see the KB article link here https://kb.clearlyip.com/trunking/Buying-Service.html#Dispatchable_Locations%C2%A0
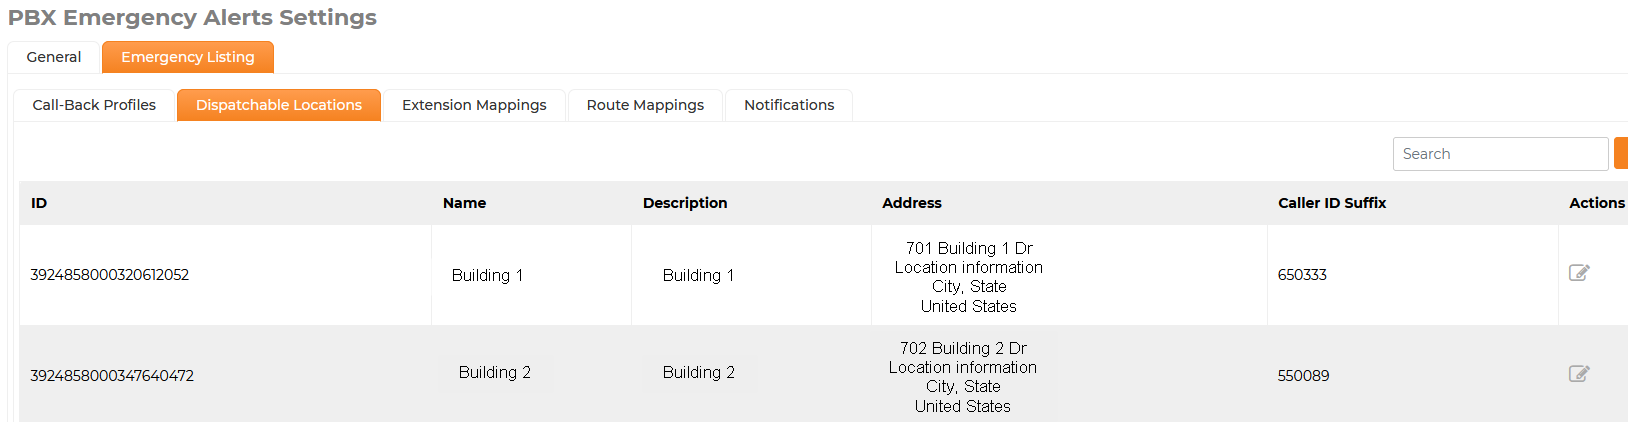
- Name: Name for the Dispatchable Location pulled from Clearly Trunking
- Description: Description for the Dispatchable Location pulled from Clearly Trunking
- Address: Address associated with the Dispatchable Location pulled from Clearly Trunking
- Caller ID Suffix: Pulled from Clearly Trunking. This will be used for the Outbound Emergency CallerID and will be the Suffix appended to the Call-Back Profiles Caller ID Prefix. Together the prefix and suffix form the Emergency Caller ID for outbound emergency calls used by Clearly Trunking to send the dispatchable location to the PSAP
- You can program more than one Dispatchable location if you have multiple buildings and need to provide more than one physical address.
Extension Mappings
- Extension Mappings are used to configure a Call-Back Profile, Dispatchable Location, and Address Line 2 info for individual extensions.
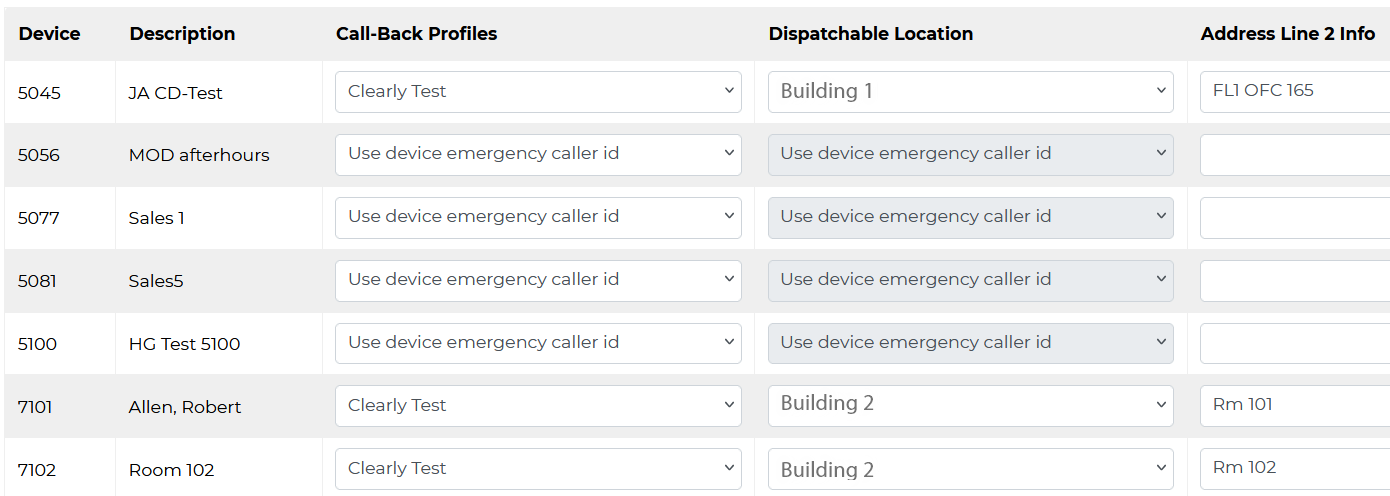
By default If the Extension is mapped to use both the default Call-Back Profile and Dispatchable location the extensions emergency callerID will remain empty and the Clearly Trunking Emergency Outbound Route’s Emergency Calller ID containing the default Call-Back Profile’s Caller ID Prefix and the default Dispachable Location’s Caller ID Suffix will be used. If a Call-Back profile or
Dispatchable Location are chosen from the dropdown the combination of the Call-Back Profile and the Dispatchable Location will be combined to form an emergency Caller ID for the associated Extension.
You must choose a Call-Back Profile before you can choose a different Dispatchable Location.
- You must choose a Call-Back Profile before you can choose a different Dispatchable Location.
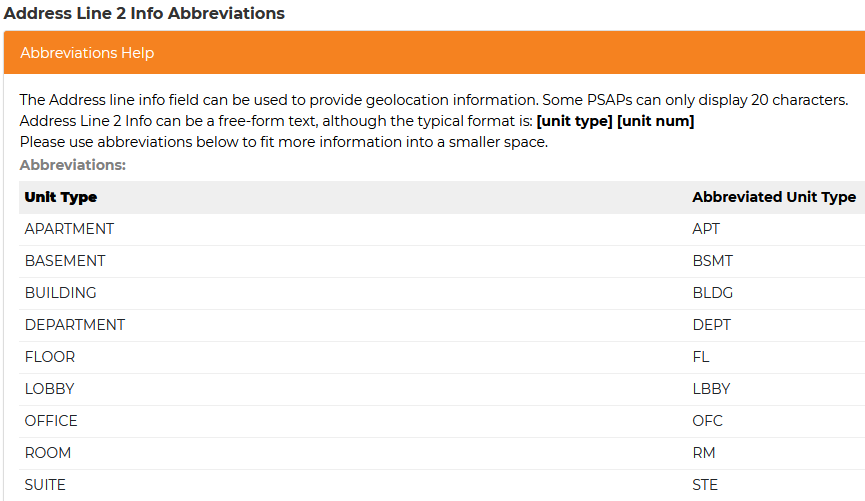
- The Address Line 2 Info field can be configured to provide supplementary location details such as floor, suite, office, etc that refine the primary address in Line 1 which is part of the 911 information
There are example Abbreviations available in the in the Extension Mappings page that can be expanded by clicking on the Abbreviation Help + symbol
If the Address Line 2 info field is configured with data a SIP header of X-CIP-EmergGeoLocAddrLine2 will be added to the SIP Invite.
- Example for OFC 222:
- X-CIP-EmergGeoLocAddrLine2: OFC%20222
- Example for Rm 101
- X-CIP-EmergGeoLocAddrLine2: Rm%20101
Note: Currently the Address Line 2 is not played back in the Clearly IP 933 emergency test call
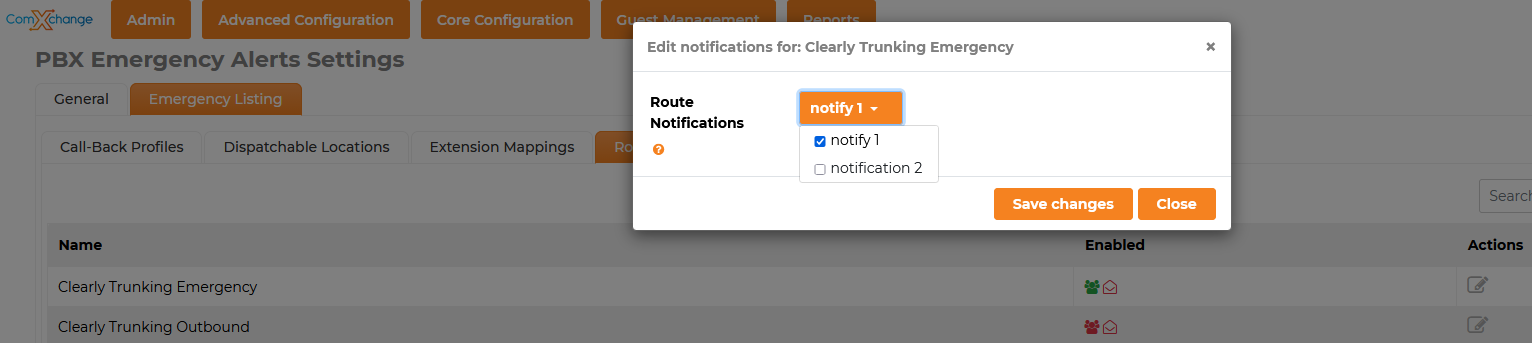
Route Mapping
Route Mapping is used to assign a notification method to an emergency outbound route
You will need to create the notification method in the Notifications tab before you can assign anything to a route.
In the Route Mappings Tab click on the Edit Config icon for the emergency route that you need to map a notification to
If more than one notification is available you can choose the one you want in the drop down menu
Notifications
Notifications In ClearlyIP Trunking mode notifications can be delivered in the form of a call, an SMS, an email, a page, or a combination of them.
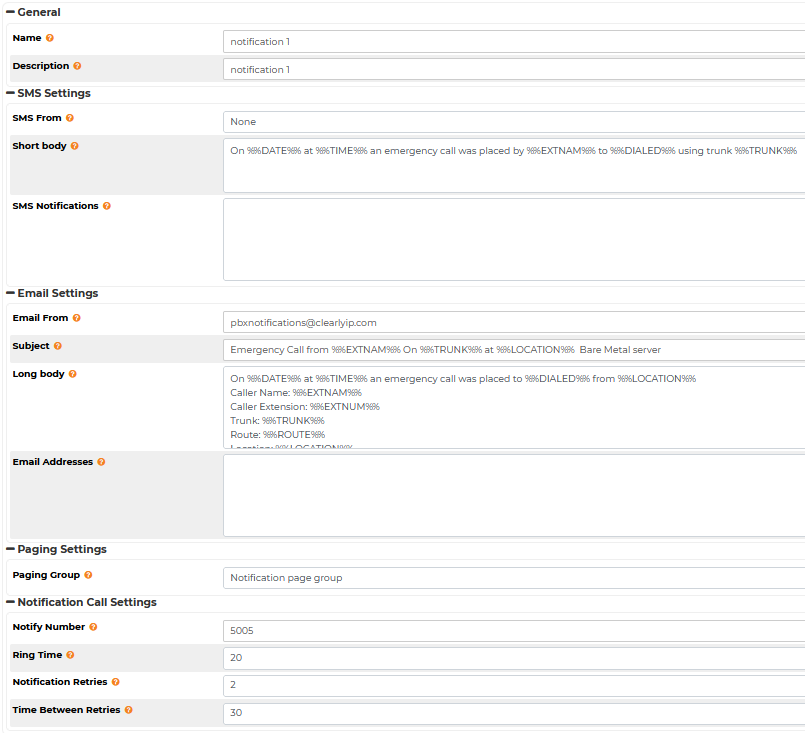 Name: Enter a name for the notification Description: Enter a description for the notificationSMS Setttings
SMS From: Choose a number from the dropdown to choose a number to send the SMS fromNote: You must use a number linked to a Brand and a Campaign in order for a Message to be sent from the numberhttps://kb.clearlyip.com/trunking/Buying-Service.html#MessagingSMS Short Body: Can be left as default or can be customizedSMS Notifications: Enter the recipient numbers for the SMS message
Email Settings- Email From: Enter the Email From Address
- Subject: Can be left as default or can be customized
- Long Body: Can be left as default or can be customized
- Email Addresses: Enter the email address recipient for the emergency notification email
Paging Settings- Paging Group – Enter the Paging Group to receive the 911 call in a page
- Note: the Page will connect to the live 911 call that is in progress allowing the devices in the page group to listen to the call
Notification Call Settings- Notify Number: Enter the number the notification call should be sent to from the PBX
- This can be an extension, a ring group etc.
- Ring Time: Set the length of time the notifcation call should ring the Notify Number
- Notification Retries: How many times should the PBX attempt a notification call if it goes unanswered or the caller does not acknowledge they received the call by pressing “1”
- Time Between Retries: Enter the number of seconds the PBX should wait until attempting a retry
Generic PIDF-LO
Generic PIDF-LO mode will be used when a carrier provides dispatchable location information by embedding a Geolocation header withing the SIP Invite of an emergency call. The carrier will provide a reference URI for a PIDF-LO (Presence Information Data Format - Location Object) that contains the dispatchable location in an XML-based format. More detailed location information can be appended to the Geolocation Header by configuring the address line 2 field in the Emergency Listing > Extensions Mappings tab.
When using Generic PIDF-LO mode emergency notifications can be delivered in the form of a call, an email, a page, or a combination of them.
Configure Generic PIDF-LO mode
Navigate to Admin > Emergency Alerts

General Settings
Choose the E911 mode of Generic PIDF-LO
Submit and Apply
Extension Name for Emergency Calling Address Line 2
- No – The SIP Invite geolocation header set in the dispatchable locations tab will be sent out with no extension information.
- Yes - This option will send out the extension number appended to the geolocation header set in the dispatchable locations tab as an address line 2 location.
- Default Call-Back Profile: A default Call-Back profile can be chosen after a Call-Back Profile is created in the Emergency Listing – Call-Back Profile tab
- If only one is created it will be the default
- Default Dispatchable Location: A default Dispatchable Location can be chosen after a Dispatchable Location is created in the Emergency Listing – Dispatchable Location tab
- If only one is created it will be the default
Emergency Listing Configuration
Call-Back Profile
The Call Back Profile is used to declare the Emergency CID in the Callback CallerID field

- Name: Name for the Call-Back Profile
- Description: Description for the Call-Back Profile
- Caller Name: Informational field for extra Carrier data
- CallBackNumber: Informational field for extra Carrier data
- CallBack CallerID: This will be used for the Outbound Emergency CallerID. It should be configured with the number to be called back to talk to a live person at the site if needed.
- You can program more than one Call-Back Profile if you have multiple buildings and need to configure a Call back to different destinations
Note: the callback number should not be directed to an IVR it should be configured to go to a destination that can be answered live.
Dispatchable Locations
Dispatchable locations are used to configure the reference URI for the Geolocation Header
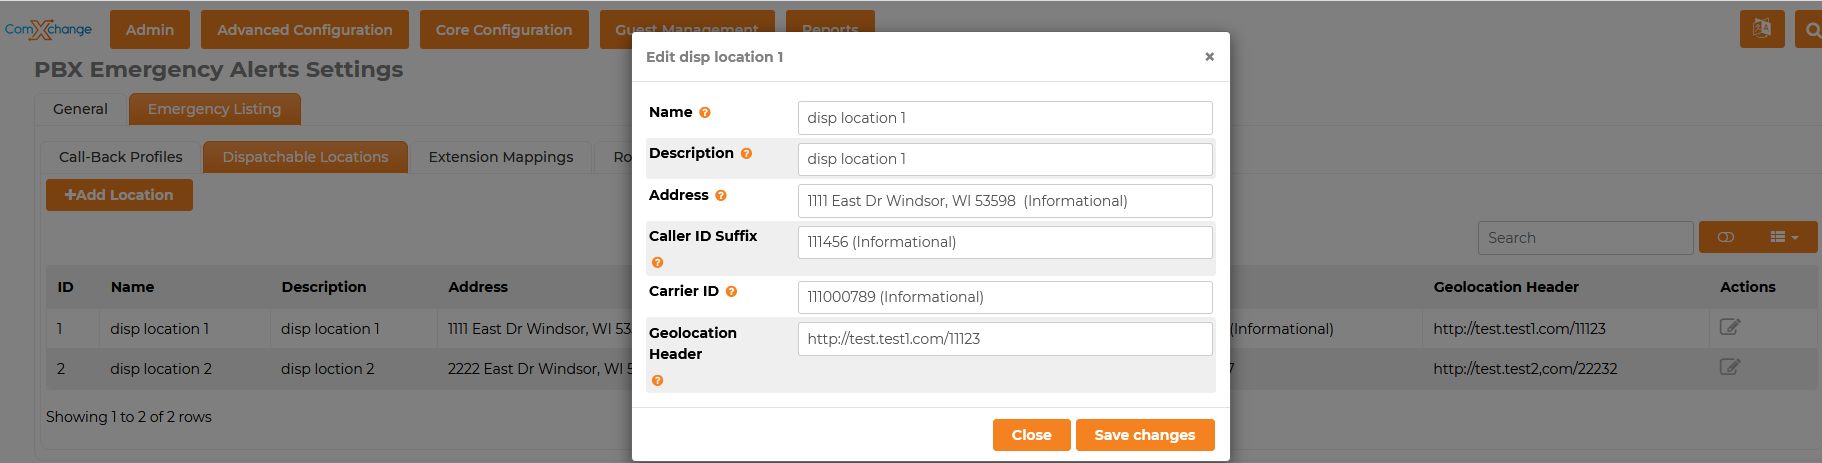
- Name: Name for the Dispatchable Location
- Description: Description for the Dispatchable Location
- Address: Informational field for extra Carrier data
- Caller ID Suffix: Informational field for extra Carrier data
- Carrier ID: Informational field for extra Carrier data
- Geolocation Header: Enter a http(s) reference URI provided by the carrier that will be sent as a geolocation header within the emergency call’s SIP Invite
- You can have more than one Dispatchable Location to accommodate additional reference URIs if needed for Hotels with buldings that have different physical addresses
Extension Mappings
Extension Mappings are used to configure a Call-Back Profile, Dispatchable Location, and Address Line 2 info for individual extensions.
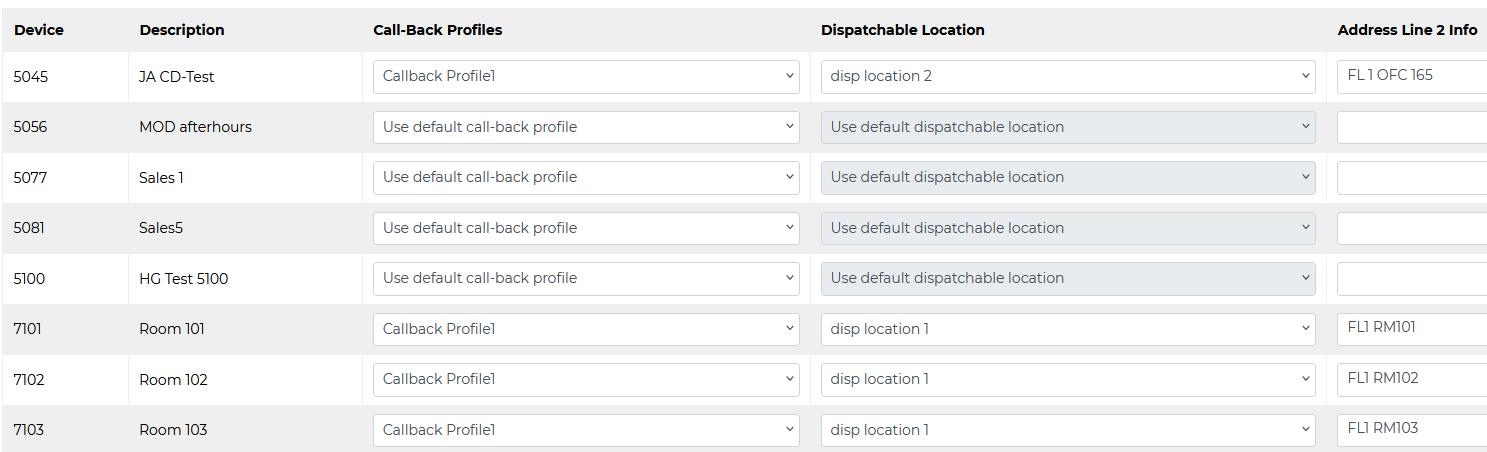
- The extensions will be configured to use the default Call-Back Profile and Dispatchable Locations Chosen in the General Tab
- You must choose a Call-Back Profile before you can choose a different Dispatchable Location.
- The Address Line 2 Info field can be configured to provide supplementary location details such as floor, suite, office, etc that refine the primary address in Line 1 which is part of the PIDF-LO information
- If Extension Name for Emergency Calling Address Line 2 is set to yes and the Address Line 2 info field is left blank the Geolocation header will attach the extension number.
- If you configure the Address Line 2 info field with Fl1 Rm101 it will attach that information
There are example Abbreviations available in the in the Extension Mappings page that can be expanded by clicking on the Abbreviation Help + symbol
Route Mapping
Route Mapping is used to assign a notification method to an emergency outbound route. You will need to create the notification method in the Notifications tab before you can assign one to a route
- In the Route Mappings Tab click on the Edit Config icon for the emergency route that you need to map a notification to
- If more than one notification is available you can choose the one you want in the drop down menu

Notifications
In PIDF-LO mode notifications can be delivered in the form of a call, an email, a page, or a combination of them.
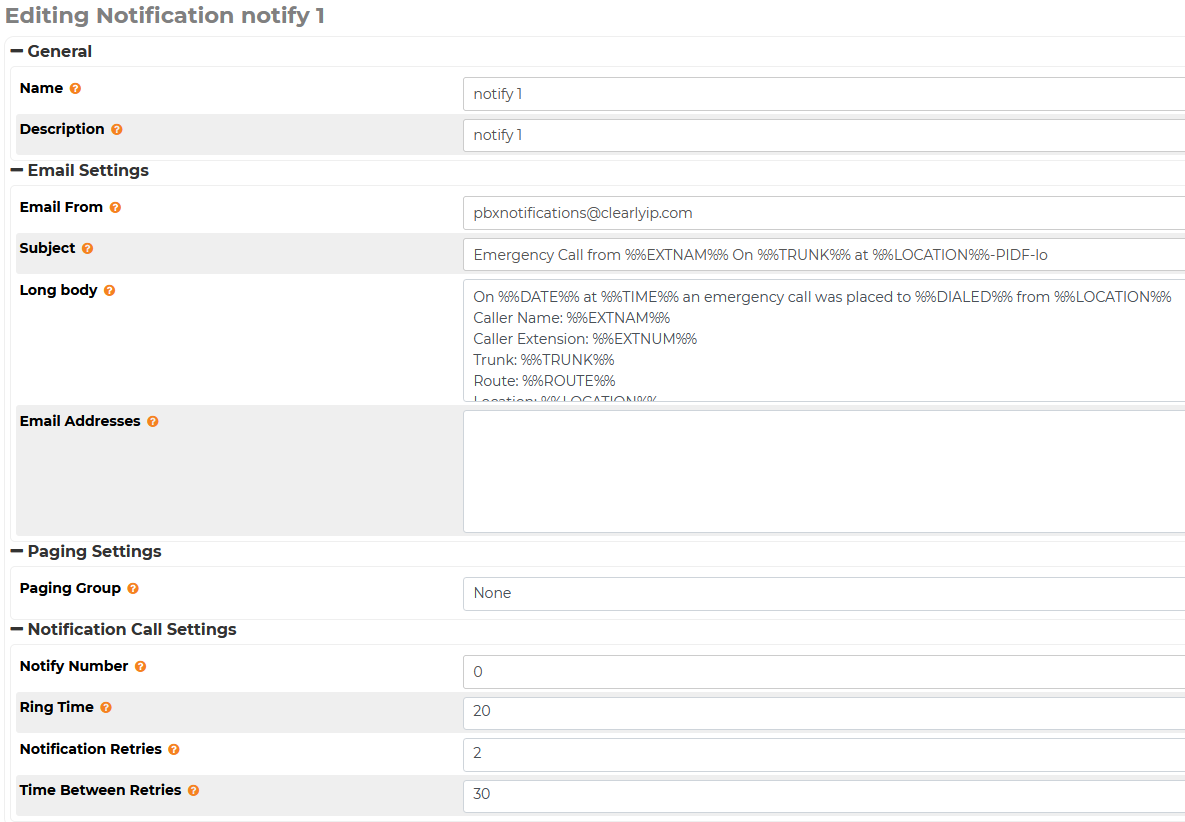
- Name: Enter a name for the notification
- Description: Enter a description for the notification
- Email Settings
- Email From: Enter the Email From Address
- Subject: Can be left as default or can be customized
- Long Body: Can be left as default or can be customized
- Email Addresses: Enter the email address recipient for the emergency notification email
- Paging Settings
- Paging Group – Enter the Paging Group to receive the 911 call in a page
- Note: the Page will connect to the live 911 call that is in progress allowing the devices in the page group to listen to the call
- Notification Call Settings
- Notify Number: Enter the number the notification call should be sent to from the PBX
- This can be an extension, a ring group etc.
- Ring Time: Set the length of time the notifcation call should ring the Notify Number
- Notification Retries: How many times should the PBX attempt a notification call if it goes unanswered or the caller does not acknowledge they received the call by pressing “1”
- Time Between Retries: Enter the number of seconds the PBX should wait until attempting a retry
 Uploading ....