The Clearly Anywhere App when used with ComXchange will allow you to register an extension using the Clearly Anywhere App on an ios or android cell phone to the ComXchange. Calls can be made to and received from the ComXchange PBX as well as connect to the extensions voicemail box. The extension that will be using the Clearly Anywhere App will need to be a PJSIP extensions and the Max Contacts changed allow multiple connections. To configure the Clearly Anywhere Module on the ComXchange you will need the following: - The Clearly Anywhere Token
- Access to the CLI to add the Clearly Anywhere firewall rules
- The External IP address or the FQDN of the ComXchange server
- Set Max Contacts for the extension to allow more than one connection
- Permissions setup for the user that will be using the Clearly Anywhere Application
Minimum requirements
- ComXchange verision 14.13.2 or above
- Extensions created using PJSIP driver
- Ports forwarding rules defined on the Add firewall rules section below.
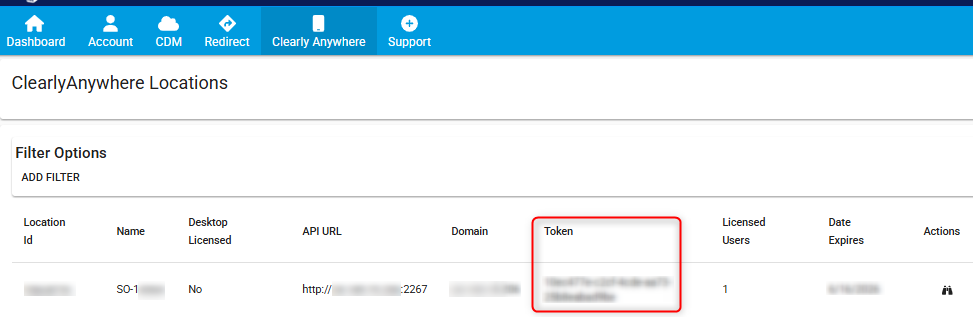
Retrieving the Clearly Anywhere Token.
You should receive the Clearly Anywhere token in an email from Clearly IP, but you can also get it from the Clearly Device Manager
- Log into the device manager at https://devices.clearlyip.com/
- look for the Clearly Anywhere tab and locate the token for the site may be named for the Sales Order that was used to purchase it
- Look under the token field to copy it to be used when setting up the Clearly Anywhere module
Add firewall rules
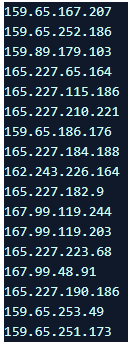
SIP connections will need to be allowed from the following IP addresses for the Clearly Anywhere App to work correctly.
- Connect to the ComXchange CLI and edit the iptables file /etc/sysconfig/iptables
- Add the following lines to the top of the rules. Must be above the Drop rules.
![]()
# ClearlyAnywhere rules
-A INPUT -i eth1 -s 165.227.223.68 -p udp -m udp --dport 5160 -j ACCEPT
-A INPUT -i eth1 -s 159.65.167.207 -p udp -m udp --dport 5160 -j ACCEPT
-A INPUT -i eth1 -s 159.65.251.173 -p udp -m udp --dport 5160 -j ACCEPT
-A INPUT -i eth1 -s 159.65.253.49 -p udp -m udp --dport 5160 -j ACCEPT
-A INPUT -i eth1 -s 167.99.119.244 -p udp -m udp --dport 5160 -j ACCEPT
-A INPUT -i eth1 -s 165.227.115.186 -p udp -m udp --dport 5160 -j ACCEPT
-A INPUT -i eth1 -s 165.227.210.221 -p udp -m udp --dport 5160 -j ACCEPT
-A INPUT -i eth1 -s 167.99.48.91 -p udp -m udp --dport 5160 -j ACCEPT
-A INPUT -i eth1 -s 162.243.226.164 -p udp -m udp --dport 5160 -j ACCEPT
-A INPUT -i eth1 -s 165.227.190.186 -p udp -m udp --dport 5160 -j ACCEPT
-A INPUT -i eth1 -s 159.89.179.103 -p udp -m udp --dport 5160 -j ACCEPT
-A INPUT -i eth1 -s 159.65.186.176 -p udp -m udp --dport 5160 -j ACCEPT
-A INPUT -i eth1 -s 165.227.65.164 -p udp -m udp --dport 5160 -j ACCEPT
-A INPUT -i eth1 -s 159.65.252.186 -p udp -m udp --dport 5160 -j ACCEPT
-A INPUT -i eth1 -s 165.227.182.9 -p udp -m udp --dport 5160 -j ACCEPT
-A INPUT -i eth1 -s 167.99.119.203 -p udp -m udp --dport 5160 -j ACCEPT
-A INPUT -i eth1 -s 165.227.184.188 -p udp -m udp --dport 5160 -j ACCEPT
-A INPUT -i eth1 -p tcp -m tcp --dport 2267 -j ACCEPT
# END ClearlyAnywhere rules
- Restart iptables by entering the command "service iptables restart"
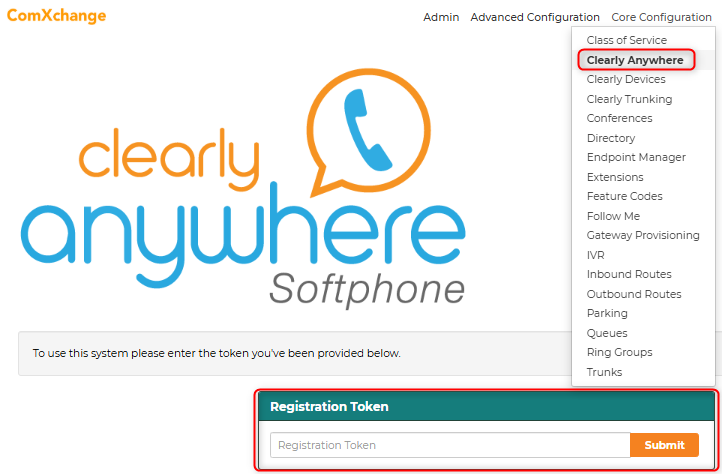
Activating the Module
To activate the Clearly Anywhere module Navigate to Core Configuration > Clearly Anywhere
- Enter the token into the Registration Token field and click on Submit
Provide the API URL and Domain
Once Clearly Anywhere is activated you will be prompted to provide the API URL and Domain. This can be the External WAN IP address or a FQDN that points to the external IP address.
- API Connection URL - This is IP address or the Full URL and port number that the Clearly Anywhere app will connect to for receiving provisioning information
- EX: https://CXP-6XXX.clearlyip.me:2267
- PBX Domain - This is the IP address or FQDN that the mobile app will use to register the extension
- EX: cxp-6XXX.clearlyip.me
Status Page Information
- PBX Domain - This is the Domain or IP Address you provide to ClearlyIP. This is the Domain the users will login to Clearly Anywhere app with and this is the Domain we will connect to asterisk to register to. If you need to change this domain you will need to contact Clearly IP Support to update this domain for you.
- API Connection URL - This is what URL our provisioning system will redirect your clients when they log in. Please note the Port at the end of the URL of 2267 is the default port you need to open on your firewall for provisioning. You can change this API URl and Port as defined below
- API Connection Status - If this shows contact support as shown below this means our API servers that are used when a user logs into the Clearly Anywhere app can not reach your PBX on the API Connection URL as defined above. Before you contact support verify the URL is reachable from the outside world.
- API Port Matches - Will show Good as long as the Port you have defined for the API is the same port that you have in the API Connection URL.
- Mobile Location ID or Location ID - This is the unique Location ID for your PBX and used when purchasing add on licenses or opening a support ticket with us so we know which license you are referencing.
- Subscription Active - This shows if your license for Clearly Anywhere is active.
- Service Through - Shows when you license for Clearly Anywhere expires.
- Total Clients - Is how many clients your PBX is licensed for
- Assigned Clients - Is how many of your users are setup in User Manager with direct permissions for Clearly Anywhere
- Inherited Clients - Is how many of your users are setup in User Manager with permissions for Clearly Anywhere that are inherited from the Group Permissions.
- Total Used Clients - This shows how many clients of your Total Clients you are currently using.
Updating the Token
If additional licenses are purchased or renewed use the refresh button on the status page to update the module information
Set Extension Max Contacts
Clearly anywhere binds to an existing extension as an additional device. For the Extension(s) that will be using the Clearly Anywhere App you will have to use a PJSIP Extension to allow for multiple devices to register to the extension. The App will increase the max contacts needed for that extension by two contacts to allow for the push server to register for inbound calls and the device to register when the app is opened.
- Navigate to Core Configuration > Extensions - Advanced Tab
- Look for the Max Contacts field and set it to 5
User Setup and Permissions
A user in Clearly Anywhere can be any User Manager user on your PBX. This will allow the user to login to the Clearly Anywhere app using their User Manager login along with the domain you defined above. A user in user manager has its own login username and its own password. Do not confuse User Manager login with the SIP Username and Password of an extension. Permissions can be set at a user or group level. Below shows how to set up at the user level.
Navigate to Admin > User Manager
- Click on the Edit Icon of the User with the linked extension that will be using the Clearly Anywhere App
Enable the Softphone
- Click on the Clearly Anywhere Tab and select Enable for the Soft phone
Enable SMS
If Messaging has been purchased for a clearly IP trunking number and a Message Campaign has been fulfilled Enable Messaging: If set to Enable, this will explicitly enable the Messaging option in the Clearly Anywhere app. Once enabled, you also need to pick an SMS Number from any SMS number set up for this user in the User Manager. The SMS portion of Clearly Anywhere at this time can only link to a single Phone Number, so if a user has more than 1 number setup for SMS already, you will need to pick one of these SMS numbers to be linked for Clearly Anywhere. To allow a user to use an MSM number see the Setup SMS portion of the ComXchange Clearly Trunking set up here https://kb.clearlyip.com/trunking/ComXchange-PBX.htm. To setup a messaging campaign see the Messaging Section of Clearly Trunking here: https://kb.clearlyip.com/trunking/Buying-Service.html#Messaging.
Enable Parking
When enabled a Park button will show while on a active call. By default the park button is not enabled and you will need to Enable the Park button
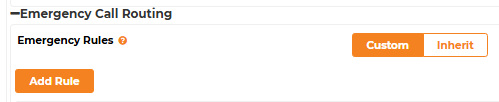
Emergency Call Routing
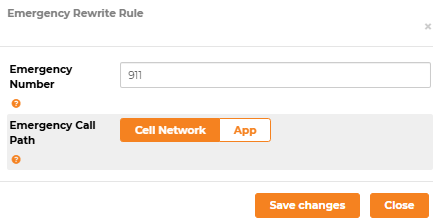
By default, if a user were to call Emergency Services like 911 in the US or Canada, it would route the call over the Clearly Anywhere application. This is not an ideal situation for most users since the PBX has no way of knowing where the actual user is to relay the emergency services. Unlike traditional Cell Phone operations, which knows from GPS and Tower Triangulation where the user is, your, PBX cannot relay or receive this information. For this reason we have a feature in Clearly Anywhere that you can define from the Clearly Anywhere module what numbers your users’ dial for Emergency calling including 911 and have it automatically tell the Clearly Anywhere application to dial that number out their Cell Phone carrier instead of the PBX even if they dial it from the Clearly Anywhere Application.
- Set the Emergency Rules to Custom
- Click Add a rule
- Add 911 to the emergency number rule and select Cell Network
Note:
Please note, if you are using an extension of 911 (North America emergency) or 112 (European emergency), you will need to disable Call Integration to be able to dial the extension. To do this:
- In Clearly Anywhere Mobile App
- Click the 3 dots in the upper right
- Settings
- Preferences
- Controls
- Call Integration
- Call Integration Mode
Clearly Anywhere User Information
Sending User Login emails
From within the Status page of your Clearly Anywhere module on your PBX, you will see a list of users who have been enabled for Clearly Anywhere through the user Manager. From here, we can check for each user if they were allowed at the User Level (Explicitly Given) or if they were enabled at the Group level and inherited the permission (Inherited from Group).
- From the list click on the user Check box for those you want to send emails to
- Click on the Setup Instructions button.
Provisioning token
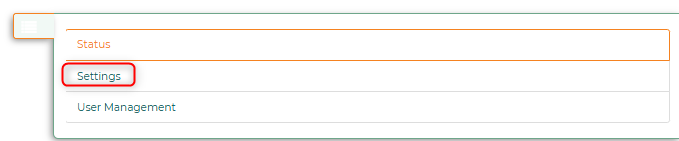
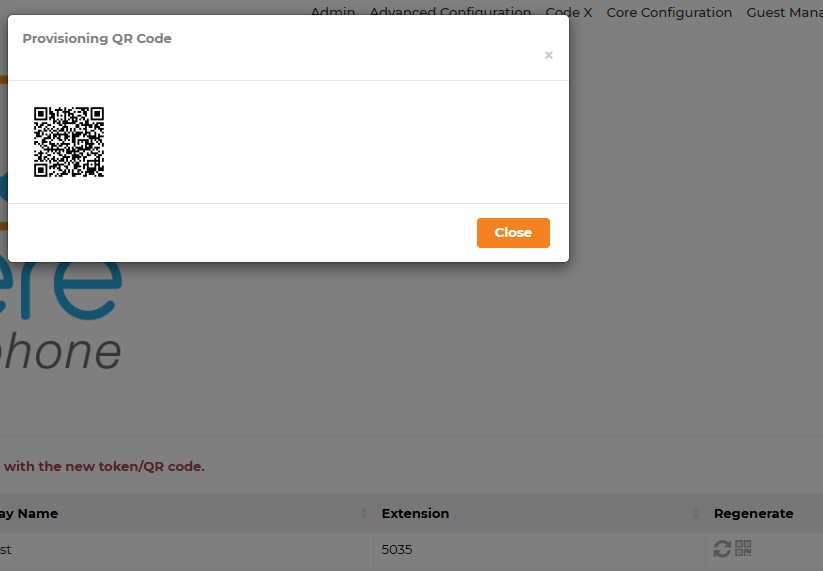
Sometimes when there are issues with Clearly Anywhere or changes are made to the module such as External IP changes you may need to regenerate the users provisioning tokens. These can also be viewed as a QR code that you can send as a screen shot for the user if the email is not going through.
- While in the Clearly Anywhere Module click on the fly out menu on the right side of the screen
- Click on Settings
- Click on the Provisioning Token Tab
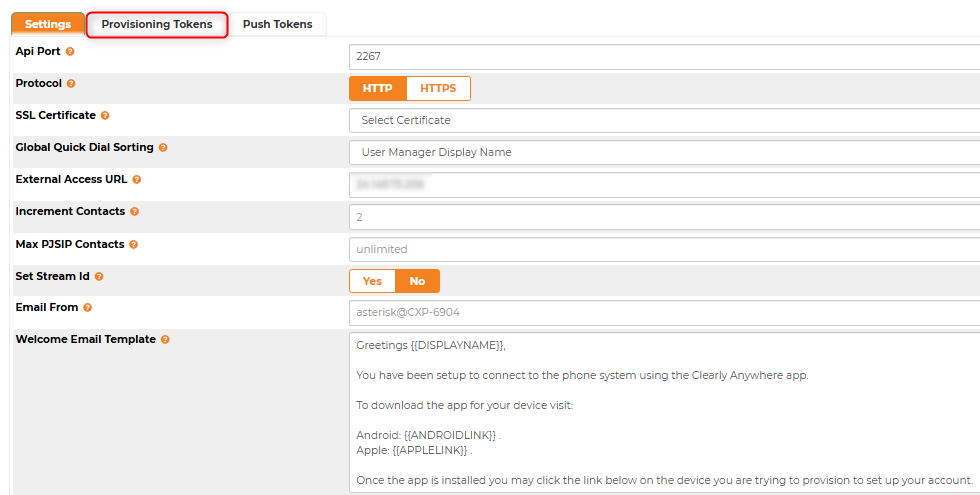
- You can then regenerate or see the QR Code for the user
- *** Note: Once the QR code is regenerated you will need to reload the webpage for the new qr code to be available. If the page is not reloaded the old qr code will still be displayed.
Push Tokens
Here we will show you the Push Token each device and user is currently registered to your PBX with. - A Push Token is used to push new calls to the phone anytime a new inbound call is received for the extension of the User
- A Push Token is also used to notify a phone when it has a new SMS or MMS message.
Video Setup
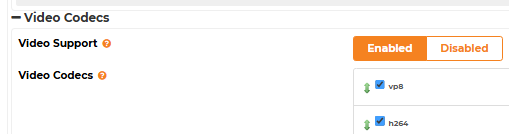
The Clearly Anywhere app supports making video calls from 1 Extension to another extension, also known as 1:1 Video Calling. Video calling should work with any other extension on your PBX that is set up with a Video enabled DeskPhone or Softphone including Clearly Anywhere. The supported Codecs for Clearly Anywhere Video is VP8 and H264. You need to make sure that your PBX is set up with these Video Codecs enabled and any other non Clearly Anywhere the device also supports these codecs. - Navigate to your Asterisk SIP Settings module in your PBX and verify you have both H264 and VP8 enabled and that Video Support is also enabled.
Further Information and Troubleshooting
Ports and Registration
- The Clearly Anywhere mobile app communications with your PBX for provisioning information by default on port 2267 (TCP) as shown in the module in. the API Connection URL field. You can change this as outlined above in the Settings section of this guide. This port must be opened to the outside world to allow the app to get provisioning data and login.
- By default when your Clearly Anywhere App goes to pull provisioning data the first request will come from our API server with a IP Address of 66.185.18.42, 66.185.18.43 or 66.185.18.44 and all request after will come direct from the Clearly Anywhere App. We do have the ability to set a toggle on a Token by Token basis to force all Provisioning data to proxy through us so that you can open 2267 only to our IPs of 66.185.18.42, 66.185.18.43 and 66.185.18.44. Contact support if you want us to enable this for you.
- Once the user is logged in and receives the provisioning data, it will register to your PBX using the domain name set in the module under the PBX Domain field. If you want to change the Domain or IP address the phones registered to at this time, you need to open a ticket with Clearly IP to change it on our backend. Soon, you can control this from within the module yourself.
- The phone will register to asterisk using whatever you have defined in the PJSIP channel driver for the port so if your phones are remote you will need to make sure that port is allowed through your firewall and if using the built in FreePBX firewall, make sure you have the responsive firewall enabled for PJSIP or the PJSIP ports opened as well as ports RTP ports which by default are 10000-20000 but can be changed inside the FreePBX SIP Settings module.
- The app will first scan to see if you have UDP enabled and use that. If UDP is not enabled, it will look to TCP next and use that Port, and lastly, it will look to TLS based on your Global SIP Settings.
- If you want to restrict a specific user to use a specific protocol like TLS, you would go into the extension settings of that user and restrict their "Transport" setting from Auto to whatever protocol you wanted to use for that user.
- Since inbound calls by default are sent from Push Servers all over the world, the Push Servers have to register to your PBX for inbound calls to work. Below is a list of all the Push Servers that calls can come from that you need to make sure are able to connect to your PBX on the SIP port.
Signalling UDP TCP and TLS
- By default the Clearly Anywhere Module attempts to use the following signaling in this order
- When the Clearly Anywhere module on your PBX sets up configurations for your Clearly Anywhere app for each user it follows this logic.
- It looks to see what you have enabled in your Asterisk SIP Settings module under the PJSIP Section
- It eliminates any of the protocols listed above if they are not enabled in your SIP Settings module.
- Finally it looks into the extension of each user and if the extension on the PBX is restricted to a certain protocol type such as UCP, TCP or TLS it will use that.
- If the extension is set to Auto for Transport (which is the default behavior in FreePBX on new Extensions) it will use the protocol based on the Order in Step 1 after it has eliminated anything that was not enabled in Step 2 above
- Example 1
- I have in SIP Settings both UDP and TCP enabled
- The extension 101 is set to Auto for Transport
- 101 will be provisioned with UDP since you have UDP and TCP enabled and our App prefers to use UDP over TCP and you have the extension set to auto
- Example 2
- I have in SIP Settings both UDP, TCP and TLS enabled
- The extension 101 is set to TCP for Transport
- 101 will be provisioned with TCP since you have the extension in the PBX hard set to use TCP and not auto.
By default, the Clearly Anywhere Module attempts to use the following codecs in this order. The order depends if you are making a call on Wi-Fi or Cellular Data. These are hardcoded orders based on sound quality and bandwidth requirements. - Wifi
- opus
- G722
- ulaw
- alaw
- g729
- ilbc
- gsm
- Cellular Data
- opus
- g729
- gsm
- ulaw
- alaw
- ilbc
- g722
When the Clearly Anywhere module on your PBX sets up configurations for your Clearly Anywhere app for each user, it follows this logic.
- It looks to discover what you have enabled in your Asterisk SIP Settings module under the PJSIP Section.
- It eliminates any of the codecs listed above if they are not enabled in your SIP settings module.
- The following are a list of fwconsole commands you can use with the Clearly Anywhere module. You can also add a --json at the end of the commands below to have it export everything as json.
- fwconsole clearlysp --info
- Will return back Module Token, Domain Name and Licensed Total users and currently used licenses
- fwconsole clearlysp --refresh
- Will refresh its license information from our license server. Normally used after purchasing more seats or extending the expiration date
- fwconsole clearlysp --listusers
- Will list all the users that are setup with Clearly Anywhere
- fwconsole clearlysp --uncap XXX
- Replace XXX with a user name and when run it will set that userback to inherit instead of yes for Clearly Anywhere enabled for that user.
- fwconsole clearlysp --remove
- Will remove the token on this PBX so that you can reuse the token with a different PBX
API Connection Status error in Module
- If you see the following error in the module this means that our redirect server that redirects the Clearly Anywhere mobile users on login to your PBXs API URL is not reachable.
- This is usually caused by 1 of the following reasons.
- The port you have us redirecting to is not open on your firewall. This default port is 2267 and can be seen in the "API Connection URL" field in the Clearly Anywhere module main page. Verify you have this port opened on your Corporate Firewall and if enabled the FreePBX Firewall.
- The node.js application that the phones connect to on the above port is not running. See below on how to debug the node.js application
- The FQDN or IP address you provided to us is not resolvable or reachable.
- If using a IP address in the API Connection URL verify the IP address is correct.
- If using a FQDN verify the FQDN resolves to the correct IP Address.
- The Clearly Anywhere mobile app receives its provisioning on login and when it updates from your PBX direct on the API URL that is shown in the module. The default for this is http://XXX:2267 with XXX being your IP or FQDN.
- If the node.js application is not running the phones will not be able to receive provisioning data or let you login and our API server would not be able to relay clients to your PBX
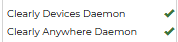
- You can verify this is by looking in Dashboard of your PBX and locating the Clearly Anywhere Daemon and verify it has a Green Checkmark.
- You can also verify this by running the following command from your PBX Linux CLI.
fwconsole pm2 --list - Verify the process clearlysp is online
- If the process is not running you can start it with the following command
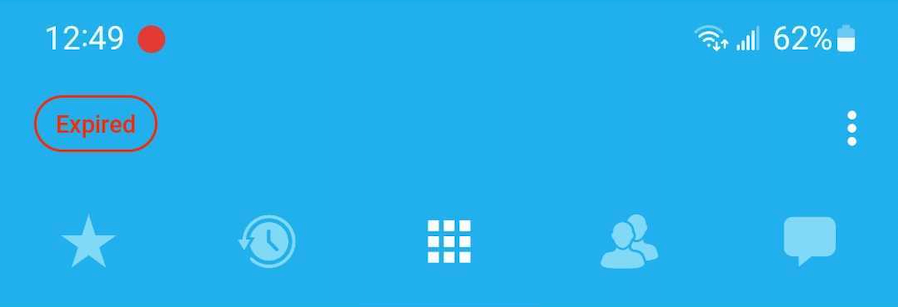
fwconsole restart clearlysp Mobile App Showing Expired
- If you see a Red Box that says Expired when viewing your mobile app this means the license on your PBX for Clearly Anywhere has expired and you need to renew your license.
 Uploading ....