| | | |
 Uploading .... Uploading ....
Installing the Module - IMPORTANT: Clearly Anywhere Requires FreePBX 14 or newer.
- If you are using ClearlyIP Mirror Servers for your FreePBX System, the Clearly Anywhere module should be available in Module Admin when checking online for updates. If you are not using our mirror servers, you will need to manually load it as outlined below.
From the Linux CLI
- For 14/15/16
- fwconsole ma downloadinstall https://mirror.clearlyip.com/modules/clearlysp/clearlysp-14.0.16.4.tgz
- For 17
- fwconsole ma downloadinstall https://mirror.clearlyip.com/modules/clearlysp/clearlysp-17.0.1.11.tgz
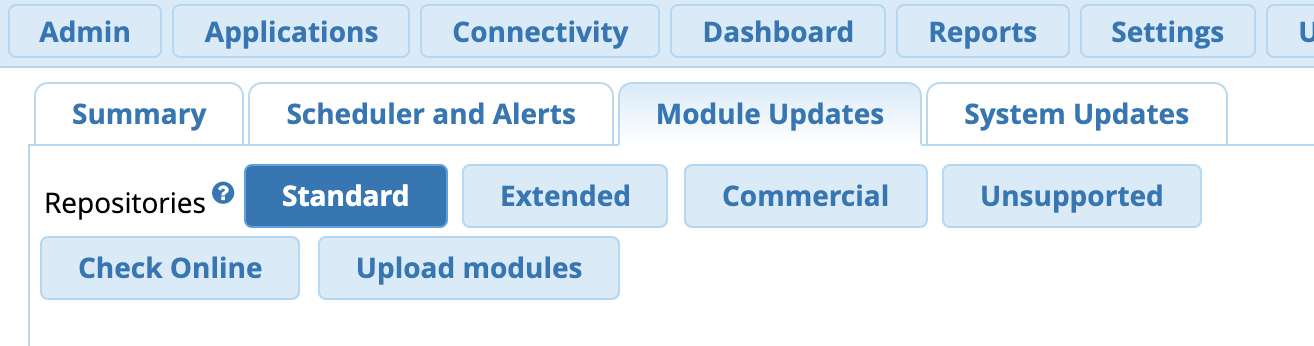
From the FreePBX Admin GUI Navigate to your FreePBX Admin GUI and Login. From there, click on Module Admin module in FreePBX and click on "Upload Modules" button as shown below.
Click on Type, and pick “Download (From Web)" from the drop down 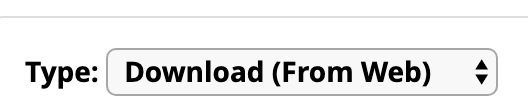
Put in the URL of the moduleFor 14/15/16, use https://mirror.clearlyip.com/modules/clearlysp/clearlysp-14.0.11.7.tgzFor 17, use https://mirror.clearlyip.com/modules/clearlysp/clearlysp-17.0.1.11.tgz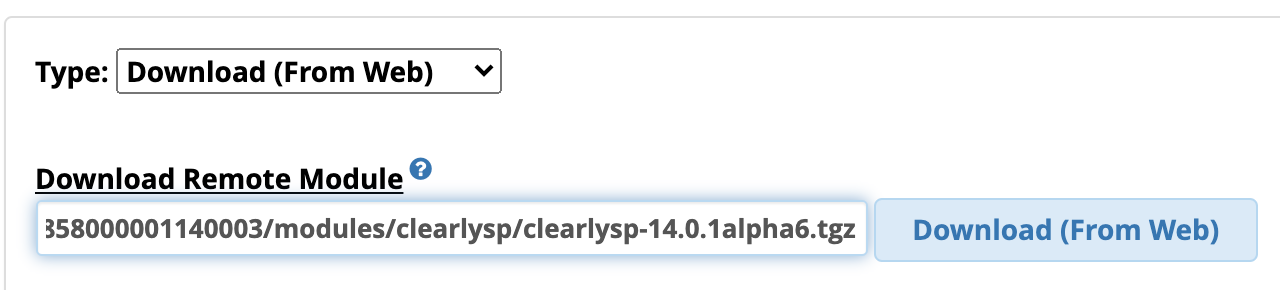
Now click on “Download (From Web)" button 
We can now go install the module by clicking on “local module administration” link below 
Scroll down to the Clearly Anywhere module and click Install 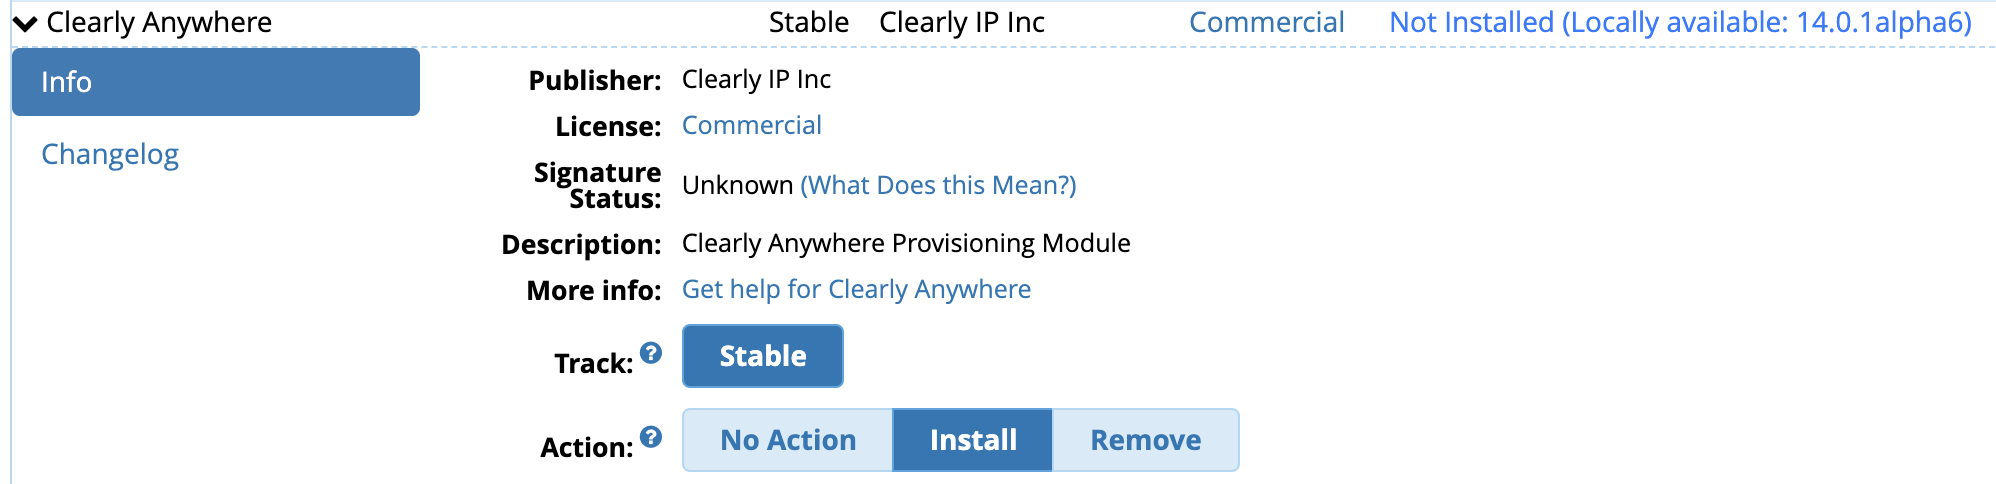
Scroll down and click Process button 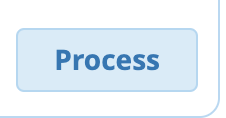
Confirm you want to install the module 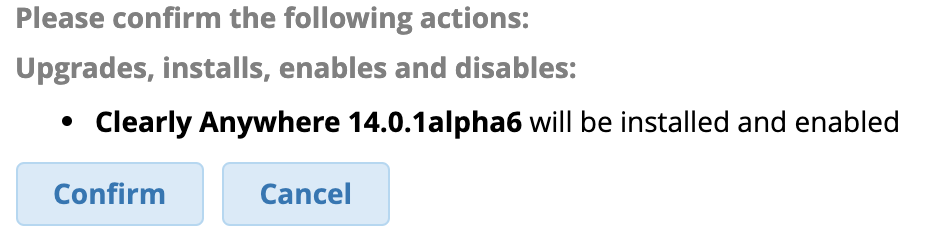
Once the install completes you will get a Return button to click on 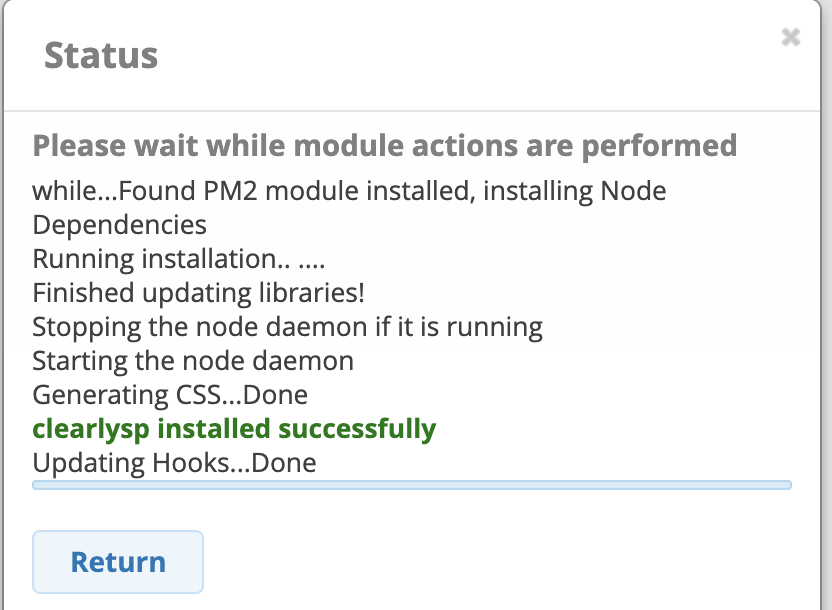
Press the Apply Config button now to write out the changes 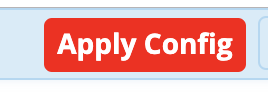
All future updates will now be handled in the normal FreePBX module admin section with the "Check Online" button, just like any module provided by FreePBX project We suggest you check for updates of the module in FreePBX module admin now as the module linked above only gets updated occasionally in the documentation here. You want to ensure you update to the latest and greatest of the module. | | Activating your Module - If you need to change your API Connection URL you can follow these steps.
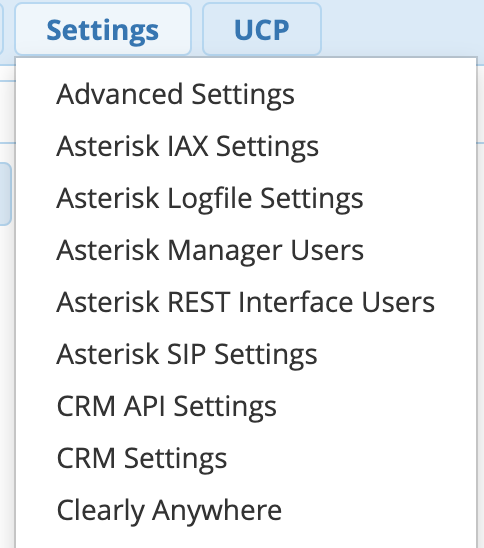
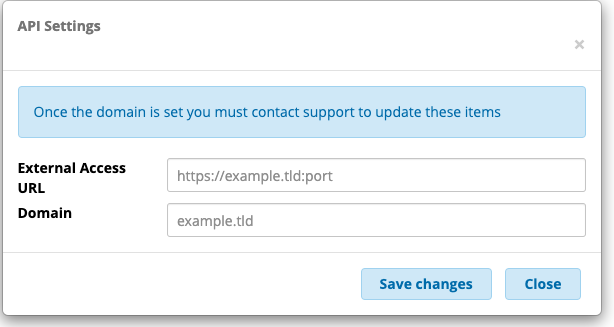
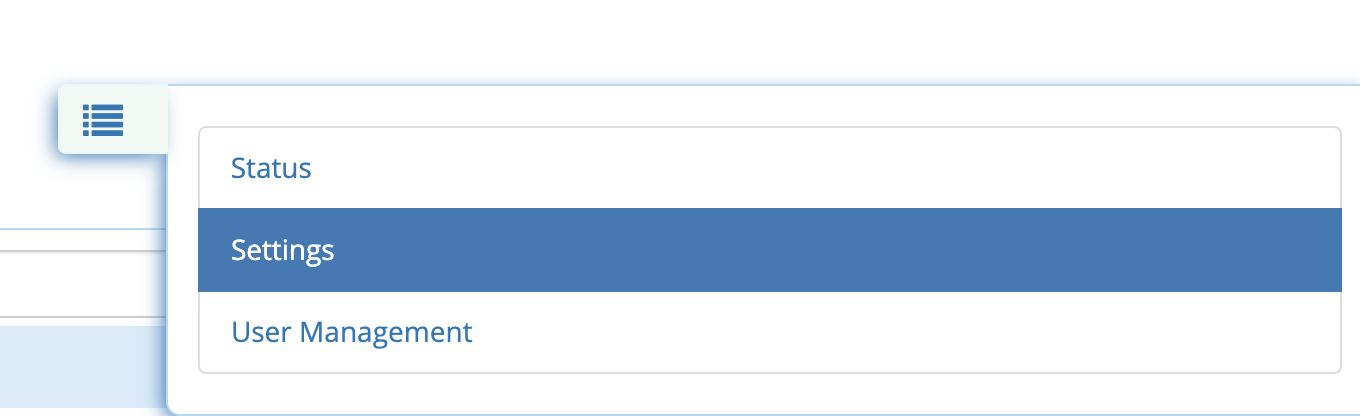
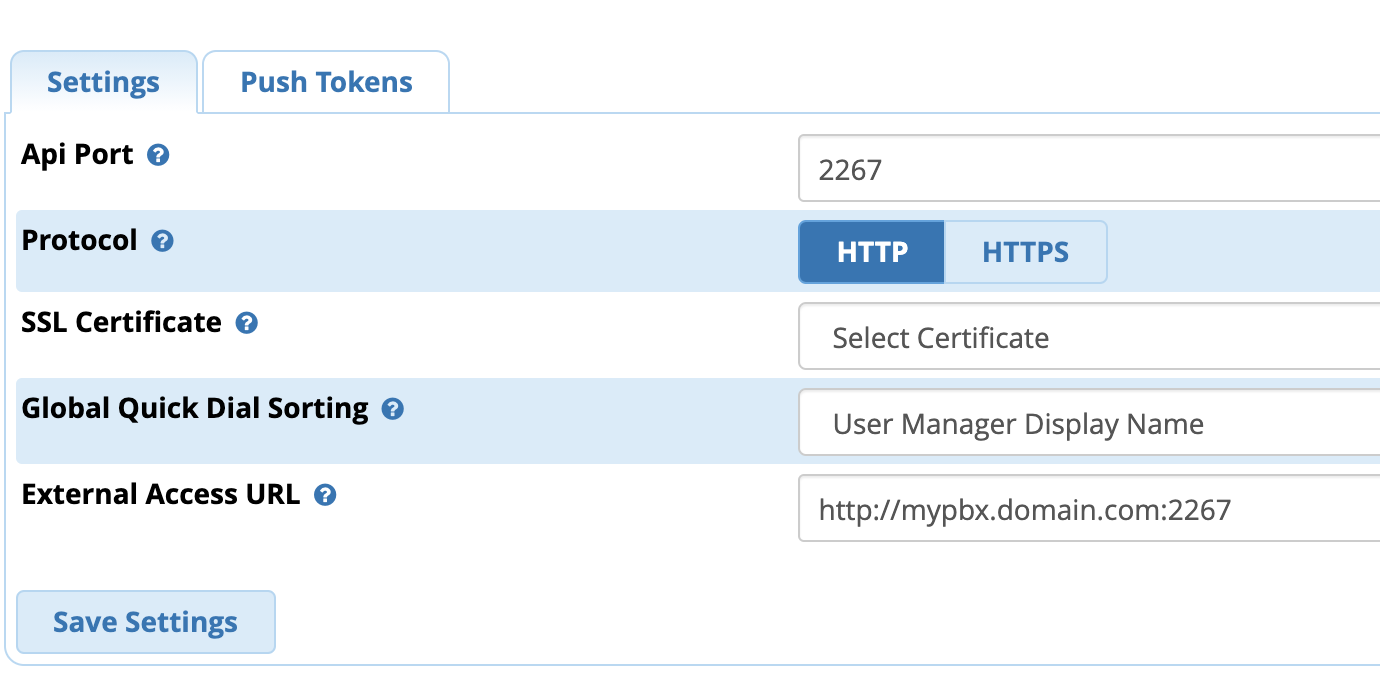
- Click on Settings from the Clearly Anywhere menu on the right side.
- From here you can update the External Access URL

- If you are changing between HTTP or HTTPS you will also want to update the protocol above as shown here.

- If you are changing the Port you will also want to update the API Port above as shown here

- Once your changes are done you can press the Save Settings button

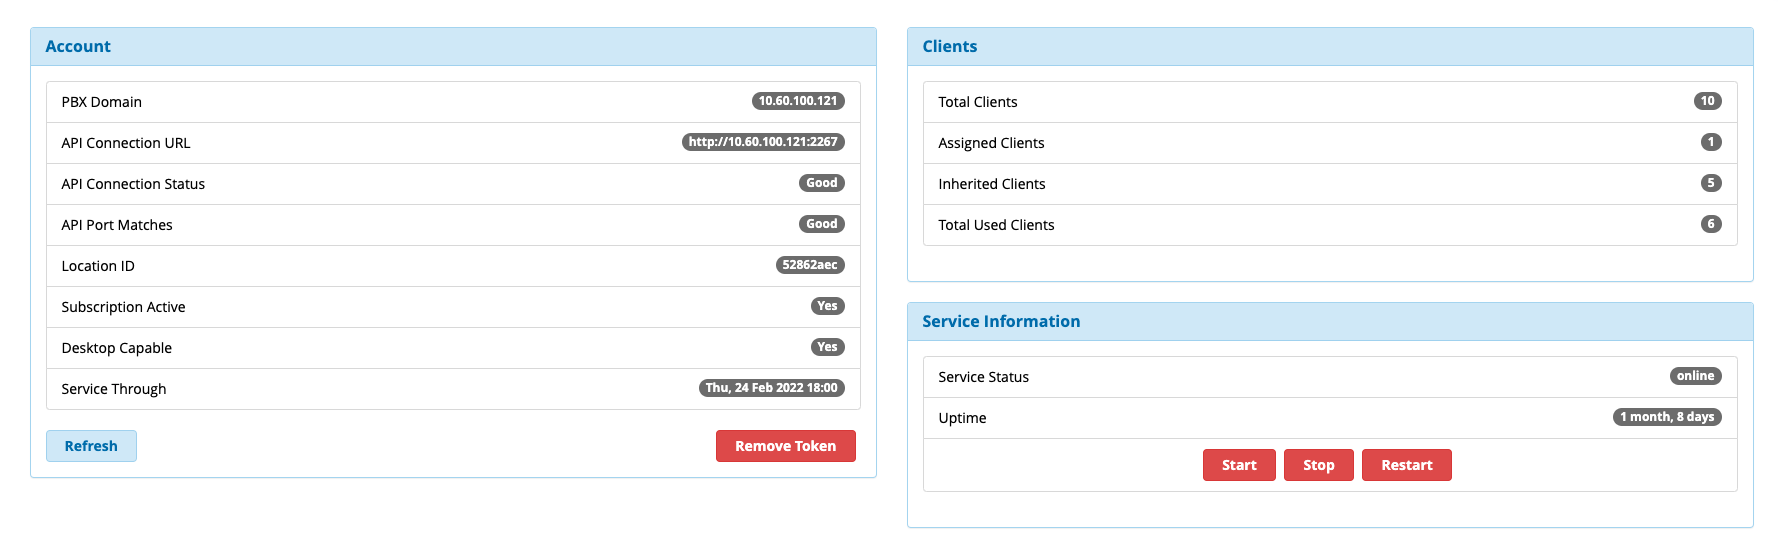
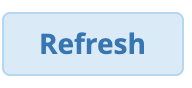
Updating Token - If you purchase additional Client counts for your PBX in the future, such as going from 25 users to 50, after the purchase is made with Clearly Anywhere, you will need to come into this module and press the Refresh button. This will reconcile the licensing on your system, with that of our database.
- If you renew your Clearly Anywhere subscription you will need to press the Refresh button to get the updated expiration date.
Setting Up Users Clearly Anywhere binds to your existing extension as an additional device, which means it only works with extensions set up using PJSIP. When enabling Clearly Anywhere for a user below, it will increase the max contacts for that extension by two contacts to allow for the push server to register for inbound calls and the device to register when opened. If you are going to have more than 1 Clearly Anywhere app connected to the same extension, you will need to increase the Max Contacts for that extension on the extension page under the Advanced Tab. - A user in Clearly Anywhere can be any User Manager user on your PBX. This will allow the user to login to the Clearly Anywhere app using their User Manager login along with the domain you defined above.
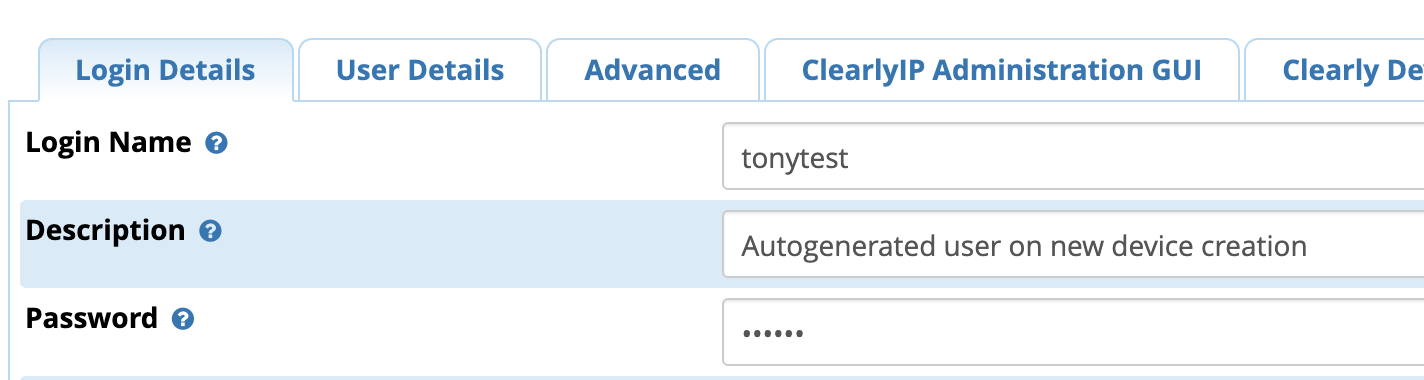
- A user in user manager has its own login username and its own password. Do not confuse User Manager login with the SIP Username and Password of an extension. You can identify the User's Username from User Manager of the user under the Login Details tab. By default, you can't see the password and can either email the user a password reset link or reset their password from here.
 The user in user manager is linked to a Primary Extension in FreePBX. This can be seen when viewing a user in the user manager under the Login Details tab. Ensure your user is linked to a Primary Extension, or your Clearly Anywhere App will not know what extension to set up on the phone. The user in user manager is linked to a Primary Extension in FreePBX. This can be seen when viewing a user in the user manager under the Login Details tab. Ensure your user is linked to a Primary Extension, or your Clearly Anywhere App will not know what extension to set up on the phone.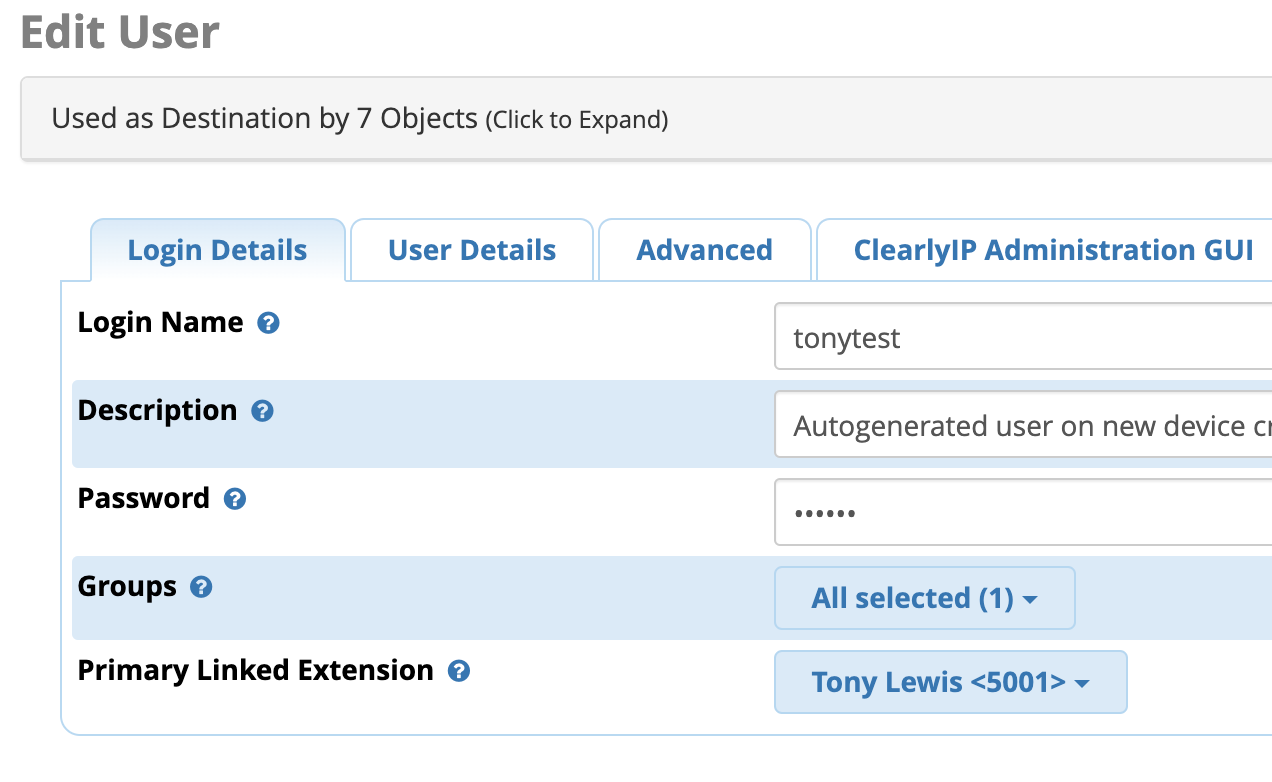 Users can be enabled for Clearly Anywhere at the user level in a User Manager or a Group Level if the User is set to inherit from the group. Users can be enabled for Clearly Anywhere at the user level in a User Manager or a Group Level if the User is set to inherit from the group. User Level Login Navigate to your user in User Management and locate the Clearly Anywhere tab: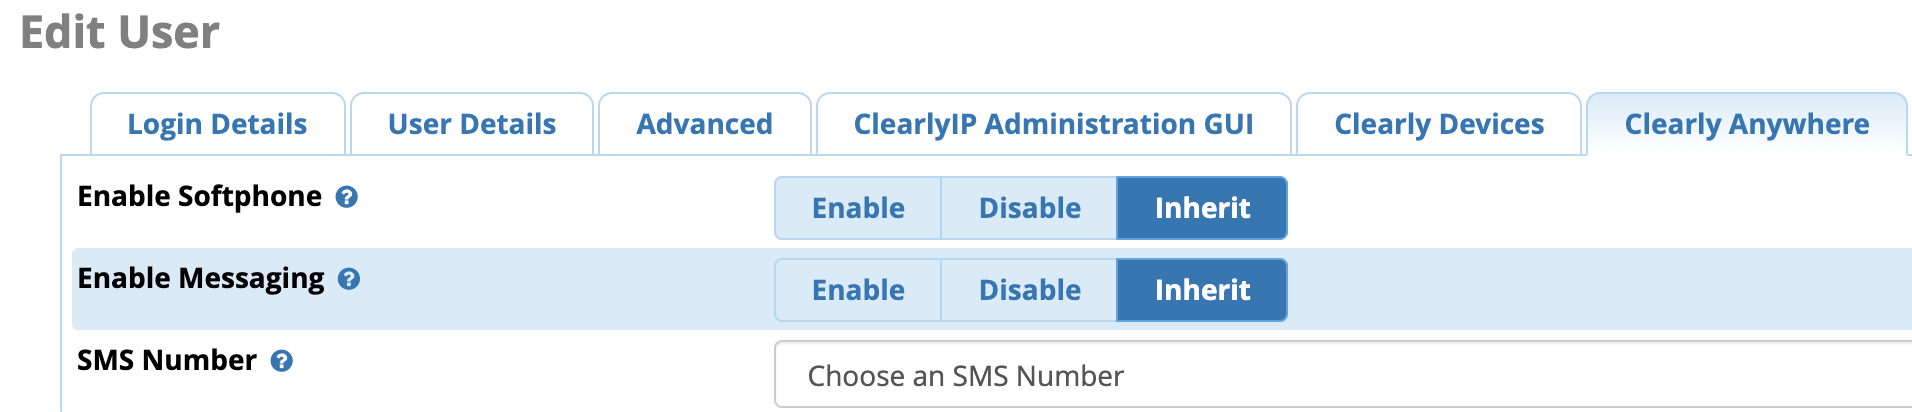 Enable Softphone: If set to Enable, this will explicitly enable the Softphone Login for this user. Enable Softphone: If set to Enable, this will explicitly enable the Softphone Login for this user. Enable Messaging: If set to Enable, this will explicitly enable the Messaging option in the Clearly Anywhere app. Once enabled, you also need to pick an SMS Number from any SMS number set up for this user in the User Manager. The SMS portion of Clearly Anywhere at this time can only link to a single Phone Number, so if a user has more than 1 number setup for SMS already, you will need to pick one of these SMS numbers to be linked for Clearly Anywhere. Enable Messaging: If set to Enable, this will explicitly enable the Messaging option in the Clearly Anywhere app. Once enabled, you also need to pick an SMS Number from any SMS number set up for this user in the User Manager. The SMS portion of Clearly Anywhere at this time can only link to a single Phone Number, so if a user has more than 1 number setup for SMS already, you will need to pick one of these SMS numbers to be linked for Clearly Anywhere. If the SMS Number list is empty, the User in User Manager is not set up with any SMS numbers, so you first must enable an SMS number for the user. The SMS integration with Clearly Anywhere is tied into the FreePBX SMS system and supports SMS and MMS from any providers who hook into the FreePBX Messaging system, including ClearlyIP's own SIP trunking service. To discover how to set up an SMS Number for a user with Clearly Anywhere SIP trunking, please review our SMS setup wiki here. If the SMS Number list is empty, the User in User Manager is not set up with any SMS numbers, so you first must enable an SMS number for the user. The SMS integration with Clearly Anywhere is tied into the FreePBX SMS system and supports SMS and MMS from any providers who hook into the FreePBX Messaging system, including ClearlyIP's own SIP trunking service. To discover how to set up an SMS Number for a user with Clearly Anywhere SIP trunking, please review our SMS setup wiki here. User Group Login Navigate to your user in User Management and locate the Clearly Anywhere tab. You will see both Softphone and Messaging are set to inherit by default. That means they will inherit their permissions from the group they belong to. Next, we will want to navigate to User Manager Groups and edit the group(s) that we want to enable for Clearly Anywhere. Next, we will want to navigate to User Manager Groups and edit the group(s) that we want to enable for Clearly Anywhere.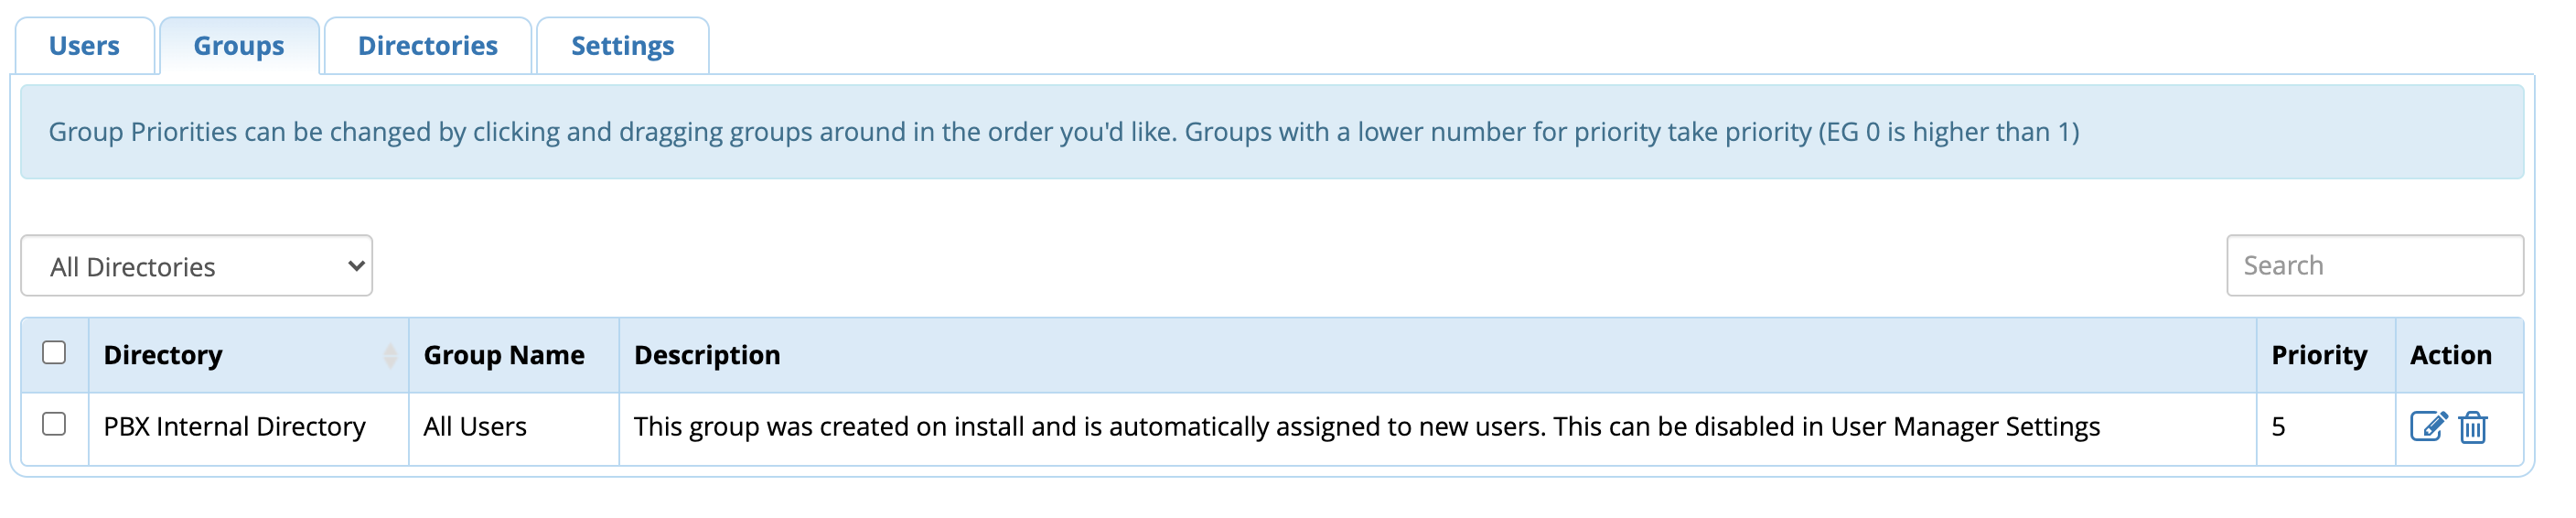 Click the Edit icon under Action for the group you want to edit, and navigate to the Clearly Anywhere tab Click the Edit icon under Action for the group you want to edit, and navigate to the Clearly Anywhere tab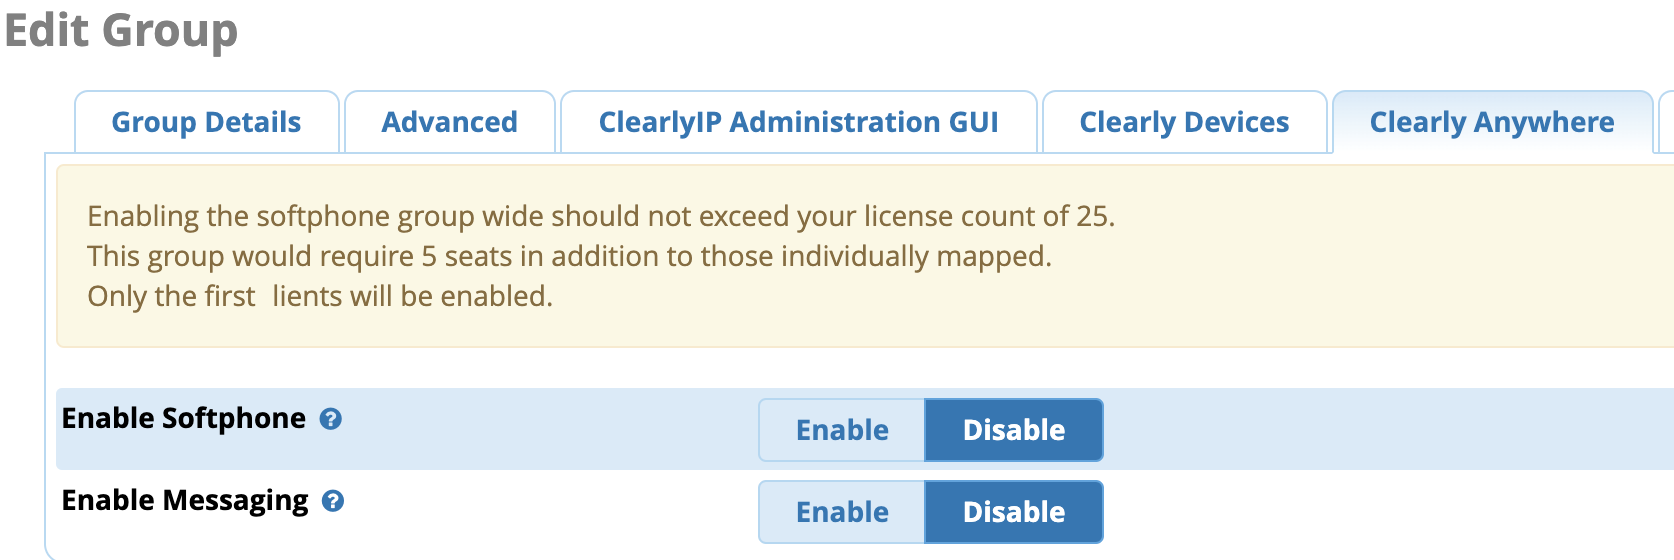 From here, you will note (in the example above) that you have 25 seats available for Clearly Anywhere users, and if you enable it for this group, it will use 5 of those seats as five users in our example are linked to this group. From here, you will now enable both Softphone and Messaging, and Press Submit From here, you will note (in the example above) that you have 25 seats available for Clearly Anywhere users, and if you enable it for this group, it will use 5 of those seats as five users in our example are linked to this group. From here, you will now enable both Softphone and Messaging, and Press Submit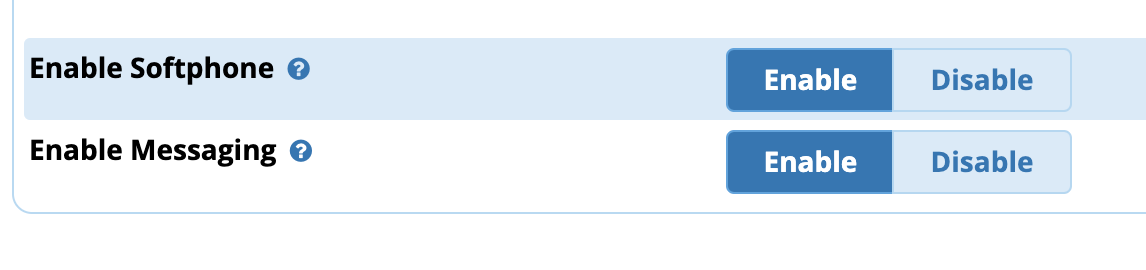 Enable Messaging: If set to Enable, this will explicitly enable the Messaging option in the Clearly Anywhere app. Once enabled, you also need to pick an SMS Number from any SMS number set up for this user in the User Manager. The SMS portion of Clearly Anywhere at this time can only link to a single Phone Number, so if a user has more than 1 number setup for SMS, already you will have to pick one of their SMS numbers to be linked for Clearly Anywhere. To set this up, you will need to go into each user now and pick their SMS Number that cannot be set at a group level. Enable Messaging: If set to Enable, this will explicitly enable the Messaging option in the Clearly Anywhere app. Once enabled, you also need to pick an SMS Number from any SMS number set up for this user in the User Manager. The SMS portion of Clearly Anywhere at this time can only link to a single Phone Number, so if a user has more than 1 number setup for SMS, already you will have to pick one of their SMS numbers to be linked for Clearly Anywhere. To set this up, you will need to go into each user now and pick their SMS Number that cannot be set at a group level. If the SMS Number list is empty, the User in User Manager is not set up with any SMS numbers, so you first must enable an SMS number for the user. The SMS integration with Clearly Anywhere is tied into the FreePBX SMS system and supports SMS and MMS from any providers who hook into the FreePBX Messaging system, including ClearlyIP's own SIP trunking service. To discover how to set up an SMS Number for a user with Clearly Anywhere SIP trunking, please review our SMS setup wiki here If the SMS Number list is empty, the User in User Manager is not set up with any SMS numbers, so you first must enable an SMS number for the user. The SMS integration with Clearly Anywhere is tied into the FreePBX SMS system and supports SMS and MMS from any providers who hook into the FreePBX Messaging system, including ClearlyIP's own SIP trunking service. To discover how to set up an SMS Number for a user with Clearly Anywhere SIP trunking, please review our SMS setup wiki here
Enable Park Button- With Version 14.0.10.19 or higher of the Clearly Anywhere module for your PBX we now support showing a Park button while on a active call. By default the park button is not enabled and you will need to Enable the Park button and set what Parking Lot you want the calls parked to at the Group or User level in User Manager.

- If enabled while on a active call you will now see the Park Button.
Sending Users Log in Emails From within the Status page of your Clearly Anywhere module on your PBX, you will see a list of users who have been enabled for Clearly Anywhere through the user Manager. From here, we can check for each user if they were allowed at the User Level (Explicitly Given) or if they were enabled at the Group level and inherited the permission (Inherited from Group).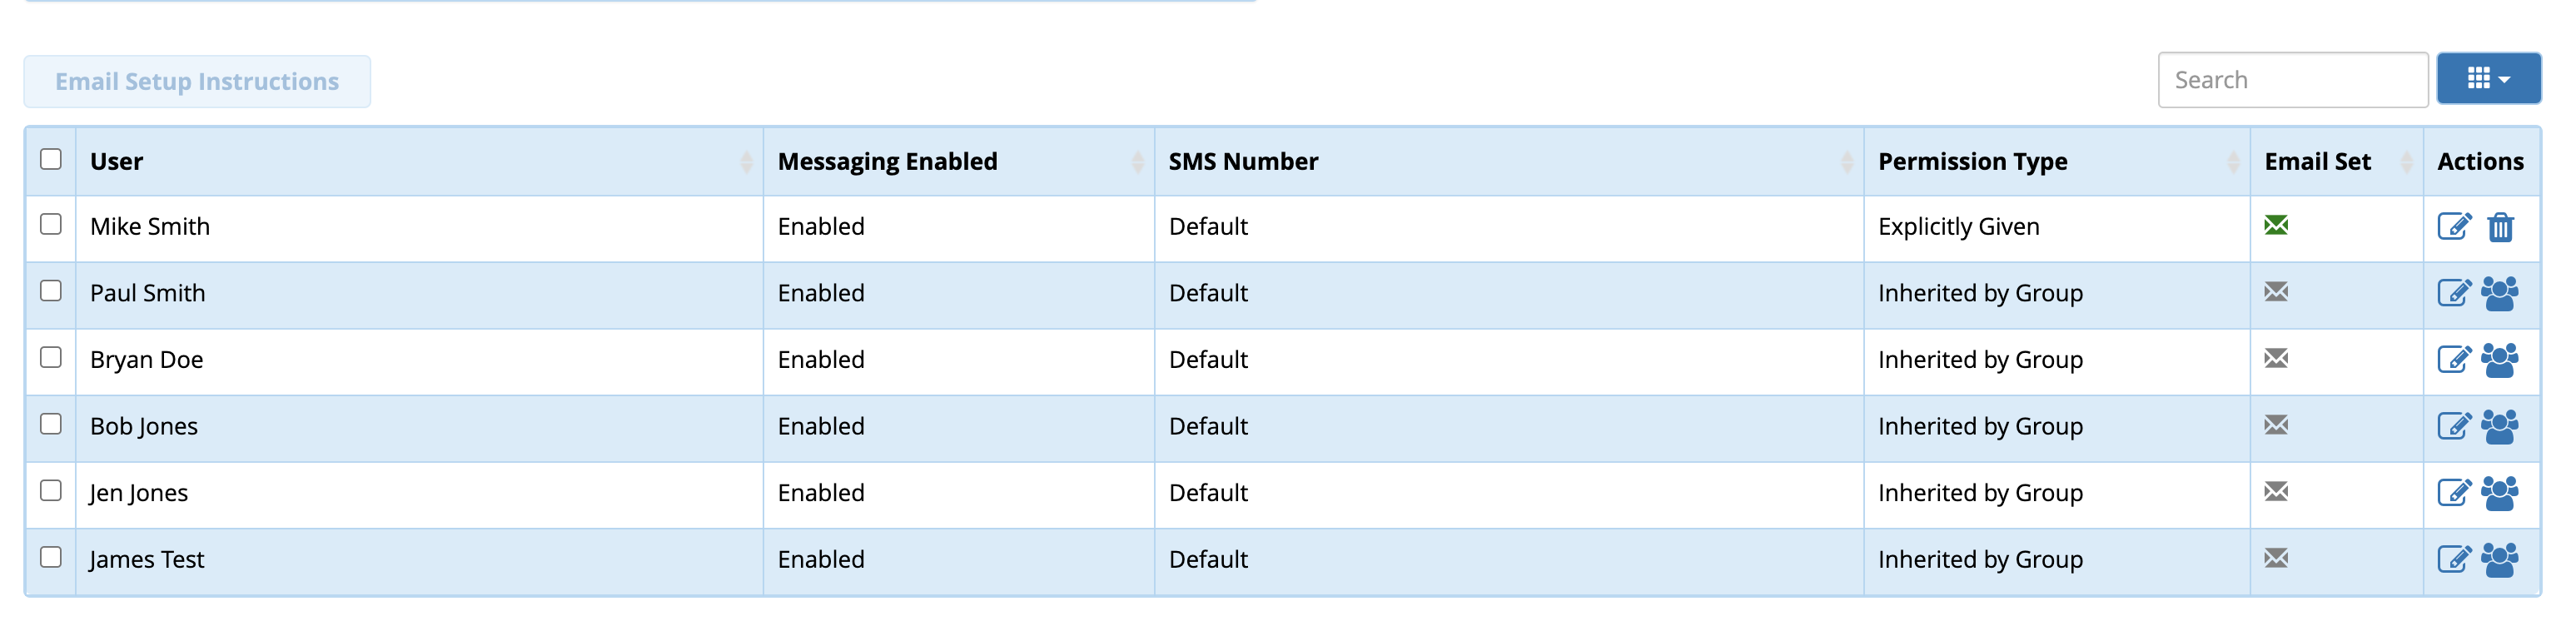 From this list, you can click the check box next to each user you want to send an invitation email to that will include a magic link that will auto log them into their Clearly Anywhere application without the user having to provide their username, password, and domain of the PBX and press the "Email Setup Instructions" button at the top of the list From this list, you can click the check box next to each user you want to send an invitation email to that will include a magic link that will auto log them into their Clearly Anywhere application without the user having to provide their username, password, and domain of the PBX and press the "Email Setup Instructions" button at the top of the list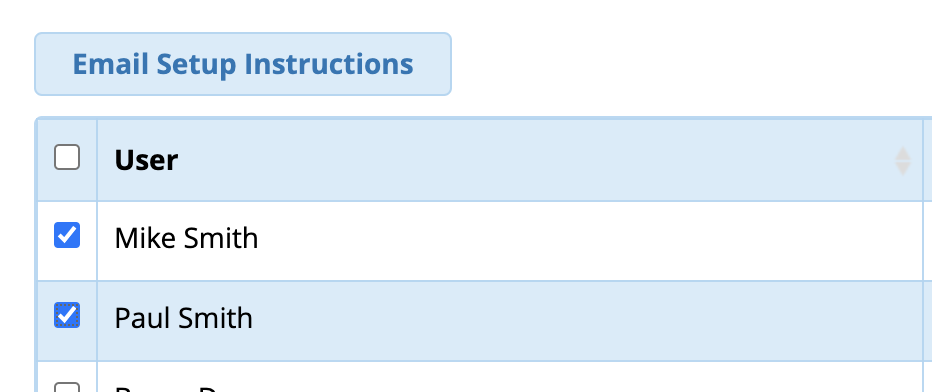 The email template sent to the users can be viewed and edited from the Clearly Anywhere module from the Settings' menu. The email template sent to the users can be viewed and edited from the Clearly Anywhere module from the Settings' menu.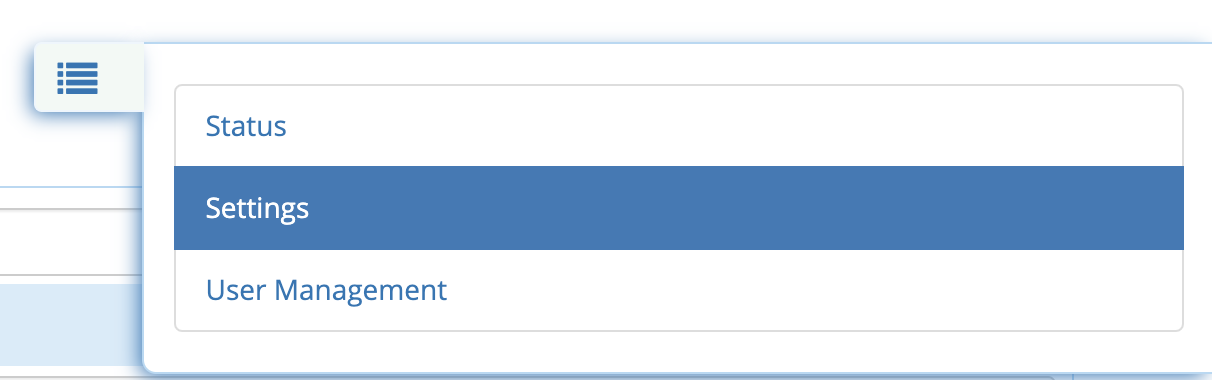 From here, you can modify the Email Body that is sent. From here, you can modify the Email Body that is sent.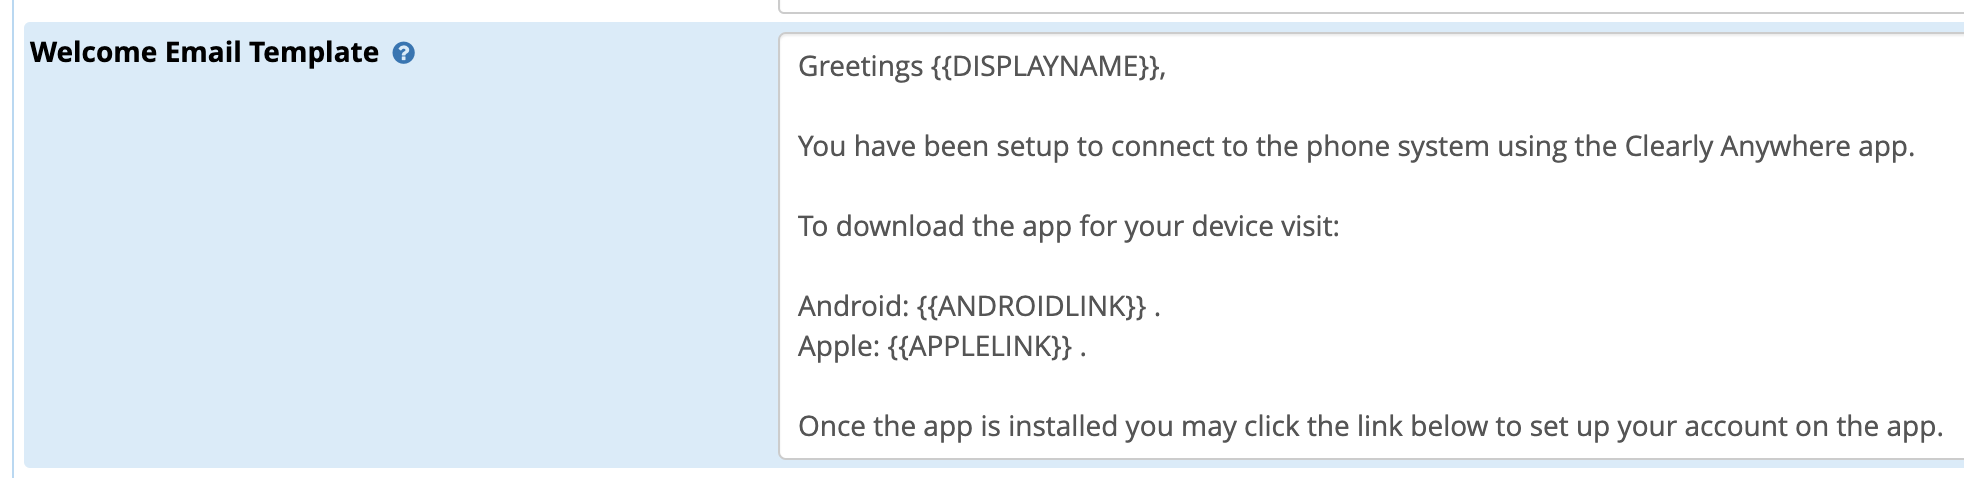 Setup Server Side Quick Dials (BLFs) - Requires Clearly Anywhere module 14.0.7 or newer
- You can push Quick Dial contacts to any Clearly Anywhere user from within the User Manager module. You can create the Quick Dials at a Group and User level. When creating Group Level Quick Dials, you can then choose to include those Group Level Quick Dials at a user level and have the User include their own Quick Dials on top of what they inherited from the Group.
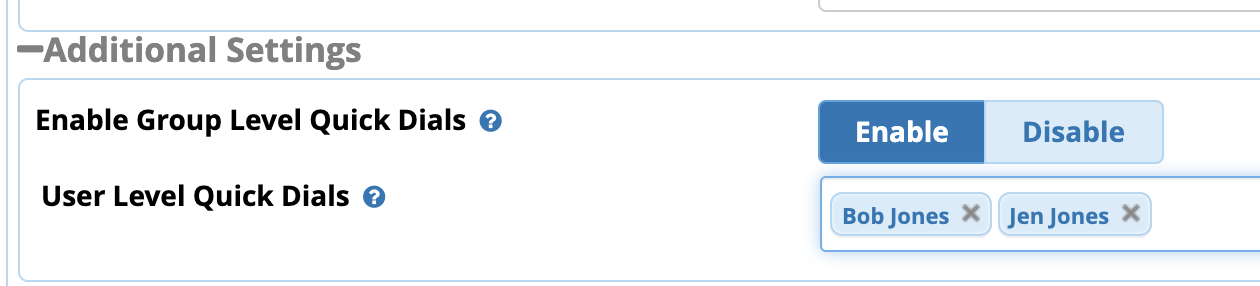
Group Level Quick Dials Navigate to User Manager and pick a Group to edit.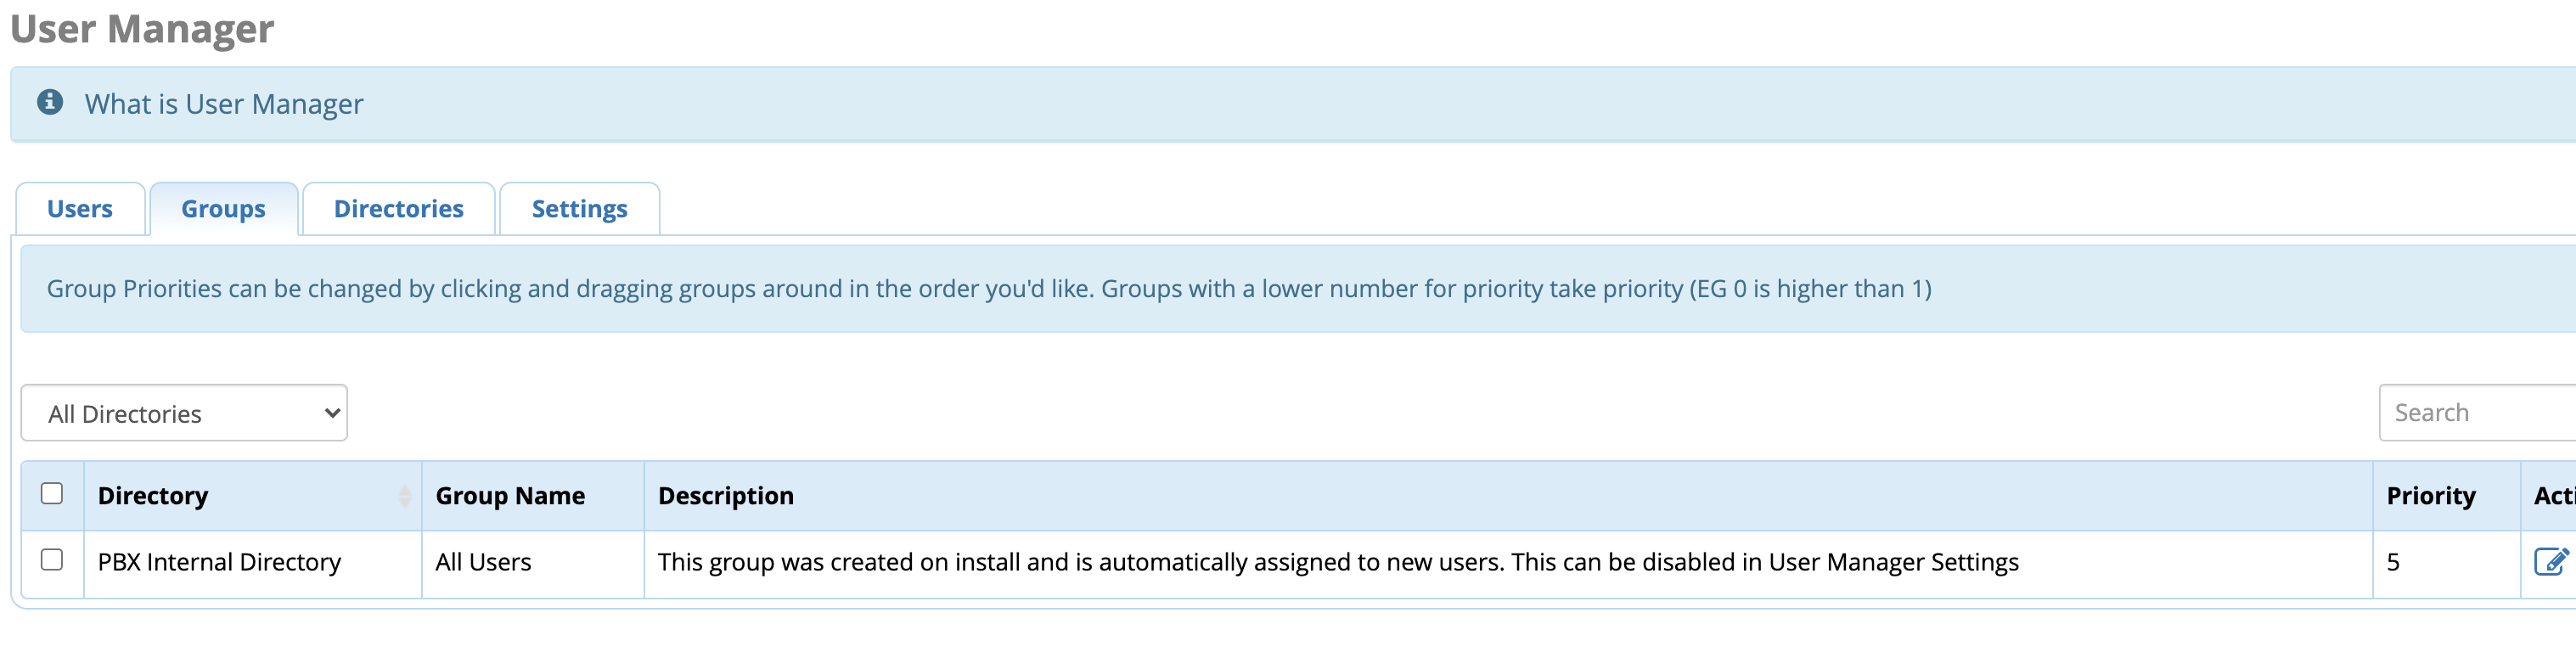 Click on the Clearly Anywhere tab at the top. Click on the Clearly Anywhere tab at the top.  From the Group Level Quick Dial section, pick which Users you want to include as Quick Dials and standard BLF feature codes for Time Conditions, Parking, and Call Flow controls. From the Group Level Quick Dial section, pick which Users you want to include as Quick Dials and standard BLF feature codes for Time Conditions, Parking, and Call Flow controls.
Submit your changes User Level Quick Dials At a user Level in User Manager, we can now observe by default that all users inherit the quick dials setup from the group. You can also choose not to inherit these and add Quick Dials for a specific user that will be overlaid with the Group Level Quick Dials if you decide at the User level to include the Group Quick Dials. - Edit a user in User Manager and click on the Clearly Anywhere tab at the top

From here, you can tell it to include or exclude the Group Level Quick Dials. Enable means to have the Group Level, and Disable will exclude them. The default here is to include any Quick Dials at the Group Level for any Groups this user belongs to.

Next, you can optionally include your own User Level Quick dials included with any Group Level Quick Dials if enabled above.
Press Submit when done
Emergency Calling Routing Overview Requires Clearly Anywhere module 14.0.7 or newer
By default, if a user were to call Emergency Services like 911 in the US or Canada, it would route the call over the Clearly Anywhere application. This is not an ideal situation for most users since the PBX has no way of knowing where the actual user is to relay the emergency services. Unlike traditional Cell Phone operations, which knows from GPS and Tower Triangulation where the user is, your, PBX cannot relay or receive this information. For this reason we have a feature in Clearly Anywhere that you can define from the Clearly Anywhere module what numbers your users’ dial for Emergency calling including 911 and have it automatically tell the Clearly Anywhere application to dial that number out their Cell Phone carrier instead of the PBX even if they dial it from the Clearly Anywhere Application. Setup The number rewriting can be done at a Group or User level. A user by default is set to inherit the number rewriting rule from the group it belongs to. From within the User, Manager Group click on the Clearly Anywhere tab Enable the Emergency Rule option below Enable the Emergency Rule option below Click the Add Rule button to add one or more numbers that can be dialed for Emergency Services such as 911 Click the Add Rule button to add one or more numbers that can be dialed for Emergency Services such as 911 Define the Number they would dial, like 911, and pick if you want the call to use the Cell Network or the App. Usually, you would choose the Cell Network to force the call if someone calls 911 to go out the Cell Network and not the App and press the Save Changes button at the bottom. Define the Number they would dial, like 911, and pick if you want the call to use the Cell Network or the App. Usually, you would choose the Cell Network to force the call if someone calls 911 to go out the Cell Network and not the App and press the Save Changes button at the bottom. You can now see the rule for 911 has been added to your group and press the Submit Changes to have it push the rule to all the users of this group that are set by default to inherit the group permissions for Emergency Call Routing You can now see the rule for 911 has been added to your group and press the Submit Changes to have it push the rule to all the users of this group that are set by default to inherit the group permissions for Emergency Call Routing You can now navigate to a user-level and verify the user is set to inherit from the group. You can optionally tell it not to inherit from the group and define Custom Emergency Call Routing rules at a user level in the User Manager. You can now navigate to a user-level and verify the user is set to inherit from the group. You can optionally tell it not to inherit from the group and define Custom Emergency Call Routing rules at a user level in the User Manager. Please note, if you are using an extension of 911 (North America emergency) or 112 (European emergency), you will need to disable Call Integration to be able to dial the extension. To do this: - In Clearly Anywhere Mobile App
- Click the 3 dots in the upper right
- Settings
- Preferences
- Controls
- Call Integration
- Call Integration Mode
Viewing Users set up for Clearly Anywhere Now that we have set up some users for Clearly Anywhere in User Manager, we can go back into Clearly Anywhere and see all the users that are setup on the main page of the module. From here, we can see what is enabled, such as Messaging and what SMS number they have set up and if the user is explicitly enabled for Clearly Anywhere or if it’s enabled because it's inheriting the permission from the group it belongs to.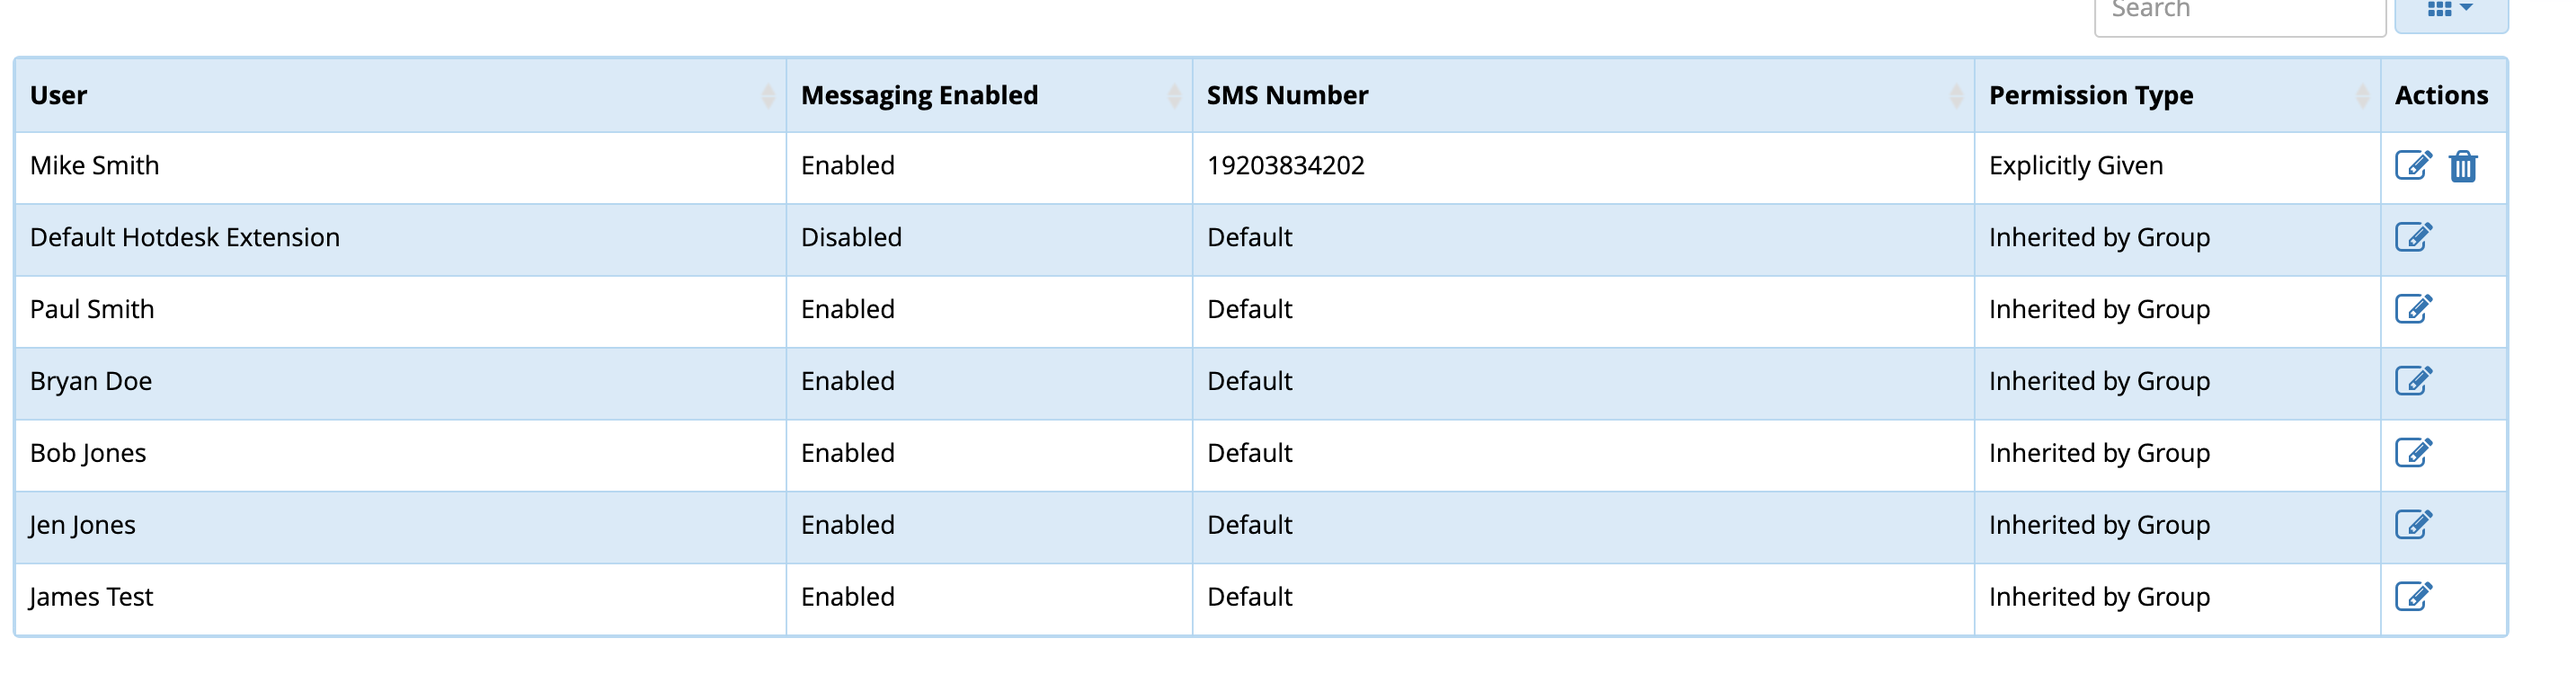 Settings From within the Clearly Anywhere module, you can click on the Right Menu bar and then click on 'Settings': 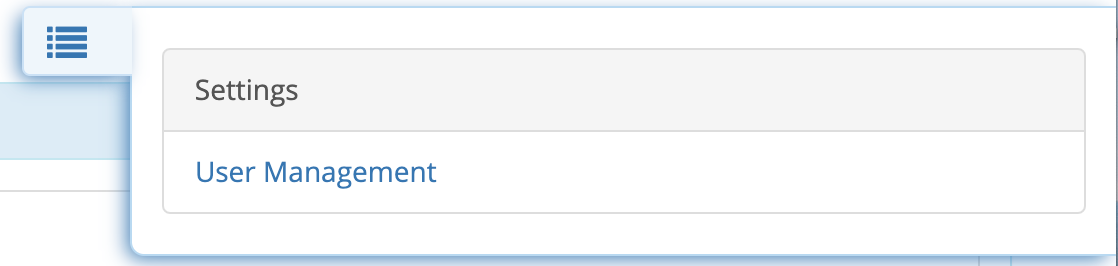 Settings - API Port - Will show you what API port is set up on your PBX for your Clearly Anywhere to communicate when logging in and getting provisioning data. If you want to change the port, the local Node.js application is listening on. You can update it here. Please note changing the port will require you to change the External Access URL below to the same port.
- The only time the API Port and the External Access URL port would be different is if you had the Node.JS application setup on one port. Still, in your firewall, you wanted to open a different port and redirect it to the API port. You would then define the External Access URL port at the end to be the port opened on your firewall that redirects to the API Port here.
- You also need to make sure you have this ported opened on your firewall for your external users to provision the device.
- Protocol - Do you want to use HTTP or HTTPS for Node.js application running on your PBX. If you pick HTTPS here, make sure you choose an SSL certificate below, and you can't use a Self Signed certificate. It needs to be a valid issued certificate. Please note changing the Protocol here will require you to change the External Access URL below to the same protocol.
- SSL Certificate - Pick which installed SSL Certificate you want to use if you are using HTTPS as your protocol above.
- You must pick a Non-Self Signed Certificate from here. The list of SSL Certificates is pulled from the Certificate Management Module in FreePBX
- External Access URL - This is the URL our API servers will redirect you to on login from the Clearly Anywhere application. This is usually your PBX FQDN plus the protocol and port form above.
- Global Quick Dial Sorting - When setting up Quick Dial BLFs in user manager at a user or group level, all your Quick Dials will be sorted on the setting below.
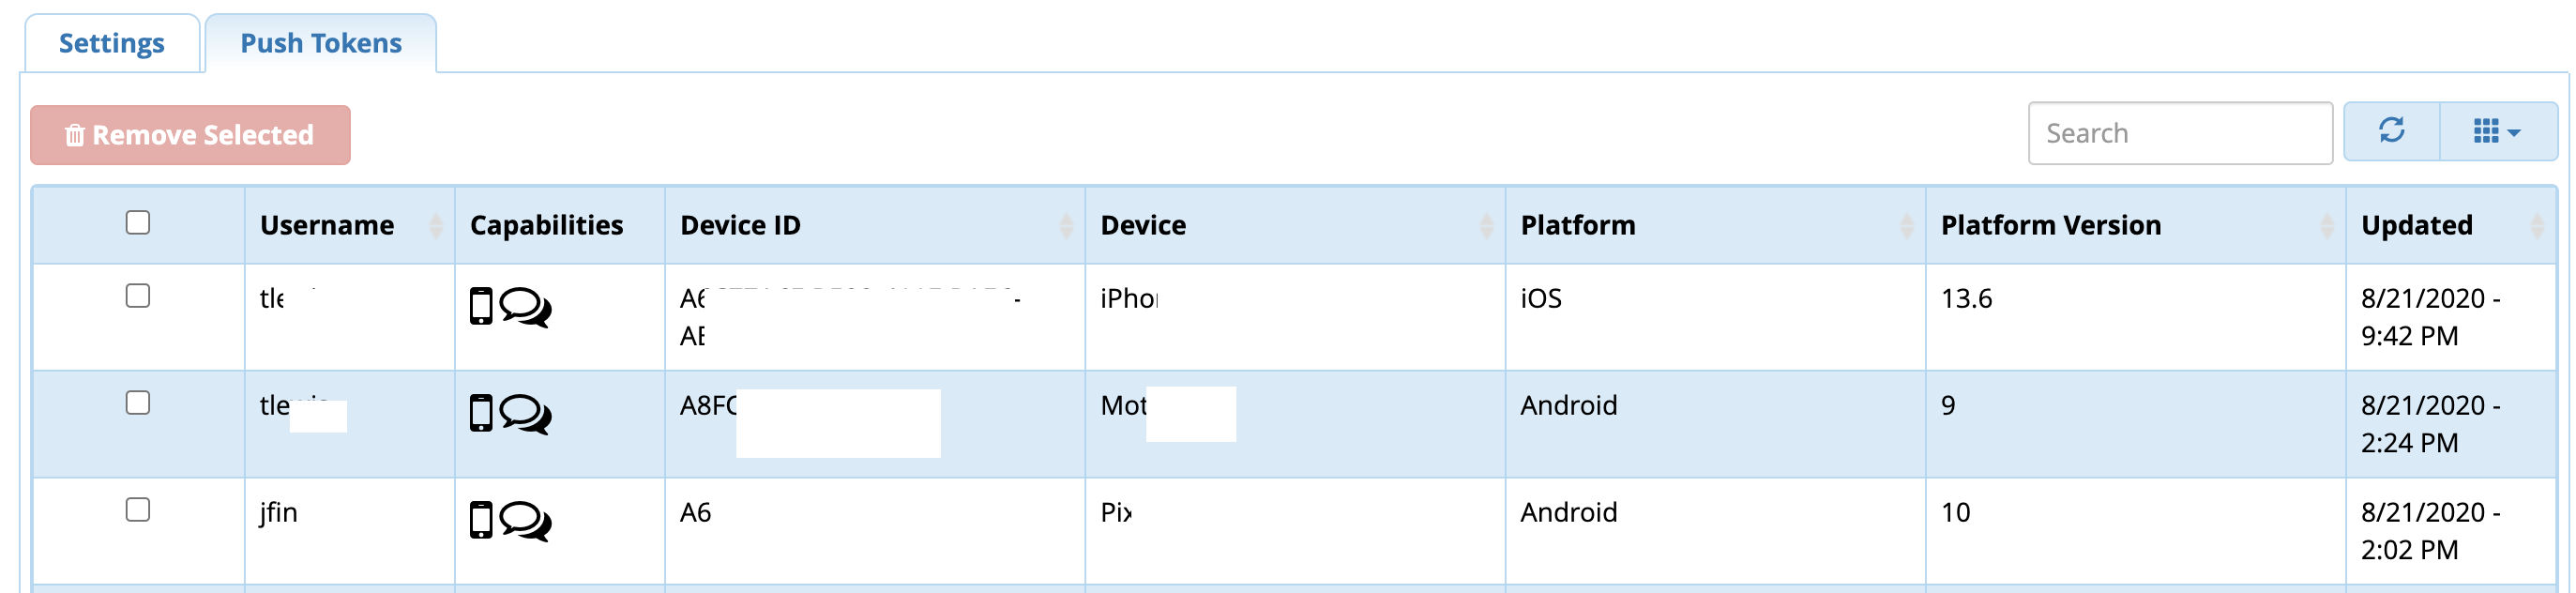
Push Tokens Here we will show you the Push Token each device and user is currently registered to your PBX with. - A Push Token is used to push new calls to the phone anytime a new inbound call is received for the extension of the User
- A Push Token is also used to notify a phone when it has a new SMS or MMS message.
 Ports and Registration - The Clearly Anywhere mobile app communicates with your PBX for provisioning information by default on port 2267 (TCP) as shown in the module in the API Connection URL field. You can change this as outlined above in the Settings section of this guide. This port must be opened to the outside world to allow the app to get provisioning data and login.
- By default when your Clearly Anywhere App goes to pull provisioning data the first request will come from our API server with a IP Address of 66.185.18.42, 66.185.18.43 or 66.185.18.44 and all request after will come direct from the Clearly Anywhere App. We do have the ability to set a toggle on a Token by Token basis to force all Provisioning data to proxy through us so that you can open 2267 only to our IPs of 66.185.18.42, 66.185.18.43 and 66.185.18.44. Contact support if you want us to enable this for you.
- Once the user is logged in and receives the provisioning data, it will register to your PBX using the domain name set in the module under the PBX Domain field. If you want to change the Domain or IP address the phones registered to at this time, you need to open a ticket with Clearly IP to change it on our backend. Soon, you can control this from within the module yourself.
- The phone will register to Asterisk using whatever you have defined in the PJSIP channel driver for the port so if your phones are remote you will need to make sure that port is allowed through your firewall and if using the built in FreePBX firewall, make sure you have the responsive firewall enabled for PJSIP or the PJSIP ports opened as well as ports RTP ports (which are 10000 to 20000 by default, but can be changed in the FreePBX SIP Settings module).
- The app will first scan to see if you have UDP enabled and use that. If UDP is not enabled, it will look to TCP next and use that Port, and lastly, it will look to TLS based on your Global SIP Settings.
- If you want to restrict a specific user to use a specific protocol like TLS, you would go into the extension settings of that user and restrict their "Transport" setting from Auto to whatever protocol you wanted to use for that user.
- Inbound calls are delivered by ClearlyIP Push Servers distributed globally. Because these servers initiate the SIP traffic for inbound calls, each one must be able to register to your PBX. The list of Push Server IP addresses you need to allow on your PBX’s SIP port is obtained from the command dig +short all.sipis.clearlyip.com.
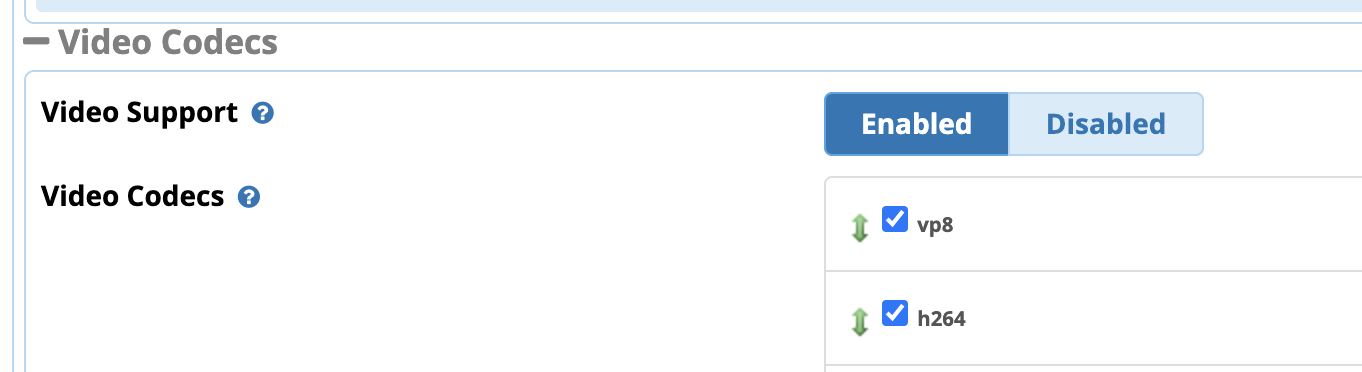
Video Setup The Clearly Anywhere app supports making video calls from 1 Extension to another extension, also known as 1:1 Video Calling. Video calling should work with any other extension on your PBX that is set up with a Video enabled DeskPhone or Softphone including Clearly Anywhere. The supported Codecs for Clearly Anywhere Video is VP8 and H264. You need to make sure that your PBX is set up with these Video Codecs enabled and any other non Clearly Anywhere the device also supports these codecs. - Navigate to your Asterisk SIP Settings module in your PBX and verify you have both H264 and VP8 enabled and that Video Support is also enabled.
 Signalling UDP TCP and TLS - By default the Clearly Anywhere Module attempts to use the following signaling in this order
- When the Clearly Anywhere module on your PBX sets up configurations for your Clearly Anywhere app for each user it follows this logic.
- It looks to see what you have enabled in your Asterisk SIP Settings module under the PJSIP Section
- It eliminates any of the protocols listed above if they are not enabled in your SIP Settings module.
- Finally it looks into the extension of each user and if the extension on the PBX is restricted to a certain protocol type such as UCP, TCP or TLS it will use that.
- If the extension is set to Auto for Transport (which is the default behavior in FreePBX on new Extensions) it will use the protocol based on the Order in Step 1 after it has eliminated anything that was not enabled in Step 2 above
- Example 1
- I have in SIP Settings both UDP and TCP enabled
- The extension 101 is set to Auto for Transport
- 101 will be provisioned with UDP since you have UDP and TCP enabled and our App prefers to use UDP over TCP and you have the extension set to auto
- Example 2
- I have in SIP Settings both UDP, TCP and TLS enabled
- The extension 101 is set to TCP for Transport
- 101 will be provisioned with TCP since you have the extension in the PBX hard set to use TCP and not auto.
Codec Setup and Flow By default, the Clearly Anywhere Module attempts to use the following codecs in this order. The order depends if you are making a call on Wi-Fi or Cellular Data. These are hardcoded orders based on sound quality and bandwidth requirements. - Wifi
- opus
- G722
- ulaw
- alaw
- g729
- ilbc
- gsm
- Cellular Data
- opus
- g729
- gsm
- ulaw
- alaw
- ilbc
- g722
When the Clearly Anywhere module on your PBX sets up configurations for your Clearly Anywhere app for each user, it follows this logic.
- It looks to discover what you have enabled in your Asterisk SIP Settings module under the PJSIP Section.
- It eliminates any of the codecs listed above if they are not enabled in your SIP settings module.
Updating CID for Outbound Calls- By default FreePBX uses a feature in Asterisk called Connected Line state that when making a outbound call has the effect of updating the Caller ID Name portion of the call to be the Caller ID Number used for your outbound call. This has a adverse effect in mobile applications where they by default show the Caller ID Name field versus the Caller ID Number if a name is provided and since the PBX is replacing on the outbound call the CID Name field with the Caller ID Numbering being used for the outbound call all you see in the list of call history for outbound calls is your Caller ID for Number for each call.
- You can turn off this behavior by going into the Advanced Settings module on your FreePBX system and locate the field called "Display CallerID on Calling Phone" and make sure you set it to be No

- Save and Apply your changes and all future outbound calls should show correct now.
Module Debugging Tools - The following are a list of fwconsole commands you can use with the Clearly Anywhere module. You can also add a --json at the end of the commands below to have it export everything as json.
- fwconsole clearlysp --info
- Will return back Module Token, Domain Name and Licensed Total users and currently used licenses
- fwconsole clearlysp --refresh
- Will refresh its license information from our license server. Normally used after purchasing more seats or extending the expiration date
- fwconsole clearlysp --listusers
- Will list all the users that are setup with Clearly Anywhere
- fwconsole clearlysp --uncap XXX
- Replace XXX with a user name and when run it will set that userback to inherit instead of yes for Clearly Anywhere enabled for that user.
- fwconsole clearlysp --remove
- Will remove the token on this PBX so that you can reuse the token with a different PBX
API Connection Status error in Module - If you see the following error in the module this means that our redirect server that redirects the Clearly Anywhere mobile users on login to your PBXs API URL is not reachable.

- This is usually caused by 1 of the following reasons.
- The port you have us redirecting to is not open on your firewall. This default port is 2267 and can be seen in the "API Connection URL" field in the Clearly Anywhere module main page. Verify you have this port opened on your Corporate Firewall and if enabled the FreePBX Firewall.
- The node.js application that the phones connect to on the above port is not running. See below on how to debug the node.js application
- The FQDN or IP address you provided to us is not resolvable or reachable.
- If using a IP address in the API Connection URL verify the IP address is correct.
- If using a FQDN verify the FQDN resolves to the correct IP Address.
- The Clearly Anywhere mobile app receives its provisioning on login and when it updates from your PBX direct on the API URL that is shown in the module. The default for this is http://XXX:2267 with XXX being your IP or FQDN.
- If the node.js application is not running the phones will not be able to receive provisioning data or let you login and our API server would not be able to relay clients to your PBX
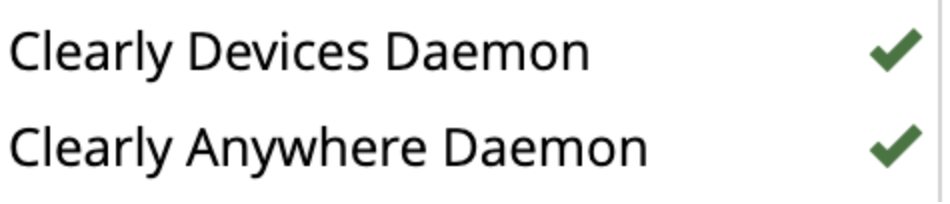
- You can verify this is by looking in Dashboard of your PBX and locating the Clearly Anywhere Daemon and verify it has a Green Checkmark.
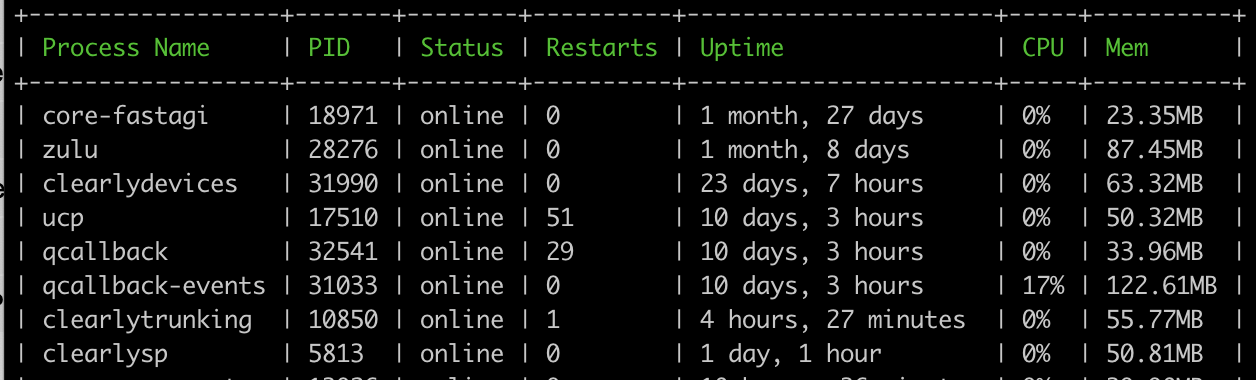
- You can also verify this by running the following command from your PBX Linux CLI.
fwconsole pm2 --list
- Verify the process clearlysp is online
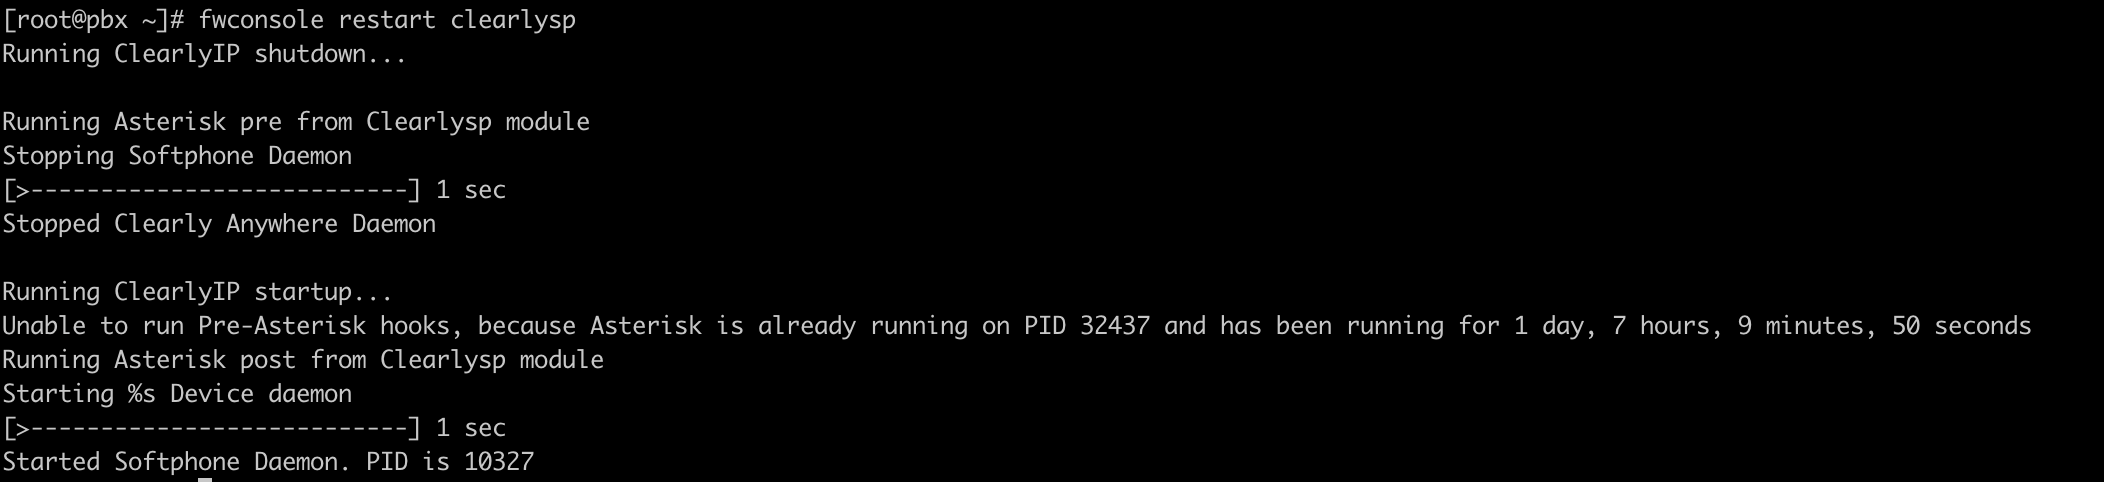
- If the process is not running you can start it with the following command
fwconsole restart clearlysp
Mobile App Showing Expired- If you see a Red Box that says Expired when viewing your mobile app this means the license on your PBX for Clearly Anywhere has expired and you need to renew your license.
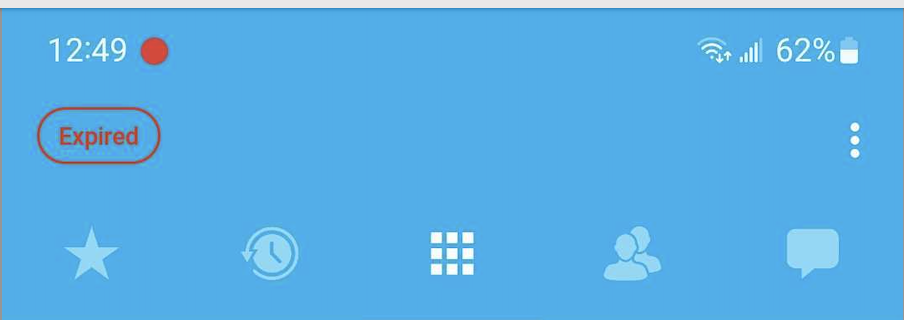
- To view your current license and expiration date review this wiki here.
- You can renew your license at https://store.clearlyip.com.
|
|
|
| | | |
|