| | | |
 Uploading .... Uploading ....Configuring ClearlyIP SIP Trunks on Issabel and Legacy Elastix PBX
Trunk Configuration - Navigate to PBX --> PBX Configuration --> Trunks
- Select "Add SIP Trunk"
Note: Issabel only supports the Chan_SIP Driver which has been deprecated by Asterisk and Replaced by the PJSIP Driver - We suggest configuring four trunks for redundancy.
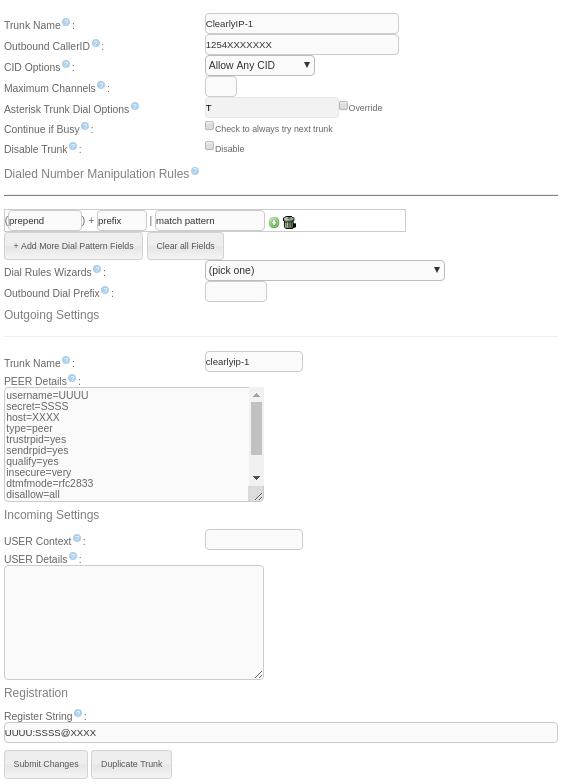
- Set your "Trunk Name" to match the trunk name of your 4 servers listed in our Portal for each location.
- Set your "Outbound CallerID", this should be the same as your Main DID
- Set "Trunk Name" for your PEER Details ex: to match the trunk name of your 4 servers listed in our Portal for each location
- Set Your PEER Details as below with the SIP Credentials as found here
where UUUU is your SIP Username, SSSS is your SIP Secret, & XXXX is your SIP Server
- username=UUUU
- type=peer
- trustrpid=yes
- sendrpid=yes
- secret=SSSS
- qualify=yes
- insecure=invite
- host=XXXX
- dtmfmode=rfc2833
- disallow=all
- context=from-pstn
- allow=ulaw
- Set your Register String to:
- UUUU:SSSS@XXXX
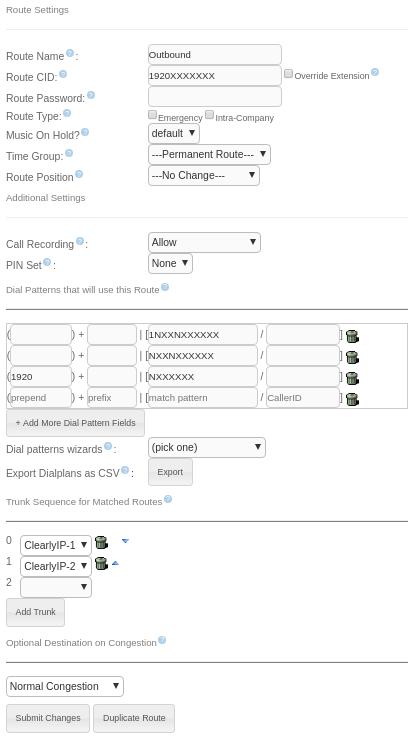
Outbound Routes- Navigate to "Outbound Routes"
- Set the "Route Name" ex: Outbound
- Set the "Route CID", this will be the CallerID for calls using this route, if this is not set calls will default to the CID set on the Trunk.
- Set "Route Position" to First, this will set this route to be used before others.
Note: If you setup a 911 route you will want that one above this one. - From the "Dial pattern wizards" drop down Select "Local 7/10 Digit", and then Select "Long-distance"
- For the 7 Digit match (NXXXXXX) in the prepend field add 1 and your local area code ex: 1920
Note: If your users are used to always dialing with the area code you can delete this pattern match - For the "Trunk Sequence for Matched Routes", Set your first ClearlyIP trunk in slot 0 and your second ClearlyIP trunk in slot 1
- Submit Changes
It is your responsibility to verify that your 911 configuration is working as intended by dialing 933, or the appropriate process for emergency address verification in your area!
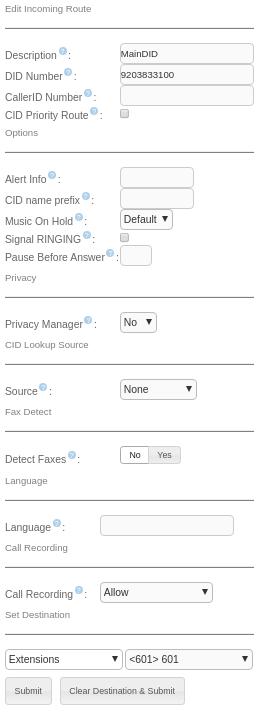
Inbound Routes- Navigate to "Inbound Routes"
- Select "Add Incoming Route"
- Set the "Description" ex: MainDID
- Set the "DID Number" to be your 10 Digit DID ex: 9203833100
Note: Leave "CallerID Number" blank, this is a matching field you would only use this if you wanted to route calls based on the CallerID of who's calling. - Set "Destination", this should where ever you want calls to that DID to route to. ex: Ring Group, Queue, Extension, etc.
|
|
|
| | | |
|