Overview
The following guide should work for all Clearly IP Gateways such as- CX-GW1U24FXS - 24 Port 1U Gateway
- CX-GW1U48FXS - 48 Port 1U Gateway
- CX-GW2U72FXS - 72 Port 2U Gateway
- CX-GW2U96FXS - 96 Port 2U Gateway
- CX-GW8FXS-G2 - 8 Port Gateway
- CX-GW4S4O-G2 - 4 Port FXS and 4 Port FXO Gateway
Information gathering
You will need to retrieve the following information from Clearly IP Trunking portal for the location you want to connect the device to.- SIP Credentials
- Username - SIP Username
- Password - SIP Password
Review this wiki on how to get the above information here Retrieve the IP Address
Power up the ATA on your local network- 1.For a device with FXS ports, you can dial ## by using an analog telephone connected to the FXS port 1 after the equipment is powered on.
- 2.For a device without FXS ports, you can use device IP address obtaining tool called 'Finder' or any network scanner to obtain the IP address.
Configuration
Logging in
Navigate through your web browser to the IP address of the device on the same network where the ATA is connected.- Log into the web GUI. Default Username is "Admin" and the initial password is in a sticker in the bottom of the device for older devices. If the sticker does not list a Password the device will have a default password of "clearly".
- Enter the captcha letters and numbers to access. These are case insensitive

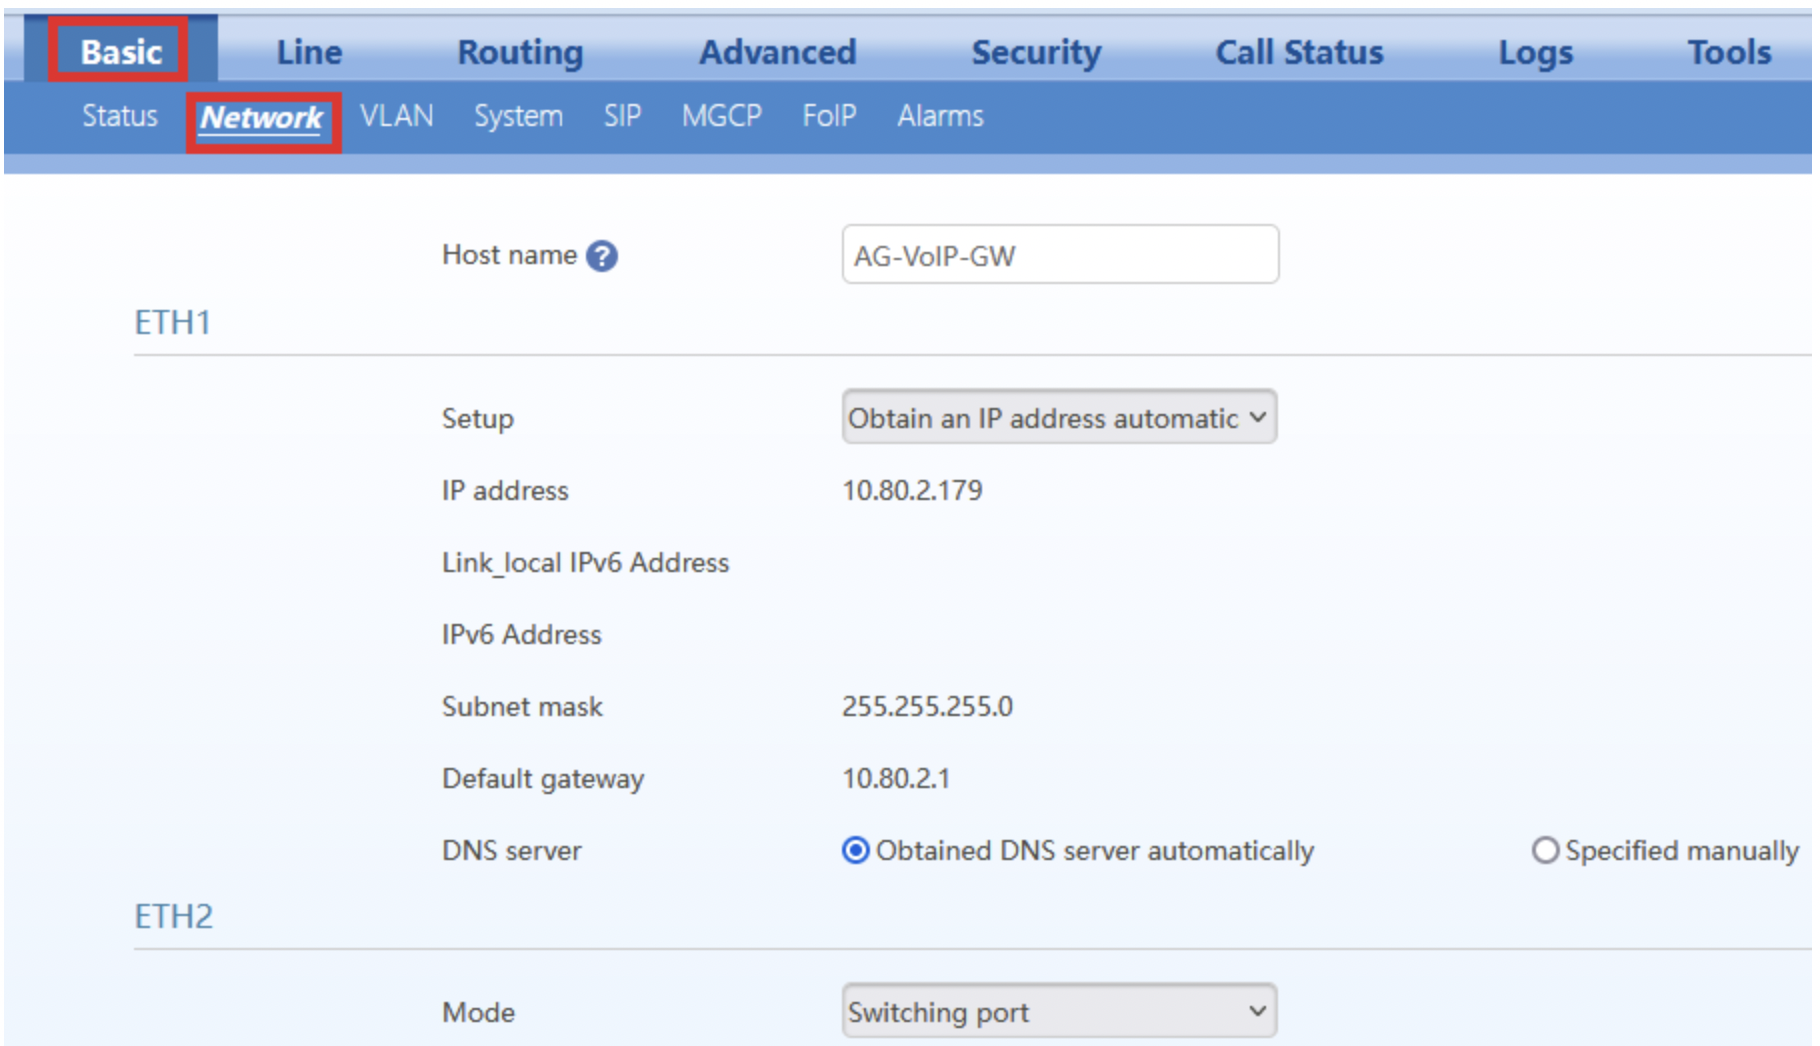
Network
In the menu Basic > Network you can set the following parameters:
- IP assignment (Setup): Obtain an IP address automatically or set an static IP.
- Set ETH2 as a switching port. This will let the LAN port/ETH2 act as a bridge to your network and let you plug in a device to access the same network that Port 1 is plugged into as a switch.
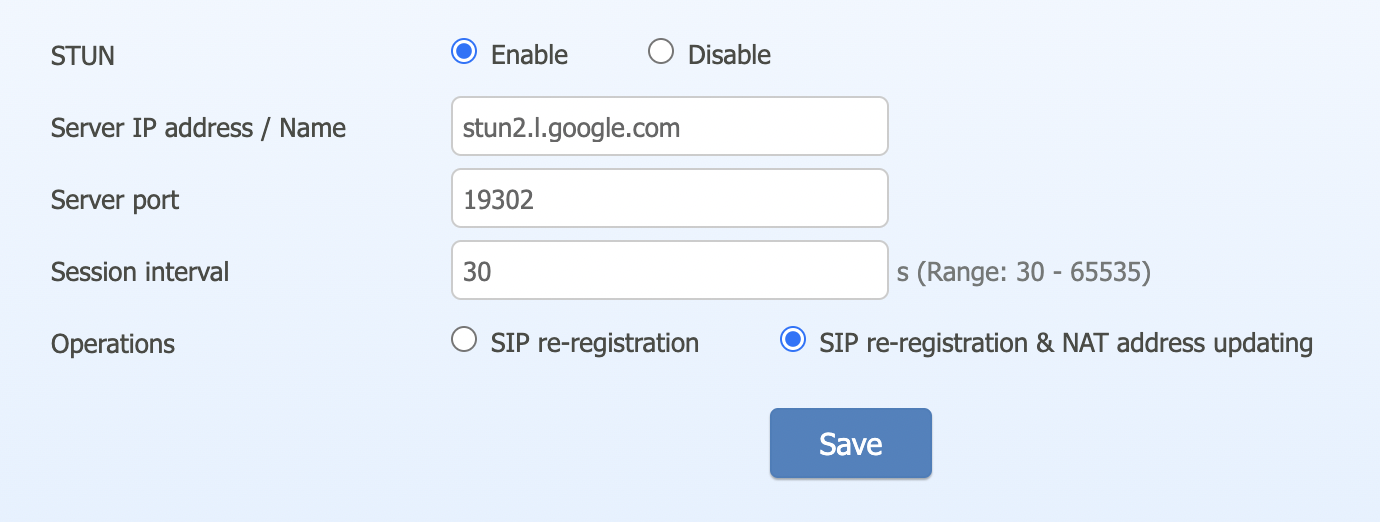
- STUN - We are going to enable STUN since your gateway has a private IP and our trunking servers are on the internet we need STUN to assist with NAT of your firewall
- STUN - Enable
- Server IP address / Name - The STUN server you want to use. We recommend using a Google STUN server such as stun.l.google.com
- Server Port - The port the STUN server wants request sent to. For Google this is 19302
- Session interval - How often we should check in with the STUN server to get information.
- Operations - Set to SIP re-registration & NAT address updating
SIP Trunk Setup
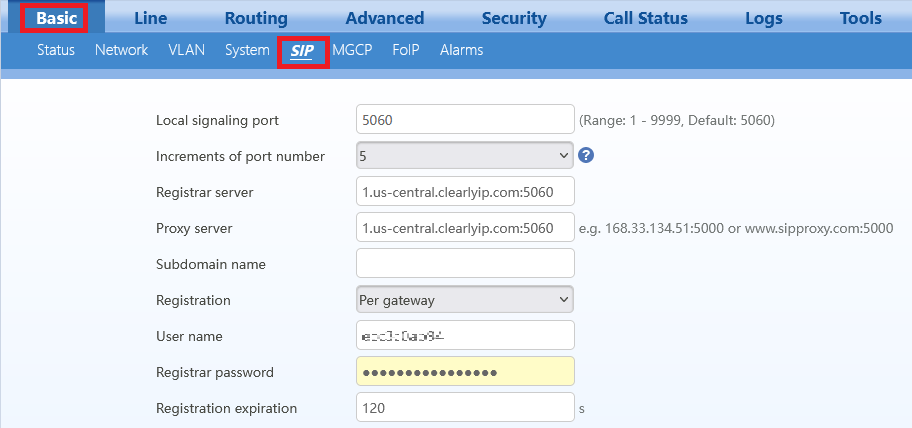
- Navigate to Basic >SIP and enter the following information and set the following fields
- Local signaling port: Leave as is default value 5060
- Increments of port number: Leave as is default value
- Registrar server: Enter the domain of the SIP Trunk. In our case it will be 1.us-central.clearlyip.com:5060
- Proxy server: Enter the domain of the SIP Proxy. In our case it will be 1.us-central.clearlyip.com:5060
- Subdomain name: Leave it empty
- Registration: Set it up as Per Gateway
- User name: This is the trunk username from the Clearly IP Trunking portal
- Registrar password :This is the trunk password from the Clearly IP Trunking portal
- Registration expiration: Leave as is default value of 120 seconds.
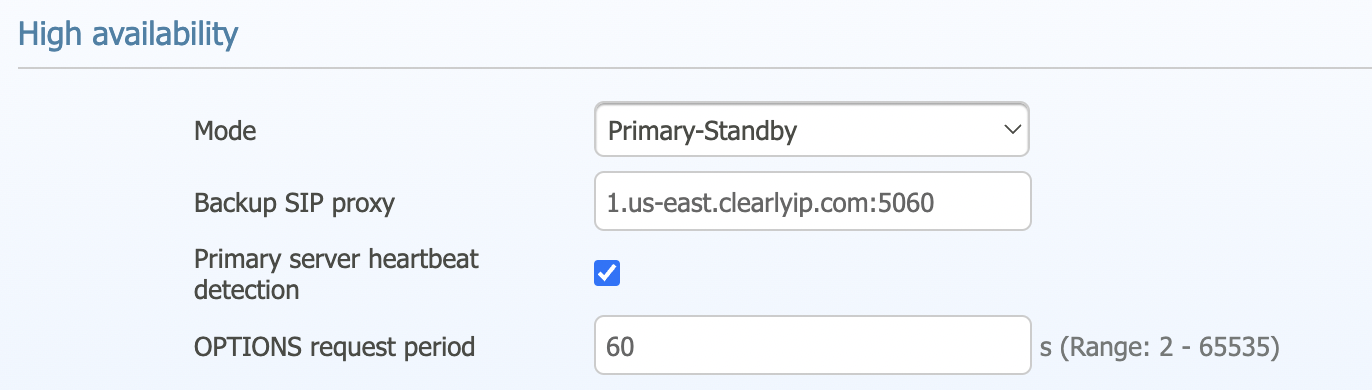
- Scroll down to the High Availability section and we are going to setup a secondary server it can try if the primary is down:
- Mode : Primary-Standby
- Backup SIP proxy: Enter the domain name of the backup SIP proxy. In our case is 1.us-east.clearlyip.com:5060
- Primary server heartbeat detection: Enabled
- OPTIONS request period: 60 seconds.
- Scroll down to the SIP transport section and set the following fields
Codecs Settings
- Navigate to Basic > System
- Under the Codec section move the codecs using the arrows from the Enabled codecs box to the Disabled codecs box so that we just have G.711U/20 picked

Click on the Save button to have this setting applied.

Advanced SIP Settings
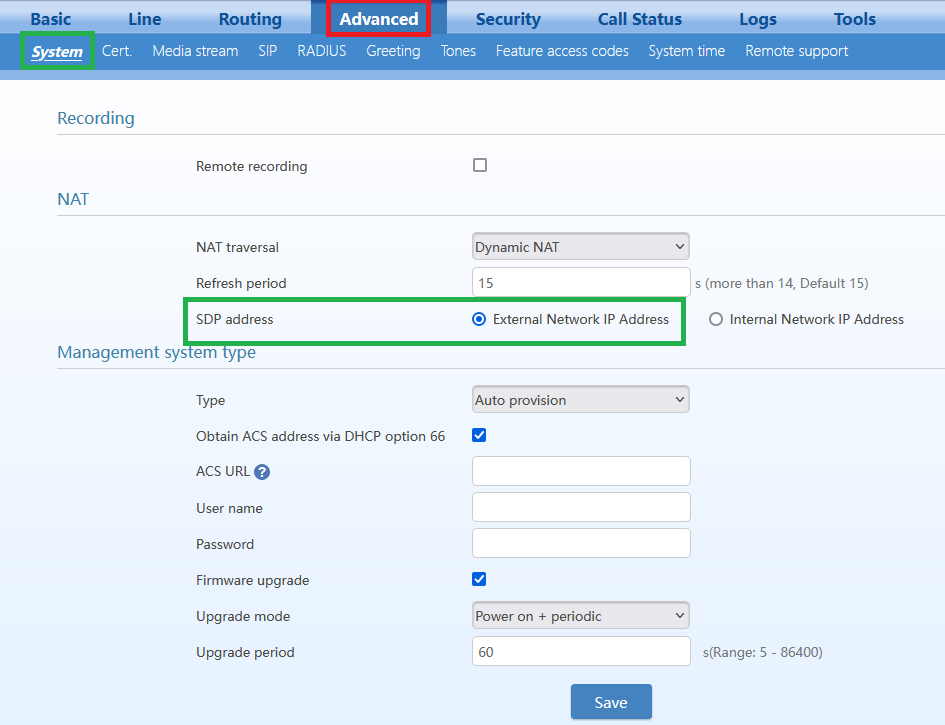
- To have a better integration with the Clearly IP Trunking System we need to modify some SIP settings regarding NAT. To do this navigate to Advanced > System and scroll down until you find the NAT section.
- Change the SDP Address setting to External Network IP Address
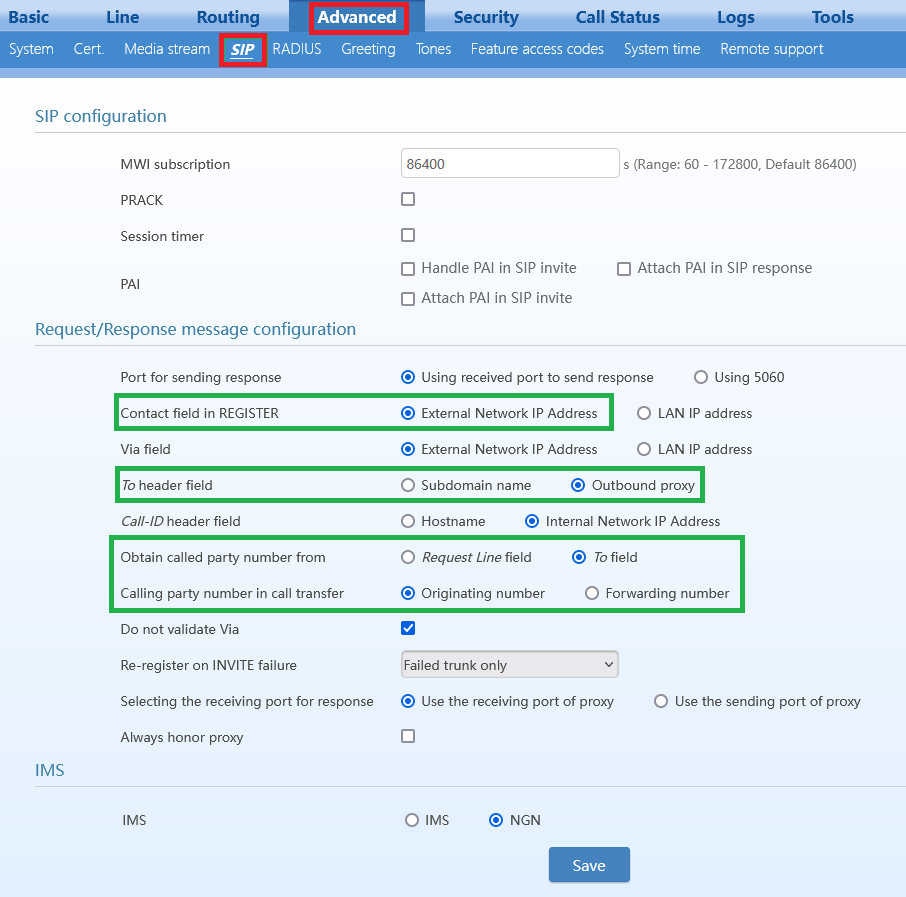
Navigate to Advanced > SIP and modify the following options:
- Contact field in REGISTER: Set it to External Network IP Address
- To header field: Outbound proxy
- Obtain called party number from: To field
- Calling party number in call transfer: Originating number
- Leave the rest of the options as they are
- Save this settings and restart the Gateway to have them applied.
Line settings
- In this section we are going to map our Trunk DIDs with our FXS ports. To do this navigate to Line > Phone number.
- Enter the DID number in the desired FXS port as follows (In our example we have only 3 DIDs in our SIP trunk):
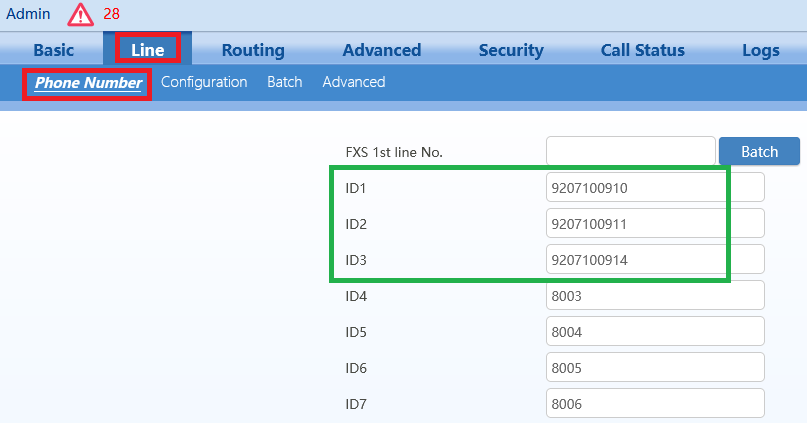
- Click on the Save button to have this setting applied.
Hunt Group calling
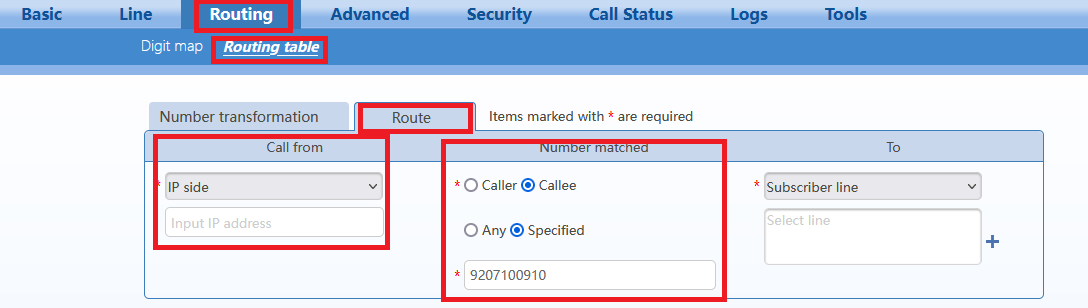
In the scenario where a port is busy with another call, we would like to route an incoming call to another available port/extension. To achieve this we can use the Gateway's internal routing capabilities.
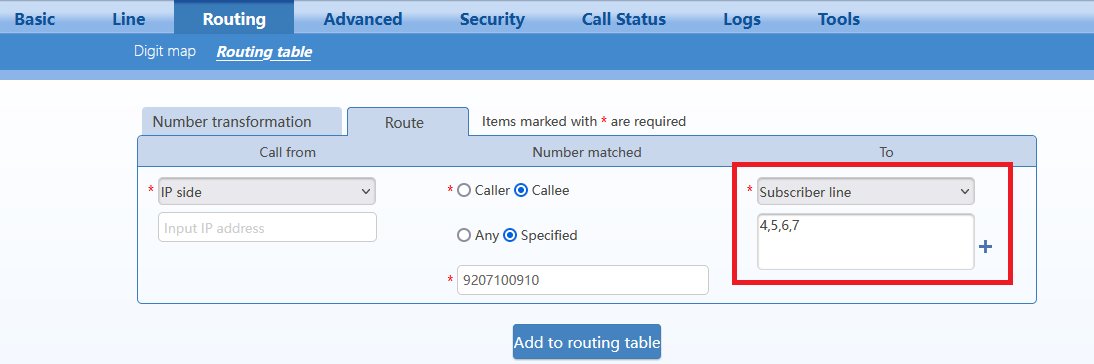
- Navigate to the menu Routing > Routing table.
- From the "Call from" field select "IP"
- In the Number Matched menu select "Callee" and select "Specified"
- In the field that has the message grayed out 'Input the prefix or number to be matched' enter the DID you would like to route
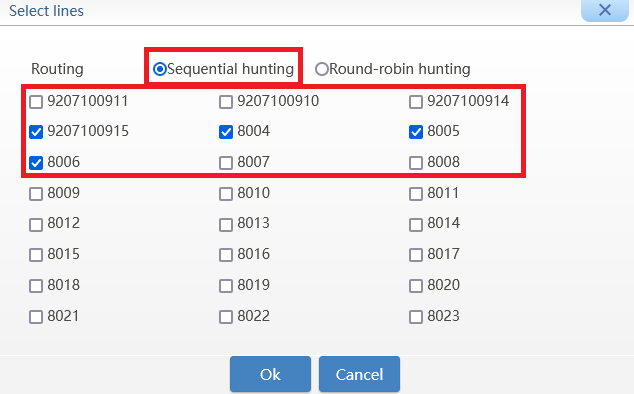
- In the "To" select 'Subscriber line" click on the plus sign to select the ports you would like to use.
- Select the ports and the hunting strategy: Sequential hunting or Round-robin hunting
- Click on OK and the To section will be updated as follows.
- Click on Add to routing table.
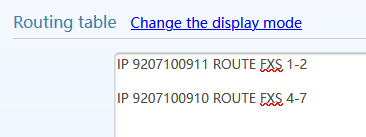
- When done you will see the new rule entered in the routing table.
- Save the changes
- In our example we are routing the DID 9207100910 to the FXS ports 4 to 7.
Faxing
Although the best choice for Faxing over the internet would be to use a device or service specifically designed for faxing a fax machine can be connected to the FXS Gateway. For this to work with the ClearlyIP Trunks you may need to change the default FoIP Settings in the gateway. The below settings have been successful for receiving faxes directly to a Fax Machine however they may need to be changed for one's own application and hardware. No other changes needed to be made to send faxes from the fax machine.
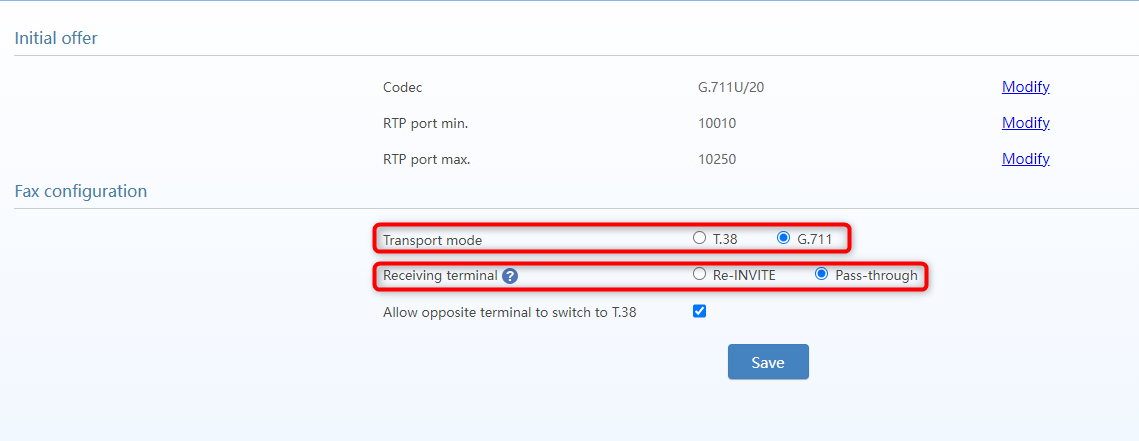
- Navigate to the menu Basic > FoIP - Fax Configuration.
- Set the Transport Mode to G.711
- Set the Receiving Terminal option to Pass-through
![]()
 Uploading ....