Overview
The following guide should work for all Adtran TA900 series T1/PRI Gateways such asFor this example we will be configuring a TA916
Information gathering
You will need to retrieve the following information from Clearly IP Trunking portal for the location you want to connect the device to.- SIP Credentials
- Username - SIP Username
- Password - SIP Password
Review this wiki on how to get the above information here You will also need a public IP address and gateway address from an ISP to assign to the ATA's interface that the SIP trunk will be using.
Connect to the ATA on its default network
Power up the ATA - The default IP Address of the TA900 series ATA's is 10.10.10.1/24 there is a DHCP server enabled by default. Connect to the ATA's Ethernet port to obtain an IP Address or assign your device a static ip address on the same 10.10.10.0/24 network. Note: If you are connecting to a TA900 e-series ATA with 3 network interfaces connect to the GI 0/1 interface.
Logging In
Navigate through your web browser to the default IP address of 10.10.10.1 on the same network where the ATA is connected.- Log into the web GUI. Default Username of "admin" password of "password"
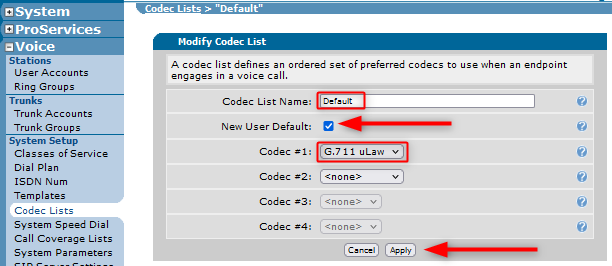
Navigate to Voice >System Setup > Codec Lists
Codec List Name - Name your Codec List (In the below example Default is used)
New User Default - check to enable as a default codec
Codec Choices - Add G.711 uLaw and any other choices you need
Click on Apply to create the Codec List
Configure the SIP Trunk
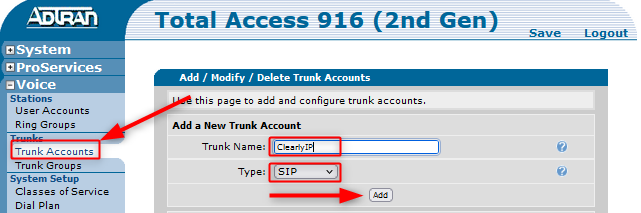
Navigate to Voice > Trunk > Trunk Accounts
- Trunk Name - Name your SIP trunk (This name descriptive for the Adtran in the example below ClearlyIP is used)
- Trunk Type - Choose type SIP
- click on Add - This will open the trunk configuration
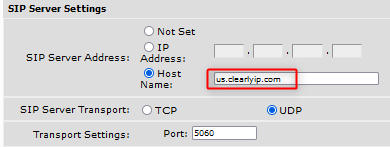
SIP Server Settings
- SIP Server Address - Enter us.clearlyip.com
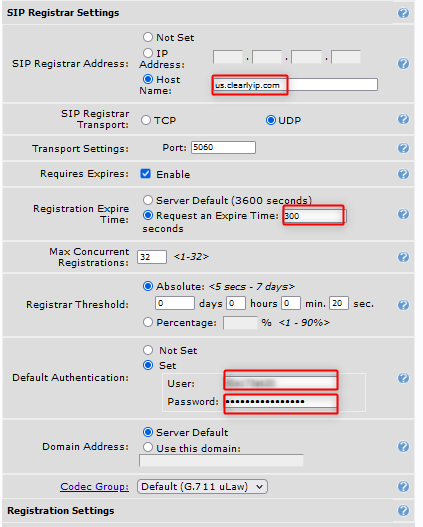
SIP Registrar Settings
- SIP Registrar Address - choose host and enter us.clearlyip.com
- Registration Expire Time - set to 300
- Default Authentication - choose Set
- User - Enter SIP Username from SIP Credentials
- Password - Enter SIP Password from SIP Credentials
- Apply at the bottom of the page, and click save on the top to save the configuration
Registration Settings
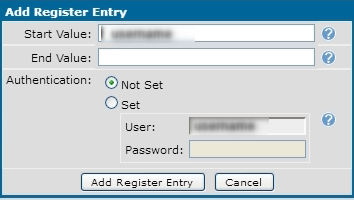
- Click on Add Registry Entry - This will open a dialogue box
- Start Value - Enter Enter SIP Username from SIP Credentials
- Under Authentication Click on the Set Radio button
- User - Enter SIP Username from SIP Credentials
- Password - Enter SIP Password from SIP Credentials
Configure the SIP Trunk Group
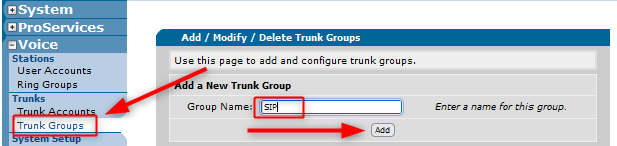
Navigate to Voice > Trunk > Trunk Accounts
- Group Name - name your SIP trunk (This name descriptive for the Adtran in the example below ClearlyIP is used)
- click on Add - this will open the trunk configuration
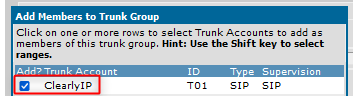
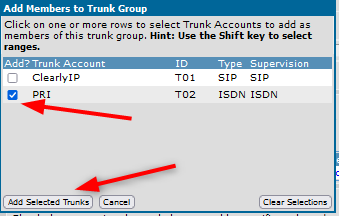
- On the next page select Add Members
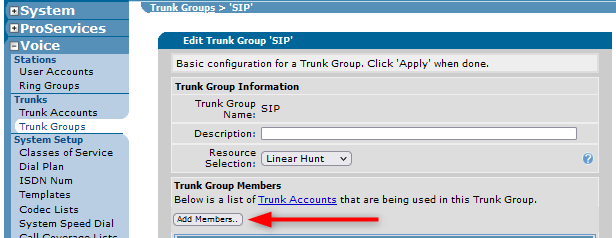
- Add the SIP Trunks you created in the previous steps
- Choose the SIP Trunk
- Click on Add Selected Trunks
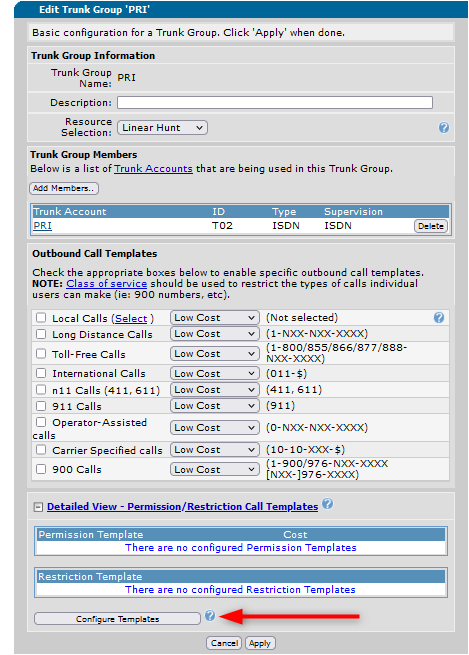
Select outbound Call Templates that will be used for this trunk group. Apply and Save
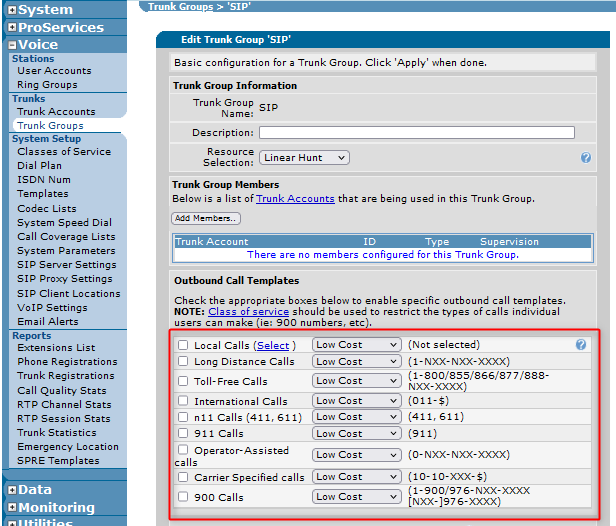
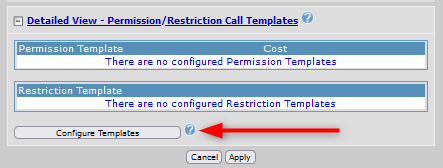
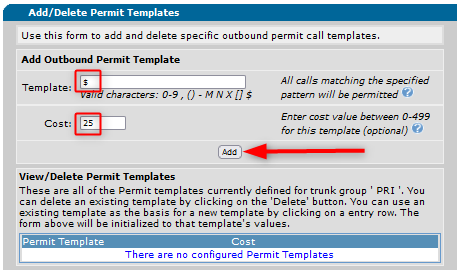
Permission Template
- Click on Configure Templates
Template - add the "$" wild card
Costs - add a cost number of "25"
Click on Add
Configure a PRI Trunk
Configuring a PRI Trunk takes place in 4 parts Configuring the T1 interface, configuring the PRI, configuring a PRI Trunk Accont, and configuring a PRI Trunk group
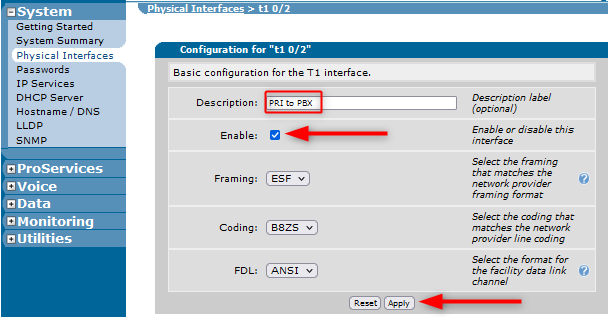
Configure the T1 interface
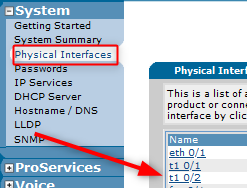
- Navigate to System > Physical Interfaces > t1 0/2
This will take you to the "T1 0/2" interface configuration page.
Basic Configuration
- Description - Enter a description
- Enable - choose Enable
- Click on Apply
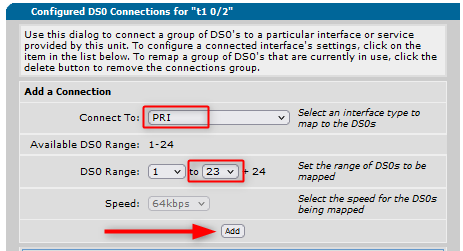
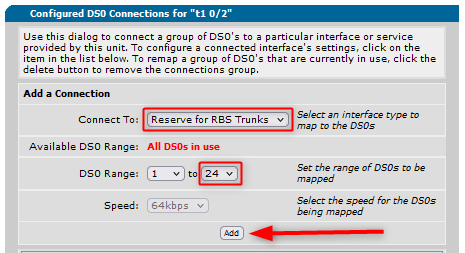
Configured DS0 Connections
- Connect To - Choose PRI in the drop-down menu.
- DS0 Range - Specify the appropriate DS0 using the drop-down boxes. Note: DS0 24 is automatically configured because it is the D-channel for the PRI.
- Click on Add to go to the ‘PRI Configuration’ page.
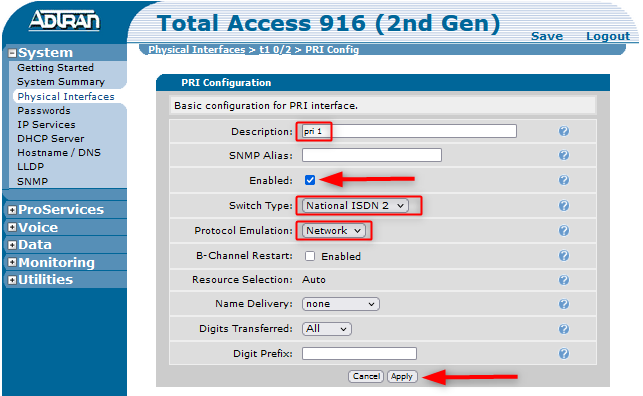
PRI Configuration
- Description - Enter an optional description
- Switch Type - Configure the appropriate switch type to be used (We will use ISDN 2)
- Protocol Emulation - Set to Network
- Click on Apply and Save
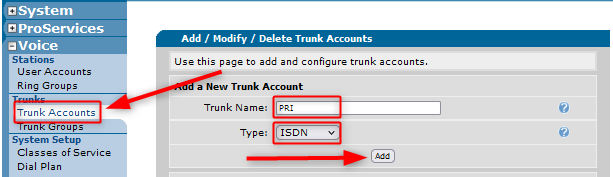
Configuring the PRI Trunk Account
Navigate to Voice > Trunk > Trunk Accounts
- Trunk Name - name your PRI trunk (This name descriptive for the Adtran in the example below PRI is used)
- Trunk Type - choose type ISDN
- click on Add - this will open the trunk configuration
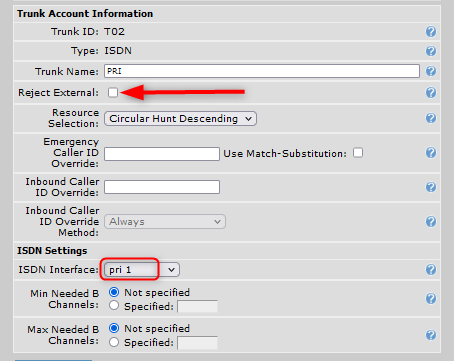
Trunk Account Information
- Reject External - Unchecked
- ISDN Interface - Select the appropriate ISDN interface from the drop-down menu
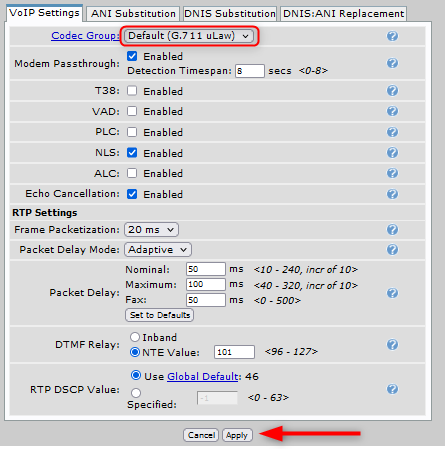
Voip Settings
- Codec Group - Select the Appropriate Codec Group from the Drop-down menu
- Click on Apply and Save
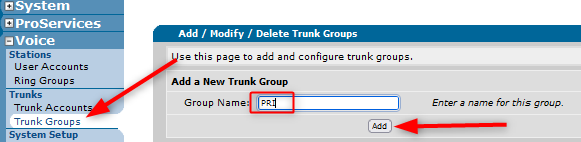
Configuring the PRI Trunk Group
Navigate to Voice > Trunk > Trunk Accounts
- Group Name - name your SIP trunk (This name descriptive for the Adtran in the example below PRI is used)
- click on Add - this will open the trunk configuration
- On the next page select Add Members
- Select the PRI Trunk
- Click on Selected Trunks
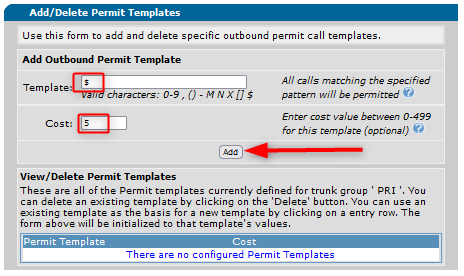
Permission Template
- Click on Configure Templates
Template - add the "$" wild card
Costs - add a lower number than the SIP Trunk "5"
Click on Add
Configuring a T1 Trunk
Configure a T1 port on the TA 900 Series ATA for a T1 to be connected to a PBX. Configuring the T1 interface takes place in 4 parts, configuring the T1 interface, configuring the RBS, configuring a PRI Trunk Account, and configuring a PRI Trunk group
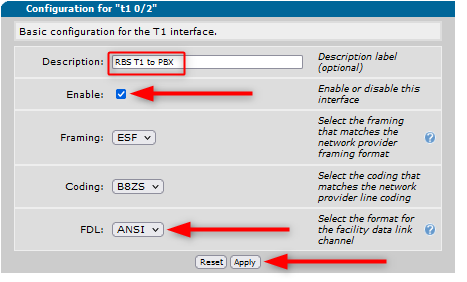
Configure the T1 interface
- Navigate to System > Physical Interfaces > t1 0/2
This will take you to the "T1 0/2" interface configuration page.
Basic Configuration
- Description - Enter a description
- Enable - choose Enable
- FDL - choose ANSI
- Click on Apply
Configured DS0 Connections
- Connect To - choose Reserve for RBS Trunks
- DS0 Range - Specify the appropriate DS0 using the drop-down boxes.
- Click on Add to go to the ‘PRI Configuration’ page.
Note: This will create a specific TDM group for each DSO selected in the range. If this is not the desired behavior, changes will need to be made via the Command Line Interface
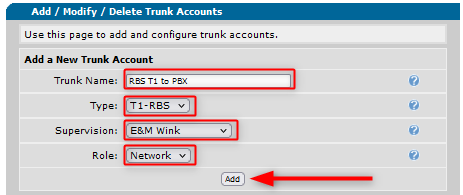
RBS Trunk Account Configuration
Navigate to Voice > Trunk > Trunk Accounts
- Trunk Name - name your T1 trunk (This name descriptive for the Adtran in the example below RBS T1 to PBX is used)
- Trunk Type - choose type T1 - RBS
- Supervision - E&M Wink
- Role - Network
- click on Add - this will open the trunk configuration
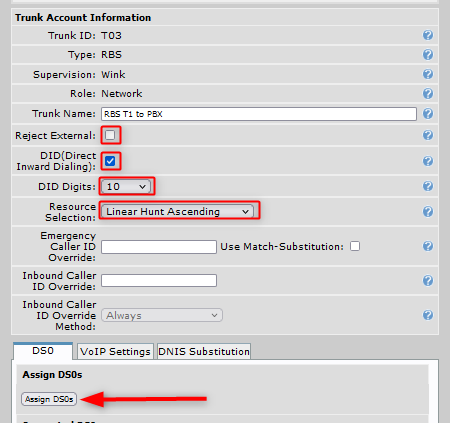
Trunk Account Information
- Reject External - Unchecked
- DID - Select If DTMF digits are needing to be sent to the CPE when an inbound call is made
- DID Digits - If Direct Inward Dialing is enabled, you need to specify the number of digits to be sent to the CPE on an inbound call
- Resource Selection - The way that a DS0 is allocated for a call can be configured to be ‘Linear’ or ‘Circular’. With ‘Linear’ the lowest available DS0 is used. With ‘Circular’, the next DS0 in line is used.
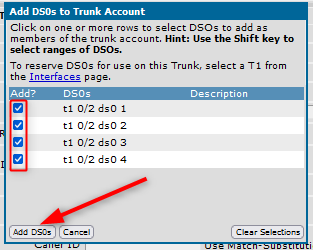
- Click on Assign DS0s
Check all of the DS0's to add to the Trunk Account
Click on Add DS0s
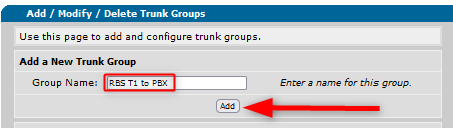
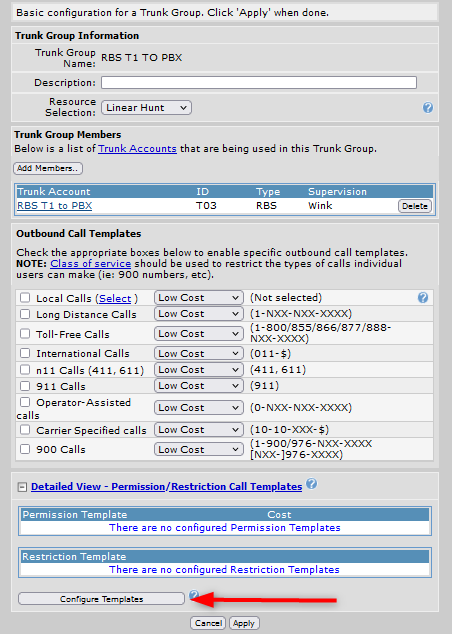
Configuring the T1 Trunk Group
Navigate to Voice > Trunk > Trunk Accounts
- Group Name - name your SIP trunk (This name descriptive for the Adtran in the example below RBS T1 to PBX is used)
- click on Add - this will open the trunk configuration
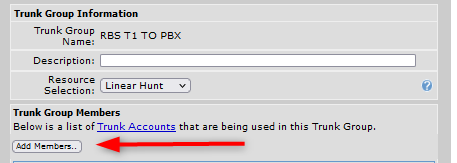
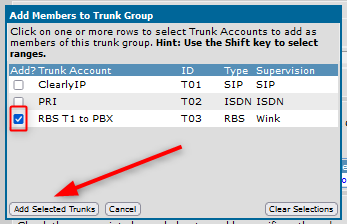
- On the next page select Add Members
- Select the PRI Trunk
- Click on Selected Trunks
- Click on Configure Templates
- Template - add the "$" wild card
- Costs - add a lower number than the SIP Trunk "5"
- Click on Add

Network - Changing the IP Address
Change The IP Address and default gateway on the ATA to the IP address given to you from the ISP provider
Warning: if you are connecting straight to the ISP you will want to take steps to secure your ATA which will be covered later in the documentation
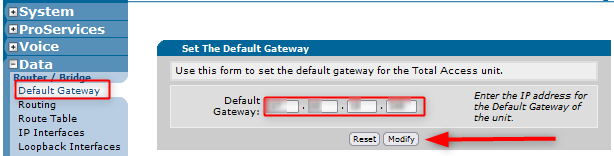
Default Route - Change this first so you do not lose network connectivity until you are ready to connect to the ISP
Navigate to Data > Default Gateway
- Default Gateway - Enter the IP of the default gateway
- Click on Modify
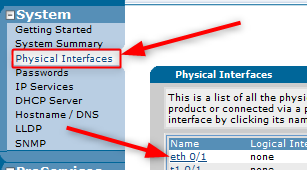
Change IP Address for eth 0/1
Navigate to System > Physical Interfaces > eth 0/1 (or gi 0/1 if wanted in the TA 900 e series)
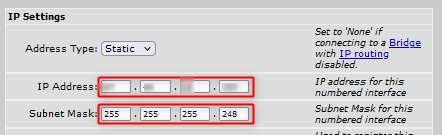
IP Settings
IP Address - Enter the IP Address from the ISP
Subnet Mask - Enter the Subnet mask of the ISP network
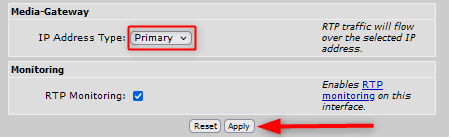
Set Media-Gateway
IP Address Type - Primary
Click on Apply and Save
Note: if this is an ATA with only one network interface (non e series) you will need to connect to the ISP and navigate to the new IP address or you can connect by assigning your device an IP address on the same network
Secure your ATA
Change your passwords
In order to change the password of the admin user you must either use the cli interface with SSH or you will need to download the configuration, change the password and save the configuration, then upload the configuration. This can be done in Utilities > Configuration
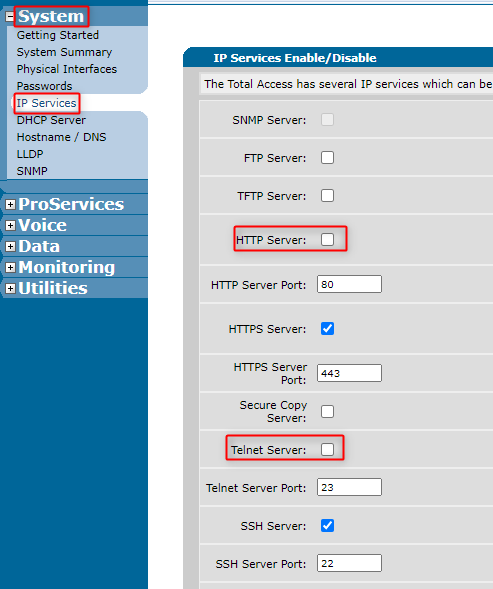
Disable Unnecessary Services
Navigate to System > IP Services
- Disable HHTP Server
- Disable Telnet Server
Add Firewall Security Zones and ACL's
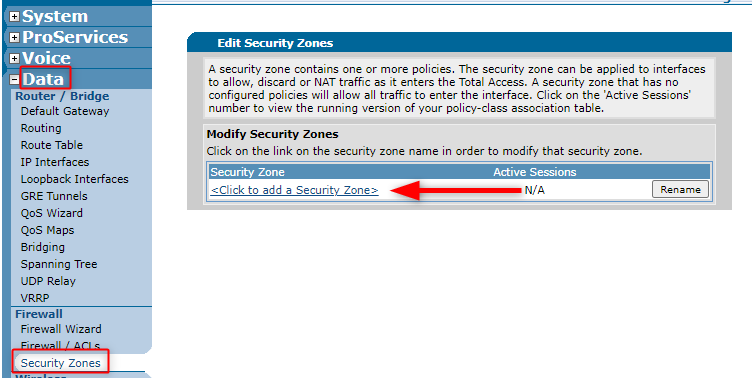
Add a Security Zone
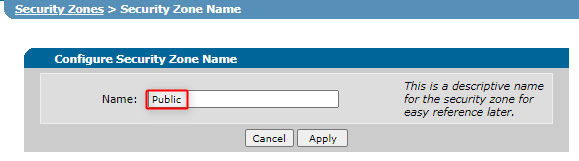
Navigate to Data > Security Zones
- Click Add a Security Zone
- Name: Add a name for your security zone
Add a Policy to the Zone for SIP Traffic- Click Add Policy Zone to 'Public'
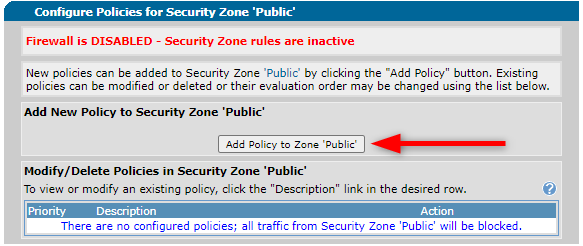
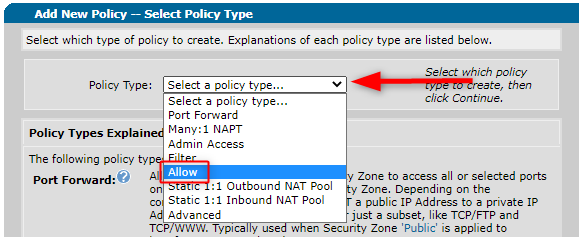
- Choose policy type allow in the dropdown
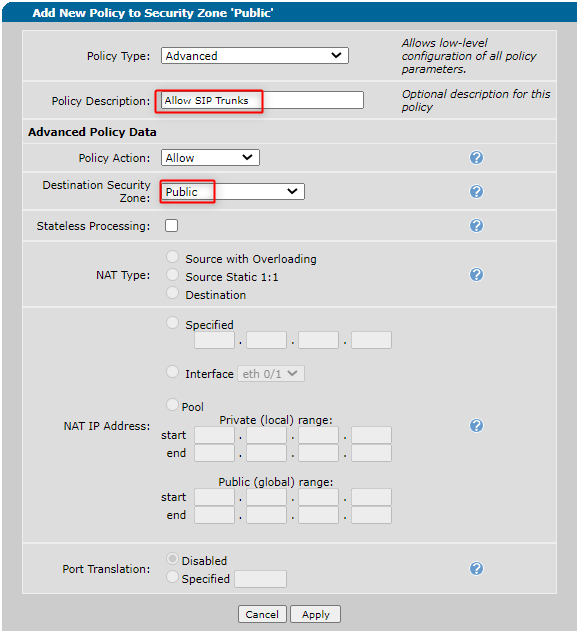
- Policy Description: Enter a Description such as "Allow SIP Trunks"
- Destination Security Zone: In the Drop Down choose Public
- Click on Apply (This will create an extended ACL that will be configured later)
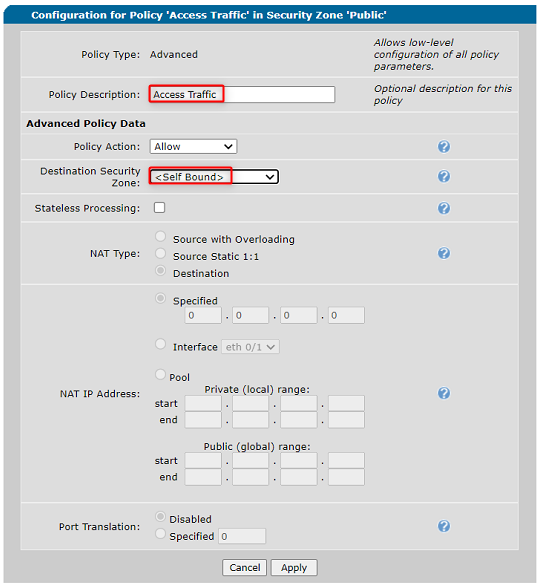
Add a second policy the Zone for Accessing the Adtran
- Click Add Policy Zone to 'Public'
- Choose policy type allow in the dropdown
- Policy Description - Enter a Description such as "Access Traffic"
- Destination Security Zone - In the Drop Down choose Self Bound
- Click on Apply (This will create an extended ACL that will be configured later)
Configure Extended ACLs for the Policys
Navigate to Data > Security Policy > Public
Add Traffic Selectors to the SIP Traffic Security Policy
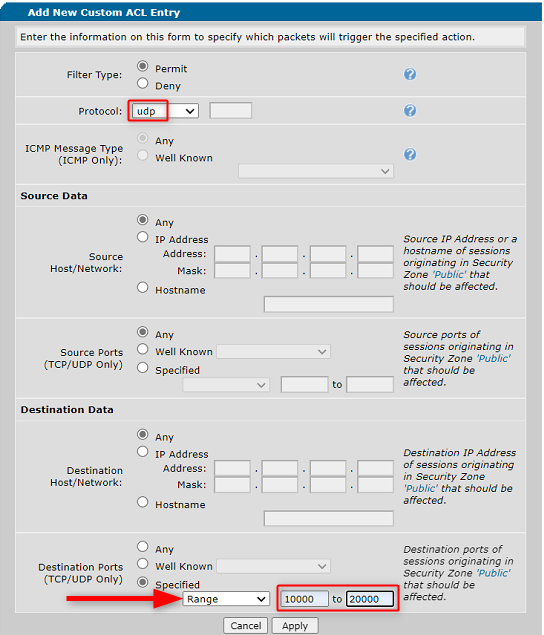
- Scroll down and click on Add New Traffic Selector

- Protocol - Choose UDP in the drop down
- Destination Ports - Check Specified and Choose Range in the drop down
- Enter 10000 to 20000 (for RTP traffic)
- Click on Apply
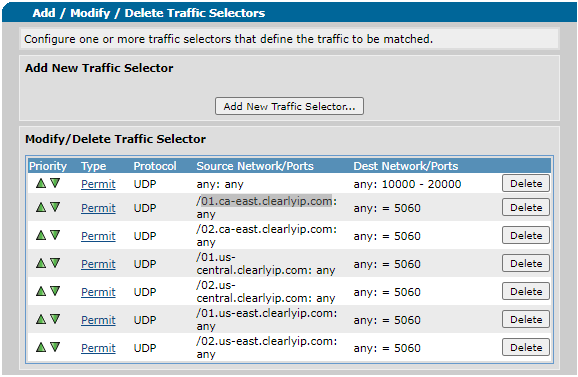
Add 6 Traffic Selectors for Clearly IP SIP registration servers which are:
1.us-east.clearlyip.com
2.us-east.clearlyip.com
1.us-central.clearlyip.com
2.us-central.clearlyip.com
1.ca-east.clearlyip.com
2.ca-east.clearlyip.com
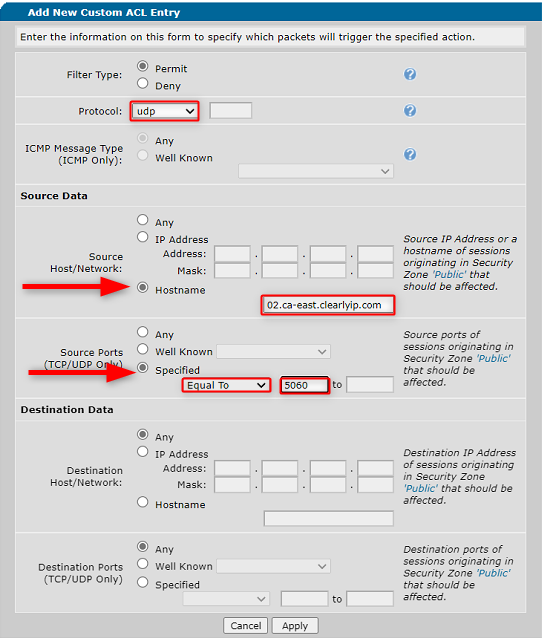
- Click on Add New Traffic Selector
- Protocol - Choose UDP in the drop down
- Source Host/Network - Choose Hostname
- Hostname - Enter 01.ca-east.clearlyip.com
- Source Ports - Choose Specified
- Choose Equal To in the drop down
- Enter 5060
- Click on Apply
After adding all of them your SIP Traffic Policy should look like the below Example:
Add Traffic Selectors to the Access Traffic Security Policy
- Scroll down and click on Add New Traffic Selector

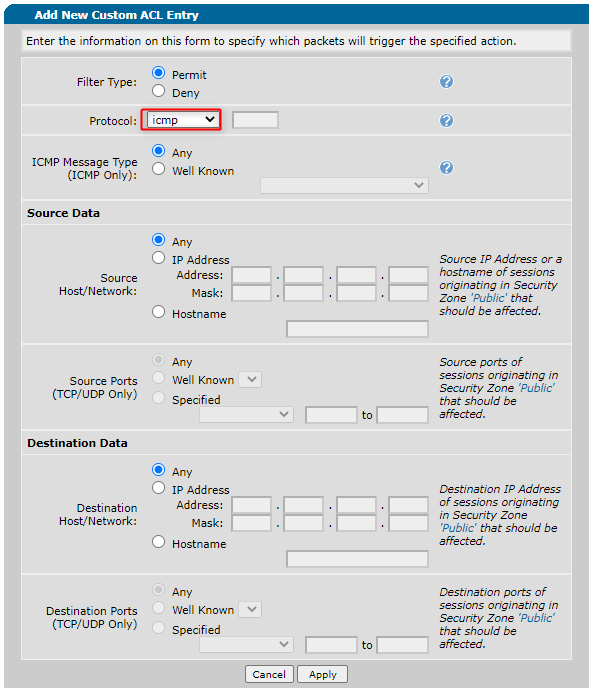
Create a Selector for Ping
- Protocol - Choose icmp in the drop down
- leave the rest set to Any
- Click Apply
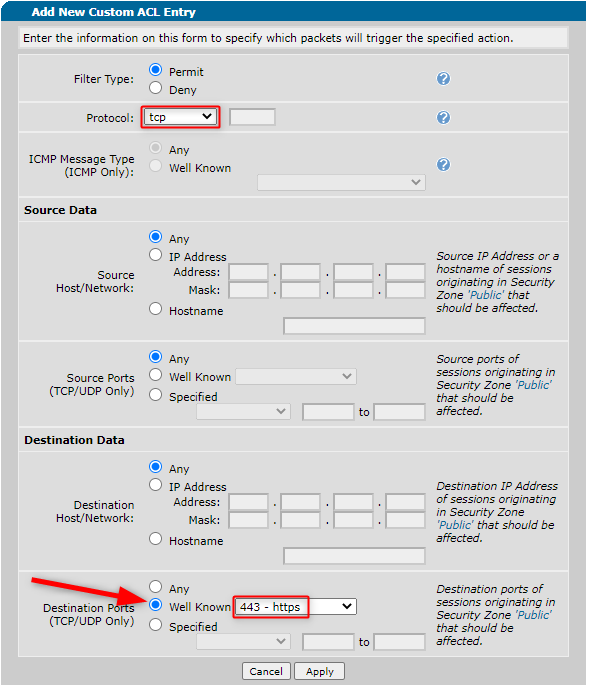
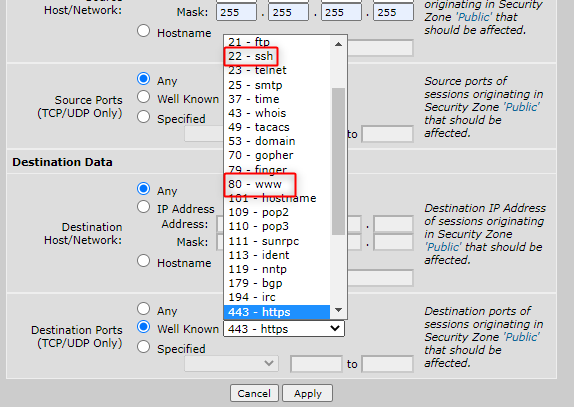
Create a Selector for HTTPS
- Click on Add New Traffic Selector
- Protocol - Choose TCP in the drop down
- Destination Ports - Choose Well Known
- Choose 443 - https from the dropdown
- Click Apply
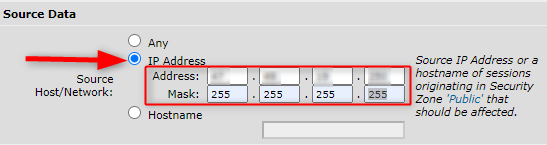
Note: if you want to secure this to specific IP addresses you can create a separate traffic selector for each IP address that you want to allow and fill in the Source Host /Network section with the ip or hostname you want to allow.
Other Traffic Selectors you may want to enable temporarily or for specific IP addresses may include Well Known Destination ports for SSH or WWW
Enable the Firewall
Once you are certain the Security Policies have the access you want allowed you can enable the firewall and assign the policy to an interface.
Note: All traffic that is not listed in the security policies will be blocked and you may need to use a console session to disable the firewall if you are locked out
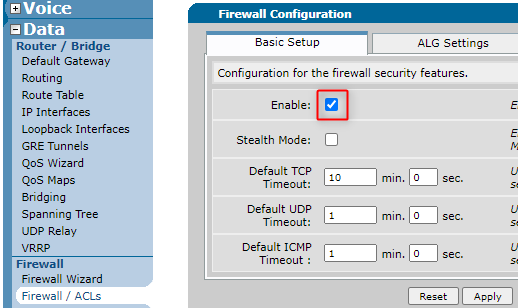
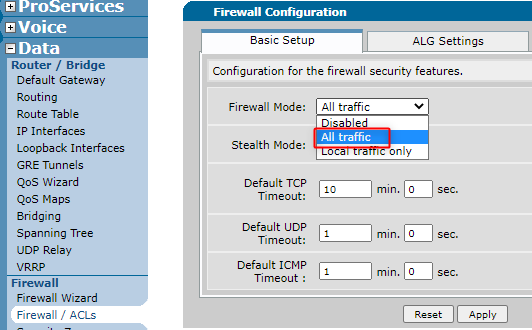
Navigate to Data > Firewall > Firewall/ACLs
Depending on your Adran type you may see Firewall mode or just an enable option
- Check Enable and Apply or All Traffic and Apply
Set the Security policy on the ethernet interface
Navigate to Data > Firewall > Security Policies
- choose the Security Zone from the dropdown
Save your configuration.
 Uploading ....