Setting Up Apache Authentication
Note: If your FreePBX® based system is Registered AND Licensed for System Admin Pro from Sangoma you can set this up via the Web Admin GUI.
For manual configuration without System Admin Pro module from Sangoma see Below
Create an apache user
- SSH into your PBX using an ssh client like PuTTy and make sure you have root/sudo access.
- Use the htpasswd command to create the Apache User password file
- htpasswd -c <password file location> <username>
Example: htpasswd -c /etc/httpd/phoneuser.auth phone

- When prompted enter your desired password, it will ask you twice to make sure you typed it correctly.
You should see a "Adding password for user phone" message confirming your password was added. If not repeat the command.
Note: Make sure you remember this password as you may have to manually enter it on the phones and in to the ClearlyIP Devices module.
Change an existing apache user's password
- SSH into your PBX using an ssh client like PuTTy and make sure you have root/sudo access.
- To change an existing users password it's the same command without the "-c" flag
- htpasswd <password file location> <username>
Example: htpasswd /etc/httpd/phoneuser.auth phone
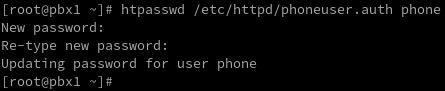
- When prompted enter your desired password, it will ask you twice to make sure you typed it correctly.
You should see a "Updating password for user phone" message confirming your password was added. If not repeat the command.
Note: Make sure you remember this password as you may have to manually enter it on the phones and into the ClearlyIP Devices module.
FreePBX is a registered trademark of Sangoma Technologies
 Uploading ....