The Guest Management Modules are where you Configure Guest Specific services such as the Guest Extensions, Guest Speed dial translations, wakeup calls and the interfaces for connecting to a Property Management System and Call Accounting Services.General Settings
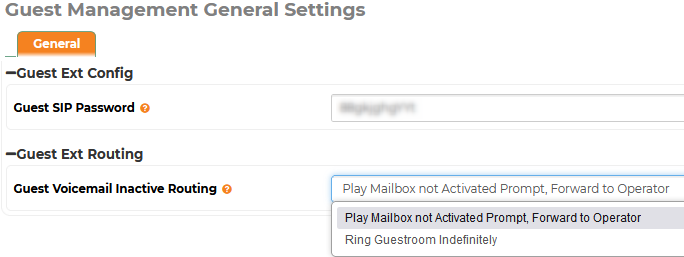
This is where the default universal Guest SIP Password and the default Guest Voicemail Inactive Routing can be configured.
Navigate to Guest Management > General Settings
- Guest SIP Password - this is the SIP password associated with all guest extensions.
- Guest Voicemail Inactive Routing - If a guest room has an inactive voicemail box due to the room being checked out should the room ring indefinitely or should it play a prompt and send the call to the front desk
- Note: Guest Voicemail boxes are cleared and disabled when the room is checked out
Guest Extensions
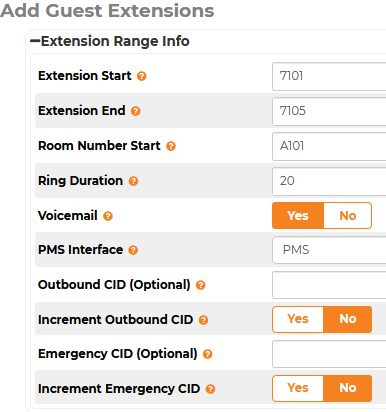
The Guest Extension module is used to create the guest extensions and assign them to a PMS Interface
Navigate to Guest Management > Guest Extensions - Click on Add Guest Extensions
- Extension Start - Guest extensions can be added in a range or one at a time, each will need an entry in the Extension Start field
- To Add a single Extension you can just add it in the Extension Start field and leave the Extension End field blank
- Extension End - To Add guest extensions in a range enter the extension to end with in the Extension End field
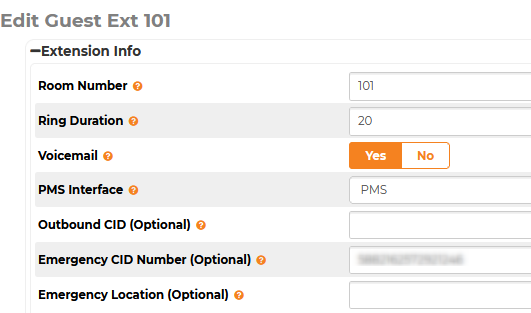
- Room Number Start - The room number will be sent over in the caller id for the guest. this can match the extension or if the extension is not the same as the room number (4 digit extension and 3 digit room number) you can enter the room number here and it will increment along with the extensions. You can also prefix the room number with a letter if needed.
- Ring Duration - How long should the extension ring before going to voicemail (if enabled)
- Voicemail - Enable or disable voicemail for the extension(s)
- PMS Interface - choose which PMS the extension is associated with. As you add the extensions you can associate them with a specific PMS this is very helpful for a dual brand or multi flag property.
- Note: There is only a single default PMS interface. For dual brand properties you will want to create the PMS interface before adding the extensions so they can be assigned as they are created. See <PMS interfaces> for more information
- Outbound CID - Optionally you can add a specific DID for the outbound CallerID
- Increment Outbound CID - If adding an Outbound CallerID to a range of extensions and they have a DID per extension you can use this to increment the number by one
- Emergency CID - Optionally you can add a specific DID for the outbound CallerID when a dial pattern associated with an emergency route is dialed.
- Increment Emergency CID - If adding an Emergency CallerID to a range of extensions and they have a DID per extension you can use this to increment the number by one
Once the extensions are added you can see the list of extensions and edit individual extensions by clicking on the edit action icon on the right
Guest Speed Dials
The Guest Speed Dial Module is a translation table for dialed numbers from the guest dial plan to be forwarded to a different number in the ComXchange. You can take a number that is hard coded into an analog phone speed dial button such as *9301 and have that dial the feature code for Wake Up calls *56. This is available so that hard coded speed dial buttons will not need to be reprogrammed to be used with the ComXchange.
To Add a Speed dial:
Navigate to Guest Management > Guest Speed Dials
- Click on + Add Guest Speed Dial
- Speed Dial Name - Enter a Speed Dial Name to reference the speed dial
- Speed Dial Code - Enter the Code as it is dialed by the speed dial button on the phone
- Note: you can find the number by dialing the speed dial and looking in the Call Event Logging (CEL) Reports, if you are not seeing anything in the CEL and the phone is connected to a gateway, you may need to log into the gateway's web GUI to look and the call message logs to see what is being dialed
- Destination - Enter the number or feature code that you would like the speed dial button to call. This is usually the front desk, voicemail, and wakeup calls but can be used to dial other destinations as well.

Interfaces
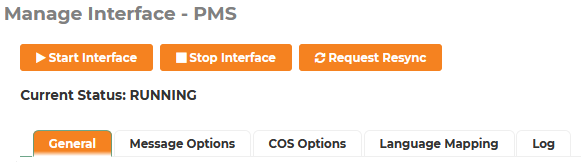
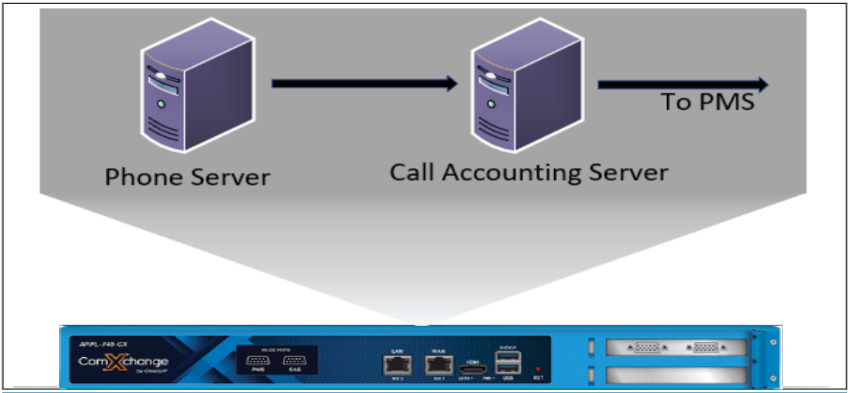
The Interface Module is used to set up communications between the ComXchange server and a Property Management System (PMS) server or a Call Accounting server. There are two interfaces that have been created by default, an SMDR interface and a PMS interface. The SMDR interface is configured to connect to the onboard Call Accounting server and The PMS interface is configured to connect to a PMS server with the default serial connection of Com Port 0. In the Interfaces Module you can edit or create new interfaces, start a room status test, or use the Check-in All button to set all guest rooms to a checked-in status with a unrestricted class of service in the case there is no PMS available. To make changes to the default interfaces you can click on the edit action icon on the right side. From the main page of the interface you can Start, Stop, Request a Resync, or Manage the interface through the different Tabs. The ComXchange can have multiple PMS interfaces to connect to different PMS providers, this is necessary in hotels that are dual branded. You can then choose which PMS provider the room is associated with. It is suggested that you create any interfaces needed before adding the guest room extensions so they can be associated with the correct PMS when you add them
To Edit or create new Interfaces:
Navigate to Guest Management > Interfaces
- To add an Interface click on the + Add Interface Button
- to configure an existing interface click in the Edit Action icon on the right
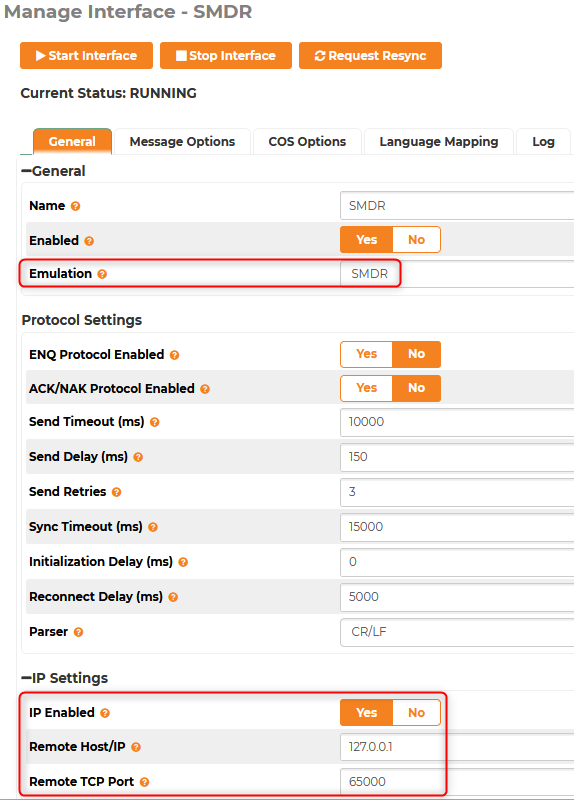
SMDR Interface
The Station Message Detail Records (SMDR) interface is used to monitor incoming and outgoing calls. It takes the raw call data and by default sends that data to the onboard Call Accounting Server. The Call Accounting server will then take the SMDR records and analyze whether the call is a chargeable call or not and if it is send it on to a connection to the PMS for Call Accounting Data. More information about call Accounting can be found here <CA Page to be added>
General Tab
The General Tab will have default settings to communicate with on board Call Accounting server. By default it is set to the SMDR emulation and to send the SMDR records to the IP of 127.0.0.1 port 65000 where the Call Accounting server is listening to receive the data. The Communication settings can be changed to send the SMDR to another server or over a serial port. To see the Com Port settings set the IP Enabled setting to no.
Message Options Tab
The default settings in the Message Options Tab do not usually need to be changed, they are set to send PBX UP and Down Messages to the Call Accounting server and to process Outbound and Internal calls.
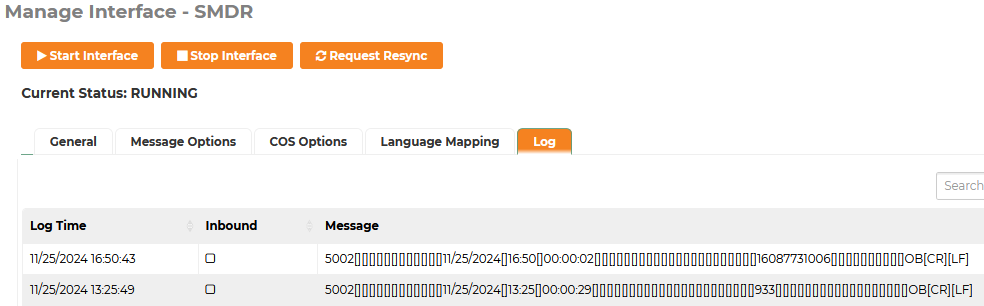
SMDR Log Tab
The Log tab allows you to see the SMDR messages that are being sent to the Call Accounting Server.
PMS Interface
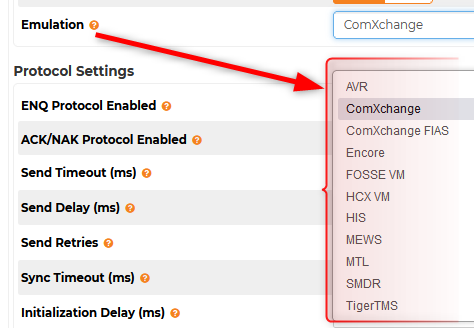
The PMS interface is a communication interface with a Property Management System (PMS) that allows the PMS to send check-in, check-out, and call restriction information to the ComXchange and the ComXchange to send Room status updates that are entered from a guest room phone. If using a Fidelio Interface Application Specification (FIAS) emulation there can be extra communication between the PMS and the ComXchange such as setting wakeup calls and sending Call Accounting data along with other PMS information over a single interface. The default PMS interface is set up with the ComXchange Emulation and to communicate to the PMS with the Serial port, Com Port 0. The ComXchange PMS interface will always be a client to the PMS so the ComXchange will initiate the communication. In its default configuration the ComXchange will send an ENQ to the PMS and will expect to receive an ACK back from the PMS System. This Acknowledgement is the first sign the two sides are communicating.
General Tab
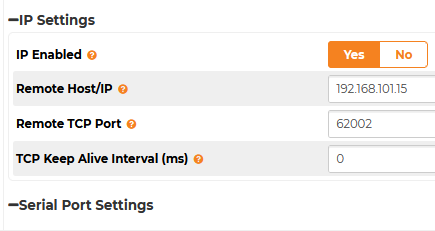
The defaults in the General Tab will usually work without making changes when connecting the Comxchange interface using a serial connection. If the PMS that you are connecting to requires different parameters such as not using ACK/NAK or ENQ (usually this is just with a FIAS interface) they can be set to No. The serial settings such a Baud rate, data bits, etc can be changed in the Com Port Settings Section. Finally you can adjust the communication parameters to use IP or Serial. To enable the IP settings Set the IP Enabled parameter to Yes, this will hide the serial port settings and allow you to enter the IP address and port that will be used to communicate with the PMS. If the interface is using IP or a very long serial cable with a low baud rate you may need to adjust the timers to allow for the communication to travel both directions and be processed.
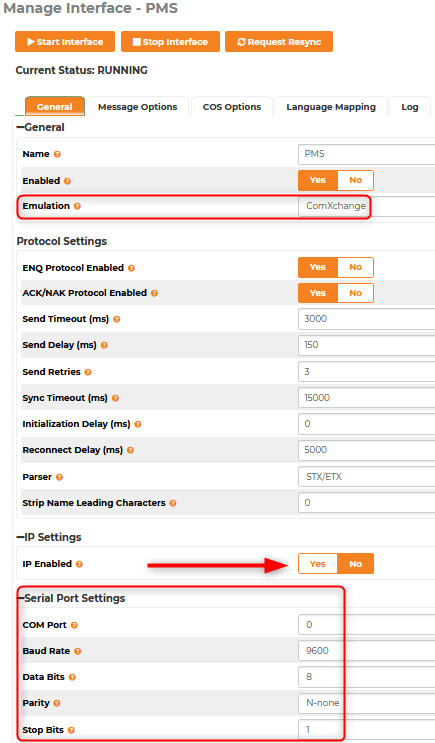
There are different options of emulation that can be chosen in the emulation dropdown. These options can be used to connect to different types of PMS servers and in some instances we can emulate a phone system that is being replaced such as the Mitel (MTL) emulation.
Message Options Tab
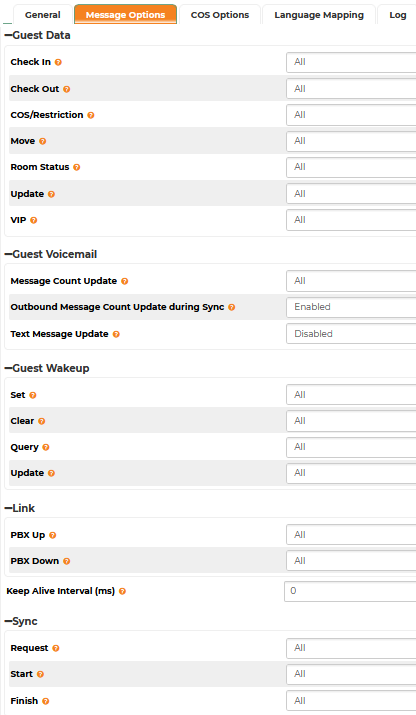
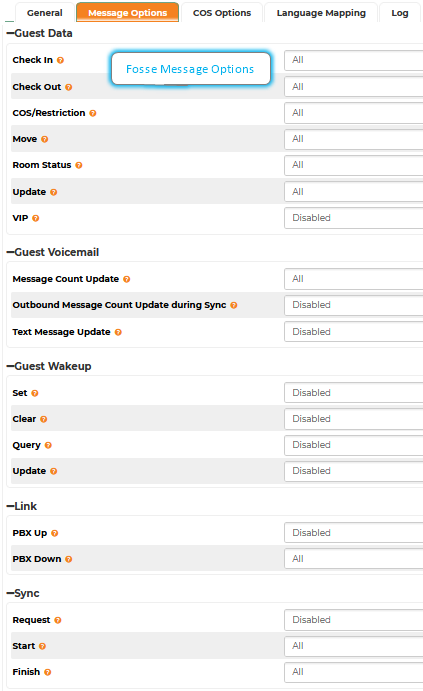
The Message Options Tab allows you to choose which messages are enabled, disabled, or only available for inbound or outbound. Any changes that you would need to make will be dependent on the PMS that is being connected to. The Fosse PMS is one that requires many of the options to be disabled for communication to work properly.
COS Options Tab
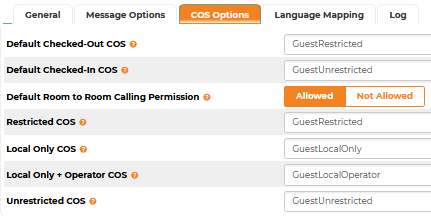
The Class of Service Options allows you to set what the default checked-in and checked-out Class of Service is for guest rooms. You can set the Default Room to Room Calling Permissions behavior to Allowed or Not Allowed depending on the hotel's preference. This allows calls to guest rooms to be denied at a room (extension) level if room to room calling is a desired default behavior but needs to be restricted sometimes or could be set to the opposite with the default set to be restricted and sometimes changed to allowed. The Guest class of service options can also be mapped to other Class of service restrictions if needed. This would also allow the use of a custom Class of service to be used as default for Checked-In, Checked-Out, etc.
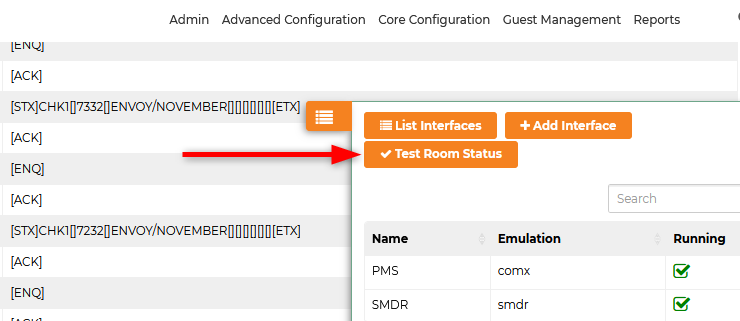
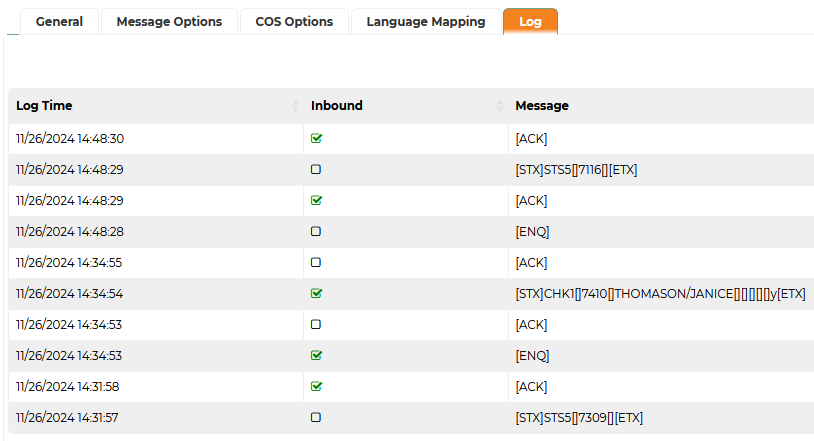
The Log tab is where you can see the messages that are sent to and from the PMS. You should see messages Inbound with CHK1 with a name if using the ComXchange Emulation, and there would be a CHK0 for Check out. The Inbound messages are noted with a green checkmark in the logs. Room Status messages will be outbound and they will contain the letters STS followed by a single digit then followed by the room number. A room status code can be keyed in from a guest room by dialing the room status feature code of *2 followed by a single digit. This is the digit that you will see in the logs. below you can see status messages for rooms 7116 and 7309 with a status of 5 for each.

Room Status Test
You can run a room status test by click on the Test Room Status Button on the Guest Settings > Interfaces page or from clicking on the button in the flyout menu.
- Click on the Test Room status Button
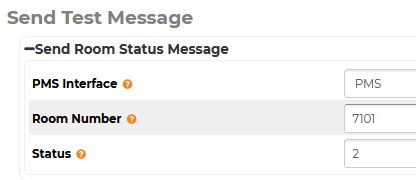
- Choose the PMS that the room is connected (there is only one by default)
- Enter the Room Number
- Enter the status code you want sent over
- Click on Submit to send the status code to the PMS
You should be able to monitor the logs and verify that a STS code was sent outbound followed by an inbound ACK message from the PMS to acknowledge they received it.
Wake Up Calls
The Wake Up Calls Module is where you can configure the wakeup call behavior, what to do in case the a wakeup call fails, and see Logs of what has happened with wakeup calls in the system.
Navigate to Guest Management > Wakeup Calls
Call Settings Tab
- Wakeup Call Ring Duration - set how long in seconds the wakeup call should ring.
- Wakeup Call Attempts - How many times should the ComXchange attempt a wakeup call before considering it a failed wakeup call
- Interval Between Attempts - Set how long in minutes the the Comxchange should wait before sending the next attempt
- Allow Snooze - enable or disable calls snoozing for 10 minutes
- Allow reoccurring - allow or disallow wakeup calls to be set for the duration of the guest stay until checkout.
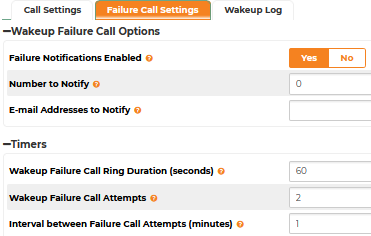
Failure Call Settings Tab
You can configure the Comxchange to send a notification call to a destination if a wakeup call exhausts it attempts which will be considered a "failed" wakeup call. The ComXchange will call the designated destination and someone will need to answer the call and press 1 to acknowledge the call for the calls to stop. The settings for the notifications are below.
- Failure Notifications Enabled - Choose Yes to be notified of failed wakeup calls or No to not use the feature.
- Number to Notify - Enter the number that the ComXchange should call, this is set to dial "0" by default.
- E-mail Address to Notify - Enter an email or emails comma separated to send an email notification of a failed wakeup call.
- It is suggested to use a distribution group if you use the email feature.
- Wakeup Failure Call Ring Duration - how long should the notification ring the destination
- Wakeup Failure Call Attempts - How many times should the ComXchange send a notification call to the destination
- Interval Between Failure Call Attempts - How long in minutes should the ComXchange wait before sending the next failure call attempt
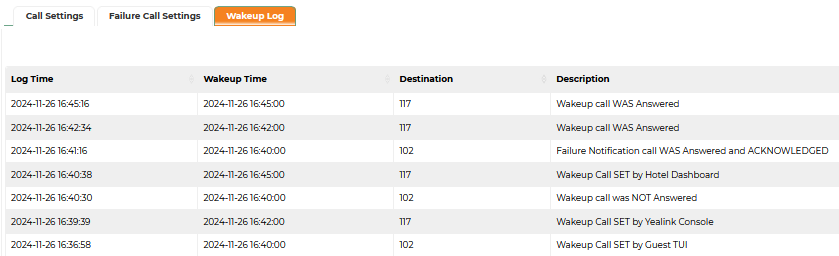
Wake Up Log Tab
This is a log of wake up calls that were set, where they were set such as by the guest TUI or the console "phone" App, or the Hotel Dashboard. The logs will also show the date, time, and number a wakeup call was initiated and whether the call was answered or not.
 Uploading ....