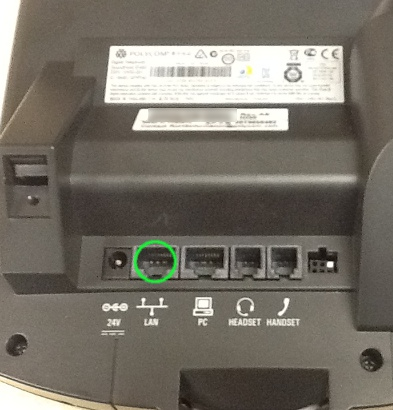
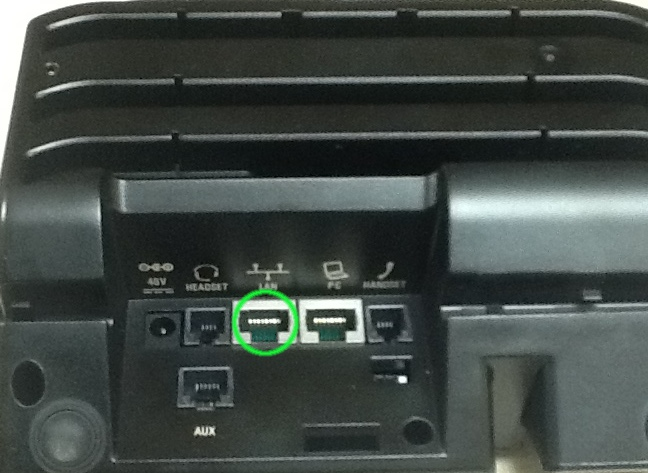
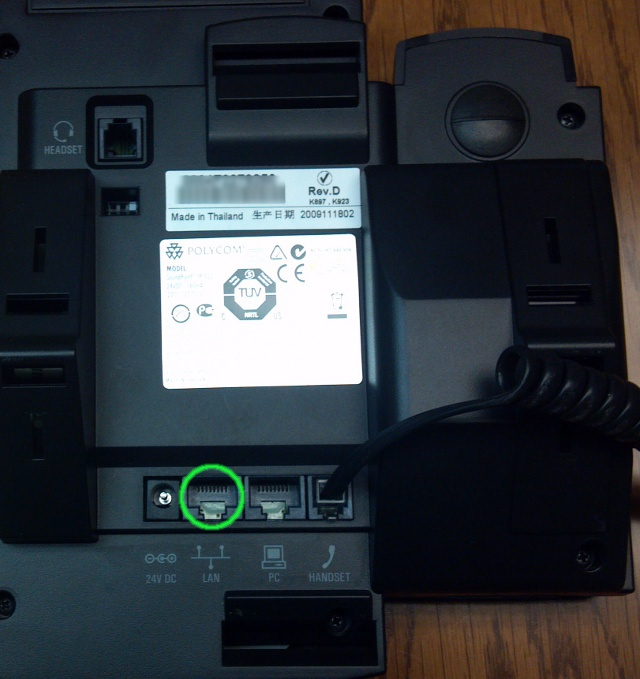
Make sure the network is plugged in to the LAN interface as shown with green circle.
Polycom 450
Polycom VVX500/600
Polycom 335
If logging into the device's web page the user name would be: Polycom (this is a capital P). Note: to setup auto provisioning you normally have to do this from the phone's keypad.
The default administrative password is 456
Add phone to PBX
The first thing needed is to add the device to the PBX service. This will allow the phone to configure automatically. Please see the VoIP PBX Admin Manual for instructions on adding a device on a PBX.
How to find the phone's IP address
- On your phone select the "Menu" key or soft-key
- Press down arrow until you see 'Status' and select it
- Press down arrow until you see 'Network' and select it
- Select "TCP/IP Parameters"
- You should now see the IP address on the display
How to reset the phone to Factory Default Settings
Unless you are sure that your phone has never been setup on another provider, you should always strive for a clean slate.
- On your phone, select the "Menu" key or soft-key
- Settings>Advanced>Administration Settings>Reset to Defaults>Reset To Factory
- "Yes" to confirm
How to configure your phone for Auto Provisioning
note: if your phone is prompting you to change the password, you can enter the 'old' factory password of 456 to a temporary password of 456456 and then the following steps.
- On your phone select the "Menu" key or soft-key
- Settings>Advanced>Admin Settings>Network Configuration
- Set DHCP Menu>set Boot Server to "Static" (you may need to push the right arrow key to scroll through the options)
- Set DHCP Menu>set BootSrv Type to "String" (you may need to push the right arrow key to scroll through the options)
- Set Server Menu>Set the Server Type to "HTTP" (you may need to push the right arrow key to scroll through the options)
- Set Server Menu> Set the Server Address to "vernon.siptalk.com" (For "." is press the "*" key)
- Set Server Menu> Set the Tag SN to UA to Enable
- Save Configuration - The phone should now reboot
- Please test to make sure the phone can make an outbound and inbound call with audio flowing in both directions.
Installing Obihai Technology OBiWiFi5G USB WiFi Adapter (Poly)
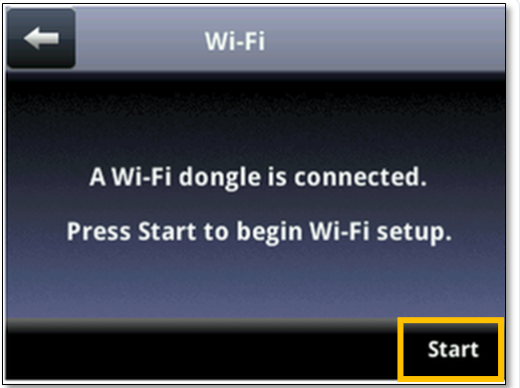
- Insert the ObiWiFi5G USB adapter into the USB port on the VVX phone. Select Start.(check image 1)
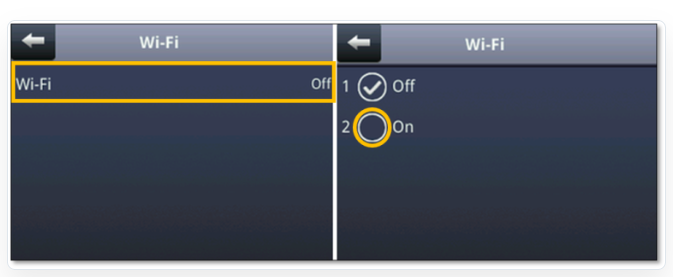
- Select Wi-Fi > ON to reboot the VVX phone.(check Image 2)
- When the VVX phone completes its reboot cycle, navigate to Settings > Basic > Wi-Fi to continue setup.
- After the VVX phone scans for Wi-Fi networks, select the correct network.
- Enter security information (Wi-Fi password) based on the network setup to connect to the Wi-Fi network.
Image1
Image 2
NOTE: If the VVX phone does not automatically scan for networks, select Scan. VVX phones will automatically attempt to connect to saved networks.
Limitations:
- Poly only supports the ObiWiFi5G USB Wi-Fi Adapter.
- The Poly VVX 1500 does not support Wi-Fi USB adapters.
- Video calls are not supported at this time.
- There is not a way to use a USB headset while using the adapter.
- There is not a way to use Wi-Fi and Ethernet at the same time.
How to configure your phone for Auto Provisioning via the phone's web page
If you can log into the phone's web page, you can check the provisioning setup
Under Settings->Provisioning Server:
 Uploading ....