Avaya IP Office
This document is an attempt to help customers configure their Avaya IP Office system with XCast trunking. It is not an exhaustive guide and is limited to only the portions of the system to configure SIP trunks to our service. The customer will require adequate knowledge of Avaya's system and will need to contact Avaya for any support related to their Avaya system. XCast, at this time, does not officially support Avaya IP Office.
Avaya Support: http://support.avaya.com
Avaya recommends, or requires, that their system be on the edge of the network outside any firewalls.
NOTE: The customer may have been given two IP addresses from XCast. One for inbound calls and one for outbound calls. Avaya seems to only work with a single IP for both inbound and outbound. Customer should only use the inbound IP they were given by XCast labs. Customer may also need to contact XCast to request changing their trunk configuration to accommodate this.
The below notes assume that the customers public IP address is 205.1.1.19 and the given outbound XCast Trunk IP is 38.102.250.60.
This section describes the Avaya IP Office configuration necessary to support connectivity to XCast SIP Trunking service. Avaya IP Office is configured through the Avaya IP Office Manager PC application. From a PC running the Avaya IP Office Manager application, select Start -> Programs -> IP Office -> Manager to launch the application. Navigate to File -> Open Configuration, select the proper Avaya IP Office system from the pop-up window, and log in with the appropriate credentials. A management window will appear similar to the one shown in the next section. The appearance of the IP Office Manager can be customized using the View menu. In the screens presented in this section, the View menu was configured to show the Navigation pane on the left side, the Group pane in the center, and the Details pane on the right side. These panes will be referenced throughout the Avaya IP Office configuration. Proper licensing as well as standard feature configurations that are not directly related to the interface with the Service Provider (such as LAN interface to the enterprise site and IP Office Softphone support) is assumed to be already in place.
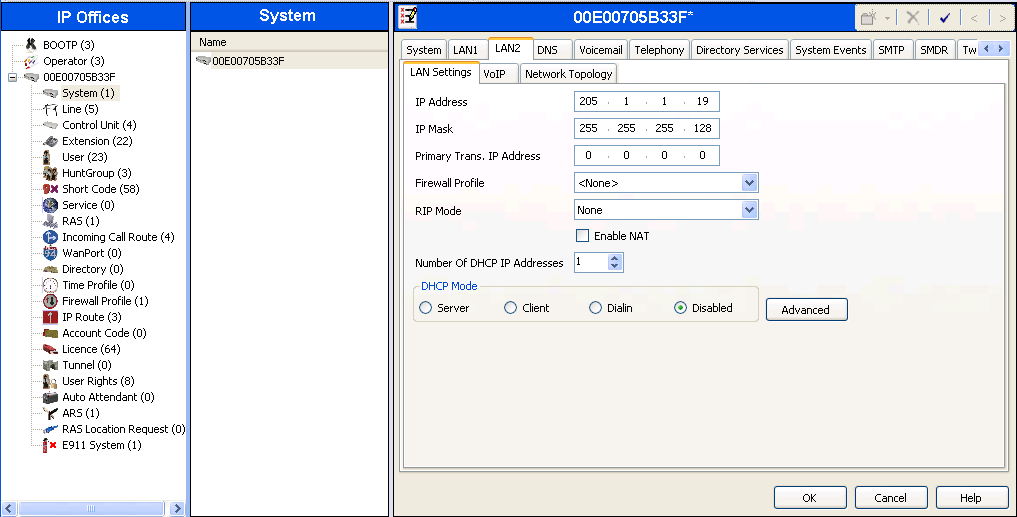
1.1. LAN2 Settings
In the sample configuration, the MAC address 00E00705B33F was used as the system name and the WAN port (LAN2) was used to connect the Avaya IP Office to the public network. The LAN2 settings correspond to the WAN port on the Avaya IP Office system. To access the LAN2 settings, first navigate to System (1) -> 00E00705B33F in the Navigation and Group Panes respectively, and then navigate to the LAN2 -> LAN Settings tab in the Details Pane. Set the IP Address field to the IP address assigned to the Avaya IP Office WAN port. Set the IP Mask field to the mask used on the public network. All other parameters should be set according to customer requirements. Click "OK" when finished and Save the configuration.
Select the VoIP tab as shown in the following screen. The SIP Trunks Enable box must be checked to enable the configuration of SIP trunks to XCast. The RTP Port Number Range can be customized to a specific range of receive ports for the RTP media. Based on this setting, Avaya IP Office would request RTP media be sent to a UDP port in the configurable range for calls using LAN2. Avaya IP Office can also be configured to mark the Differentiated Services Code Point (DSCP) in the IP Header with specific values to support Quality of Services policies for both signaling and media. The DSCP field is the value used for media and the SIG DSCP is the value used for signaling. To prevent possible loss of audio path during some call forward off-net scenarios, it is recommended to set the following fields under RTP Keepalives: Set Scope to RTP, Initial keepalives to Enable and an appropriate Periodic timeout from 1 to 180 seconds. The specific values used for the compliance test are shown in the example below. All other parameters should be set according to customer requirements.

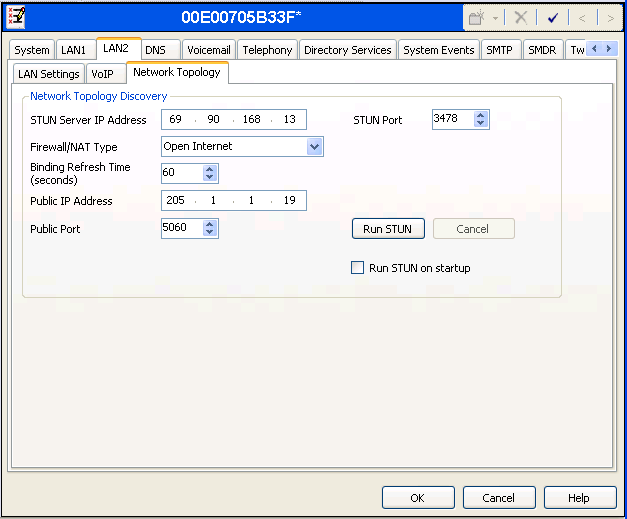
On the Network Topology tab in the Details Pane, configure the following parameters:
- Select the Firewall/NAT Type from the pull-down menu that matches the network configuration. No firewall or network address translation (NAT) device was used so the parameter was set to Open Internet. With this configuration, STUN will not be used.
- Set Binding Refresh Time (seconds) to 60. This value is used as one input to determine the frequency at which Avaya IP Office will send SIP OPTIONS messages to XCast. See Section 1.10 for complete details.
- Set Public IP Address to the IP address of the Avaya IP Office WAN port.
- All other parameters should be set according to customer requirements.
- Click "OK" when finished and Save the configuration.
In this example, the LAN1 interface is assumed to be used to connect the Avaya IP Office to the customers internal network. The LAN1 interface configuration is not directly relevant to the interface with XCast SIP Trunking service, and therefore is not described.
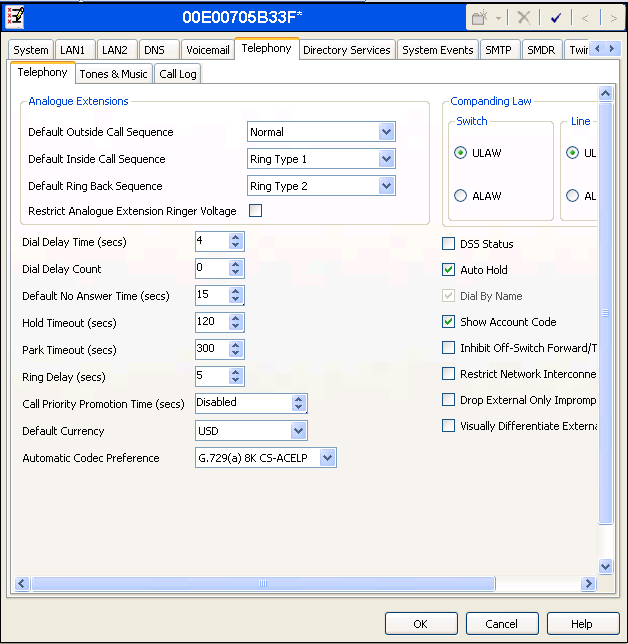
1.2. System Telephony Settings
Navigate to the Telephony -> Telephony Tab in the Details Pane. Set the Automatic Codec Preference for the default codec to be used for customers internal calls. Choose the Companding Law typical for the customers location. For North America, ULAW is used. Uncheck the Inhibit Off-Switch Forward/Transfer box to allow call forwarding and call transfer to the PSTN via XCast SIP trunk.
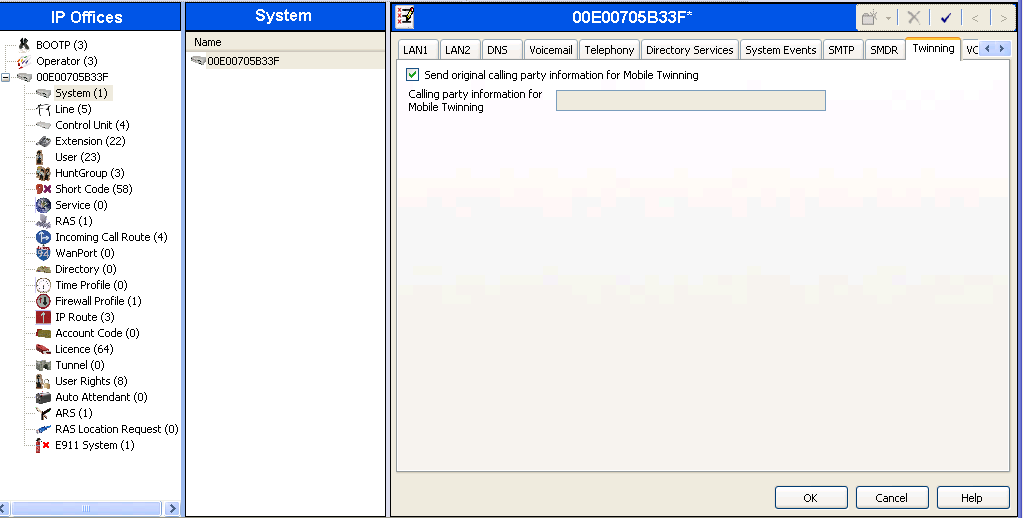
1.3. Twinning Calling Party Settings
When using twinning, the calling party number displayed on the twinned phone is controlled by two parameters. The first parameter is the Send original calling party information for Mobile Twinning box on the System -> Twinning tab. The second parameter is the Send Caller ID parameter on the SIP Line form (shown in Section 1.4). If Send original calling party information for Mobile Twinning on the System -> Twinning tab is set, the setting of the second parameter is ignored and Avaya IP Office will send the following in the SIP From Header:
- On calls from an internal extension to a twinned phone, Avaya IP Office will send the calling party number of the originating extension.
- On calls from the PSTN to a twinned phone, Avaya IP Office will send the calling party number of the host phone associated with the twinned destination (instead of the number of the originating caller).
The above behavior in Avaya IP Office Release 7 is the same as in Avaya IP Office Release 6. Avaya IP Office Release 7 also provides an alternative method of sending caller ID through SIP Diversion header (configured via unchecking Send original calling party information for Mobile Twinning here then selecting Diversion Header for the Send Caller ID parameter on the SIP Line form in Section 1.4). For this example, the Send original calling party information for Mobile Twinning box in the System -> Twinning tab was checked which overrides any setting of the Send Caller ID parameter on the SIP Line form.
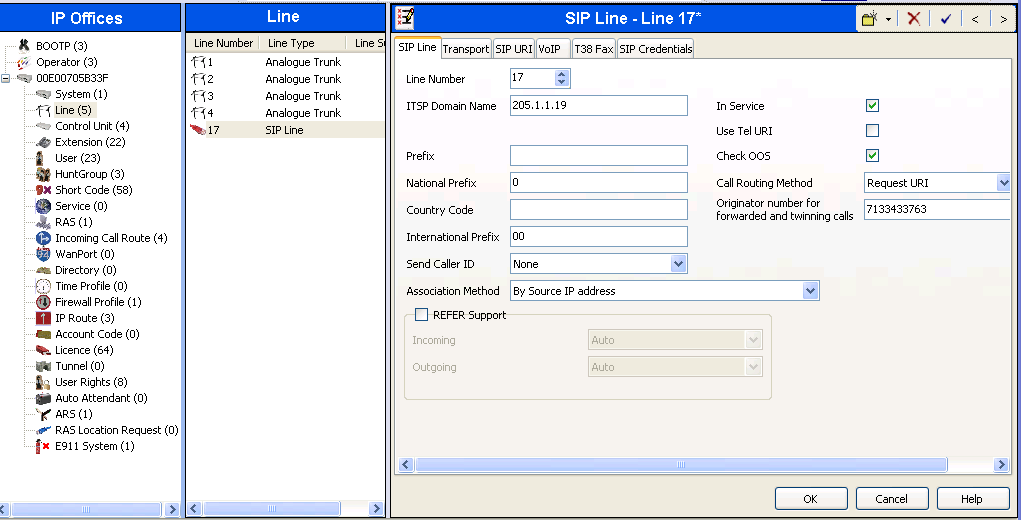
1.4. Administer SIP Line
A SIP line is needed to establish the SIP connection between Avaya IP Office and XCast SIP Trunking service. To create a SIP line, begin by navigating to Line in the left Navigation Pane, then right-click in the Group Pane and select New -> SIP Line. On the SIP Line tab in the Details Pane, configure the parameters as shown below:
- Set ITSP Domain Name to the customers domain, or the IP address of the IP Office WAN interface, so that IP Office uses this domain / IP address as the host portion of SIP URI in SIP headers such as the From header. NOTE: On newer versions of the Avaya Manager the ITSP Domain Name field should be empty and instead enter the XCast given inbound IP in the ITSP IP Address field.
- Set Send Caller ID to None. For this example, this parameter was ignored since Send original calling party information for Mobile Twinning is optioned in Section 1.3.
- Check the In Service box.
- Check the Check OOS box. With this option selected, Avaya IP Office will use the SIP OPTIONS method to periodically check the SIP Line.
- Default values may be used for all other parameters.
The area of the screen entitled REFER Support is used to enable/disable SIP REFER for call transfers. If "REFER Support" is left unchecked, or the fields for Incoming and Outgoing are set to "Auto", this will effectively disable the use of SIP REFER. To enable SIP REFER, check the "REFER Support" button and select "Always" from the drop-down menu for Incoming and Outgoing.
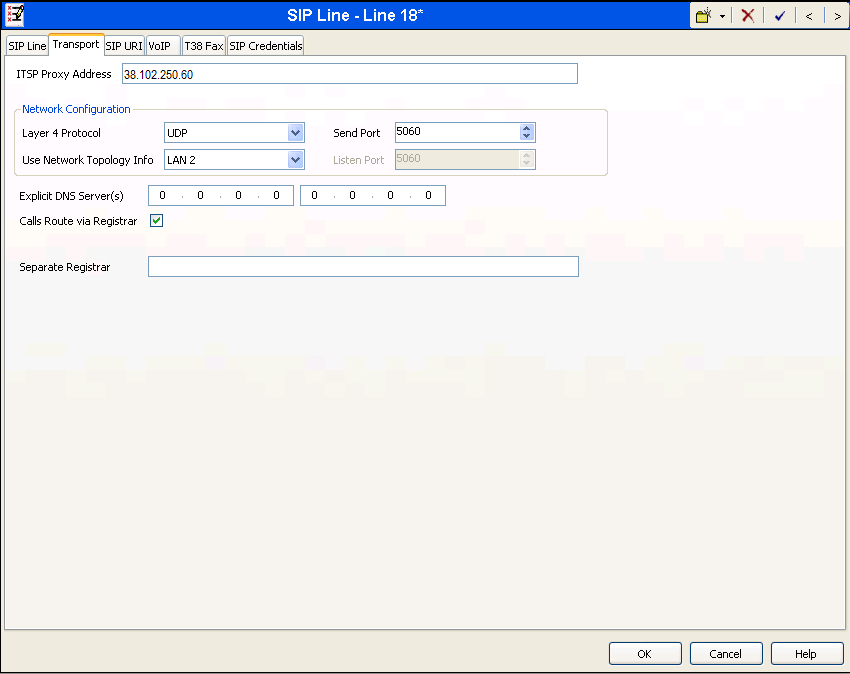
NOTE: The Transport tab may not exist in newer Avaya Manager versions so see NOTE in above section about ITSP IP Address field instead.
Select the Transport tab. The ITSP Proxy Address is set to the XCast SIP Proxy IP Address provided by XCast. As shown in the image below, this IP Address is 38.102.250.60. In the Network Configuration area, UDP is selected as the Layer 4 Protocol, and the Send Port is set to the port number provided by XCast which is typically 5060 or 7060. The Use Network Topology Info parameter is set to LAN 2. This associates the SIP Line with the parameters in the System -> LAN2 -> Network Topology tab. Other parameters retain default values in the screen below.
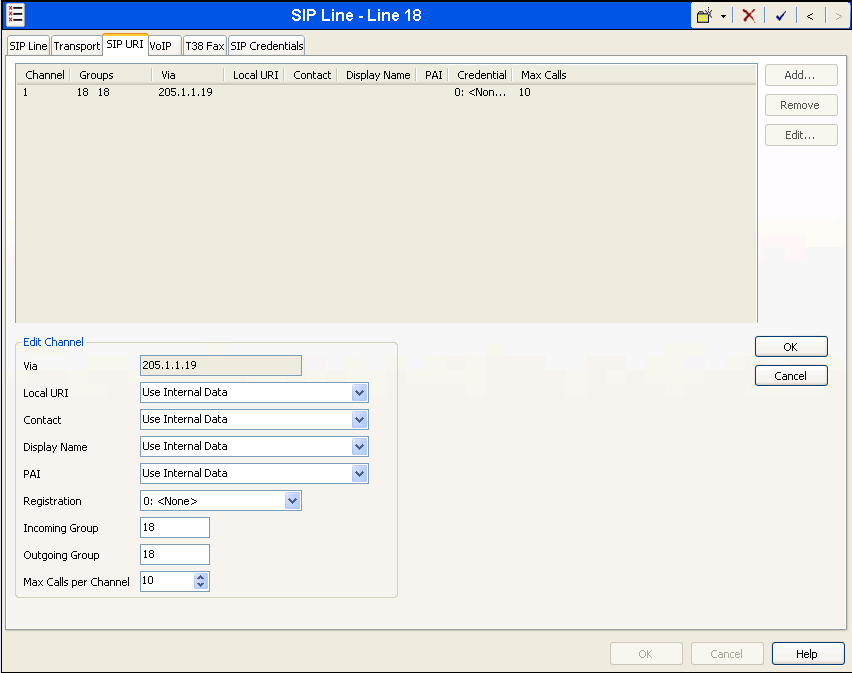
A SIP URI entry must be created to match each incoming number that Avaya IP Office will accept on this line. Select the SIP URI tab, then click the Add button and the New Channel area will appear at the bottom of the pane. To edit an existing entry, click an entry in the list at the top, and click the Edit… button. In the example screen below, a previously configured entry is edited. Alternatively, a single SIP URI entry can be created that matches any DID number assigned to an Avaya IP Office user. The entry was created with the parameters shown below:
- Set Local URI, Contact and Display Name to Use Internal Data. This setting allows calls on this line for SIP URIs that match the number set in the SIP tab of any User as shown in Section 1.6.
- Set PAI to Use Internal Data. With this setting Avaya IP Office will populate the SIP P-Asserted-Identity header on outgoing calls with the data set in the SIP tab of the User initiating the call as shown in Section 1.6.
- For Registration, select None since XCast doesn’t require Registration.
- Associate this line with an incoming line group in the Incoming Group field. This line group number will be used in defining incoming call routes for this line. Similarly, associate the line to an outgoing line group using the Outgoing Group field. For this example, a new incoming and outgoing line group 18 is expected to be defined.
- Set Max Calls per Channel to the number of simultaneous SIP calls that are allowed using this SIP URI pattern. This should have been given to you by XCast as your maximum channel or port count.
Select the VoIP tab to set the Voice over Internet Protocol parameters of the SIP line. Set the parameters as shown below:
- The Compression Mode was configured using the Advanced button, allowing an explicit ordered list of codecs to be specified. Check marks next to G.729(a) 8K CS-ACELP and G.711 ULAW codecs cause Avaya IP Office to include these codes, supported by the XCast SIP Trunking service, in the Session Description Protocol (SDP) offer, in that order.
- Set the DTMF Support field to RFC2833. This directs Avaya IP Office to send DTMF tones using RTP event messages as defined in RFC2833.
- Uncheck the VoIP Silence Suppression box. By unchecking the VoIP Silence Suppression box, calls can be established with the G.729 codec but without silence suppression.
- Select T.38 for Fax Transport Support.
- Check the Re-invite Supported box.
- Default values may be used for all other parameters.

1.5. Short Code
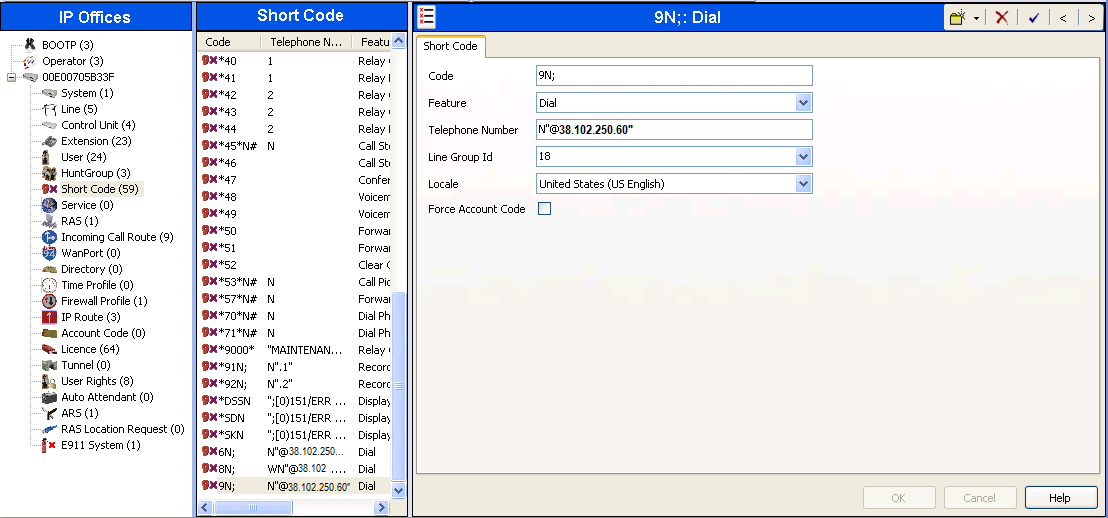
Define a short code to route outbound traffic to the SIP line. To create a short code, select Short Code in the left Navigation Pane, then right-click in the Group Pane and select New. On the Short Code tab in the Details Pane, configure the parameters for the new short code to be created. The screen below shows the details of the previously administered 9N; short code used in this example.
- In the Code field, enter the dial string which will trigger this short code, followed by a semi-colon. In this case, 9N;. This short code will be invoked when the user dials 9 followed by any number.
- Set Feature to Dial. This is the action that the short code will perform.
- Set Telephone Number to N"@38.102.250.60". This field is used to construct the Request URI and To headers in the outgoing SIP INVITE message. The value N represents the number dialed by the user. The host part following the @ is the domain or IP address of the XCast SIP trunk.
- Set the Line Group Idto the outgoing line group number defined on the SIP URI tab on the SIP Line in Section 1.4. This short code will use this line group when placing the outbound call.
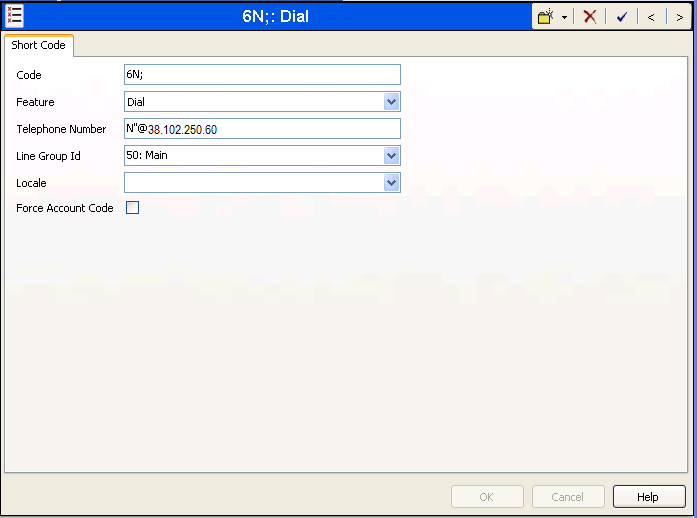
The simple 9N; short code illustrated above does not provide a means of alternate routing if the configured SIP Line is out of service or temporarily not responding. When alternate routing options and/or more customized analysis of the digits following the short code are desired, the Automatic Route Selection (ARS) feature may be used. In the following example screen, the short code 6N is illustrated for access to ARS. When the Avaya IP Office user dials 6 plus any number N, rather than being directed to a specific Line Group Id, the call is directed to Line Group ID "50: Main", configurable via ARS. See Section 1.8 for example ARS route configuration for "50: Main" as well as a backup route.
1.6. User
Configure the SIP parameters for each user that will be placing and receiving calls via the SIP line defined in Section 1.4. To configure these settings, first select User in the left Navigation Pane, then select the name of the user to be modified in the center Group Pane. In the example below, the name of the user is "H323 1616". Select the SIP tab in the Details Pane.
The values entered for the SIP Name and Contact fields are used as the user part of the SIP URI in the From header for outgoing SIP trunk calls. They also allow matching of the SIP URI for incoming calls without having to enter this number as an explicit SIP URI for the SIP line (Section 1.4). The example below shows the settings for user H323 1616. The SIP Name and Contact are set to one of the DID numbers assigned to the customer from XCast. The SIP Display Name (Alias) parameter can optionally be configured with a descriptive name. If all calls involving this user and a SIP Line should be considered private, then the Anonymous box may be checked to withhold the user’s information from the network.
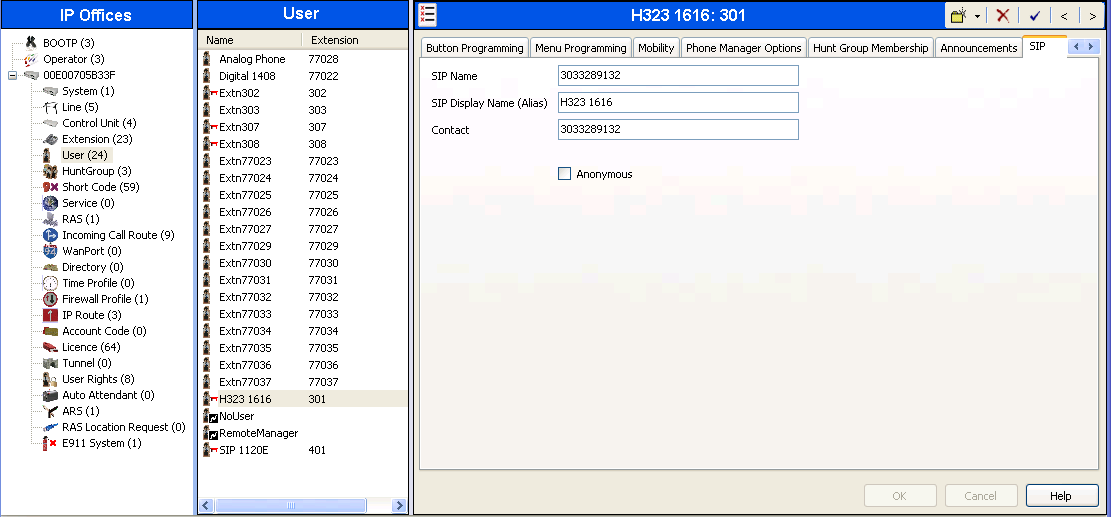
One of the H.323 IP Phones at the customers site uses the Mobile Twinning feature. The following screen shows the Mobility tab for User H323 1616. The Mobility Features and Mobile Twinning boxes are checked. The Twinned Mobile Number field is configured with the number to dial to reach the twinned mobile telephone. Other options can be set according to customer requirements.

1.7. Incoming Call Route
An incoming call route maps an inbound DID number on a specific line to an internal extension. This procedure should be repeated for each DID number provided by XCast. To create an incoming call route, select Incoming Call Route in the left Navigation Pane, then right-click in the center Group Pane and select New. On the Standard tab of the Details Pane, enter the parameters as shown below:
- Set the Bearer Capacity to Any Voice.
- Set the Line Group Id to the incoming line group of the SIP line defined in Section 1.4.
- Set the Incoming Number to the incoming number on which this route should match.
- Default values can be used for all other fields.
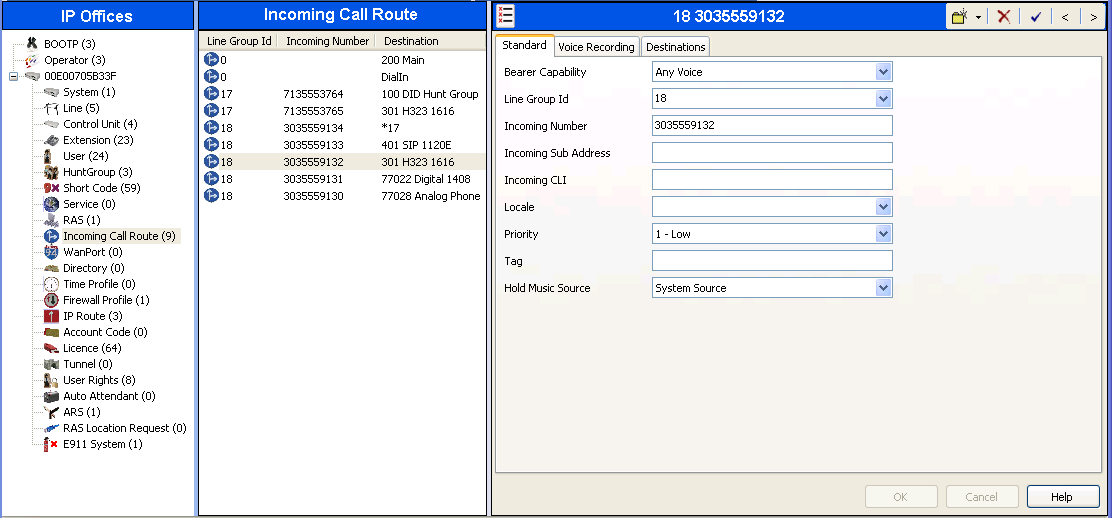
On the Destinations tab, select the destination extension from the pull-down menu of the Destination field. In this example, incoming calls to 303-555-9132 on line 18 are routed to user the Avaya 1616-I H.323 endpoint at extension 301.

1.8. ARS and Alternate Routing
While detailed coverage of Automatic Route Selection (ARS) is beyond the scope of these notes, this section includes basic ARS screen illustrations and considerations. ARS is illustrated here mainly to illustrate alternate routing should the SIP Line be out of service or temporarily not responding.
Optionally, ARS can be used rather than the simple "9N;" short code approach documented in Section 1.5. With ARS, a secondary dial tone can be provided after the access code, time-based routing criteria can be introduced, and alternate routing can be specified so that a call can re-route automatically if the primary route or outgoing line group is not available. Although not shown in this section, ARS also facilitates more specific dialed telephone number matching, enabling immediate routing and alternate treatment for different types of numbers following the access code. For example, if all 1+10 digit calls following an access code should use the SIP Line preferentially, but other local or service numbers following the access code should prefer a different outgoing line group, ARS can be used to distinguish between these call behaviors.
To add a new ARS route, right-click ARS in the Navigation pane, and select New. To view or edit an existing ARS route, select ARS in the Navigation pane, and select the appropriate route name in the Group pane.
The following screen shows an example ARS configuration for the route named "Main". The In Service parameter refers to the ARS form itself, not the Line Groups that may be referenced in the form. If the In Service box is un-checked, calls are routed to the ARS route name specified in the Out of Service Route parameter. IP Office short codes may also be defined to allow an ARS route to be disabled or enabled from a telephone. The configurable provisioning of an Out of Service Route, and the means to manually activate the Out of Service Route, can be helpful for scheduled maintenance or other known service-affecting events for the primary route.
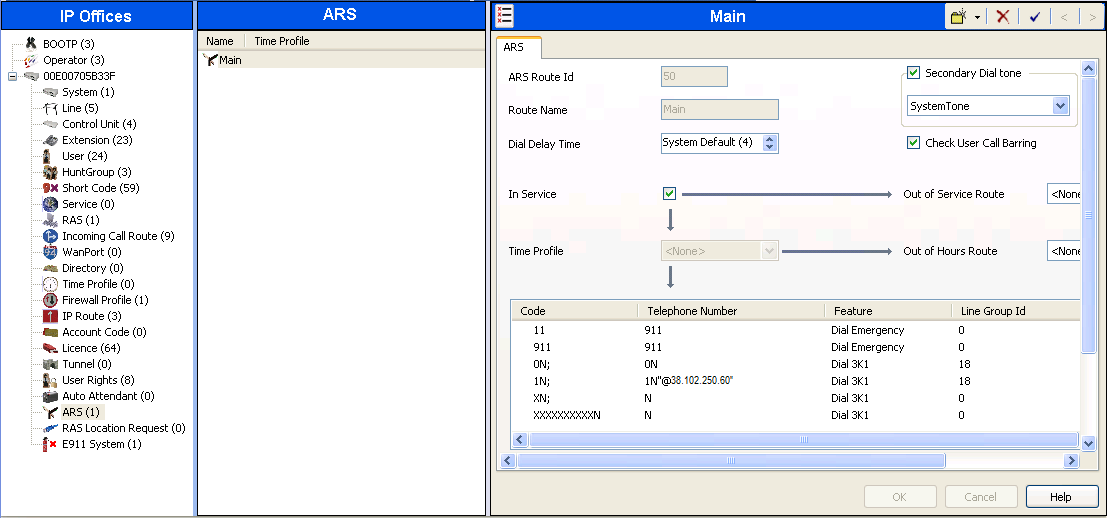
Assuming the primary route is in-service, the number passed from the short code used to access ARS (e.g., 6N in Section 1.5) can be further analyzed to direct the call to a specific Line Group ID. Per the example screen above, if the user dialed 6-1-303-555-1234, the call would be directed to Line Group 18, the SIP Line configured and described in these notes. If Line Group 18 cannot be used, the call can automatically route to the route name configured in the Additional Route parameter in the lower right of the screen (not configured for this example). Since alternate routing can be considered a privilege not available to all callers, Avaya IP Office can control access to the alternate route by comparing the calling user’s priority to the value in the Alternate Route Priority Level field.
1.9. Privacy/Anonymous Calls
For outbound calls with privacy (anonymous) enabled, Avaya IP Office will replace the calling party number in the From and Contact headers of the SIP INVITE message with "restricted" and "anonymous" respectively. Avaya IP Office can be configured to use the P-Preferred-Identity (PPI) or P-Asserted-Identity (PAI) header to pass the actual calling party information for authentication and billing. For this example, PAI was used for the purposes of privacy.
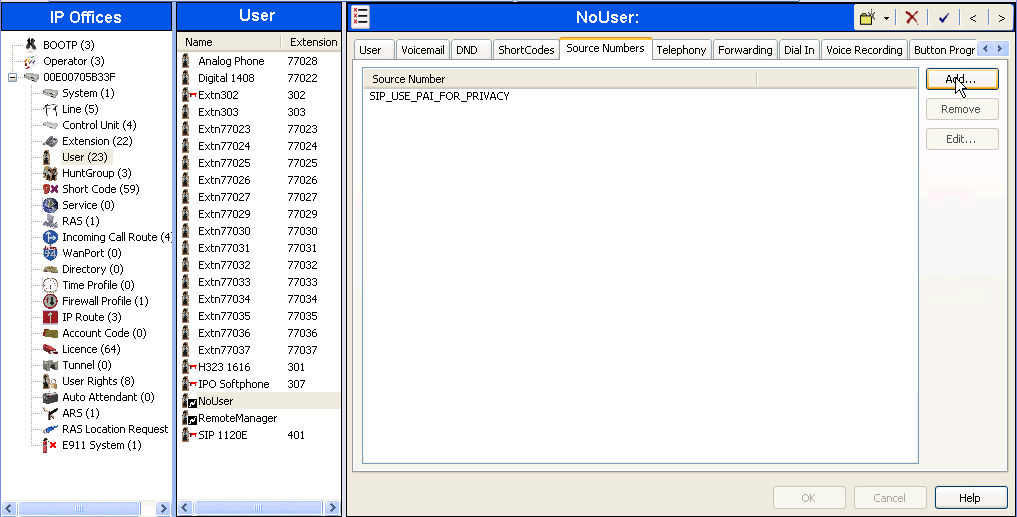
To configure Avaya IP Office to use PAI for privacy calls, navigate to User -> NoUser in the Navigation / Group Panes. Select the Source Numbers tab in the Details Pane. Click the Add button.
At the bottom of the Details Pane, the Source Number field will appear. Enter SIP_USE_PAI_FOR_PRIVACY. Click OK.

The SIP_USE_PAI_FOR_PRIVACY parameter will appear in the list of Source Numbers as shown below.

1.10. SIP Options
Avaya IP Office sends SIP OPTIONS messages periodically to determine if the SIP connection is active. The rate at which the messages are sent is determined by the combination of the Binding Refresh Time (in seconds) set on the Network Topology tab in Section 1.1 and the SIP_OPTIONS_PERIOD parameter (in minutes) that can be set on the Source Number tab of the NoUser user. The OPTIONS period is determined in the following manner:
- If no SIP_OPTIONS_PERIOD parameter is defined and the Binding Refresh Time is 0, then the default value of 42 seconds is used.
- To establish a period less than 42 seconds, do not define a SIP_OPTIONS_PERIOD parameter and set the Binding Refresh Time to a value less than 42 secs. The OPTIONS message period will be equal to the Binding Refresh Time.
- To establish a period greater than 42 seconds, a SIP_OPTIONS_PERIOD parameter must be defined. The Binding Refresh Time must be set to a value greater than 42 secs. The OPTIONS message period will be the smaller of the Binding Refresh Time or the SIP_OPTIONS_PERIOD.
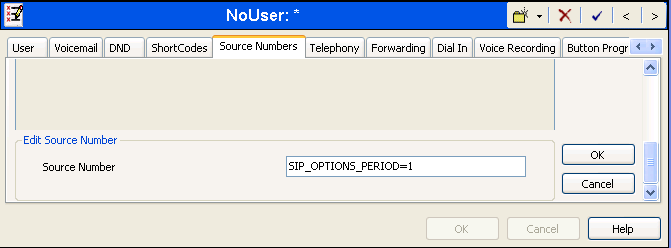
To configure the SIP_OPTIONS_PERIOD parameter, navigate to User -> noUser in the Navigation / Group Panes. Select the Source Numbers tab in the Details Pane. Click the Add button.
At the bottom of the Details Pane, the Source Number field will appear. Enter SIP_OPTIONS_PERIOD=_X, where X is the desired value in minutes. Click OK.
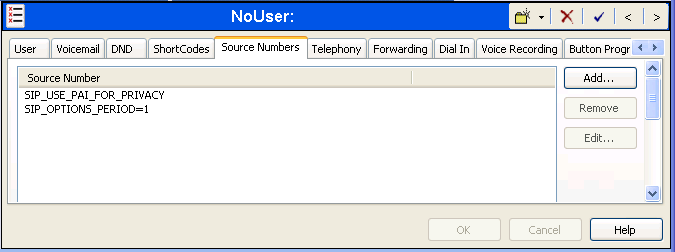
The SIP_OPTIONS_PERIOD parameter will appear in the list of Source Numbers as shown below. For this example, an OPTIONS period of 1 minute was desired. The Binding Refresh Time was set to 60 seconds (1 minute) in Section 1.1 and the SIP_OPTIONS_PERIOD was set to 1 minute. Avaya IP Office chose the OPTIONS period as the smaller of these two values (1 minute was the OPTIONS period since they were both set equal to 1 minute). Click the OK button (not shown).
1.11. Save Configuration
Navigate to File -> Save Configuration in the menu bar at the top of the screen to save the configuration performed in the preceding sections.
2. Verification Steps
The following steps may be used to verify the configuration:
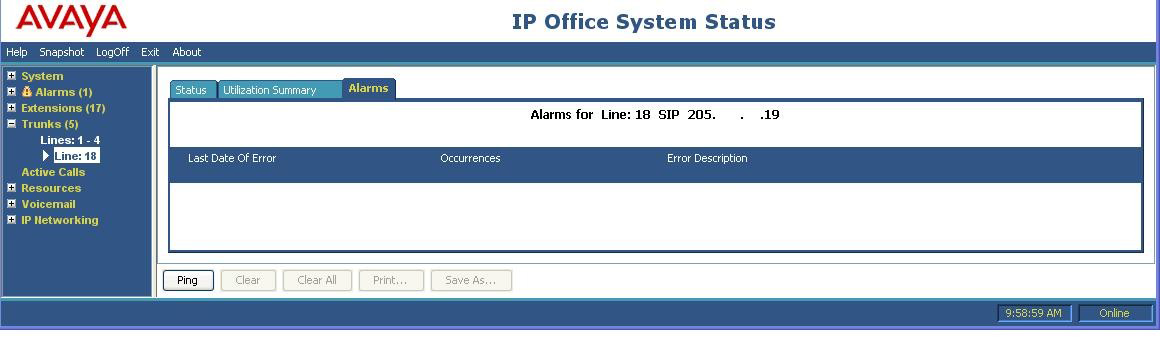
- Use the Avaya IP Office System Status application to verify the state of the SIP connection. Launch the application from Start -> Programs -> IP Office -> System Status on the PC where Avaya IP Office Manager was installed. Select the SIP line of interest from the left pane. On the Status tab in the right pane, verify that the Current State is Idle for each channel (assuming no active calls at present time).

- Select the Alarms tab and verify that no alarms are active on the SIP line.
- Verify that a phone connected to the PSTN can successfully place a call to the Avaya IP Office with two-way audio.
- Verify that a phone connected to Avaya IP Office can successfully place a call to the PSTN with two-way audio.
- Using a network sniffing tool (e.g., Wireshark), monitor the SIP signaling messages between XCast and Avaya IP Office on an outbound call from the customer to the PSTN.
 Uploading ....