Manually configuring ALGO intercoms
In this example we are working with a ALGO 8180G2 with firmware 1.7.6. The 8180 IP Audio Alerter
Wideband IP Speaker for Voice Paging, Emergency Alerting & Loud Ringing.
The 8180 SIP Audio Alerter is a wall mount IP speaker for voice paging, emergency alerting and loud ringing applications. The speaker is a fully compliant 3rd party SIP endpoint.
For specification of ALGO hardware and documentation see their website at https://www.algosolutions.com/products/ip-intercoms/
We do not officially support the ALGO devices... however here is how we have manually provisioned this device.
Note: You will need to make sure you have the device already created in VCP and have the device line credentials ready before continuing.
Initial Setup
- Plug the Network/LAN/Ethernet cable into the Internet port of the ALGO device and wait several moments for the device to acquire an IP Address.
2. Get the device's IP Address by pressing "IP Addr" button on the bottom of the device, you will hear the ALGO device announce the IP address.
3. Using the IP address logging in to device’s web administration page. Enter the IP address into your web browser for example: http://192.168.1.xxx
4. You will be prompted to login, the default admin login is `algo`.
Configuring SIP
- See the screenshots on the following pages to see where to enter SIP credentials.
2. On the "Basic Settings" and "SIP" tab
3. Under "SIP Domain (Proxy Server)" enter your PBX domain name for example: yourdomain.voippbxsite.net
4. Fill in SIP credentials starting at "Base/Page extension". These should match the device line credentials you got from VCP.
5. In the "Base/Page Extension" field enter the line name.
6. In the "Authentication ID" field enter the Auth Name.
7. In the "Authentication Password" field enter the Auth Password.
8. For an ALGO Door phone with "Extension to Dial" enter the number to dial when call button is pressed
9. Press the "Save" button at the bottom of the screen.
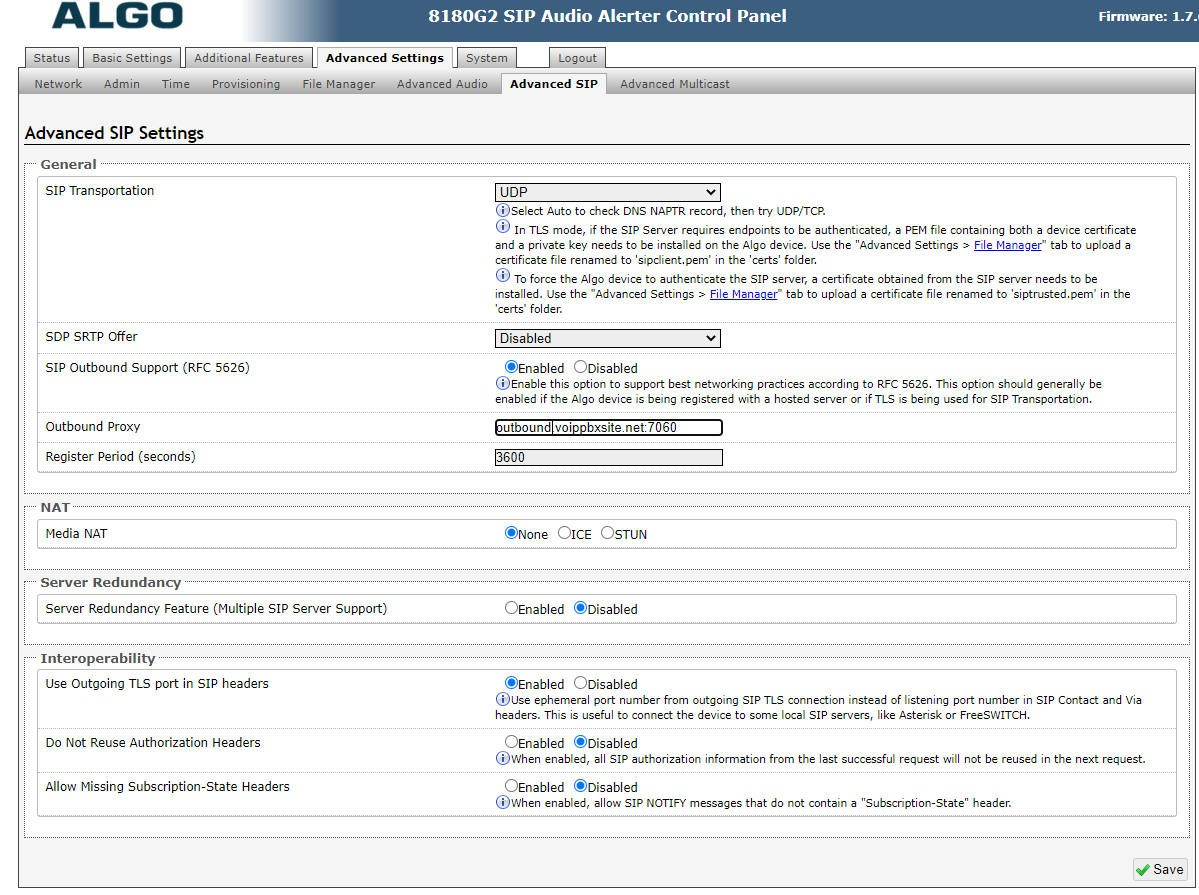
Outbound Proxy
- On the "Advanced Settings" and "Advanced SIP" tab
2. Verify the "SIP Transportation" field is set to UDP.
3. In the "Outbound Proxy" field enter outbound.voippbxsite.net:7060
4. Set the "Register Period” field to 3600
5. Press the "Save" button at the bottom of the screen.
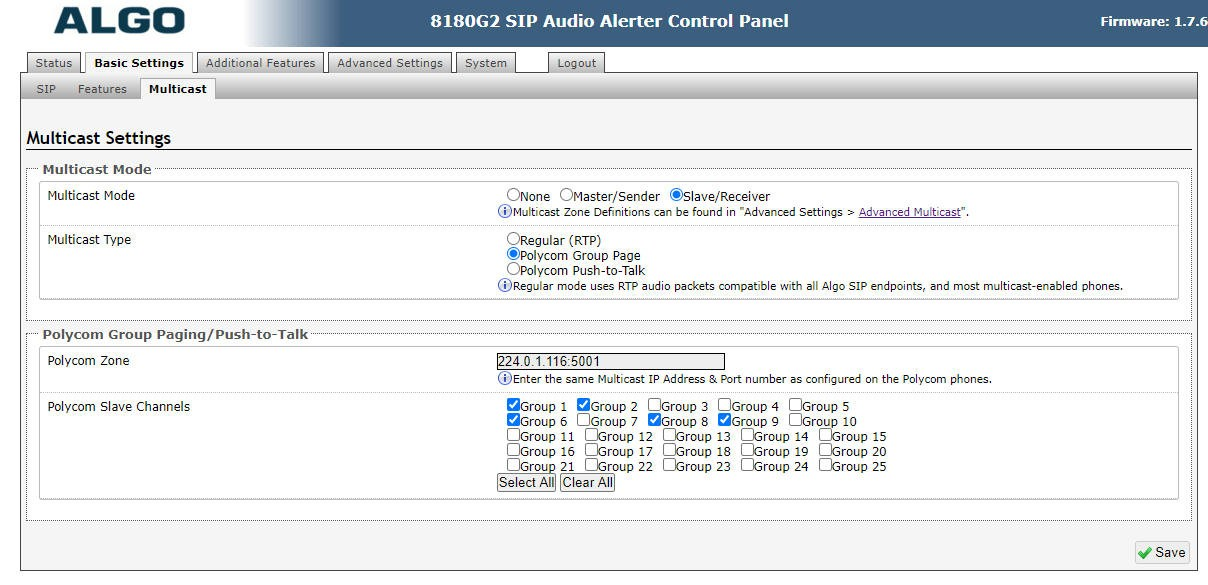
Multicast Intercom
- Multicast intercom allows you to press a key on your phone and using multicast protocol all devices listening to the multicast will answer and play your message.
2. To use the Multicast Intercom feature with Polycom devices in VCP you need to add the "Multicast Intercom" config set to all devices that will use this feature.
3. On the "Basic Settings" and "Multicast" tab
4. Set the "Slave/Receiver" field to "Multicast Mode"
5. Set the “Polycom Group Page” field to "Multicast Type"
6. Enable the needed groups under "Polycom Slave Channels"
7. Press the "Save" button at the bottom of the screen.
Images of web admin pages
ALGO Web Admin Page 1 (SIP Credentials):

ALGO Web Admin Page 2 (SIP Outbound Proxy):
ALGO Web Admin Page 3 (Intercom setup):
 Uploading ....