Overview
SAML (Security Assertion Markup Language) is an open standard for exchanging authentication and authorization data between an Identity Provider (IdP) and a Service Provider (SP). It allows users to log in to multiple applications with a single set of credentials, enabling Single Sign-On (SSO) across systems.
This extension to the Zuul module allows you to configure SAML for SSO.
When configured and active the module will intercept the standard login process with a dialogue asking you to choose the authentication method.
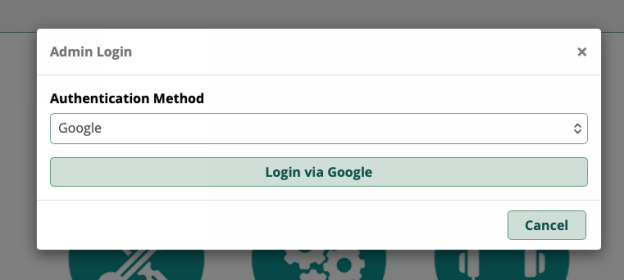
You will be able to select from any method configured; to use your standard username and password, you will choose local.
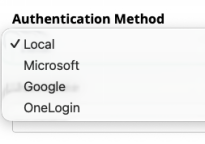
The IdP’s in our examples are Google Workspace, Microsoft 365/Entra ID, and OneLogin.
Your system is the SP.
When configuring SAML for FreePBX using the Zuul module, the following components are critical:
● Service Provider (SP) Entity ID – A unique identifier for the FreePBX instance that is shared with the IdP.
● SP Assertion Consumer Service (ACS) URL – The URL on the FreePBX system where the IdP sends the authentication response.
● SP Single Logout Service (SLS) URL – The URL where users are redirected after logging out (optional).
● Identity Provider (IdP) Entity ID – A unique identifier for the IdP.
● IdP Single Sign-On (SSO) URL – The endpoint where FreePBX redirects users for authentication.
● IdP Single Logout (SLO) URL – The endpoint for logging out of the IdP (optional).
● Certificates and Keys – X.509 certificates and SP private/public keys are used to sign and verify SAML requests and responses.
This guide walks through how to import IdP metadata, configure SP and IdP fields, and test SP-initiated logins (e.g. google my apps) . While it looks daunting if you follow the steps, it's not. Read this once, then read it again and make notes.
Before we configure anything we need to prepare 2 items.
First, we need to generate a self-signed private and public key pair - note you can use the same pair with multiple SAML providers, but could create a different pair for each if you wanted to. The process I used in testing was to create my self-signed pair by navigating to https://www.samltool.com/
Click "Online Tools" , then X.509 CERTIFICATES… choose your country and state then enter appropriate values for State or Province Name , Organization Name , and Common Name, the domain.. Change Bits to generate the private key to 2056 bits and click GENERATE SELF SIGNED CERTS.
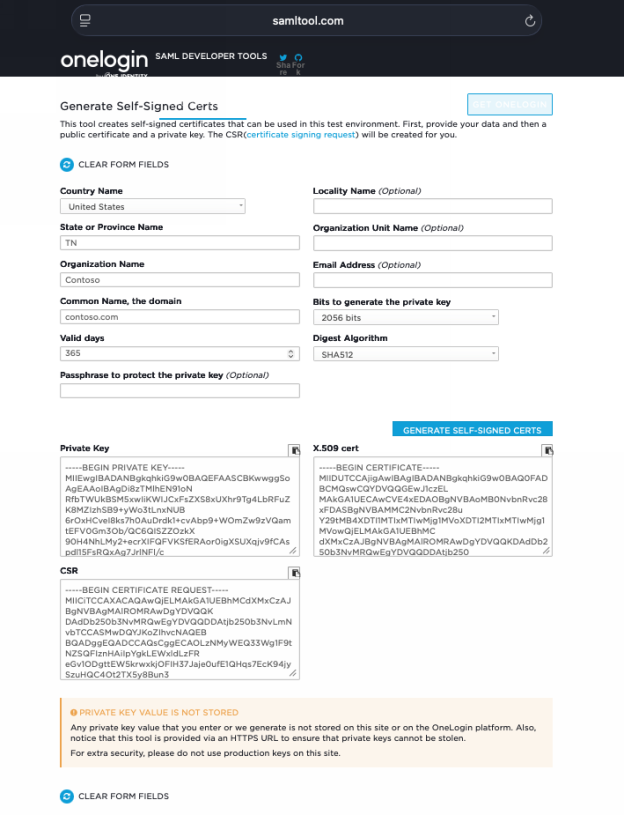
Once generated, copy the data from all of the fields and save this somewhere.
Some additional information to construct before getting started are your SP details, these are the same for every provider in our examples and should be in general for any provider you add.
The data you need:
SP Entity ID https://pbx.contoso.com/auth/saml
SP Assertion Consumer Service (ACS) URL https://pbx.contoso.com/auth/saml/login
SP Single Logout Service (SLS) URL https://pbx.contoso.com/auth/saml/logout
NameID Format Email Address (this should work for most providers)
SP Private Key - the private key you created and saved earlier
SP Signing Key - the X.509 cert that corresponds to your private key above
SP Private Key Password (if set)
(replace pbx.contoso.com with your FQDN and save the items above somewhere and note the URL will always have the path /auth/saml
We will use this data when setting up the IdP's as well as the SP details for a provider within the module as shown below…
Three IdPs were tested when creating this document , those configurations are outlined below.
 Setup for Google Workspace
important note - once configured, if you test this provider from the grid it will fail; the current test method does not work properly with Google Workspace
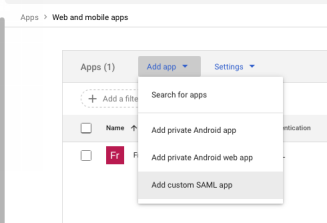
Create Custom SAML App
- Log in to Google Admin → Apps → Web and Mobile Apps → Add App → Add custom SAML app.
- Give it a name (e.g., PBX SAML Test), click continue …
Google Admin – Create Custom SAML App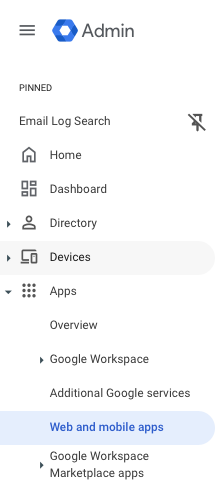
After you hit continue, you will be presented with this next screen shown below.
Download Metadata XML
- Click Download Metadata , save that file
- You must also save the certificate
Google Admin – Download Metadata XML and Certificate
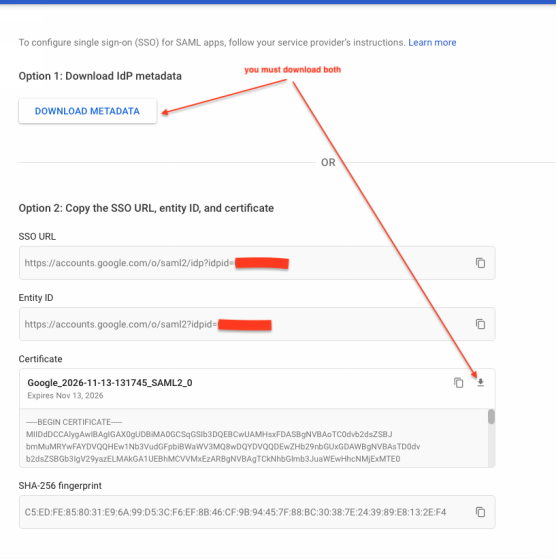
Don't worry about copying anything , just save the XML and the certificate. Click CONTINUE…
- The next screen is where you will enter your SP details , the ones you defined earlier.
SP Assertion Consumer Service (ACS) URL https://pbx.contoso.com/auth/saml/login
SP Entity ID https://pbx.contoso.com/auth/saml
The last items are for you to set the Name ID format as EMAIL, and the Name ID as Basic Information -> Primary email
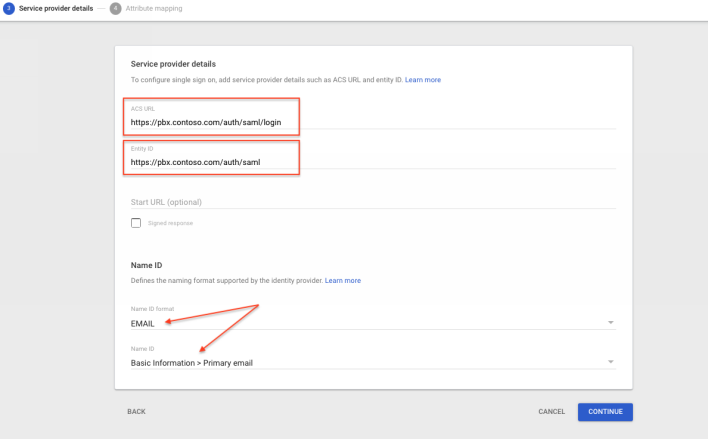
Press continue …
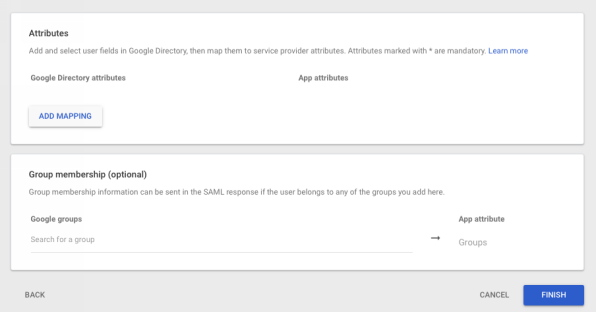
- The final step allows you to optionally define mappings that send additional information to the SP about the identity or pass along group membership information; leave these un-configured, click FINISH.
- Make the application available to everyone or a group

Congrats! You have completed the setup in Google Workspace.
Add SAML provider in PBX
Open FreePBX → Admin → Advanced Auth Config→ SAML Authentication tab
Click Add SAML Provider
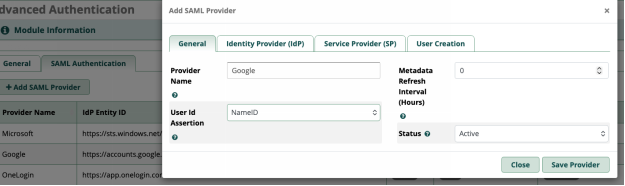
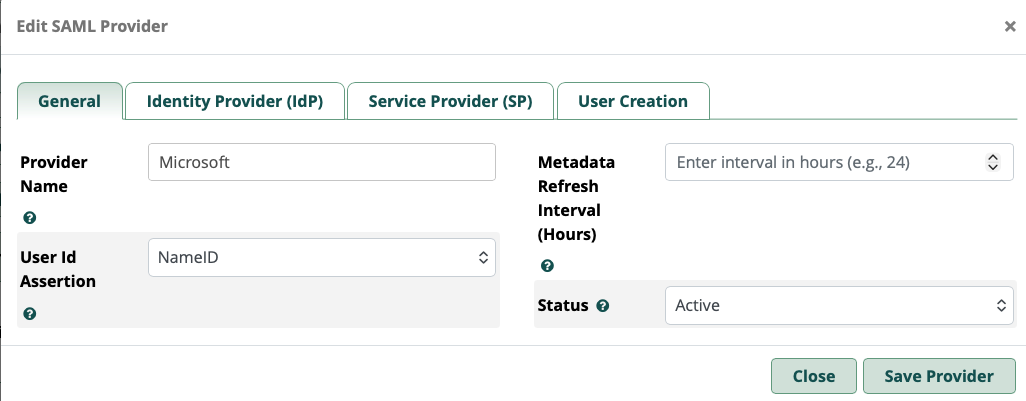
There are four tabs to complete
- General
- Enter the provider name. This is what you will see as an authentication method upon login
- User ID Assertion , use NameID , its what you configured in the Google setup
- Metadata refresh - set this to 0, disabled
- Status - Active
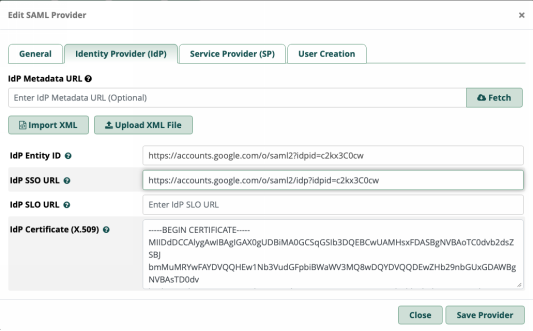
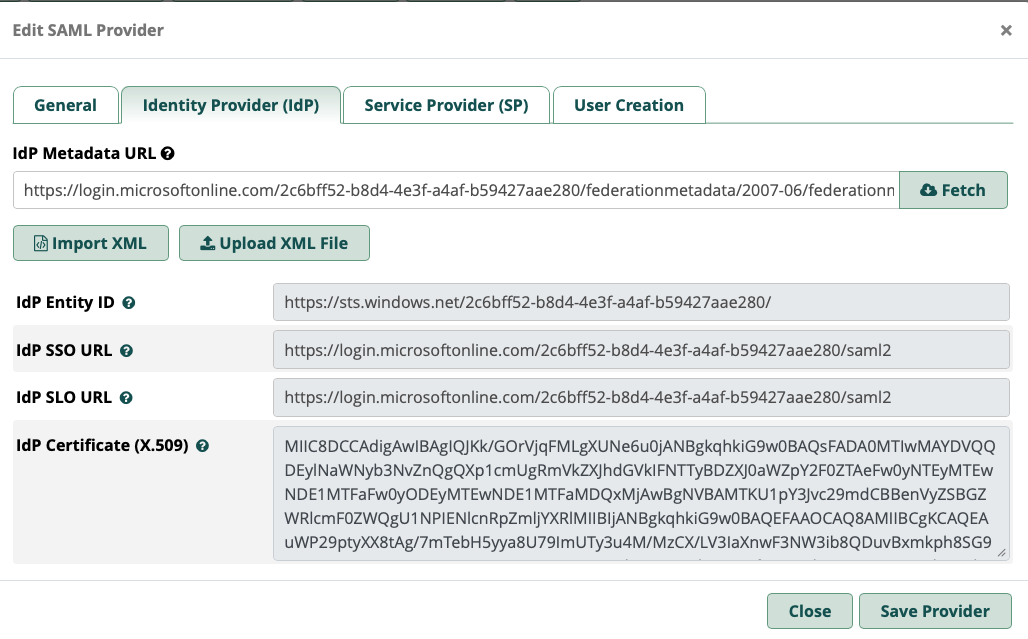
2. IDP
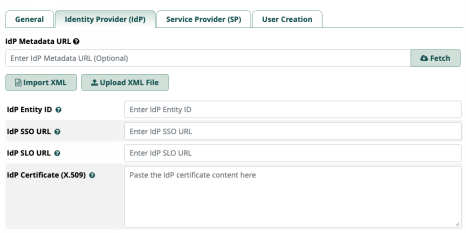
IdP metadata URL- there isn’t one for Google , leave this blank
Everything else will be populated for you when you import the files you downloaded when creating the SAML application within Google admin. This is VERY IMPORTANT. Click on Upload XML file and upload your METADATA. This will populate all of the fields - however, The IdP Certificate (X.509) field **MUST** be changed. Replace the value from the metadata import with the certificate or it will fail. You will need to open that cert file in a text editor, copy it, then paste the raw data into the IdP Certificate (X.509) field replacing the current contents.
In the end it should look something like this (but with your idpid)
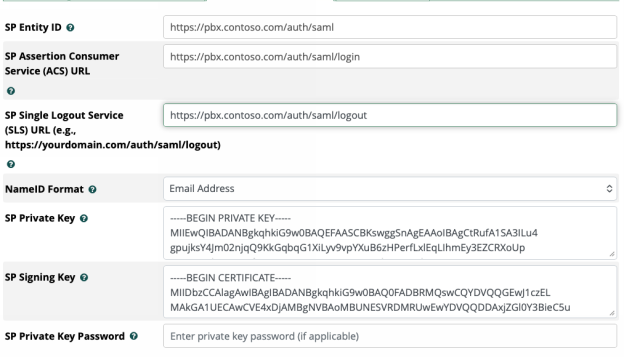
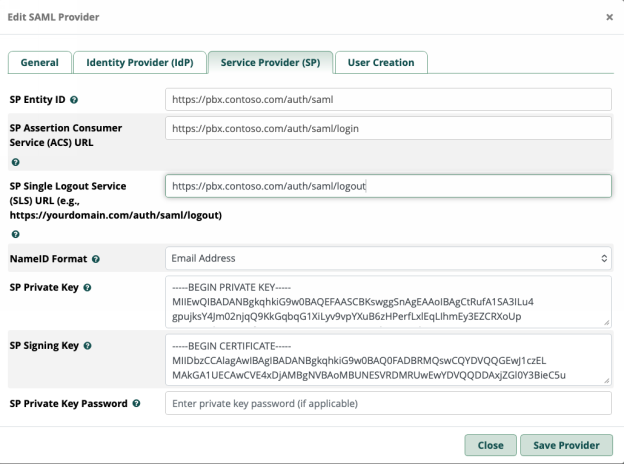
3. Service Provider (SP)
You have already saved and compiled all of the necessary information to fill this tab out. You will need the initial self signed key pair you created as well as your static SP values.
- Copy and paste your values for SP Entity ID, ACS URL , and SLS URL
- Set the NameID format to email address
- Paste the private key of your self-signed pair into the SP Private Key field
- Paste the public key of your self-signed pair into the SP Signing Key field
In the end it should look like the image below…
4. User creation
We are going to set this to No for the moment. If set to yes the system will attempt to create user within Userman (this is where additional attributes defined in the Google Admin SAML application details may become relevant)
That’s it! The setup is complete and you are ready to test.

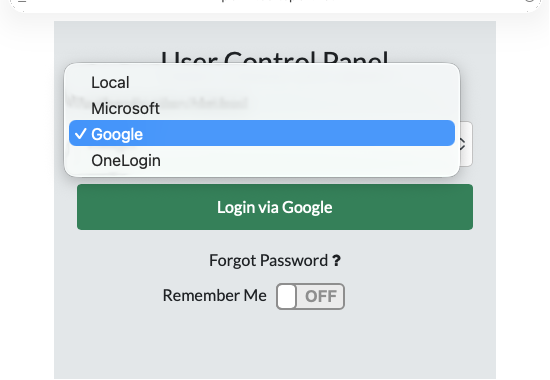
Test Login
- SP-initiated: Navigate to https://pbx.contoso.com
- Try logging into the admin , try UCP - remember the privileges of the user are still managed by userman.
- IdP-initiated: Log in via Google MyApps → select FreePBX SAML Test or whatever you named the app in Google admin.
FreePBX – UCP Login via Google

Setup for Microsoft
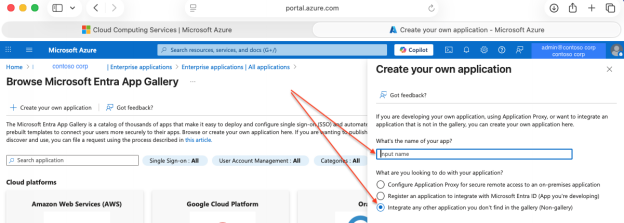
Create Custom Enterprise App
- From your MS365 Log in, go to the Azure Portal → Microsoft Entra ID → Enterprise Applications → New Application → Create your own application.
- Choose Integrate any other application you don’t find in the gallery.
- Click Create , the app will be created and you will be taken to the overview for the new app you just created
Azure Portal

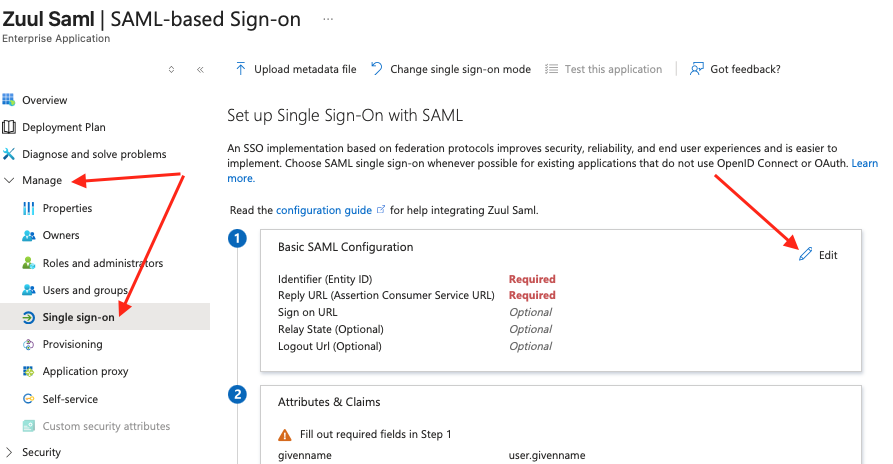
Enable SAML
- Inside the app → Manage → Single Sign-On → SAML
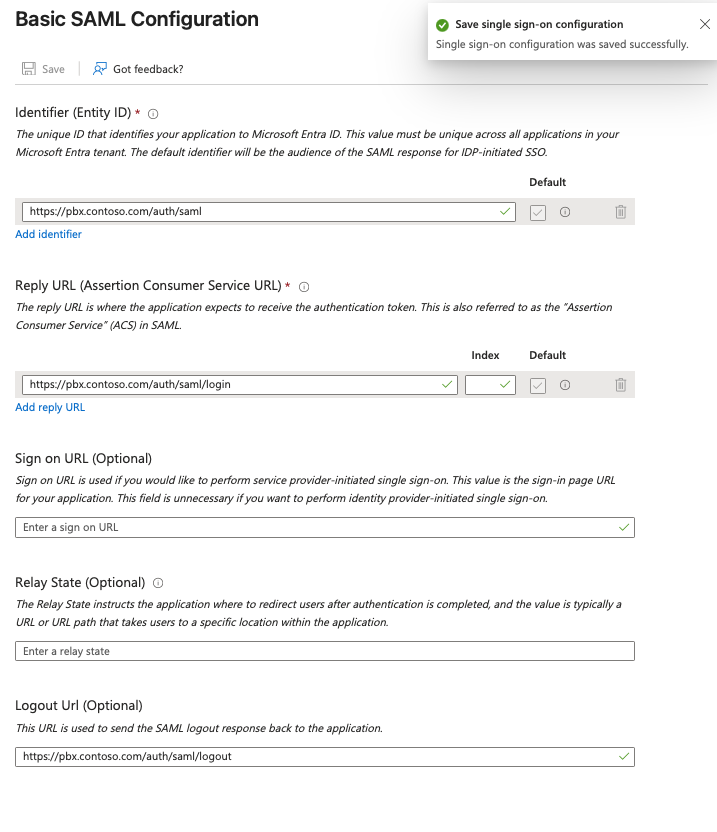
- Click Edit in Basic SAML Configuration.
Azure Portal – SAML Setup

Configure SP Fields in Azure
you will then see the following screen where you need to add the values for your SP , the same ones you compiled earlier...
Only 3 entries are required and you can accept the defaults in the other steps
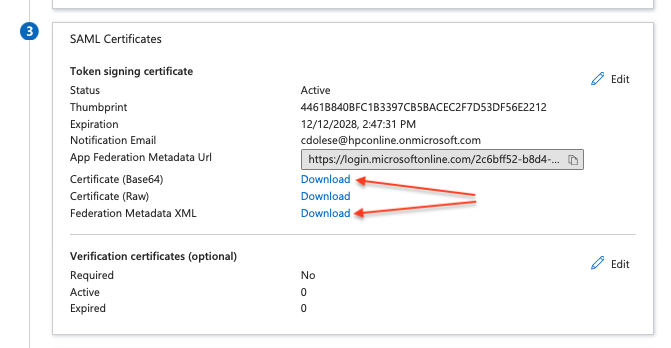
Before leaving this page you will need to download the IdP metadata so that you can import when doing the work on the PBX and you also need to copy the App Federation Metadata URL, and optionally you can download the certs as well however we should not need to manually import it.
Download Metadata XML
- Download the Certificate and the Federation Metadata XML from Azure.
- Save for import into FreePBX when we configure the provider
FreePBX – Microsoft IdP Fields

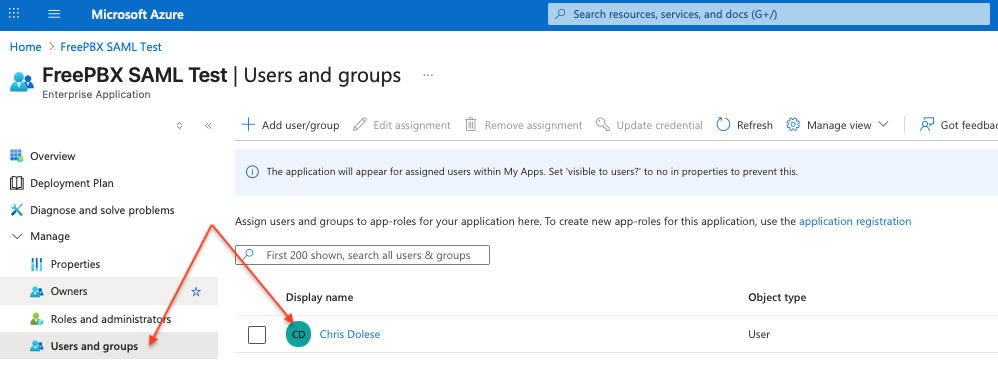
Assign users/groups to the app.
Azure Portal – user assignment
Add SAML provider in PBX
Open FreePBX → Admin → Advanced Auth Config→ SAML Authentication tabClick Add SAML ProviderThere are four tabs to complete - General
- Enter the provider name. This is what you will see as an authentication method upon login
- User ID Assertion , use NameID , its what you configured in the Google setup
- Metadata refresh - set this to 0, disabled
- Status - Active
2. IDP
IdP metadata URL- enter the URL you copied for the metadata URL and click fetch
Everything else will be populated for you when you import the metadata XML file including the IdP certificate... no need to manually paste the cert in this case with MS365
In the end it should look something like this (but with your idpid)
3. Service Provider (SP)
You have already saved and compiled all of the necessary information to fill this tab out. You will need the initial self signed key pair you created as well as your static SP values.
- Copy and paste your values for SP Entity ID, ACS URL , and SLS URL
- Set the NameID format to email address
- Paste the private key of your self-signed pair into the SP Private Key field
- Paste the public key of your self-signed pair into the SP Signing Key field
In the end it should look like the image below…

4. User creation
We are going to set this to No for the moment. If set to yes the system will attempt to create user within Userman (this is where additional attributes defined in the Google Admin SAML application details may become relevant)
That’s it! The setup is complete and you are ready to test.

Test Login
- SP-initiated: Navigate to https://pbx.contoso.com/auth/saml/login.
- IdP-initiated: Log in via Microsoft 365 portal → select FreePBX.
- Verify login success and FreePBX logs for signature validation.
Setup for OneLogin
Configure Saml App in OneLogin
login to your OneLogin domain
● Click Administration (top right)
● hover on Applications (top left), then Applications again
● Click Add App and search for "SAML Test Connector (IdP)", click save
after clicking save you will be presented with options on the left
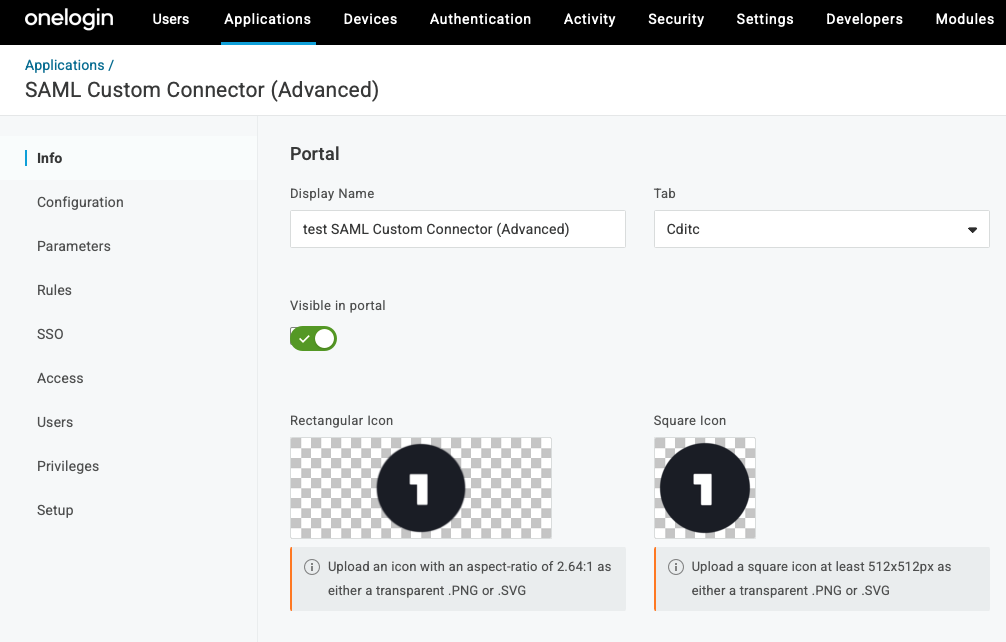
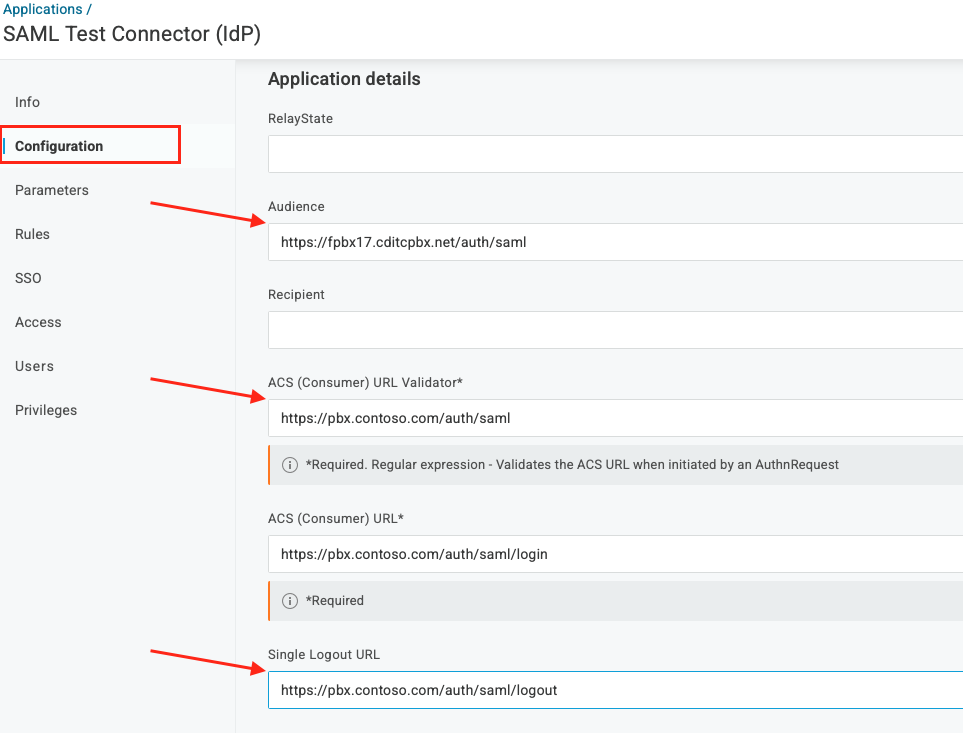
click Configuration
● Click the Audience field and add “https://PBXURL/auth/saml”
● Click the ACS validator field and add type “https://PBXURL/auth/saml”
● Click the ACS URL field and type “https://PBXURL/auth/saml/login”
● Click the Single Logout field and type “https://PBXURL/auth/saml/logout”
SAML Paramaters
● accept defaults , but this is also where you can map additional data to be included in the SAML assertion by clicking the blue +
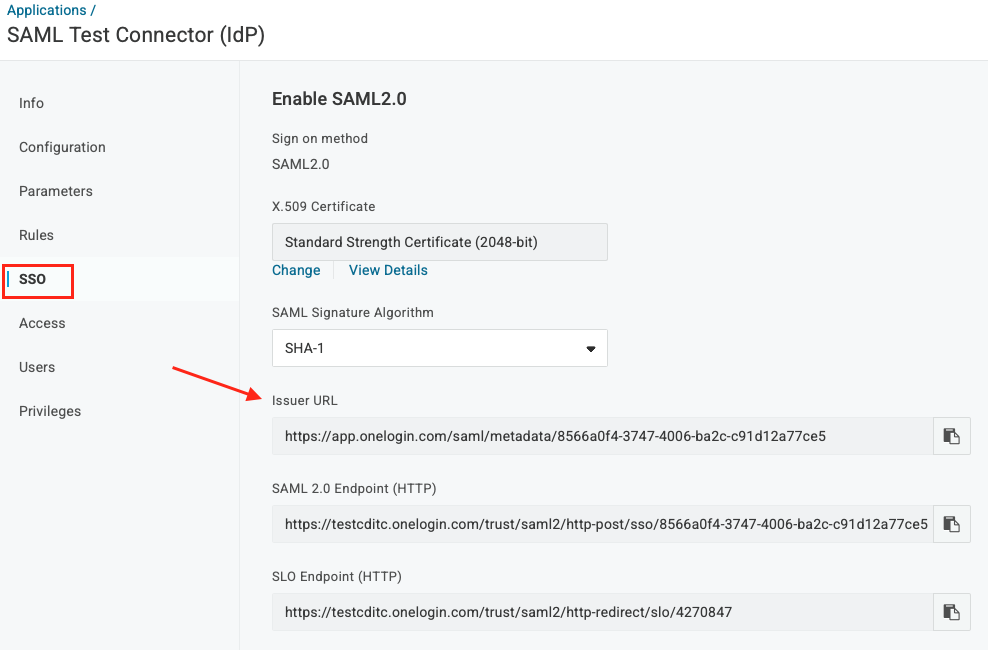
SAML Metadata
● Click SSO and copy the issuer URL , save it to a text file
Add Users
Click Users > Users (top left)

● Click New User
● Add user data
● Click Save User
● Click “More Actions”
● If this is a new user click “change password” , enter a password for the OneLogin user... don’t force update
● Click Applications on the left
● Click the +
● Assign new login: <whatever you named the app>
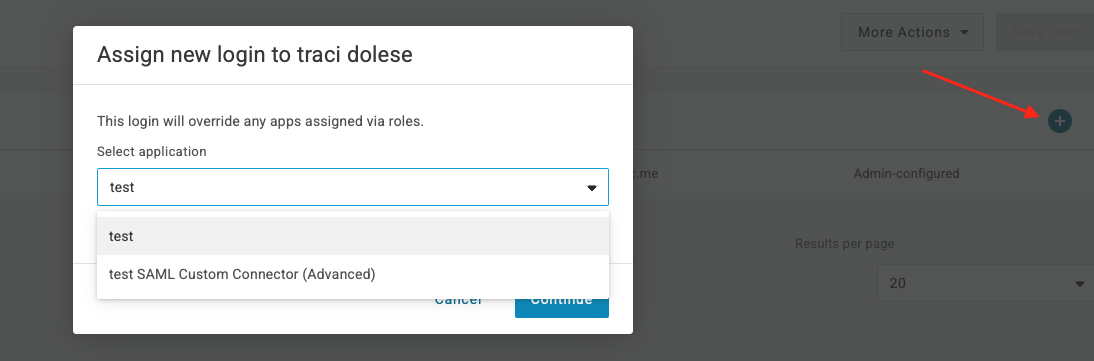
This completes the app setup in OneLogin
Open FreePBX → Admin → Advanced Auth Config→ SAML Authentication tabClick Add SAML ProviderThere are four tabs to complete - General
- Enter the provider name. This is what you will see as an authentication method upon login
- User ID Assertion , use NameID , its what you configured in the Google setup
- Metadata refresh - in my test I set this to 1 hour
- Status - Active
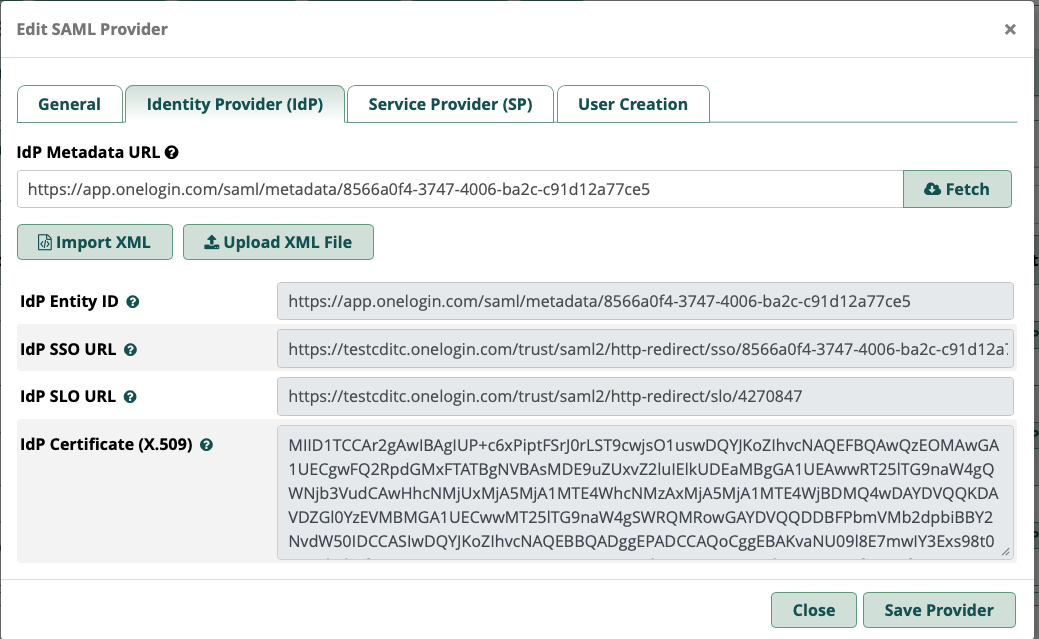
2. IDP
- IdP metadata URL - enter the URL you copied for the metadata URL and click fetch
- Everything else will be populated for you when you import the metadata XML file including the IdP certificate... no need to manually paste the cert in this case with OneLogin
It should look something like this but with your IdP info
3. Service Provider (SP)
You have already saved and compiled all of the necessary information to fill this tab out. You will need the initial self signed key pair you created as well as your static SP values.
- Copy and paste your values for SP Entity ID, ACS URL , and SLS URL
- Set the NameID format to email address
- Paste the private key of your self-signed pair into the SP Private Key field
- Paste the public key of your self-signed pair into the SP Signing Key field
In the end it should look like the image below…
4. User creation
We are going to set this to No for the moment. If set to yes the system will attempt to create user within Userman (this is where additional attributes defined in the Google Admin SAML application details may become relevant)
That’s it! The setup is complete and you are ready to test.
Test SP-initiated and IdP-initiated login
SP testing is done directly from the PBX , and IdP initiated is done from the users OneLogin profile

Troubleshooting
| Issue | Cause / Fix |
| Login fails after Google import | Check certificate — replace invalid SAML signing cert |
| Azure login fails | Check SP Entity ID, ACS URL, NameID format |
|
HTTP 400 on Test Connection |
Expected for Google |
|
Logout not working |
SLO URL optional; MS365 may not fully support SAML logout |

Summary
● SP fields remain consistent across IdPs.
● Importing IdP metadata XML simplifies configuration.
● Certificates must be validated for signature verification.
● Test SP-initiated logins.
Flowchart: PBX ↔ SAML Login Process
[User Visits Login Page]
    |
   v
[Redirected to SAML Provider]
|
v
[Authenticates Successfully]
|
v
[SAML Sends Attestation to PBX]
|
v
[PBX Extracts User ID Assertion]
|
v
[Chooses SAML Auth Method]
┌───────────────────────────────┐
           Does User Match Existing PBX?                    ->
└────────────  |  ─────────────────┘
Yes | No
               [Check Login Permission]                 |                                     [Create User if Enabled?]

                  Yes          |          No                       |                             Yes                          |                          No
[Login Granted] | [Denied] | [Check Group Permissions] | [Denied]
[Login Granted / Denied] |
Login flow png
 Uploading ....