| | | |
 Uploading .... Uploading .... Overview - Device(s) - Since the Cloud Device Manager is a generic configuration tool for SIP-based devices, we will refer to the devices that we write out configuration files for as a Device. This can include SIP Phones, ATAs, Gateways, Door Control Boxes, Overhead Paging, or Dect Base Stations.
- Options and Settings - Because Templates are agnostic to manufactures and phone models, not all settings in a template will apply to all manufacturers and models of phones.
Logging In - Open a web browser to https://devices.clearlyip.com
- Log in with your Clearly IP Single Sign On (SSO) Username and Password. This is the same username and password used to login to Clearly IP Support Site and different Portals.
- Click on the CDM Tab at the top. If you do not have a CDM tab, that means your account is not set up with CDM access. At this time, CDM is not sold or offered as a stand-alone product and is bundled with the Clearly Cloud offering only.
 Location Overview Locations in CDM are best described as a unique PBX or tenant on a multi-tenant PBX. Locations contain information about the PBX, such as the IP Address or Domain Name or how to connect to the PBX for the SIP End Points. Location also contains which codecs the Location supports and what standard feature codes may be used in program buttons.
A Location gets created and belongs to a Tenant; the Tenant users can now manage that Location.
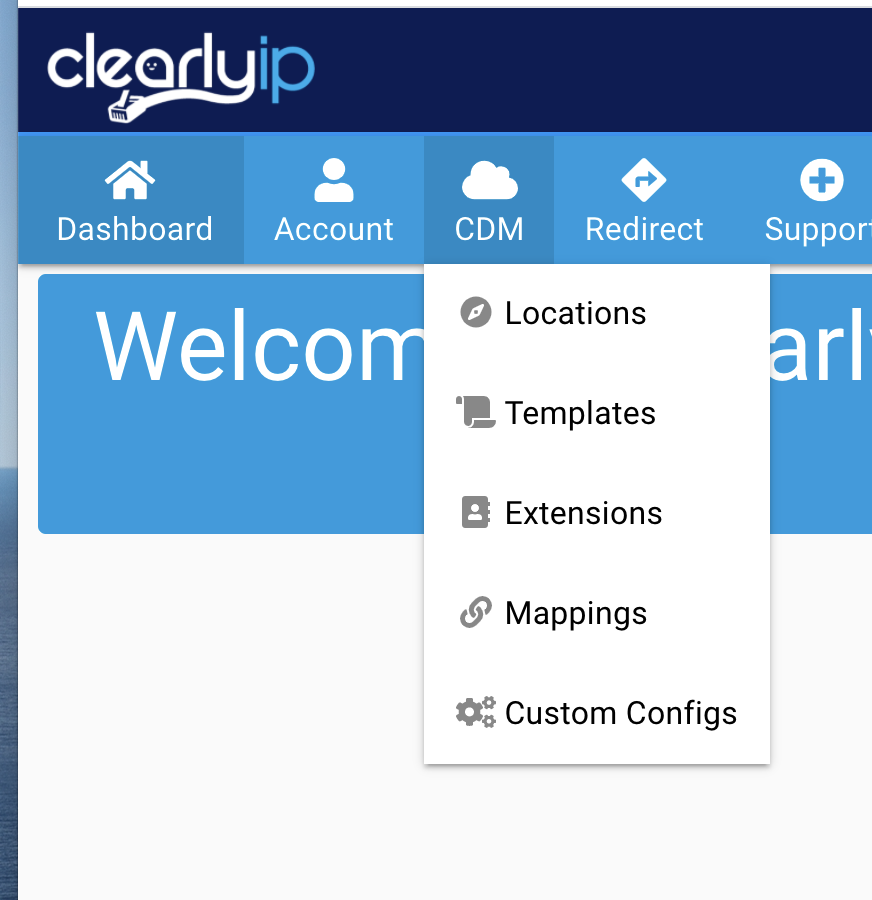
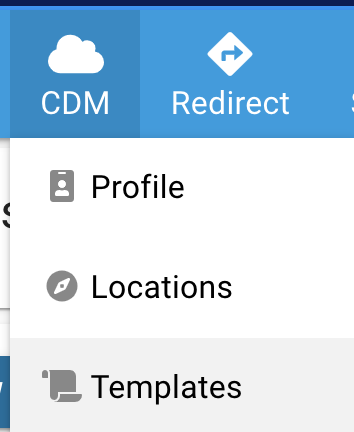
Creating a new Location - Once Logged into CDM from the Menu bar click on CDM > Locations
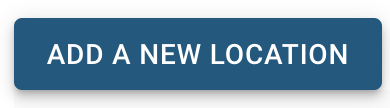
 - Click on the "Add A New Location" button to add a new Location
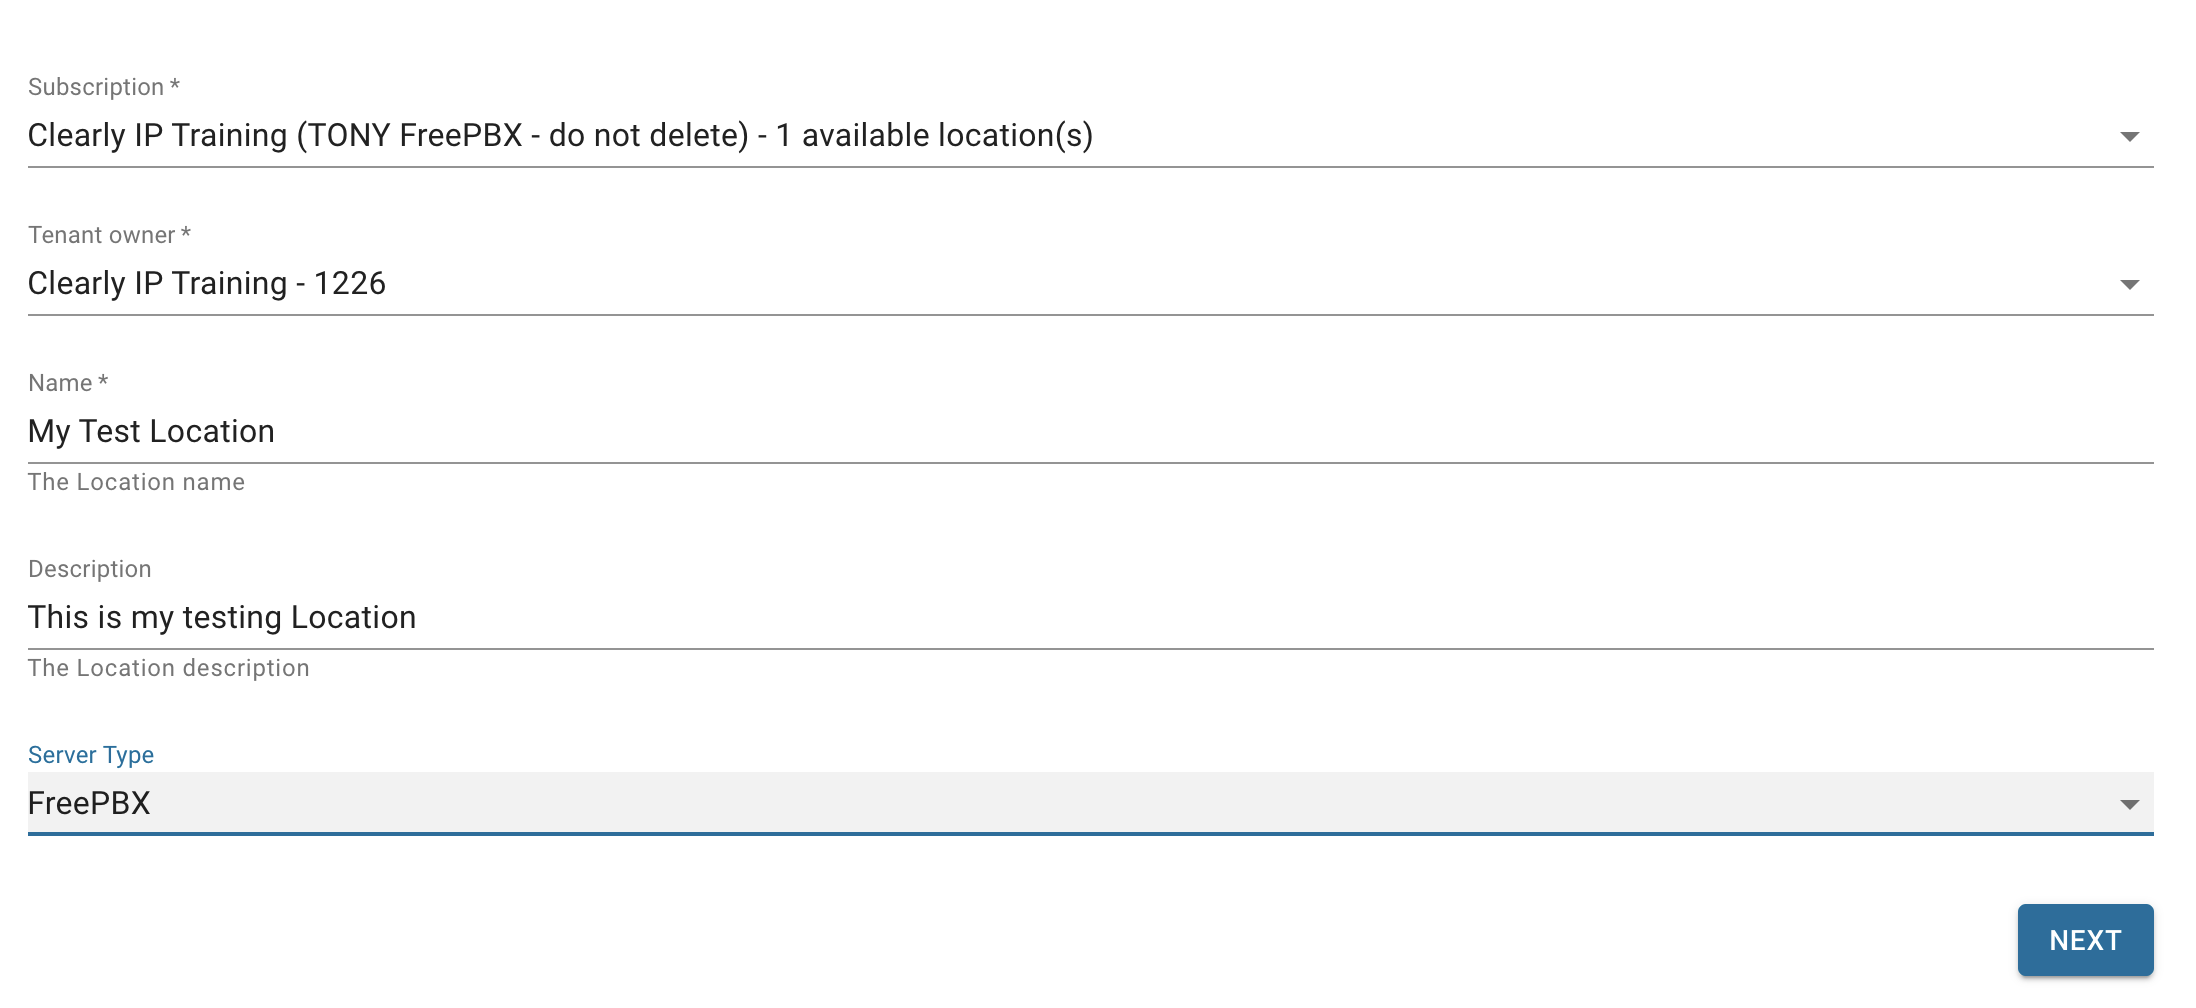
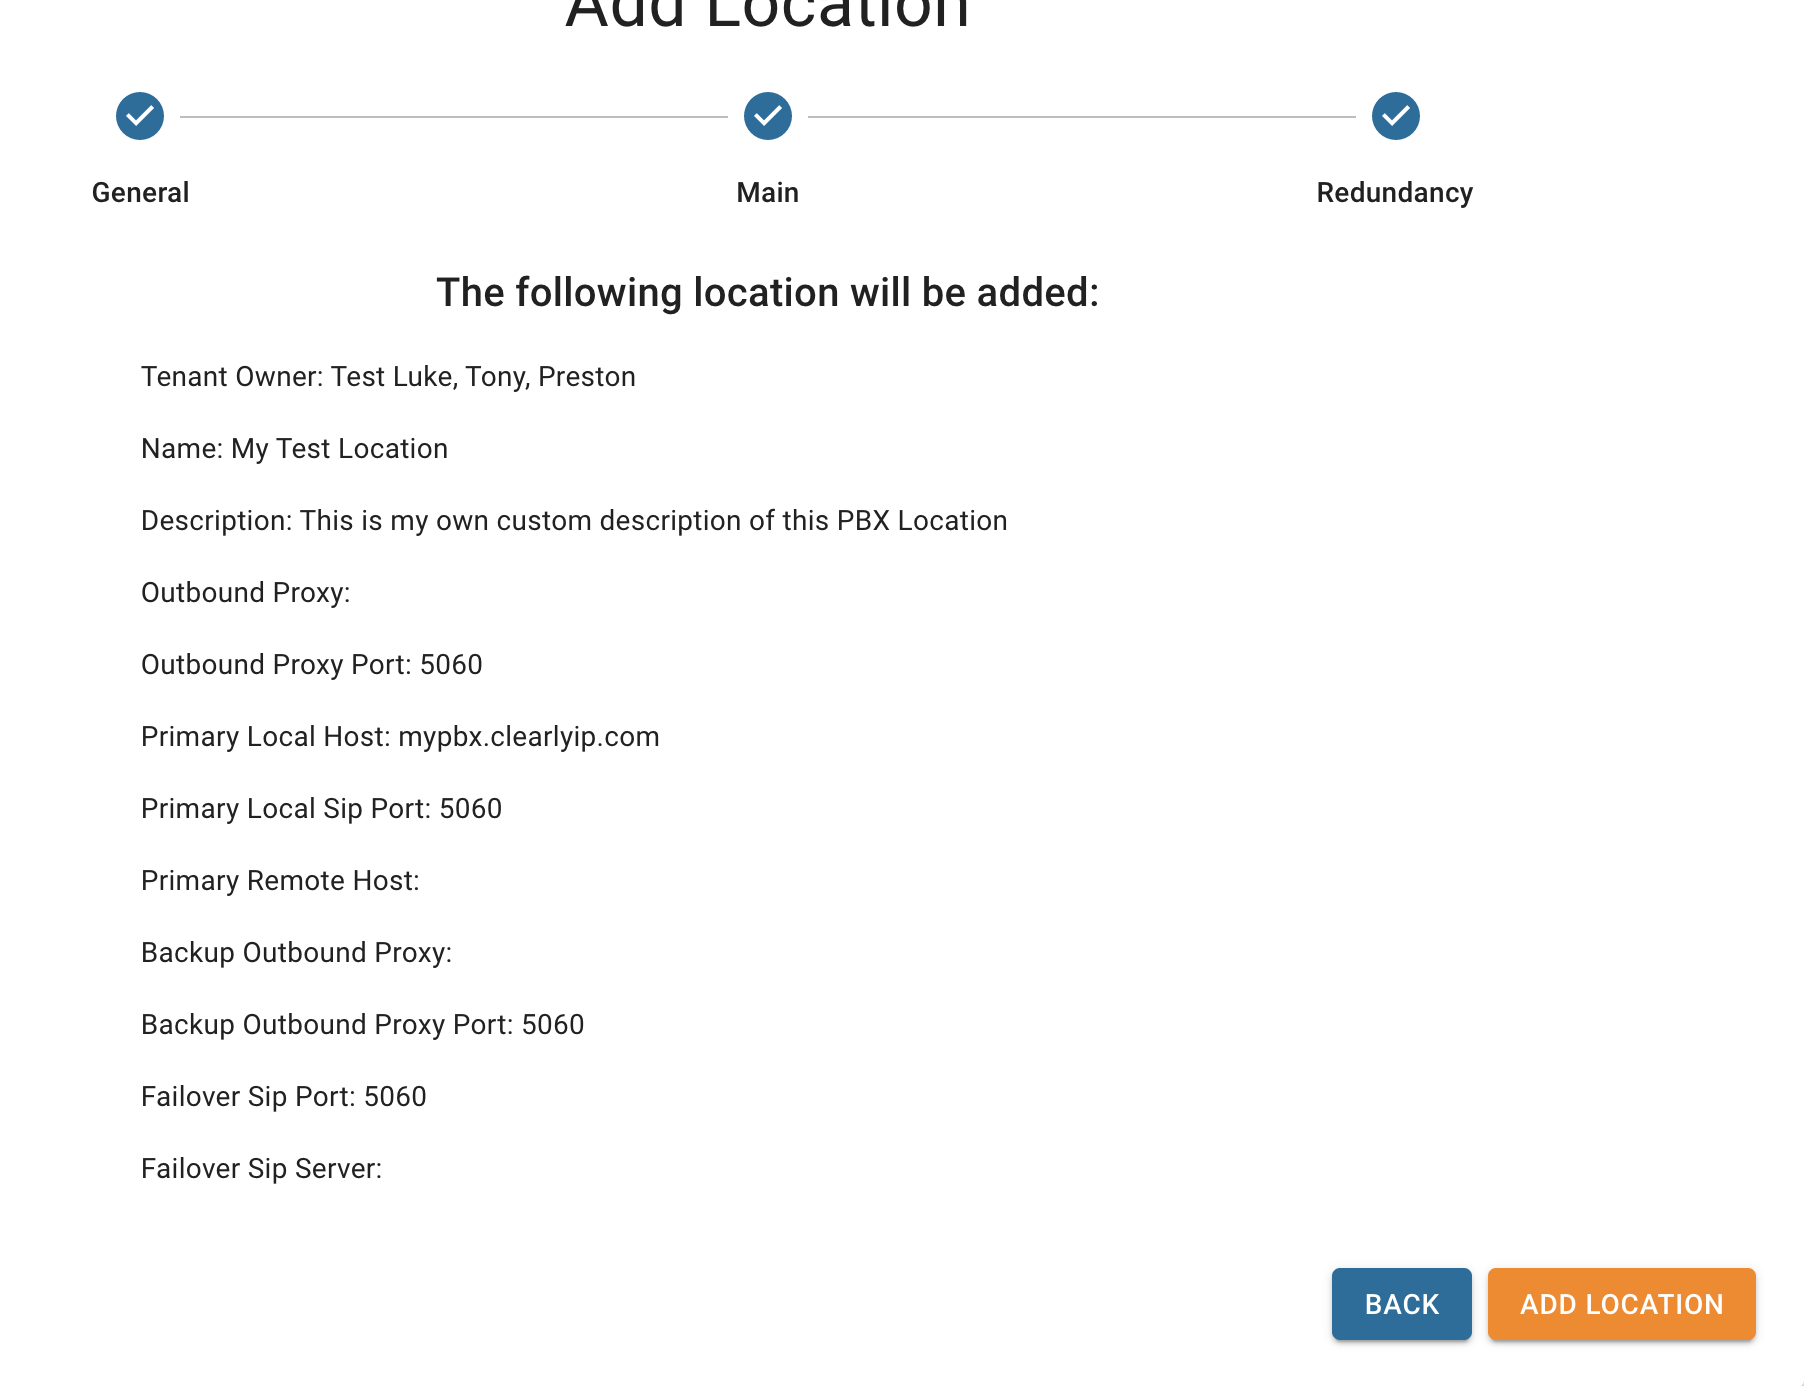
 - Add Location Step 1 Wizard - Press the next button for step 2
- Tenant Owner - Pick which Tenant this Location belongs to. If you are logged in as a tenant, you will not be able to pick a different Tenant. This only pertains to Reseller Level logins.
- Name - Provide a Name for this Location
- Description - Optionally provide a Description for this Location
- If this Location is setup as a FreePBX Location you will want to go back and view the Location and copy the Keycode to paste in the FreePBX CDM module that way FreePBX and this CDM Location can be synced and FreePBX will push all of the Extensions into CDM for mapping.
- Locate the CDM Location you need to retrieve the keycode for

- Click on the Binoculars icon to view the Location

- Scroll down under the General tab to the field called Keycod and copy and paste that Keycode
 Template Overview Templates are where we provide the information about the End Point Settings we want to configure, such as Line Keys, BLF keys, and all the options and features of the endpoints. A template gets linked to a Tenant and can be mapped to any Extensions of that Tenant as well as any Locations for that tenant.
Because Templates are agnostic to manufacture and models of phones, not all settings in a template will apply to all manufacturers and models of phones.
Creating a new Template - Once Logged into CDM from the Menu bar click on CDM > Templates
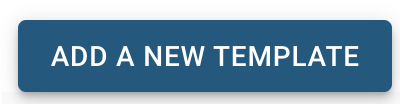
- Click on the Add New Template button at the top
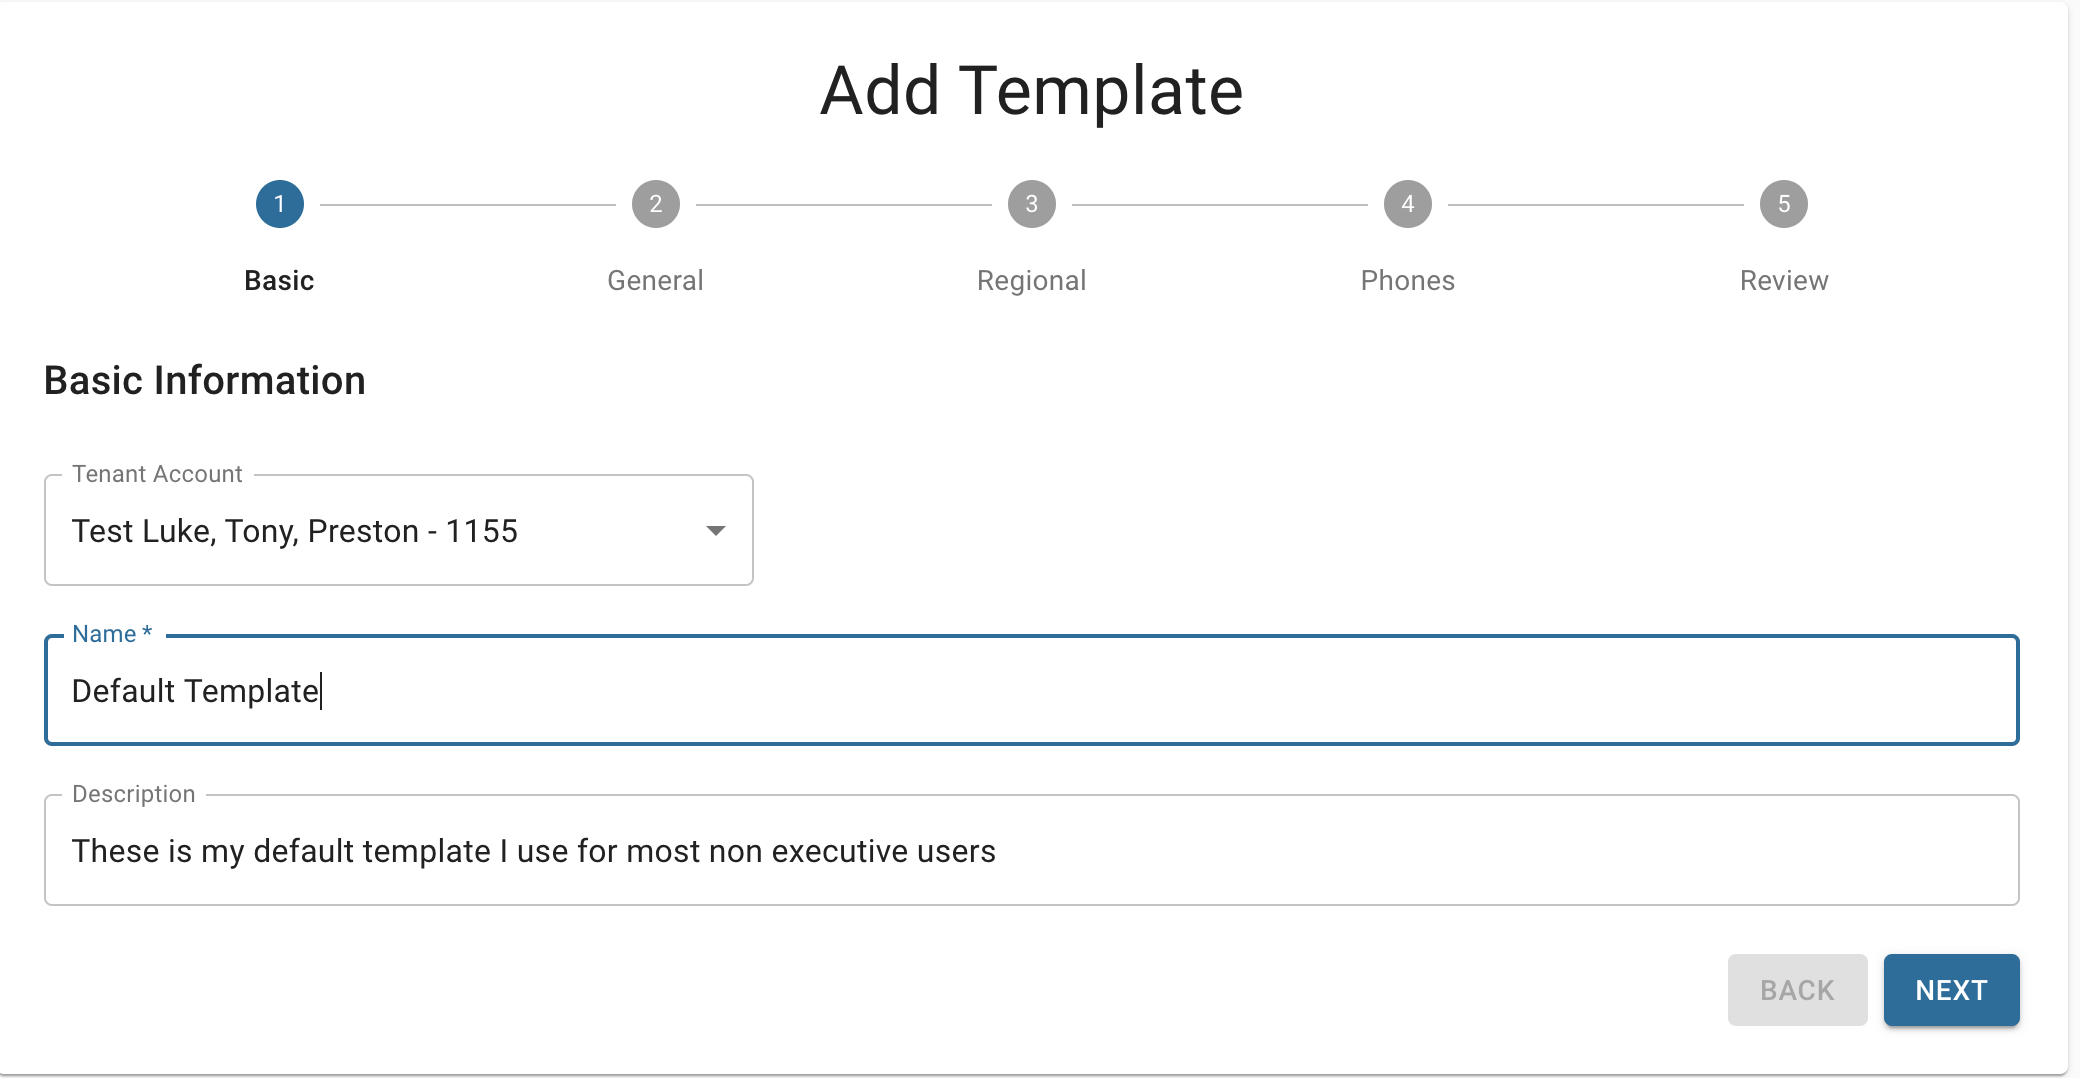
- Add Template Step 1 Basic Wizard - Press the next button for step 2
- Tenant Account - Pick which Tenant this Template belongs to. If you are logged in as a Tenant, you will not be able to pick a different Tenant. This only pertains to Reseller Level logins.
- Name - Provide a name for this template
- Description - Optionally provide an informative description of this template to remember what it is used for if you have many templates.
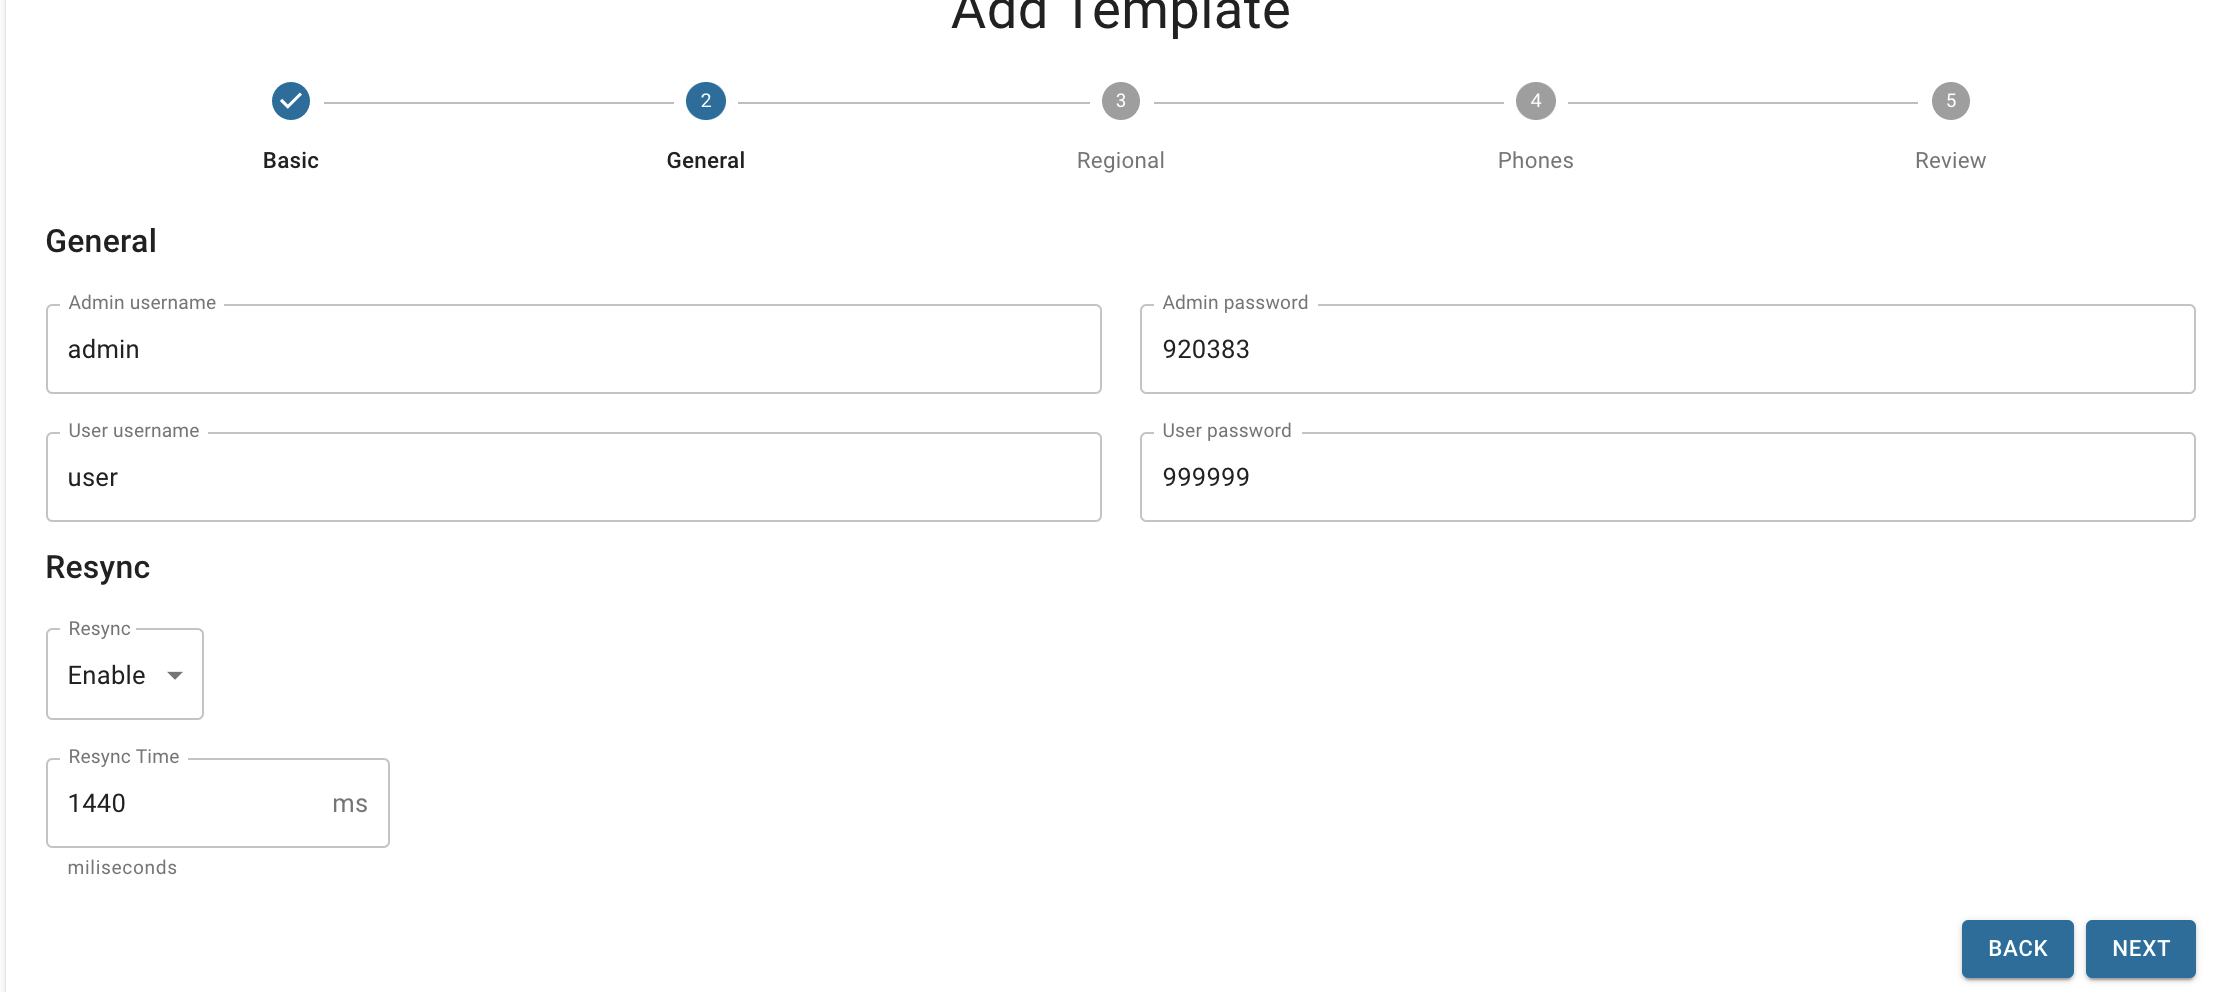
 - Add Template Step 2 General Wizard - Press the next button for step 3
- General
- Admin Username - For Devices that support an Admin User login, this is where you can set which username you want the admin user to be.
- Admin Password - For Devices that support an Admin User Login above, this is the password you would use to log in as that user.
- User Username - For Devices that support a User level login, here is where you can set what username you want the User Level user to be
- User Password - For Devices that support a User level Login, this is the password you would use to log in as that user.
- Resync
- Resync - Enable or disable how often the phone should re-check with Cloud Device Manager for a new or updated configuration file.
- Resync Time - How often, in minutes, the phone should re-check in if enabled above. The default is 1440 minutes, which is every 24 hours.
 - Add Template Step 3 Regional Wizard - Press the next button for step 4
- Time and Date
- Time Server - What NTP or Time Server the Device will sync its clock with.
- Time Zone - What Time Zone the Device will be set to.
- Daylight Savings - Enabled or Disabled will hard set the Device to have Daylight Savings on or off. Setting it to Auto will have the phone determine if it's in Daylights Saving mode or not at any given time.
- Time Format - 12 or 24 Hour format for the clock display on the Device.
- Date Format - Which format the date is shown on your Device
- Languages - Not all Devices support the same language, so verify that your device's manufacture supports the language you pick.
- Phone Webpage Language - What language should the Devices built-in Web GUI use.
- Phone GUI Language - What language should the Devices' built-in LCD menu on the device use.
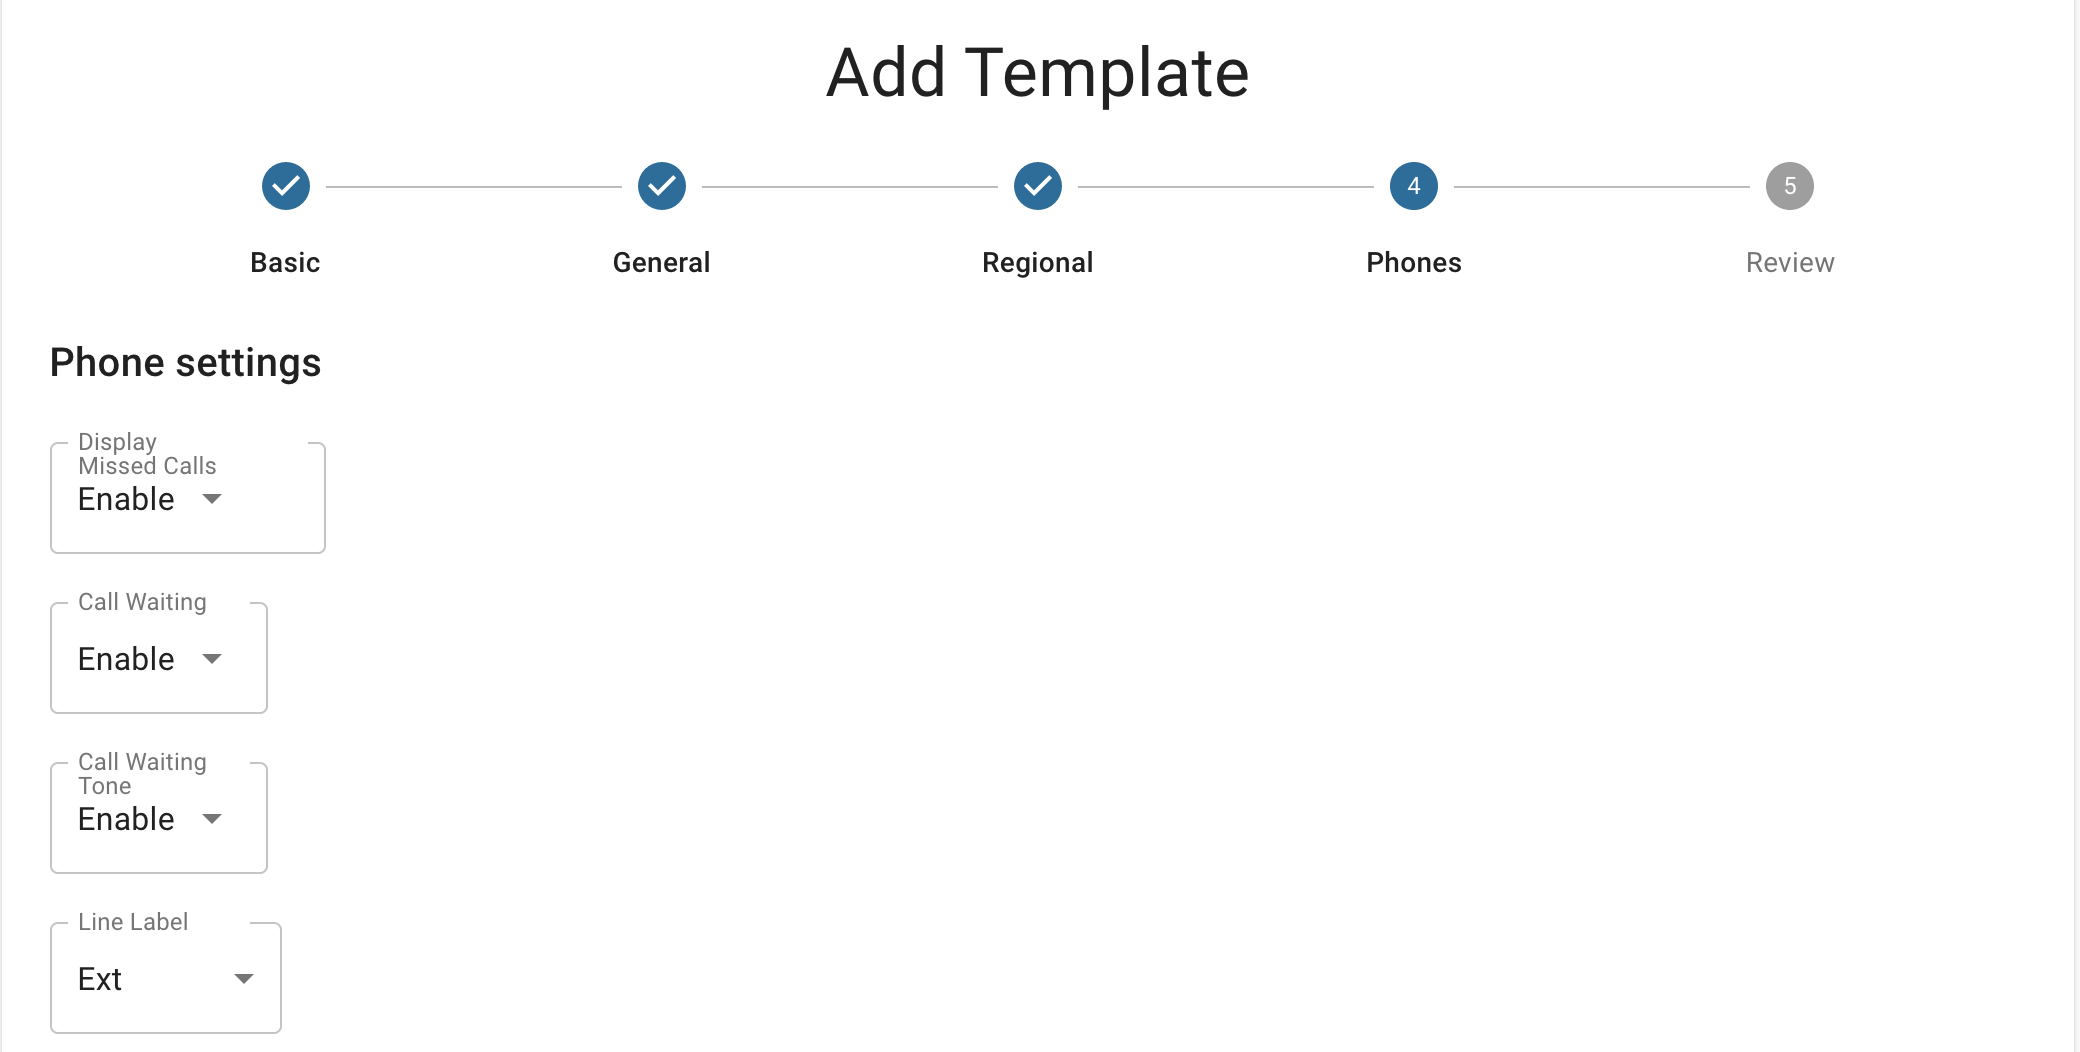
 - Add Template Step 4 Phones Wizard - Press the next button for step 5
- Phone Settings
- Display Missed Calls - Enable or Disable if the Device should show missed call notifications
- Call Waiting - Enable or Disable if the Device should honor Call Waiting
- Call Waiting Tone - Enable or Disable if the Device should play a beep when a Call Waiting call is received.
- Line Label - For Devices that use LCD Keys to display your Extension Registration/Lines, do you want the LCD to show the following;
- Ext - This will show the "Extension Number" on the LCD that are setup as line keys
- Ext-Name - This will show the "Extension Number - Extension Name" on the LCD that are setup as line keys
- Name - This will show the "Extension Name" on the LCD that are setup as line keys
- Name-Ext - This will show the "Extension Name - Extension Number" on the LCD that are set up as line keys
- Headset - To enable the Device to be in headset mode as the default mode.
- Backlight Timeout - For Devices that support having the phone's backlight go into dim or off mode after a period of inactivity time, you can set that period here.
- Conf Call Release - If the Device hangs up on a 3-way conference call, here is where you can define what should happen to the remaining parties of that call for Devices that support this feature.
- Transfer Mode - When pressing a BLF or speed-dial while on an active call, you can control what should happen to the active call you are talking to.
- Headset Ringer - Which ringtone should play on an inbound call.
 - Add Template Step 5 Review Wizard - Press the Add Template button to complete the adding of this Template
 - Now that we have created the Template, we need to Edit the template following the Guide below on Managing the existing Template to set up the different Models of Devices and buttons on those Models.
- We also have many more settings related to a Template that are only displayed when you edit that Template. These additional settings are not displayed in the Template Creation Wizard.
Managing existing Templates - Once Logged into CDM from the Menu bar, click on CDM > Templates

- From here, you can see a list of all the Templates that your login has access to and what Tenants they belong to if you are a reseller where you can see all the Tenants that are under you and manage things.
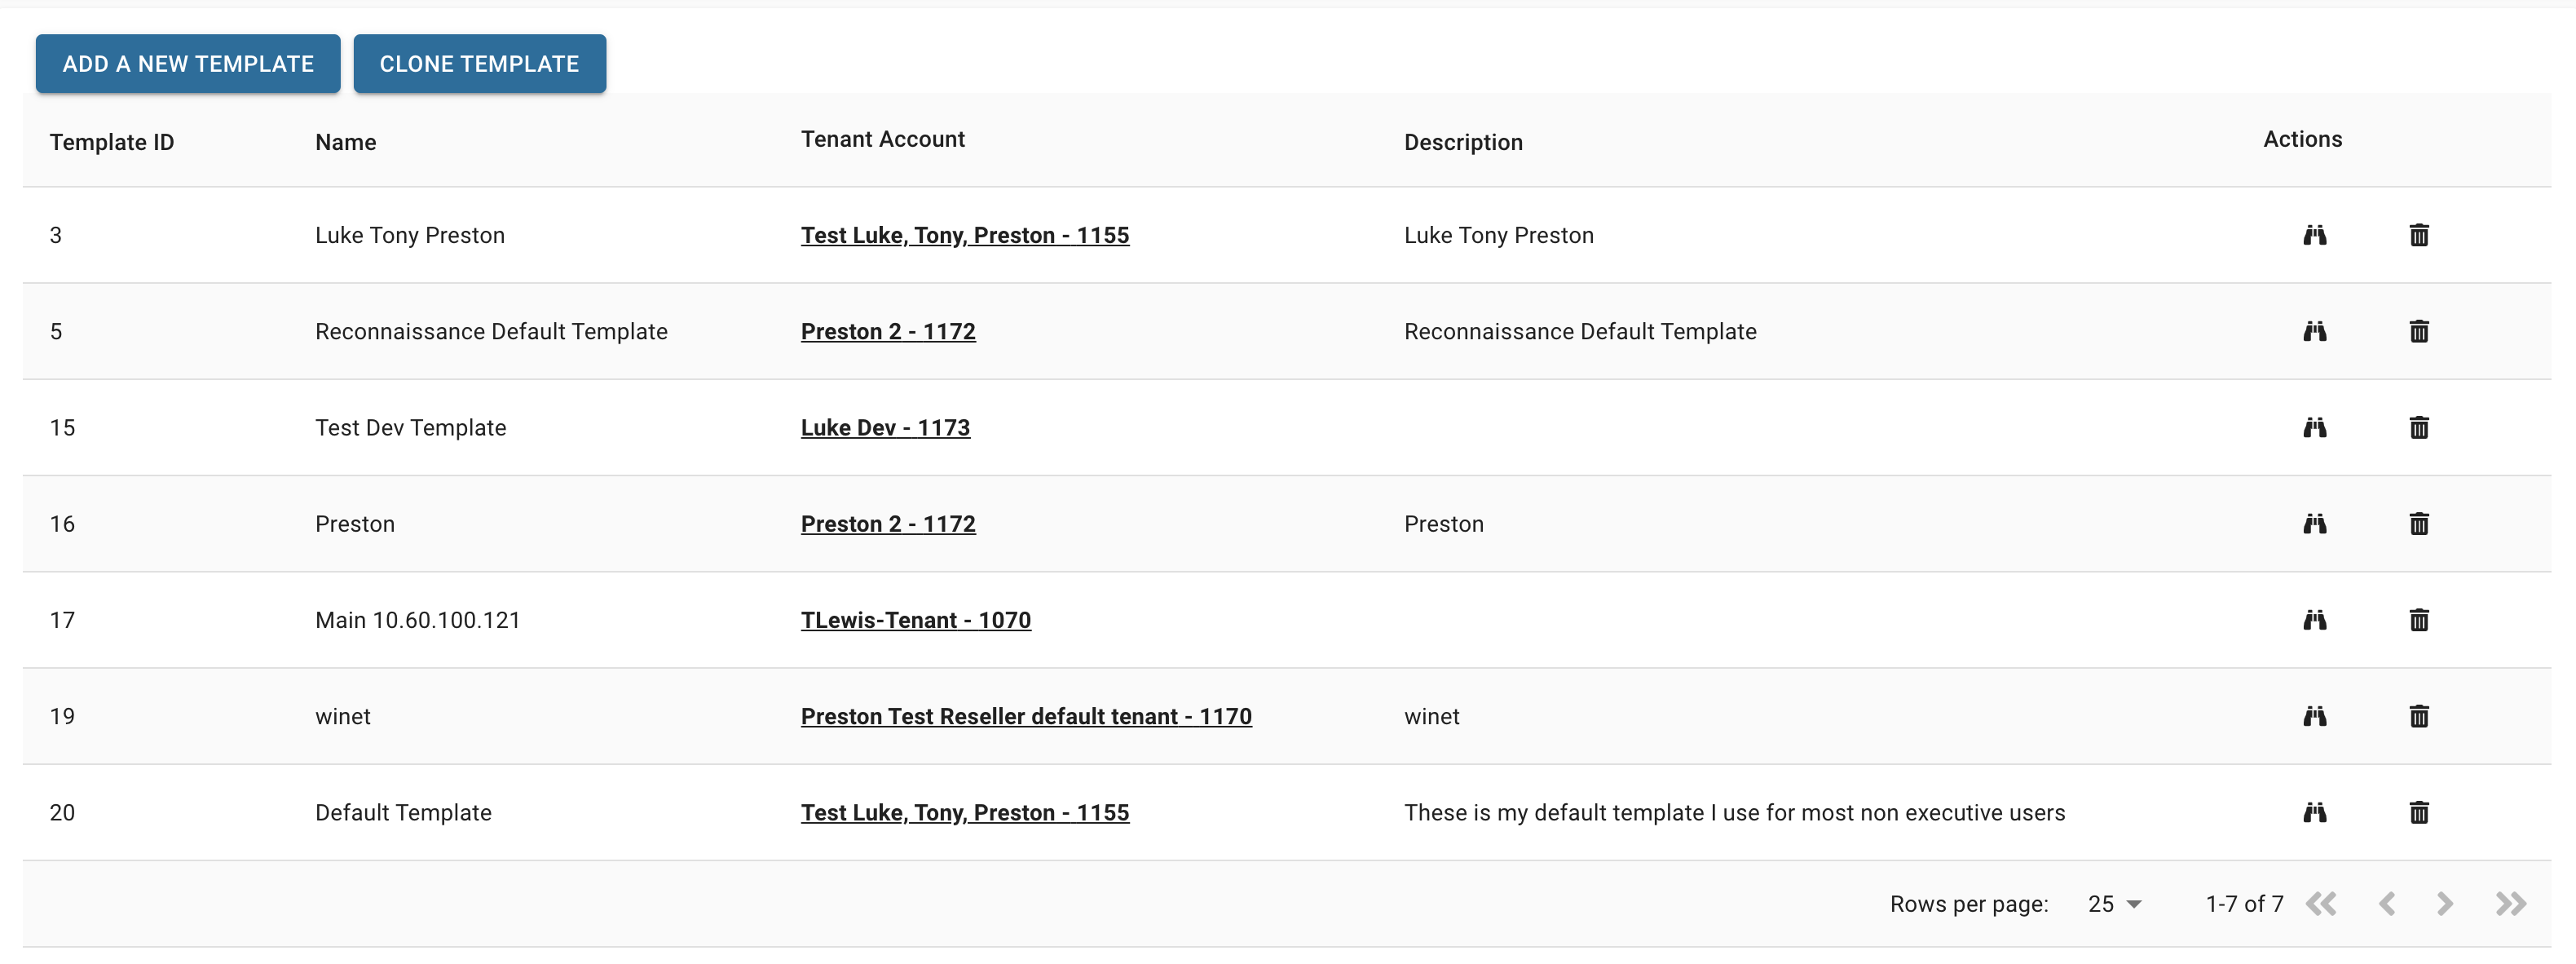
- Click on the Binocular icon.
 under the Action column to view and edit the details of the Template. under the Action column to view and edit the details of the Template.
- Click on the Trash Can icon
 under the Action column to delete the Template under the Action column to delete the Template
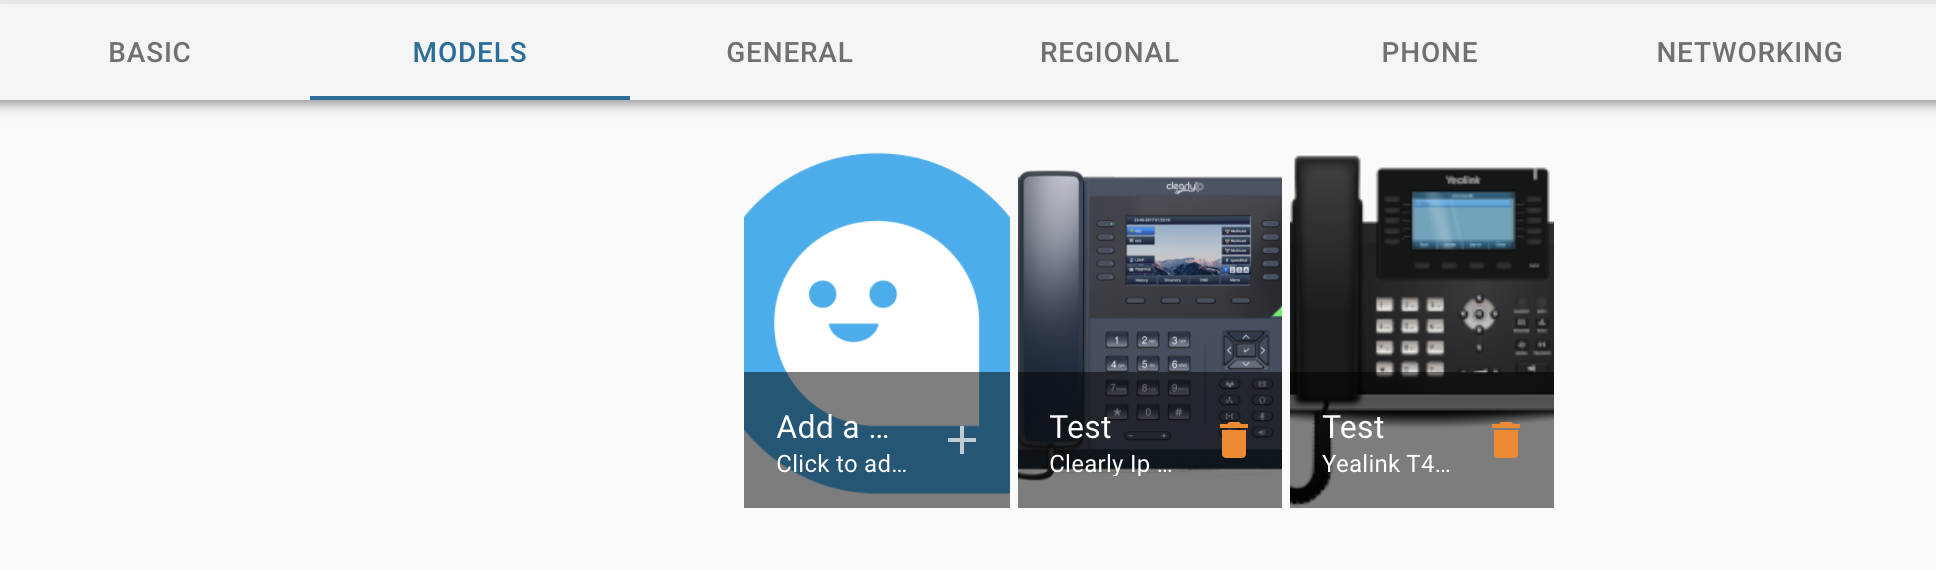
Managing Device Models in a Template - Following the steps above on Managing Existing Template, once you have clicked on the Binocular Icon for a Template, click on the Models tab and start adding, editing, or deleting any Device Models for a Template. From here, you can Add, Edit or Delete any Model.
- Delete - Click on the orange Garbage Can inside each model box.
- Edit - Click on any Model box to edit the settings for that Model
- Create New - Clicking on the Add A New Model button allows you to create a new Model
- Each Template can have one or more Models added, and you can add the same Model more than once to a template if you need to set up buttons for different groups of users without having to create a new Template.
 - Editing or Creating a new model will bring up the following options
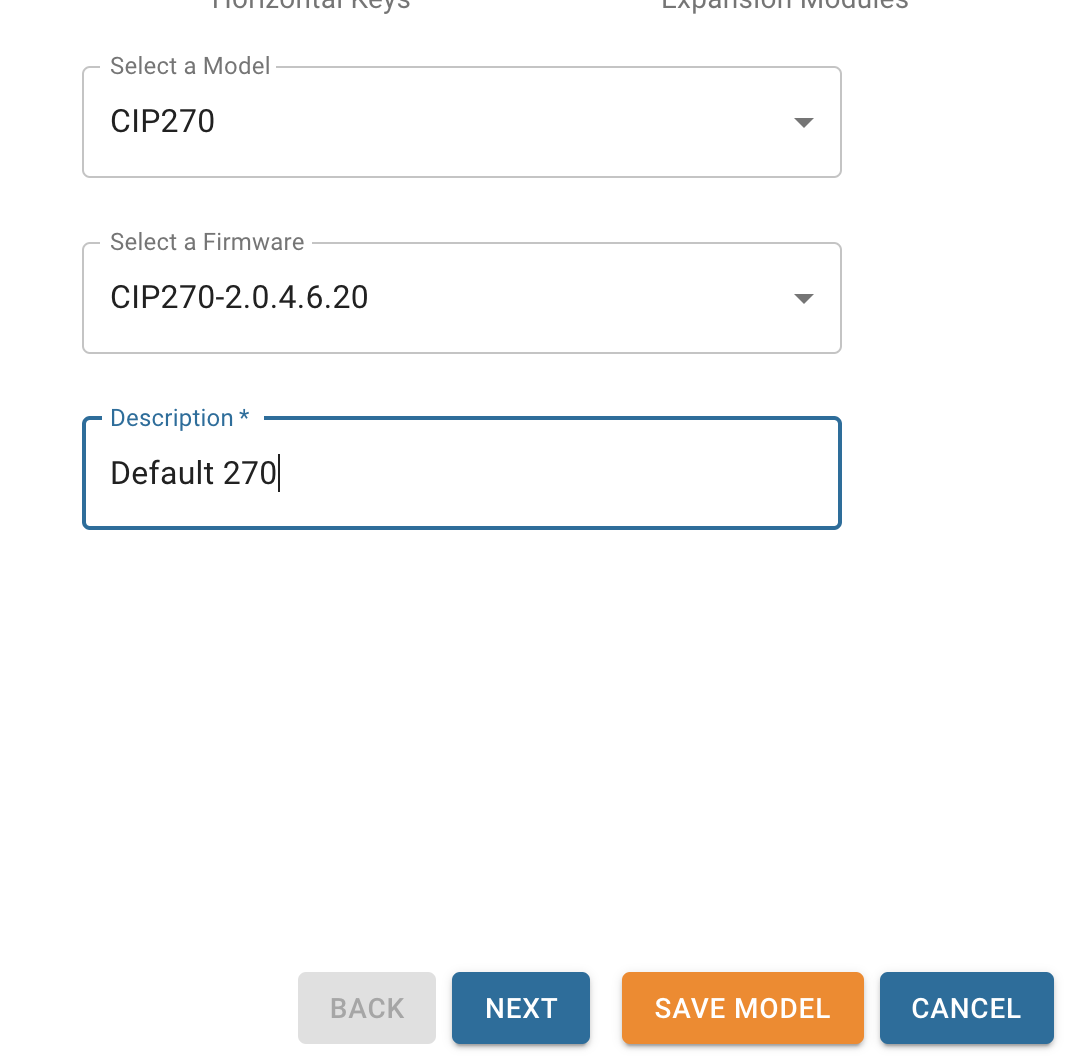
- Add Model Step 1 Model Wizard - Press the next button for step 2
- Select A Model - Which model of a device you want to set up from a drop-down sorted by manufacture.
- Select a Firmware - Pick from a drop-down of what firmware you want this Device to install once it pulls its configuration file from a list of Firmwares that are tested by us and compatible with CDM
- Description - A friendly name or description for your reference of what this model is used for.
- Add Model Step 2 Required Fields Wizard - Press the next button for step
- These fields are dependent on the Brand and Model of the device and relate to custom features that the model supports, and the options here will be different depending on this.
- Add Model Step 3 Line Keys Wizard - Press the next button for step 4
- Here is where you can set up your Lines, BLFs, Speeddials, and any other buttons that your specific model supports as Line Keys
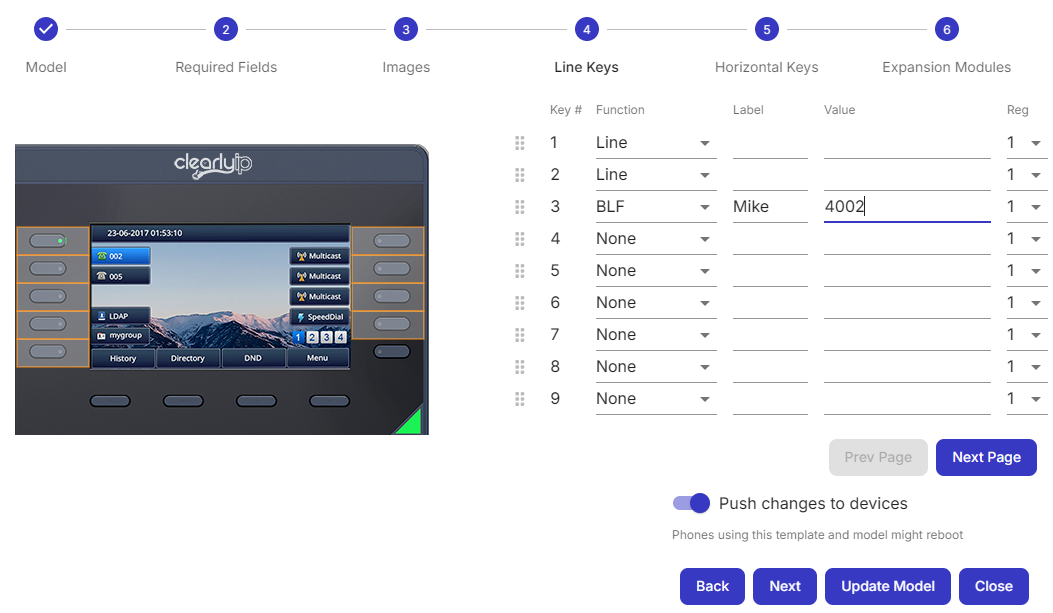
Note the grid icon to the left of each line key, this serves as a handle to be able to drag and drop to reposition the order of the line keys placement, if/when needed at any moment. to the left of each line key, this serves as a handle to be able to drag and drop to reposition the order of the line keys placement, if/when needed at any moment.
- Add Model Step 4 Horizontal Keys Wizard - Press the next button for step 5
- Here is where you can set up your Horizontal Soft Keys for Models that support changing these Button
- Some Models support changing the Layouts of the Horizontal Buttons on a per Call State, such as On A Call or Hold, and others do not.
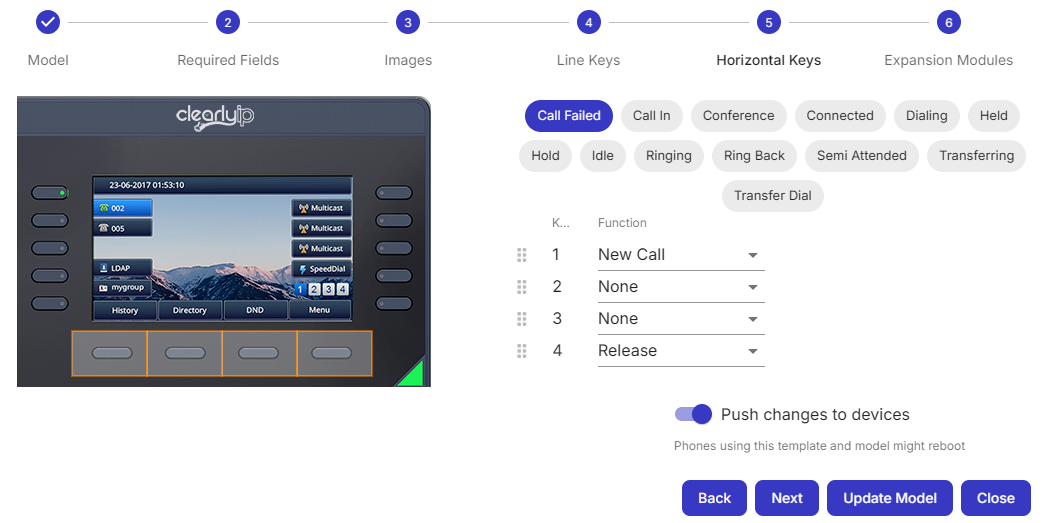
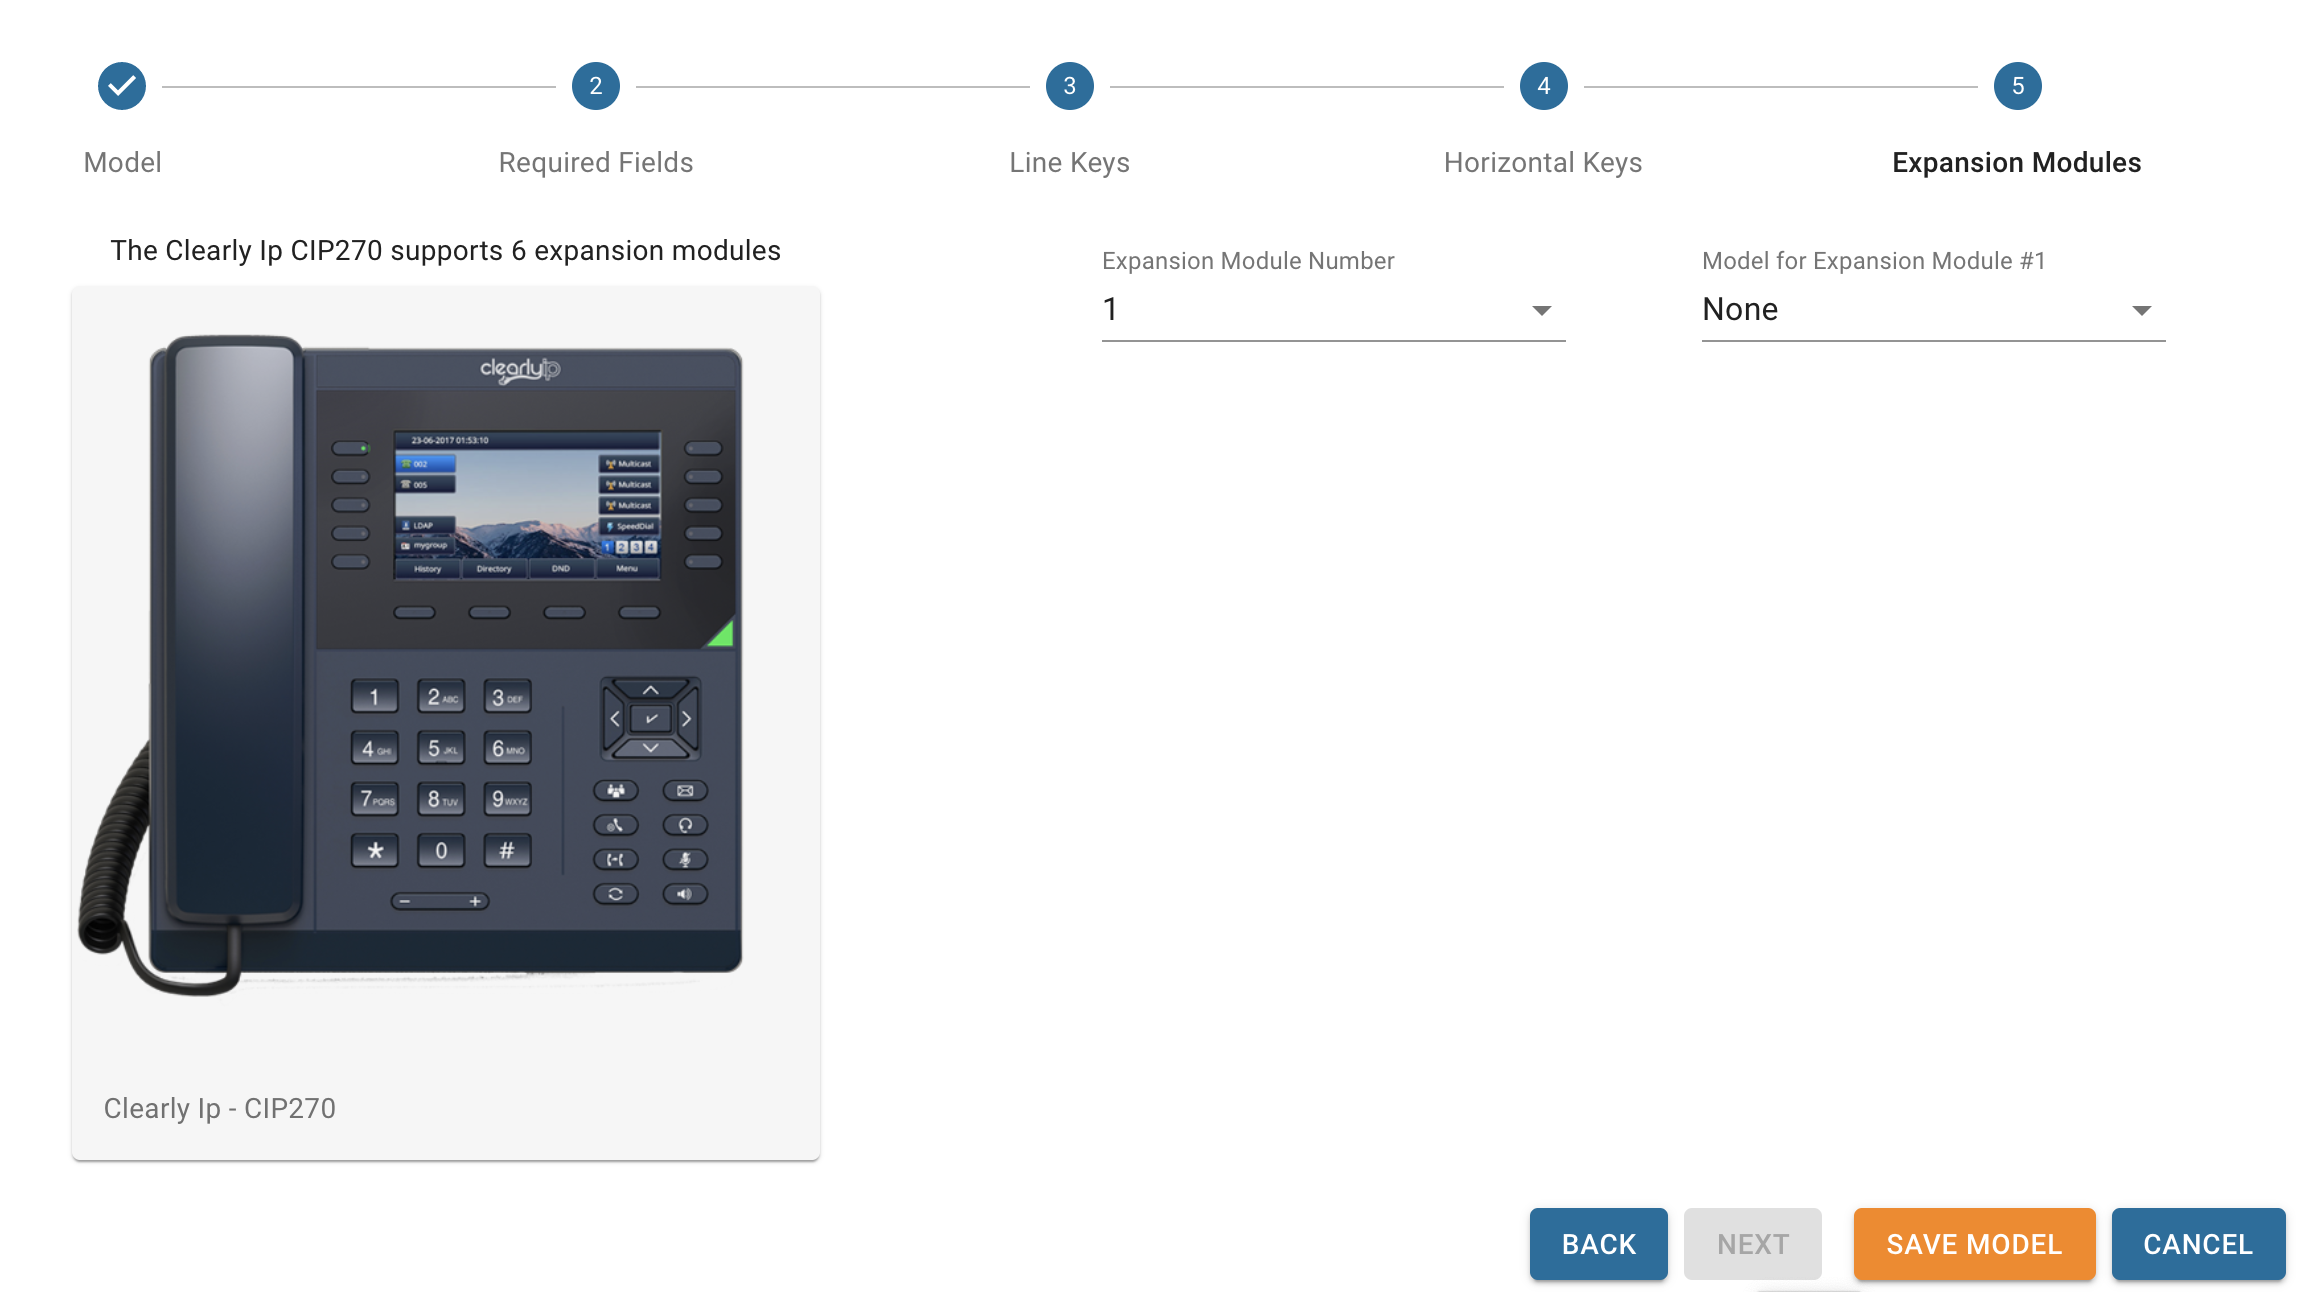
Samr as with the Line keys, note the grid icon to the left of each line key, this serves as a handle to be able to drag and drop to reposition the order of the line keys placement, if/when needed at any moment. to the left of each line key, this serves as a handle to be able to drag and drop to reposition the order of the line keys placement, if/when needed at any moment. - Add Model Step 5 Expansion Modules Wizard - Save Model Button to save your model changes
- Here is where you can set up and link any Expansion Modules to this Model for Models that support Expansion Modules
Cloning a Template - Once Logged into CDM from the Menu bar click on CDM > Templates
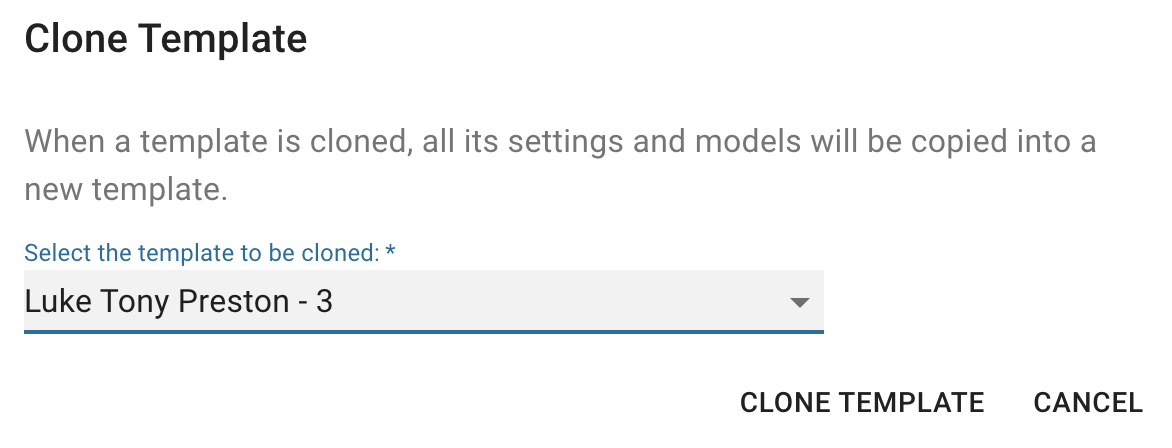
- Click on the Clone Template button at the top
- You will be asked what Template you want to Clone, and it will create a new Template with the same settings and configurations of the Template you just cloned and let you now edit that clone to change things.
Extensions are where you define the extensions from your PBX and include the Extension name, username, and SIP Password for each extension. Once Extensions are created, we can now map Extensions to Specific Templates, Device Models, and Locations to build out the configuration file for each Device based on the Devices' MAC Address.
- FreePBX - With FreePBX once you have installed the CDM module into FreePBX and pasted in the Keycode from the Location FreePBX will sync all the Extensions to CDM. As you edit or add new extensions in FreePBX they will be auto pushed into CDM.
- ClusterPBX or Clearly Cloud - In the Location in CDM their is a tab called CloudPBX and you can press the "Sync Extension" button to have CDM fetch all the extensions and any changes from your ClusterPBX or Clearly Cloud system.

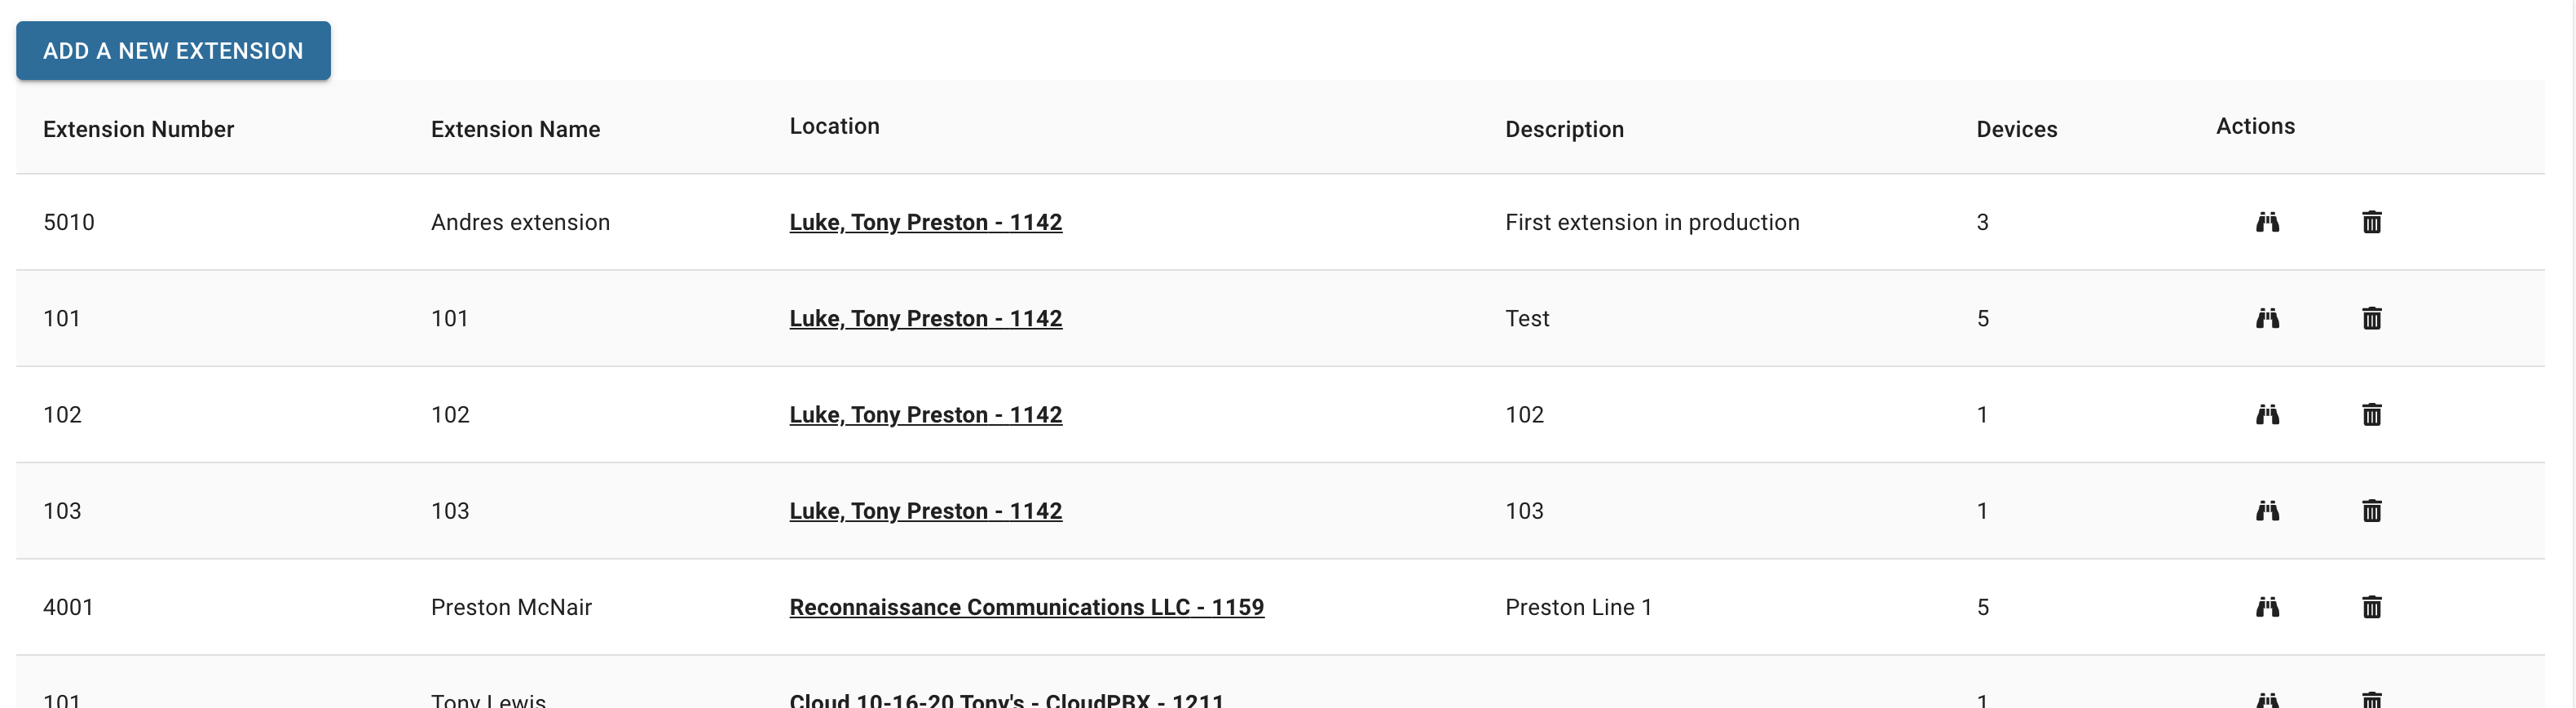
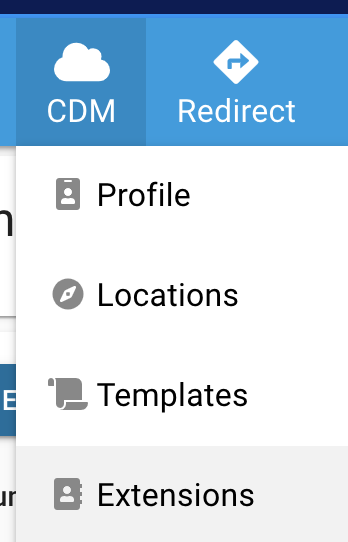
Creating New Extensions - Once Logged into CDM from the Menu bar click on CDM > Extensions
- Click on the Add A New Extension button
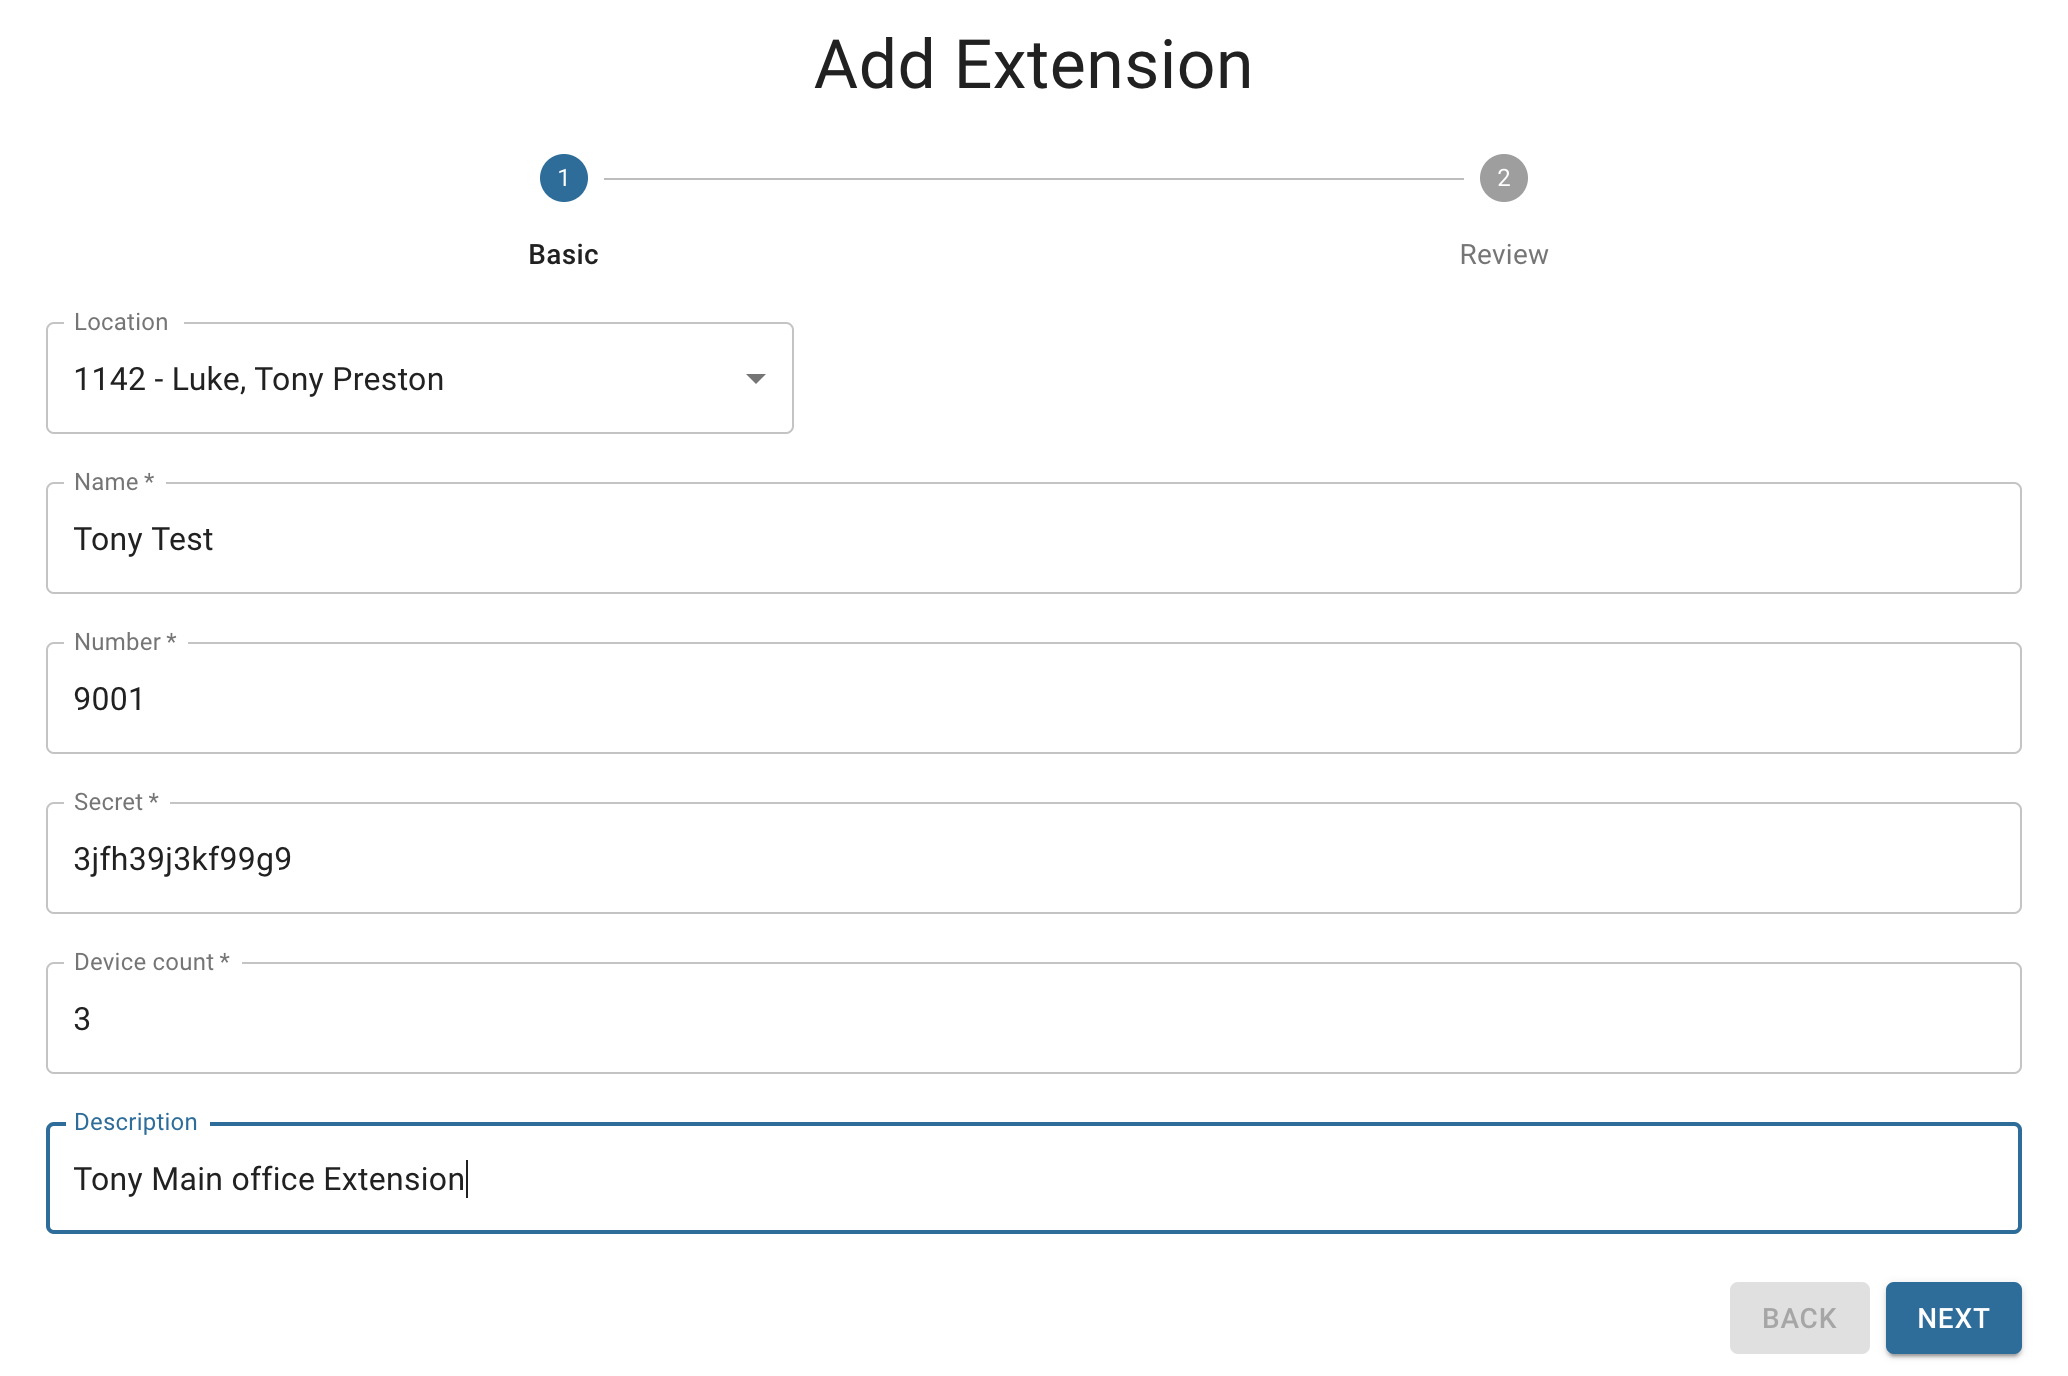
 - Add Extension Step 1 Basic Wizard - Press the next button for step 2
- Location - Pick which Location this Extension is tied to
- Name - Name of this Extension you are creating
- Number - The Extension Number or on some PBXs known as the SIP User Name
- Secret - The Extension SIP Password or Secret to register as this SIP Extension
- Device Count - How many devices can register to this extension. For example if you set this to 3 than when we setup Device Mapping next CDM will only allow you to map 3 different Device MAC Addresses to this same extension.
- Description - Friendly Description on what this Extension is.
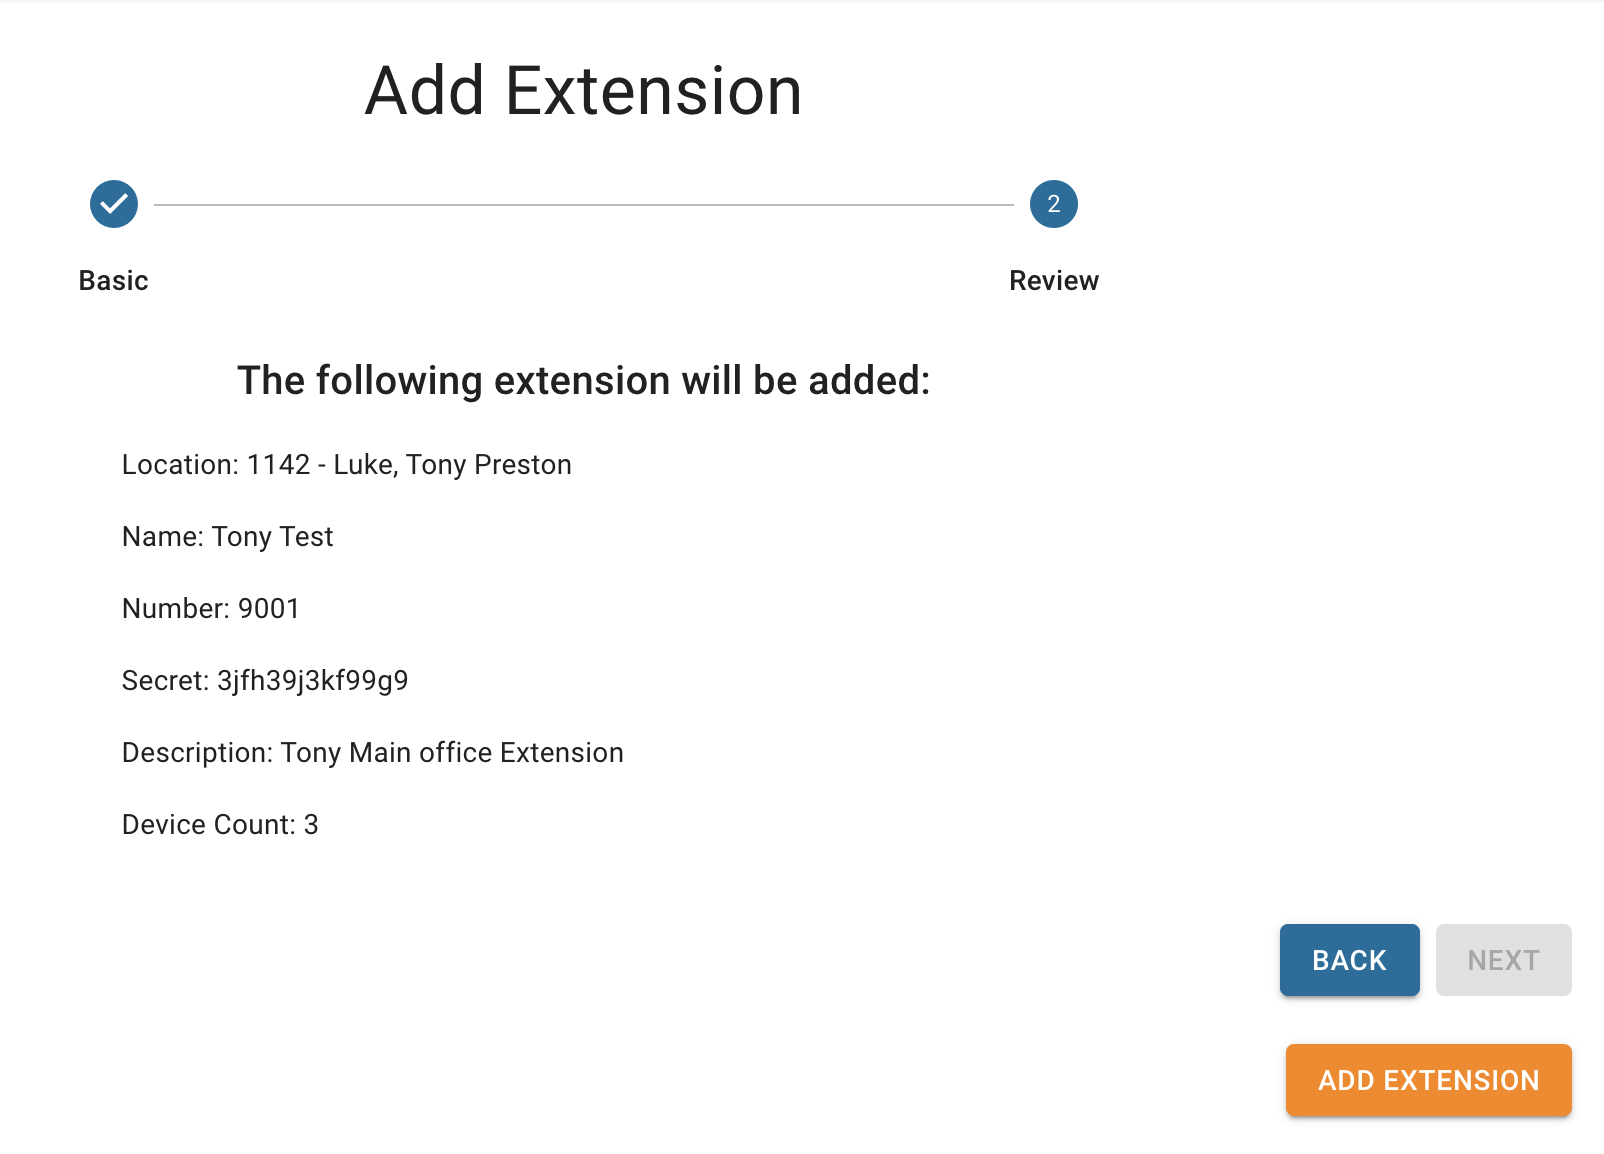
 - Add Extension Step 2 Review Wizard - Press Add Extension to complete the process of adding this Extension
Managing existing Extensions Mappings are where we pull in all the information of Locations, Templates, Models, and Extensions and map them to specific Device MAC Addresses that are used to provide all the configuration details to the Device when it logs in and requests the configuration information.
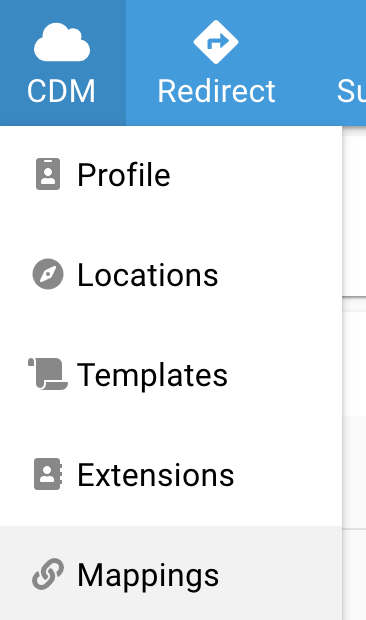
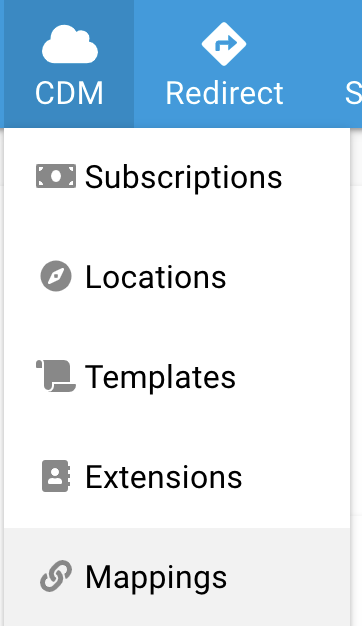
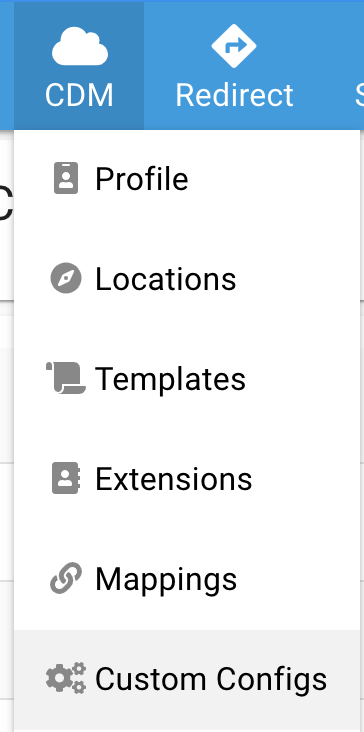
Creating new Mappings - Once Logged into CDM from the Menu bar click on CDM > Mappings
- Click on the Add A New Mapping button
- Add Mapping Step 1 - Select a Location
Pick from the dropdown menu the Location you want to assign the mapping(s) to:

and then click on the "Next" button to go to step 2.
- Add Mapping Step 2 - Template and Model
If wanting to bulk upload multiple mappings at once, click on the "Click here to upload using a CSV File" button shown on top:

Skip to here for instructions on adding mappings in bulk. Otherwise continue here below for manually adding a single mapping:
- Template - What Template are you wanting to use for this Device
- Select a Model - Based on what Template you picked above, you will be given a list of all the Models that you have set up under that Template that you can pick from.
- MAC Address - The MAC Address of the device that you are adding.
- Provisoning URL - This allows you to copy the full Provisioning URL that this device will need to be provided to get its configuration file. This is a Read-only field and is provided based on the template you picked above.
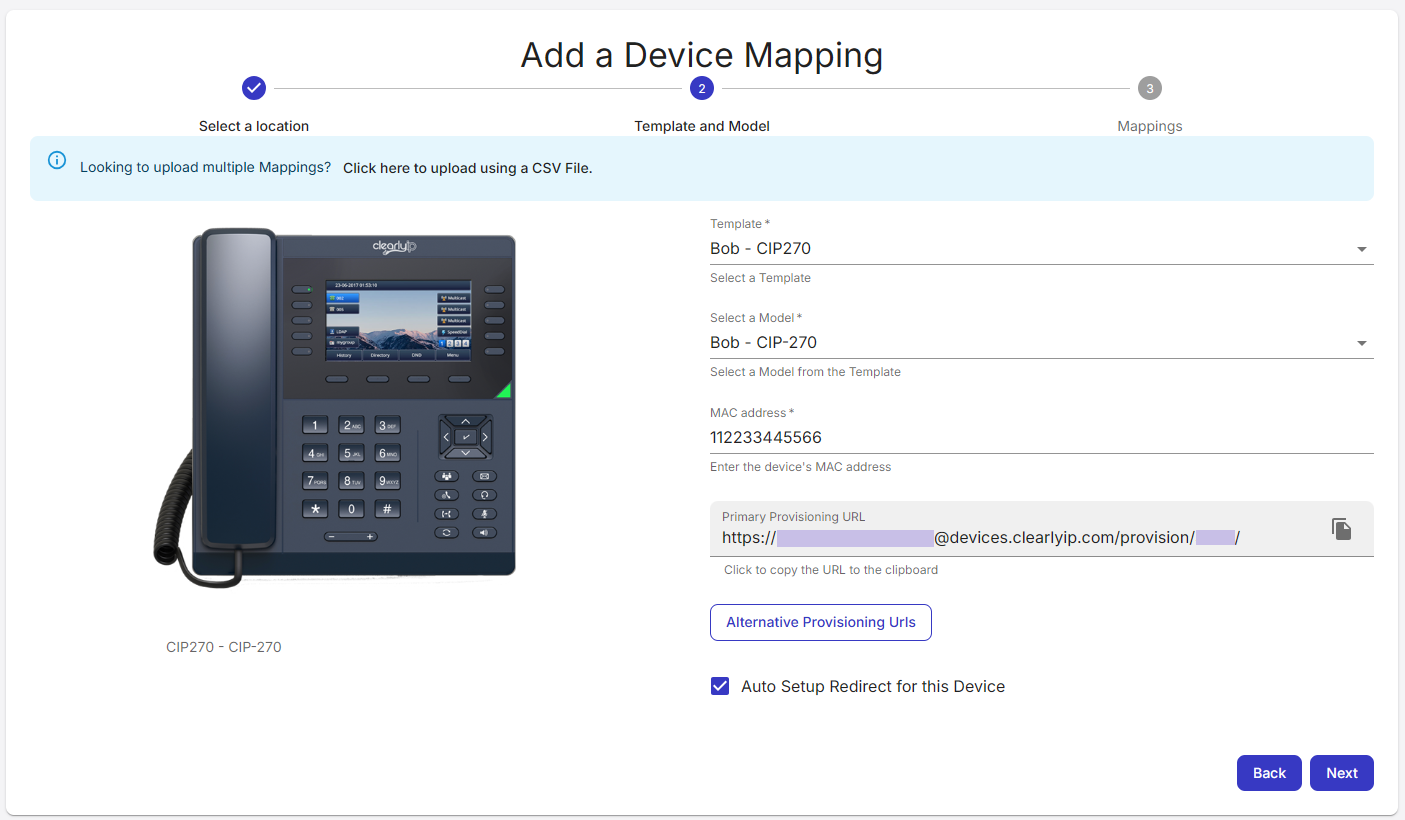
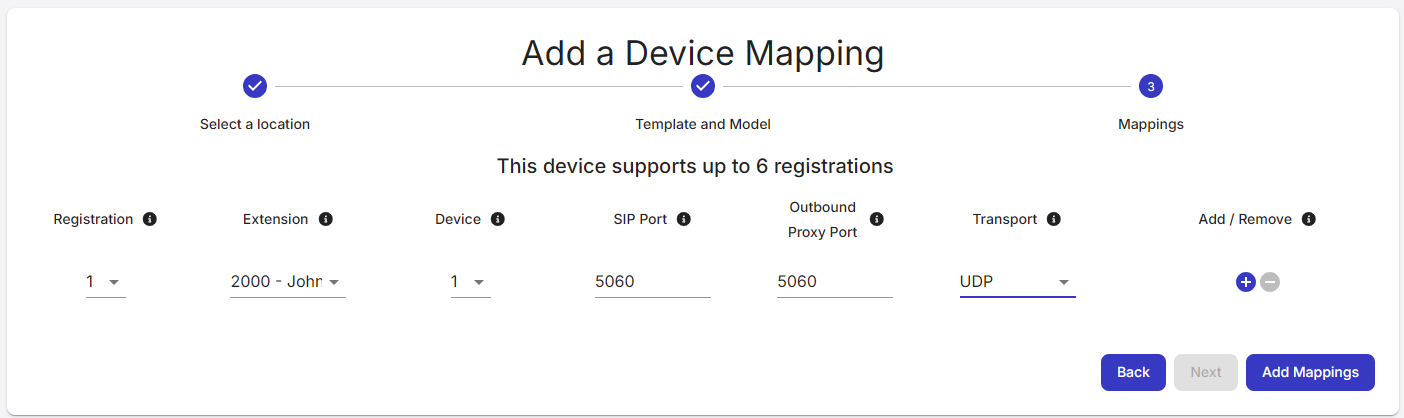
and then click on the "Next" button to go to step 3. - Add Mapping Step 3 - Mappings
- Registration - Generally, this would be set to one as the central registration on the device. Still, if you were trying to program the same device to two different extensions, you can pick a different registration for this device.
- Extension - Which Extension we are mapping to this device
- Device - This is a drop-down of which Device Count this mapping will use. Earlier, when we set up the Extension, we defined how many devices are allowed to connect to the same extension, and here we are, pick one of the free slots.
- SIP Port - This is the SIP port used by the phone system. Usually, this would be left at 5060
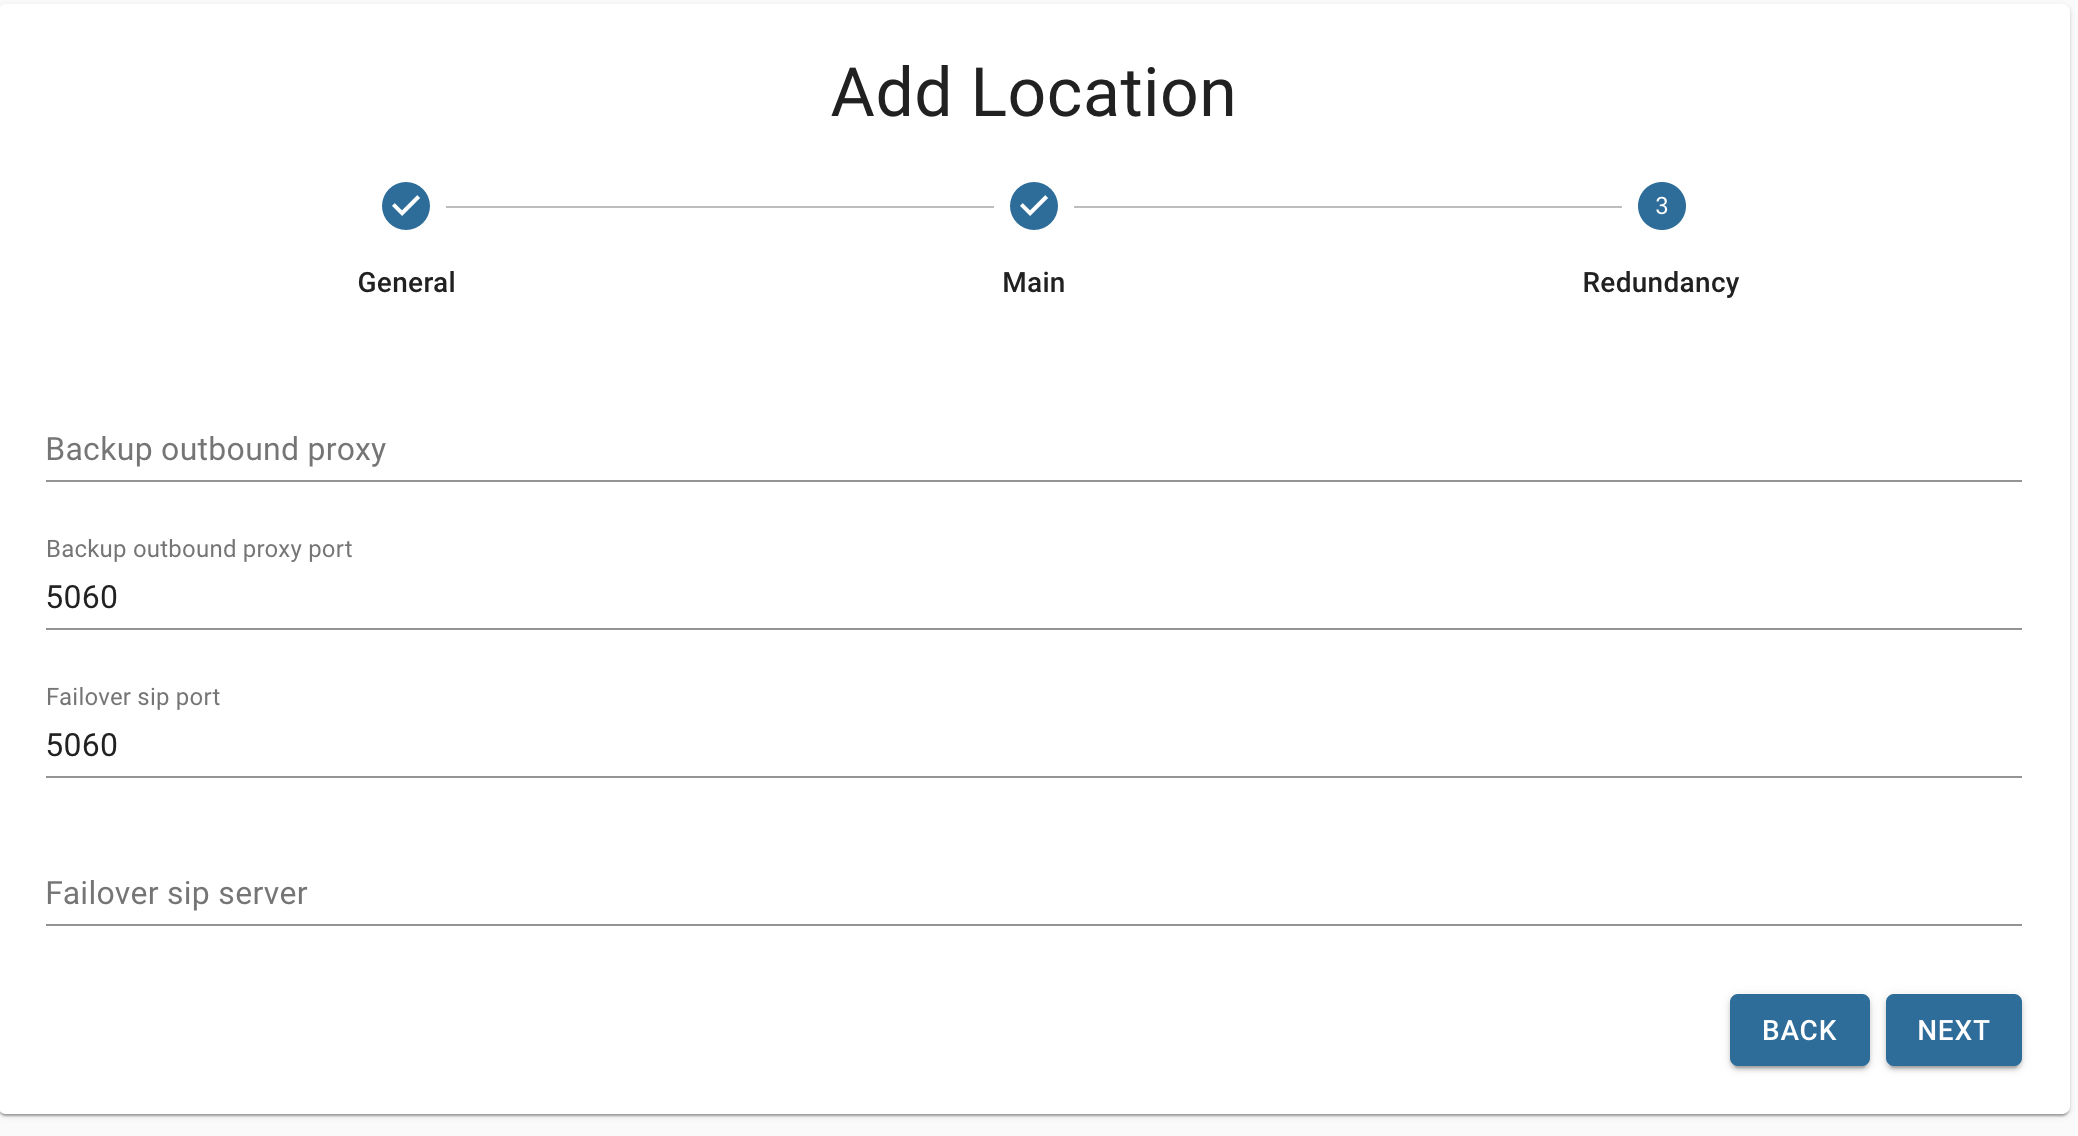
- Outbound Proxy Port - This is the SIP Outbound Proxy used by the phone system. Usually, this would be left at 5060
- Transport - This would be the Transport Type the Device should be set up to communicate with the phone system.
- Add/Remove - This allows you to map an additional Extension to the Device on an additional Registration such as Registration 2. This is only used when trying to have a single Device register as different extensions on the same device.
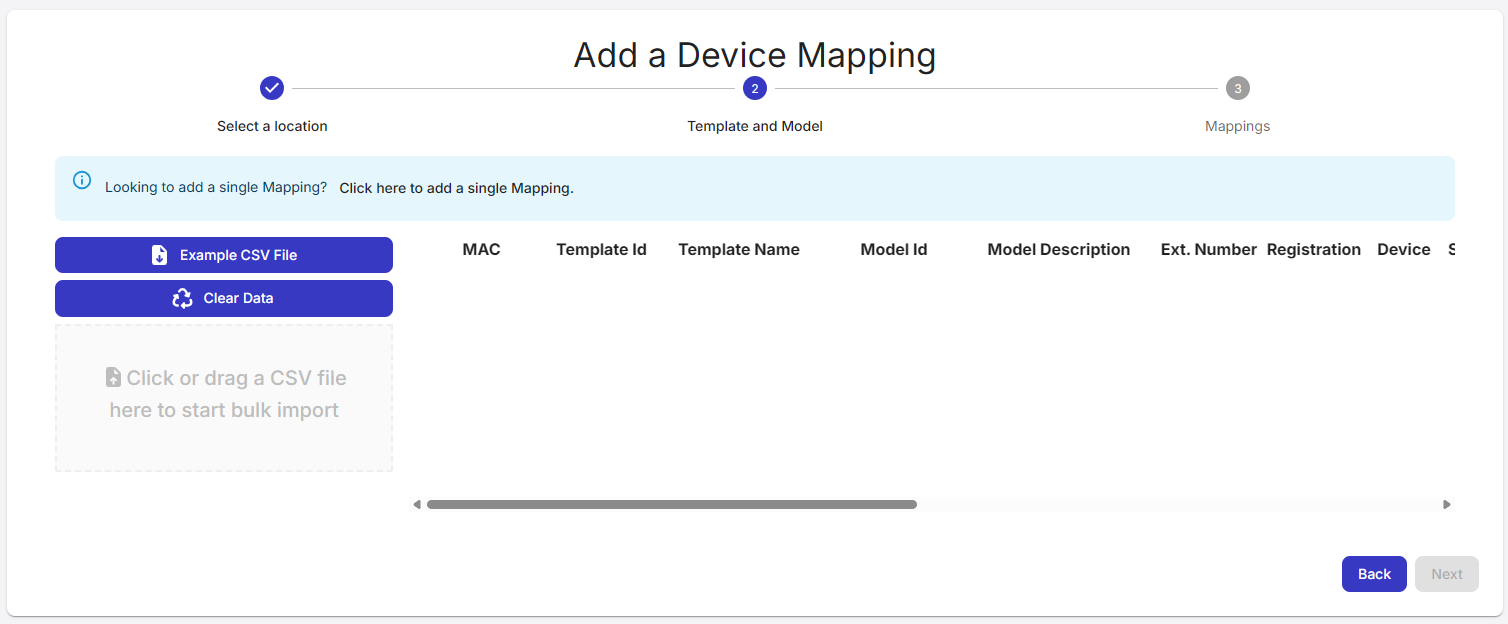
Adding Mappings in BulkWhen adding Mappings, on Step 2 (Template and Model), if the "Click here to upload using a CSV File" button shown on top is clicked, the following screen will show:
Click on the "Example CSV File" button to download a sample csv file that you can base yourself on for when preparing the csv file that you will then upload here to import your mappings definitions. Here below is an example showing the expected structure (headers) of these csv files:

where: - mac - MAC address of the SIP device you want to map to an extension
- template_id - ID of the Template you want to be used for the provisioning of this device. The Template ID can be seen in:
CDM > Templates > (click to edit the template) > id (this within the 'BASIC' tab) - template_model_id - ID of the phone model you want to be used for the provisioning of this device. The Phone Model ID can be seen in:
CDM > Templates > (click to edit the template) > MODELS > (click to edit the model) > Template Model Id - extension_number - Extension number you want to assign/map to this device
- registration - Registration position in the device. Usually, for devices that you want to assing a single extension only, this registration parameter would be '1' , if more than one extension is going to be assigned to the device then the second extension would need to have the registration parameter set to '2' and accordinly so on and so forth for any further additional extensions
- device_number - Usually, for when extensions are being assigned to once device only, this device number parameter would be '1' ; if assigning a same extension to multple devices however, then this parameter will be used to define which device this mapping is being assigned to
- sip_port - This is the SIP port used by the phone system. Usually, this would be left at 5060
- outbound_proxy_port - This is the SIP Outbound Proxy used by the phone system. Usually, this would be left at 5060
- transport_type - This would be the Transport Type the Device should be set up to communicate with the phone system. Usually, this would be left at UDP
- media_type - This would be the Media Type and encryption that the Device should be set up to communicate with the phone system. Usually, this would be left at RTP/NONE
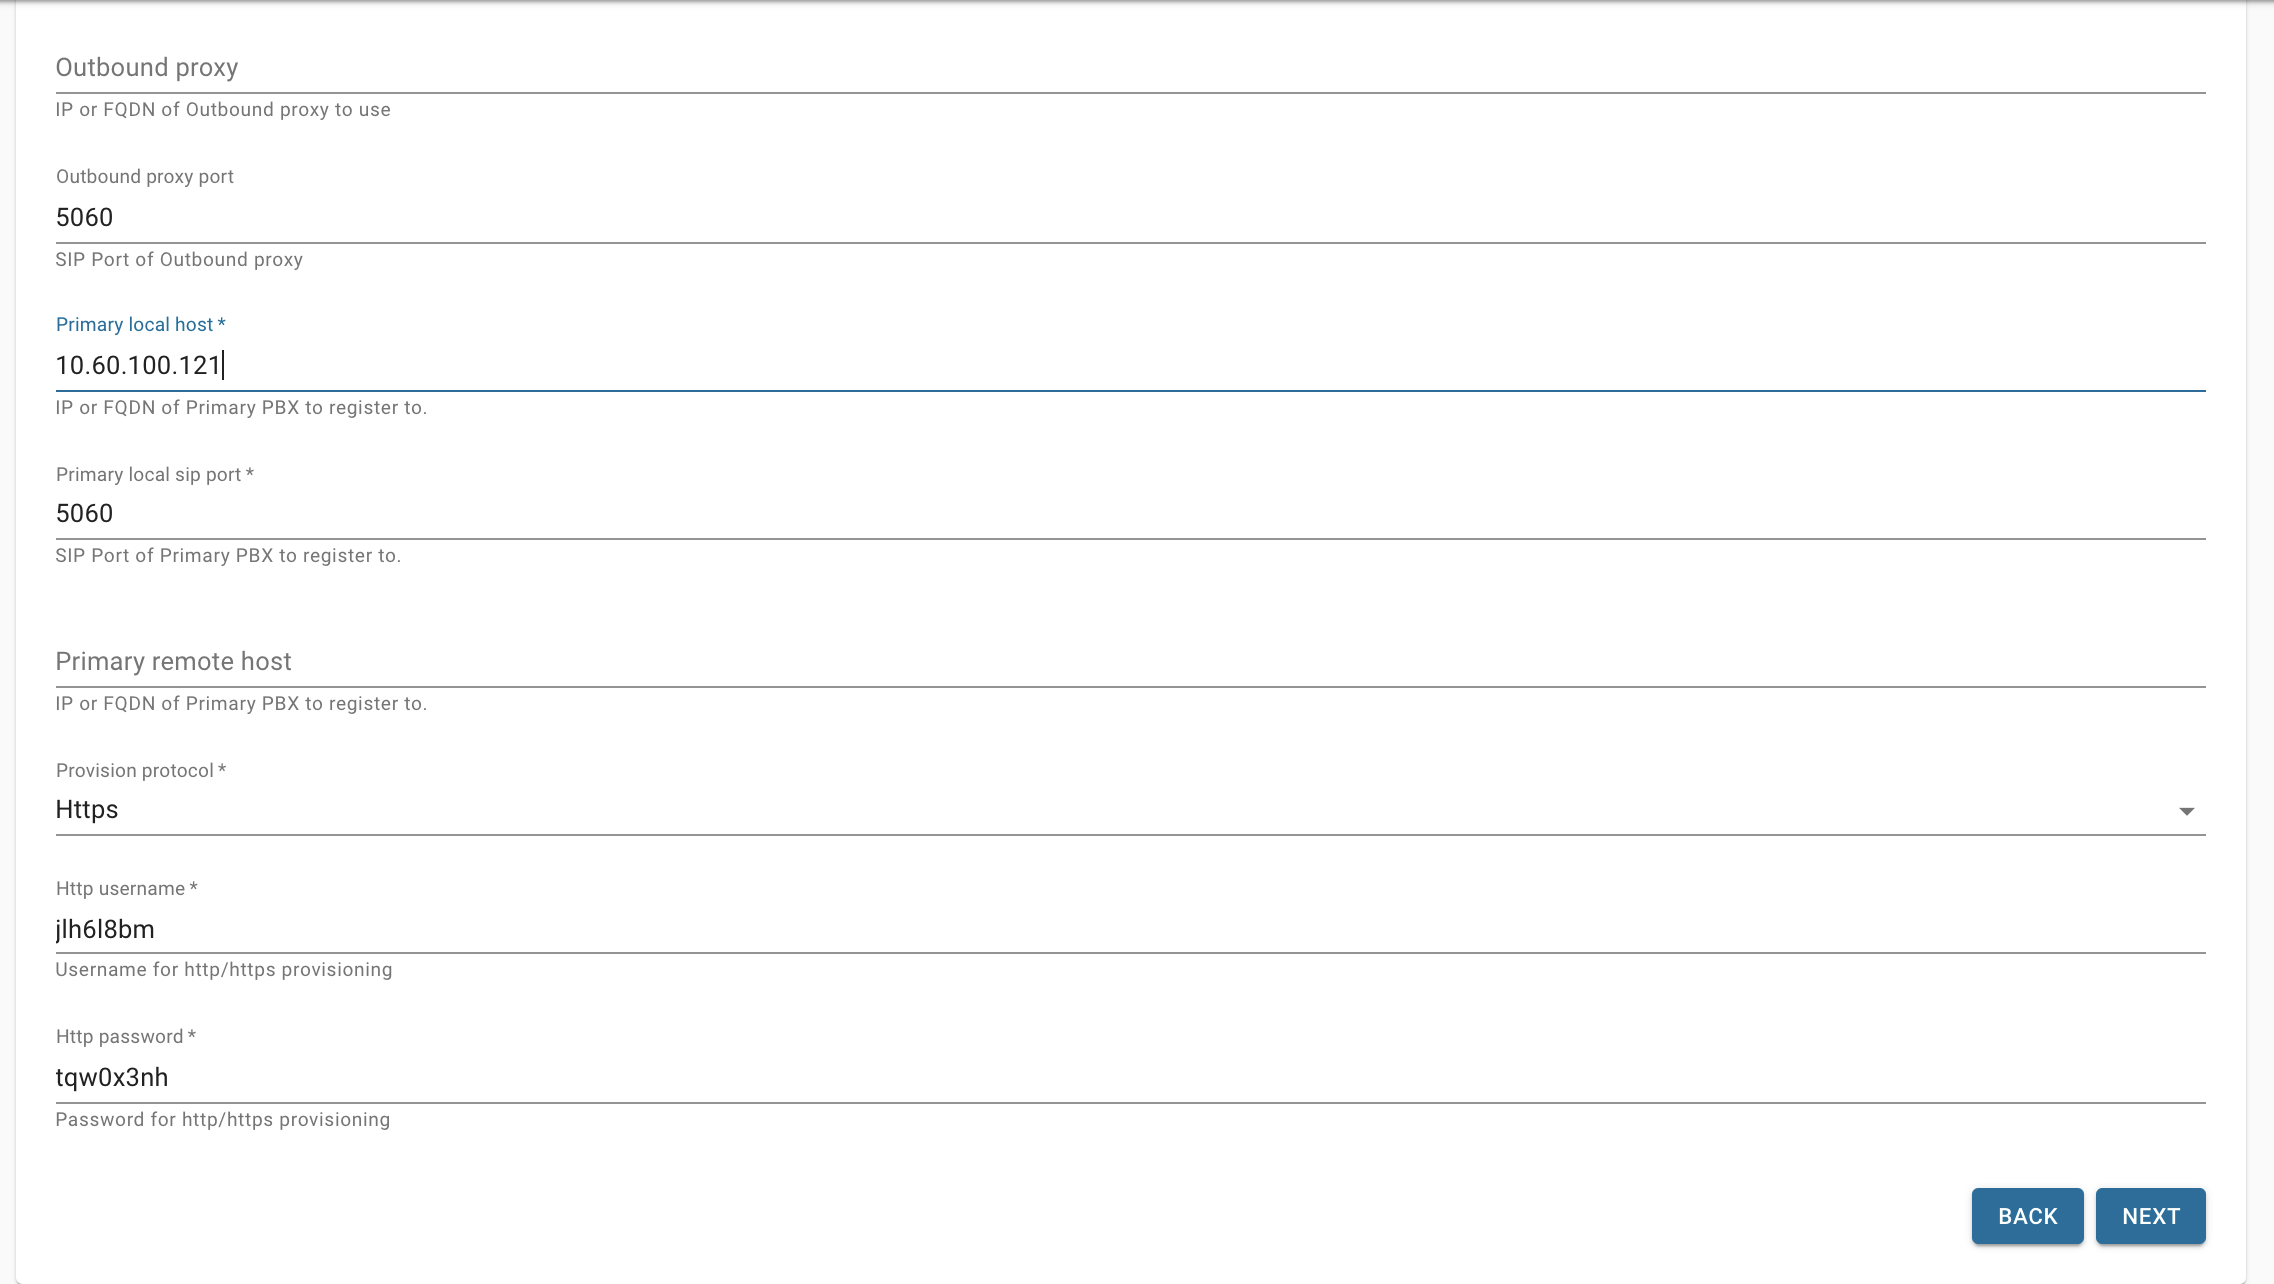
- is_remote - Define if this device is remote to the phone system or not. If set to "No" then the FQDN/IPaddress of the Primary local host will be used (this is shown/set in: CDM > Locations > (click to edit the Location) > MAIN > Primary local host). If set to "Yes" then the FQDN/IPaddress of the Primary local host will be used (this is shown/set in: CDM > Locations > (click to edit the Location) > MAIN > Primary remote host)
- ipei - If provisioning a DEC phone (base), then the handset's IPEI is entered here
- add_to_redirect - Add the redirect for this device's mapping. Usually, this would be left at Yes
Once your csv file has been properly prepared, just drag and drop it over the "Click or drag a CSV file here to start bulk import" gray area shown in the screenshot above. Right after upload, the CDM Portal will start to automatically process the file and then show the contents of it on the table to the right: 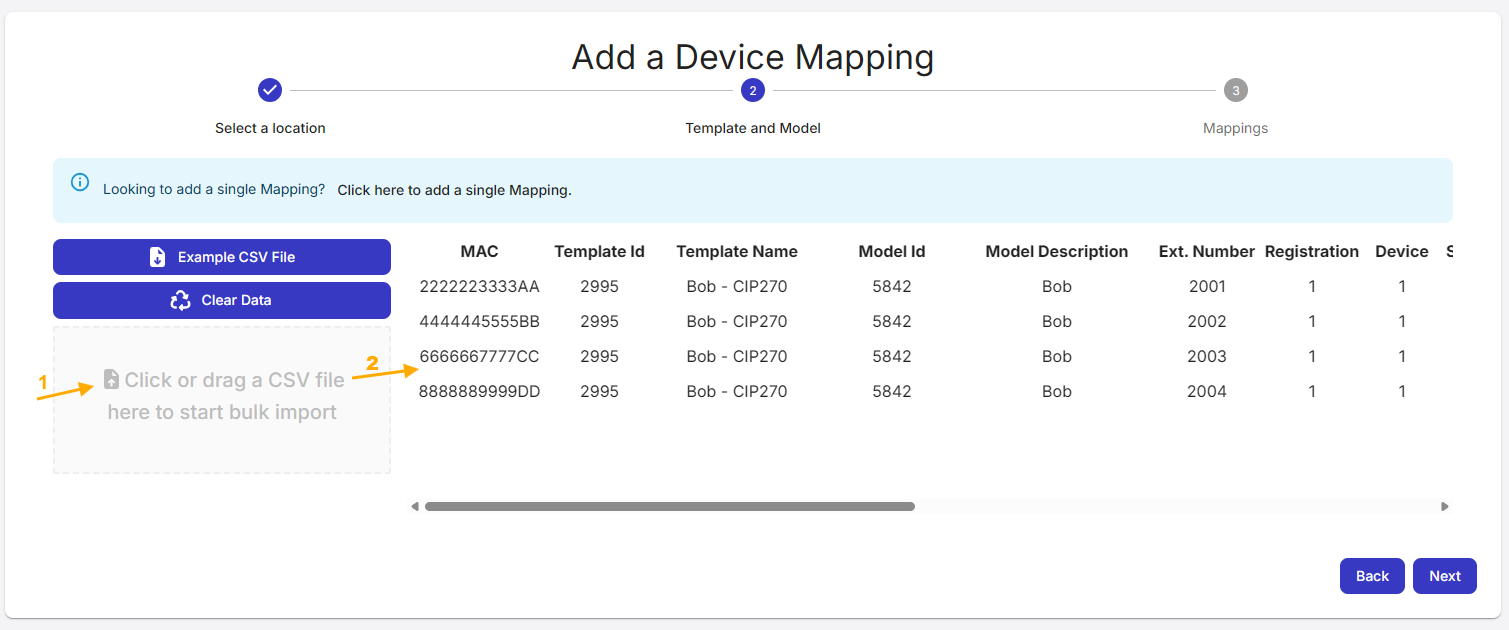
Now click on the "Next" button, a summary screen similar to the following will be shown: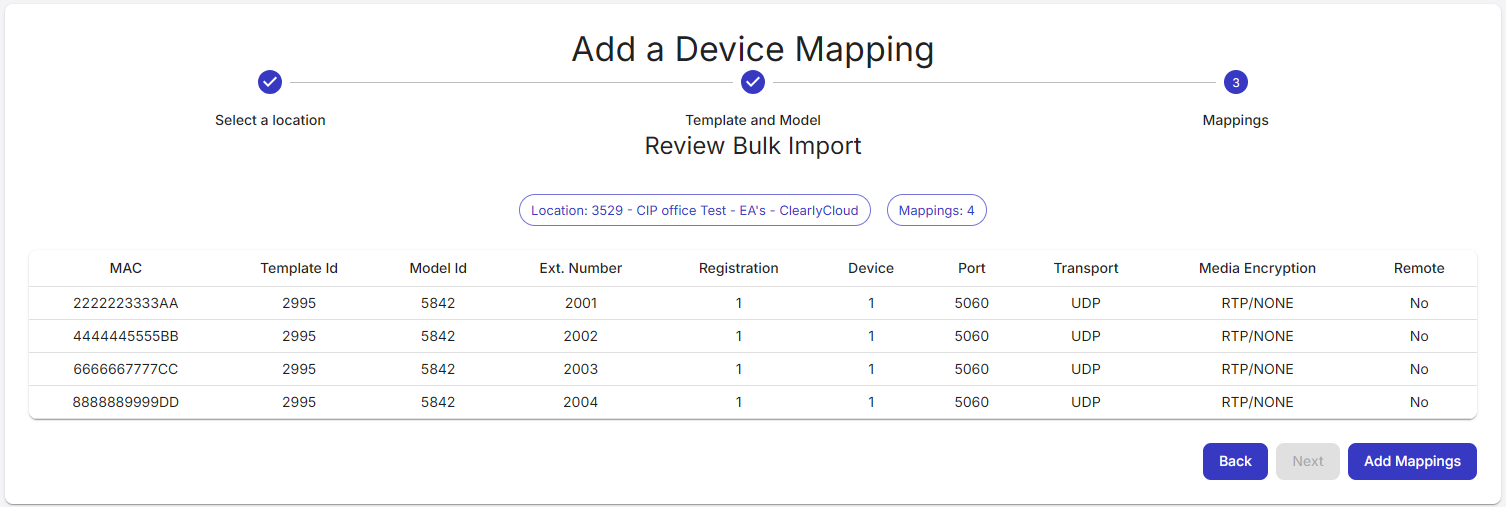
Here you can review the data before having CDM actually process it; after confirming the data is showing as expected (if not just adjust the csv file and go Back to re-upload it), just click on the "Add Mappings" button to have CDM process and create the actual mappings. The new mappings will automatically be shown listed in the Mappings section: 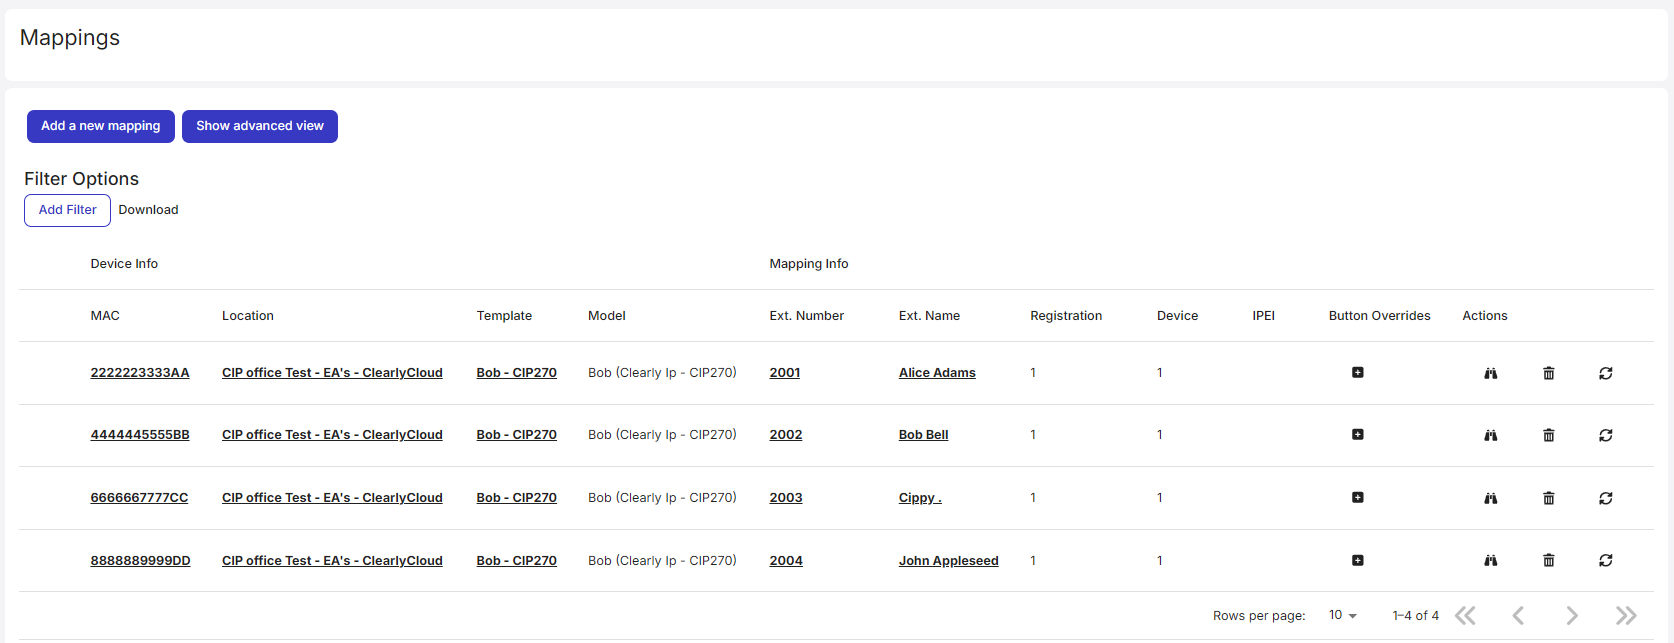
- Once Logged into CDM from the Menu bar click on CDM > Mappings

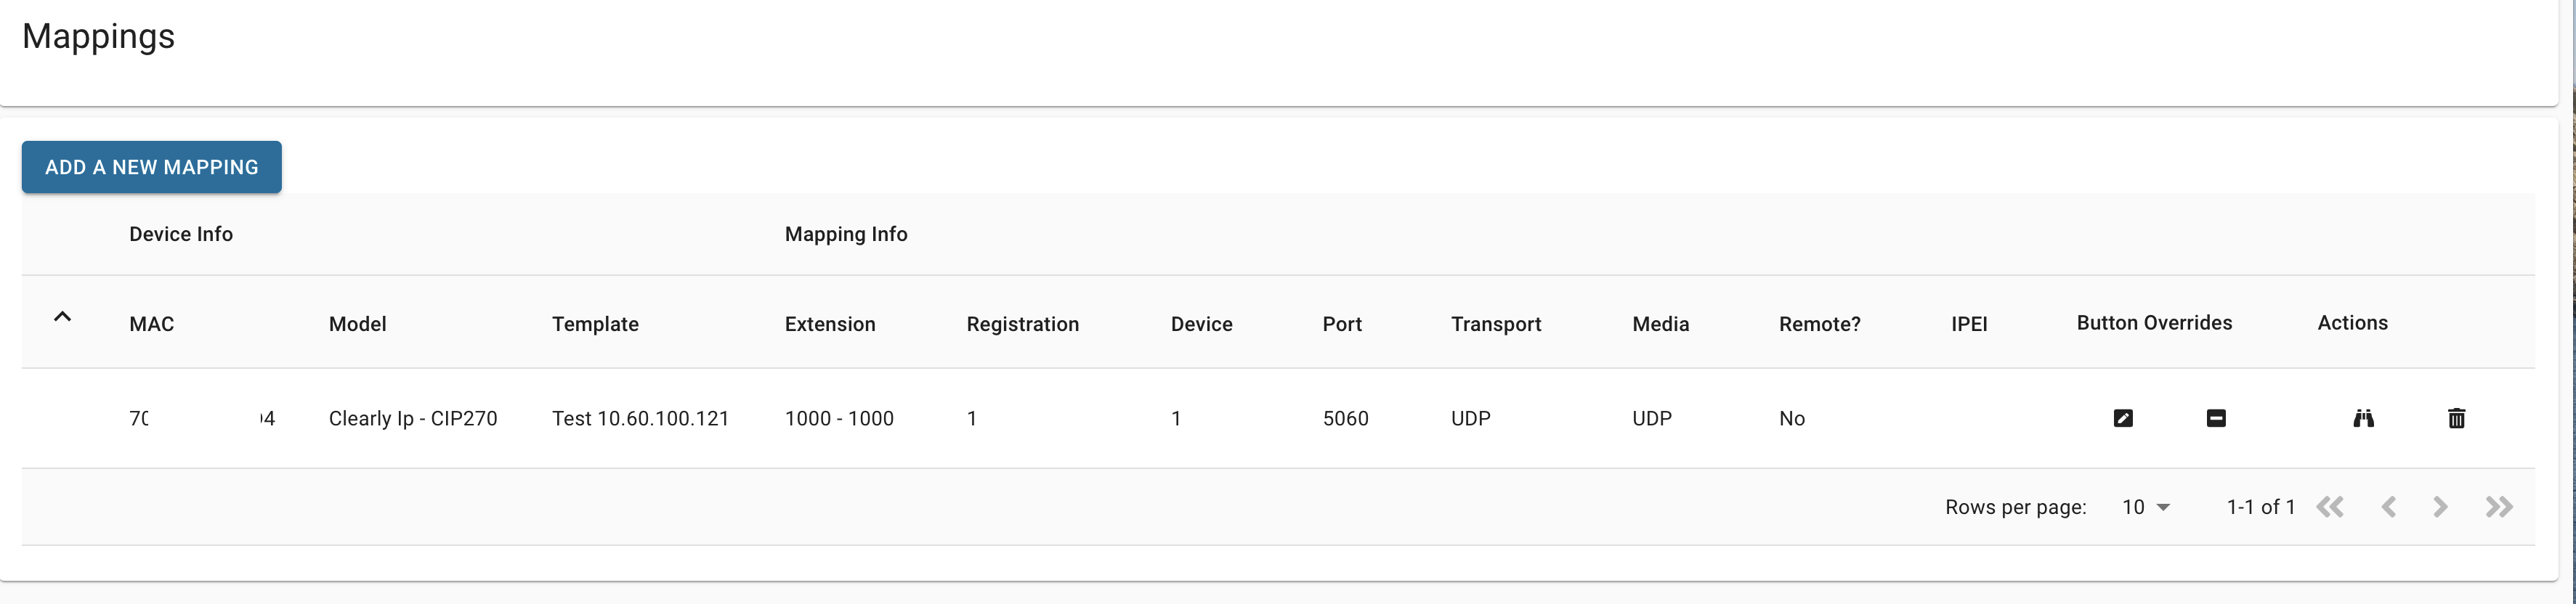
- From here, you can see a list of all the Mappings that your login has access to. If you are a reseller, you can see all the Mappings linked to any location belonging to Tenants under you.

- Click on the Binocular icon. under the Action column to view and edit the details of the Mapping.
- Click on the Trash Can icon under the Action column to delete the Mapping
- Click on the Button Override icon
 to change buttons layouts for a single phone. By default the buttons are pulled from the Model under the Template but this action will allow you to make 1 off changes to button layouts for a single phone without having to create a new template or effect other phones using the same template. Changes made here will override the Model settings from the Template for this 1 device only. to change buttons layouts for a single phone. By default the buttons are pulled from the Model under the Template but this action will allow you to make 1 off changes to button layouts for a single phone without having to create a new template or effect other phones using the same template. Changes made here will override the Model settings from the Template for this 1 device only.
Retrieving Provision URL for a Mapping- Once Logged into CDM from the Menu bar click on CDM > Mappings
- From here, you can see a list of all the Mappings that your login has access to and which Tenant they belong to; if you are a reseller where you can see all the Tenants that are under you and manage things.
- Click on the Binocular icon. under the Action column to view and edit the details of the Mapping. Scroll down and you will see the URL for provisioning and a copy button to copy the URL to your computers clipboard
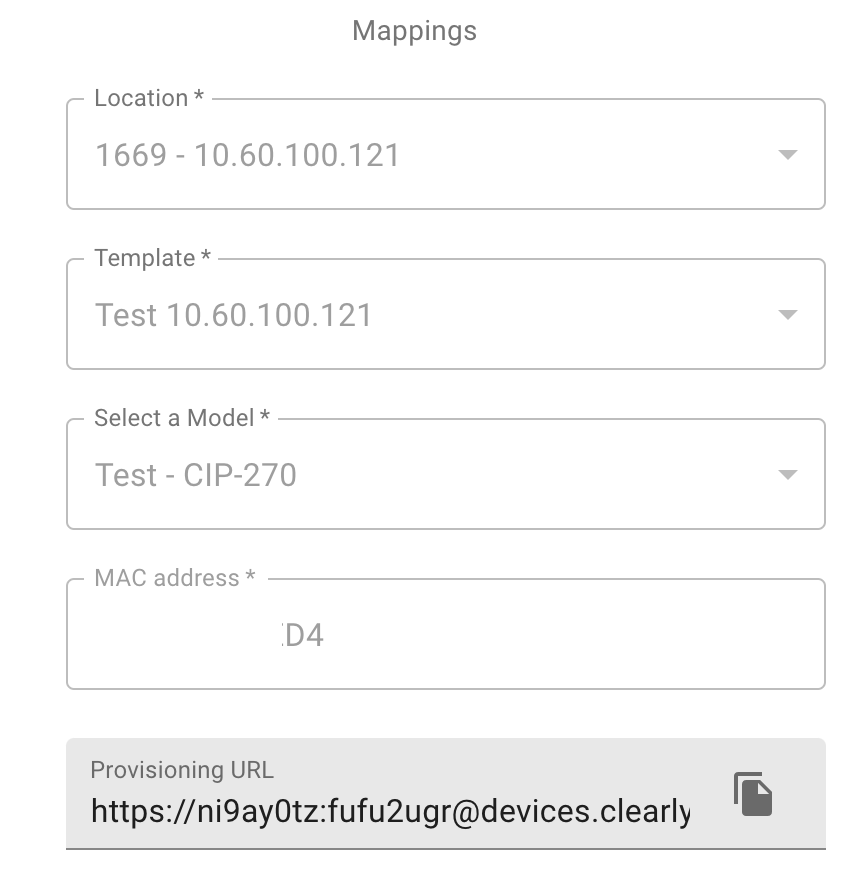
- The URL is broken into the following sections. Some devices let you paste in the full URL, and others make you break apart the Username, Password, and Protocol from the URL
- ni9ay0tz - is the actual username you set up in the Location for provisioning
- fufu2ugr - is the actual password you set up in the Location for provisioning.
- devices.clearlip.com/provision/1155/ is the URL portion of where the phone receives its provisioning data from using the username and password above.
Custom Config is for advanced users. It exposes all the config options for each phone model you have set up and lets you change or set any Custom Config setting that the Device supports. This is mainly used for custom settings for a Device that is not exposed in the Device Template. You will need to understand your Devices configuration structure and options as each manufacturer has its way of handling configuration files and options within those files.
Modifying a Custom Config - Once Logged into CDM from the Menu bar click on CDM > Custom Config
- From here, you can see a list of all the Models that your login has access to. If you are a reseller, you can see all the models linked to any Template that belong to Tenants under you.
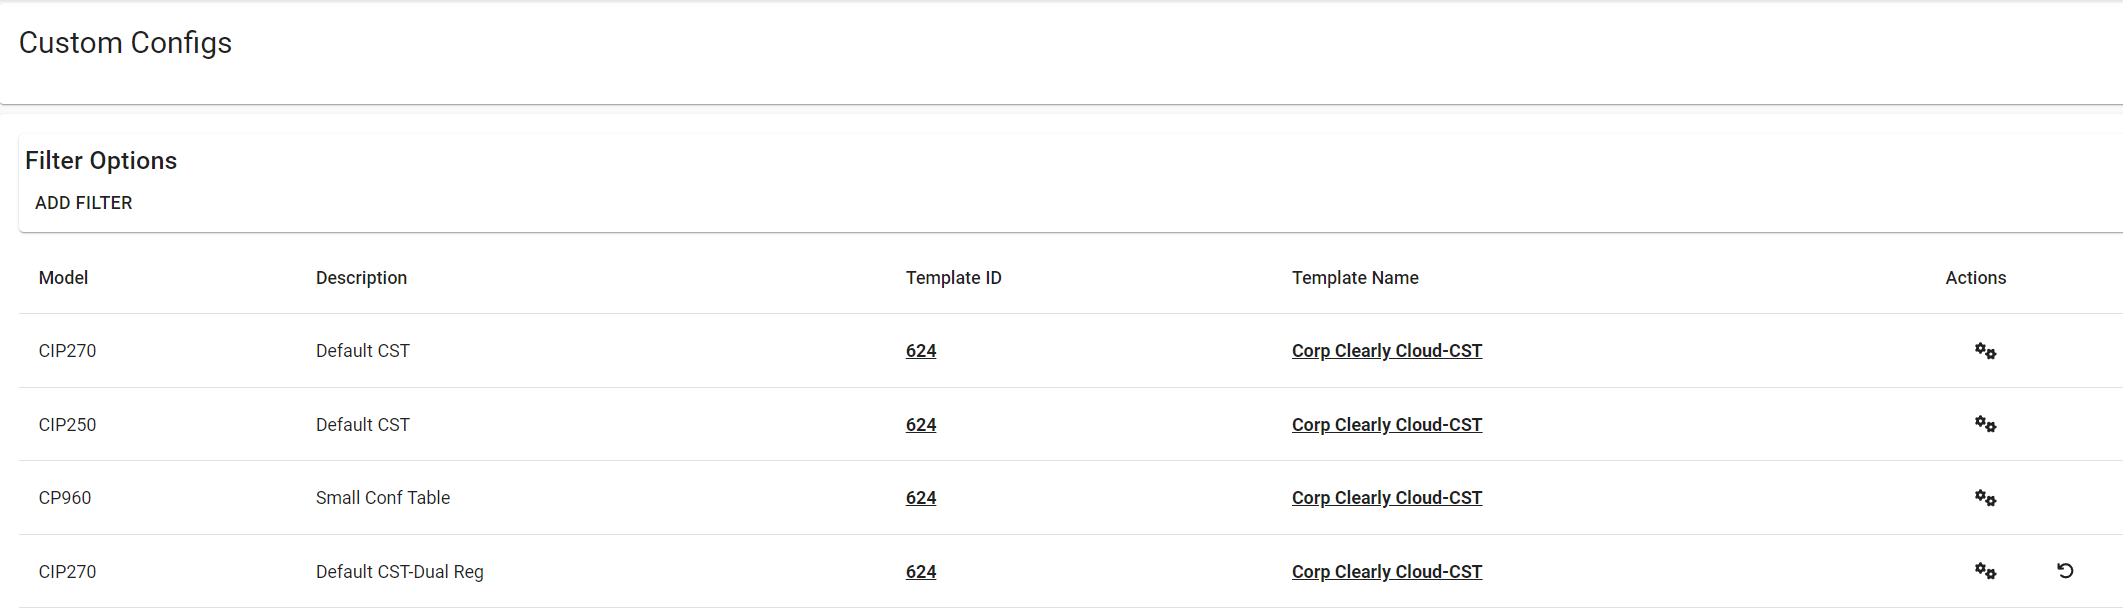
- Click on the Config Icon
 under the Action Column for the Model that you would like to modify the Custom Config on. under the Action Column for the Model that you would like to modify the Custom Config on.
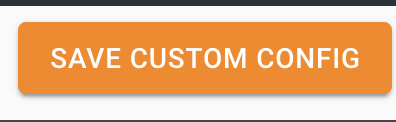
- A text editor will be opened from here, and you can start modifying the configs of anything you need to change..
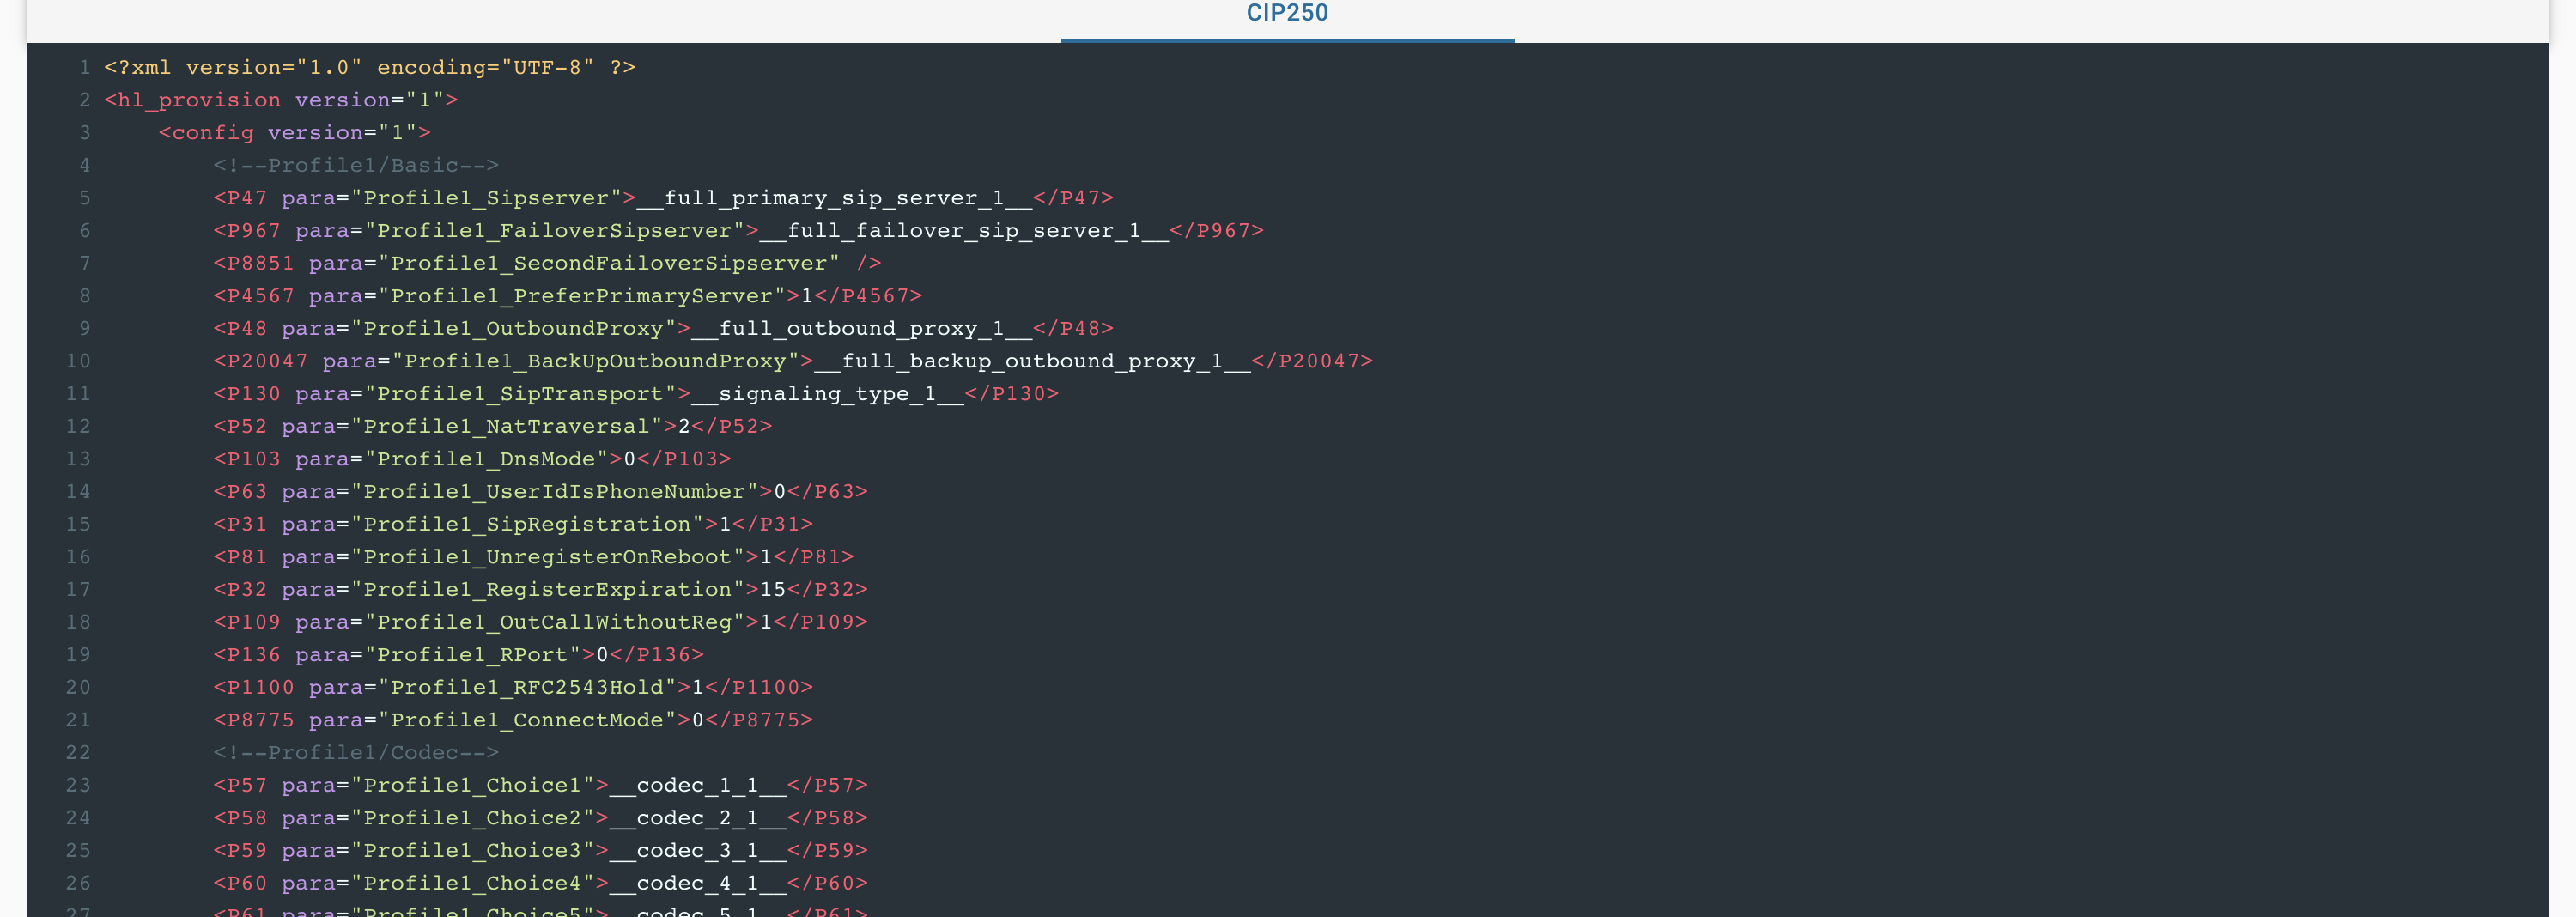
- Press the Save Custom Config button at the bottom of the page. You will now need to reboot your phones that are mapped to this Model to update their config.
 - If you have modified a model, you will see an Undo Icon
 which when clicked, will remove all custom configs for that model, and revert back to stock. which when clicked, will remove all custom configs for that model, and revert back to stock.
|
|
|
| | | |
|


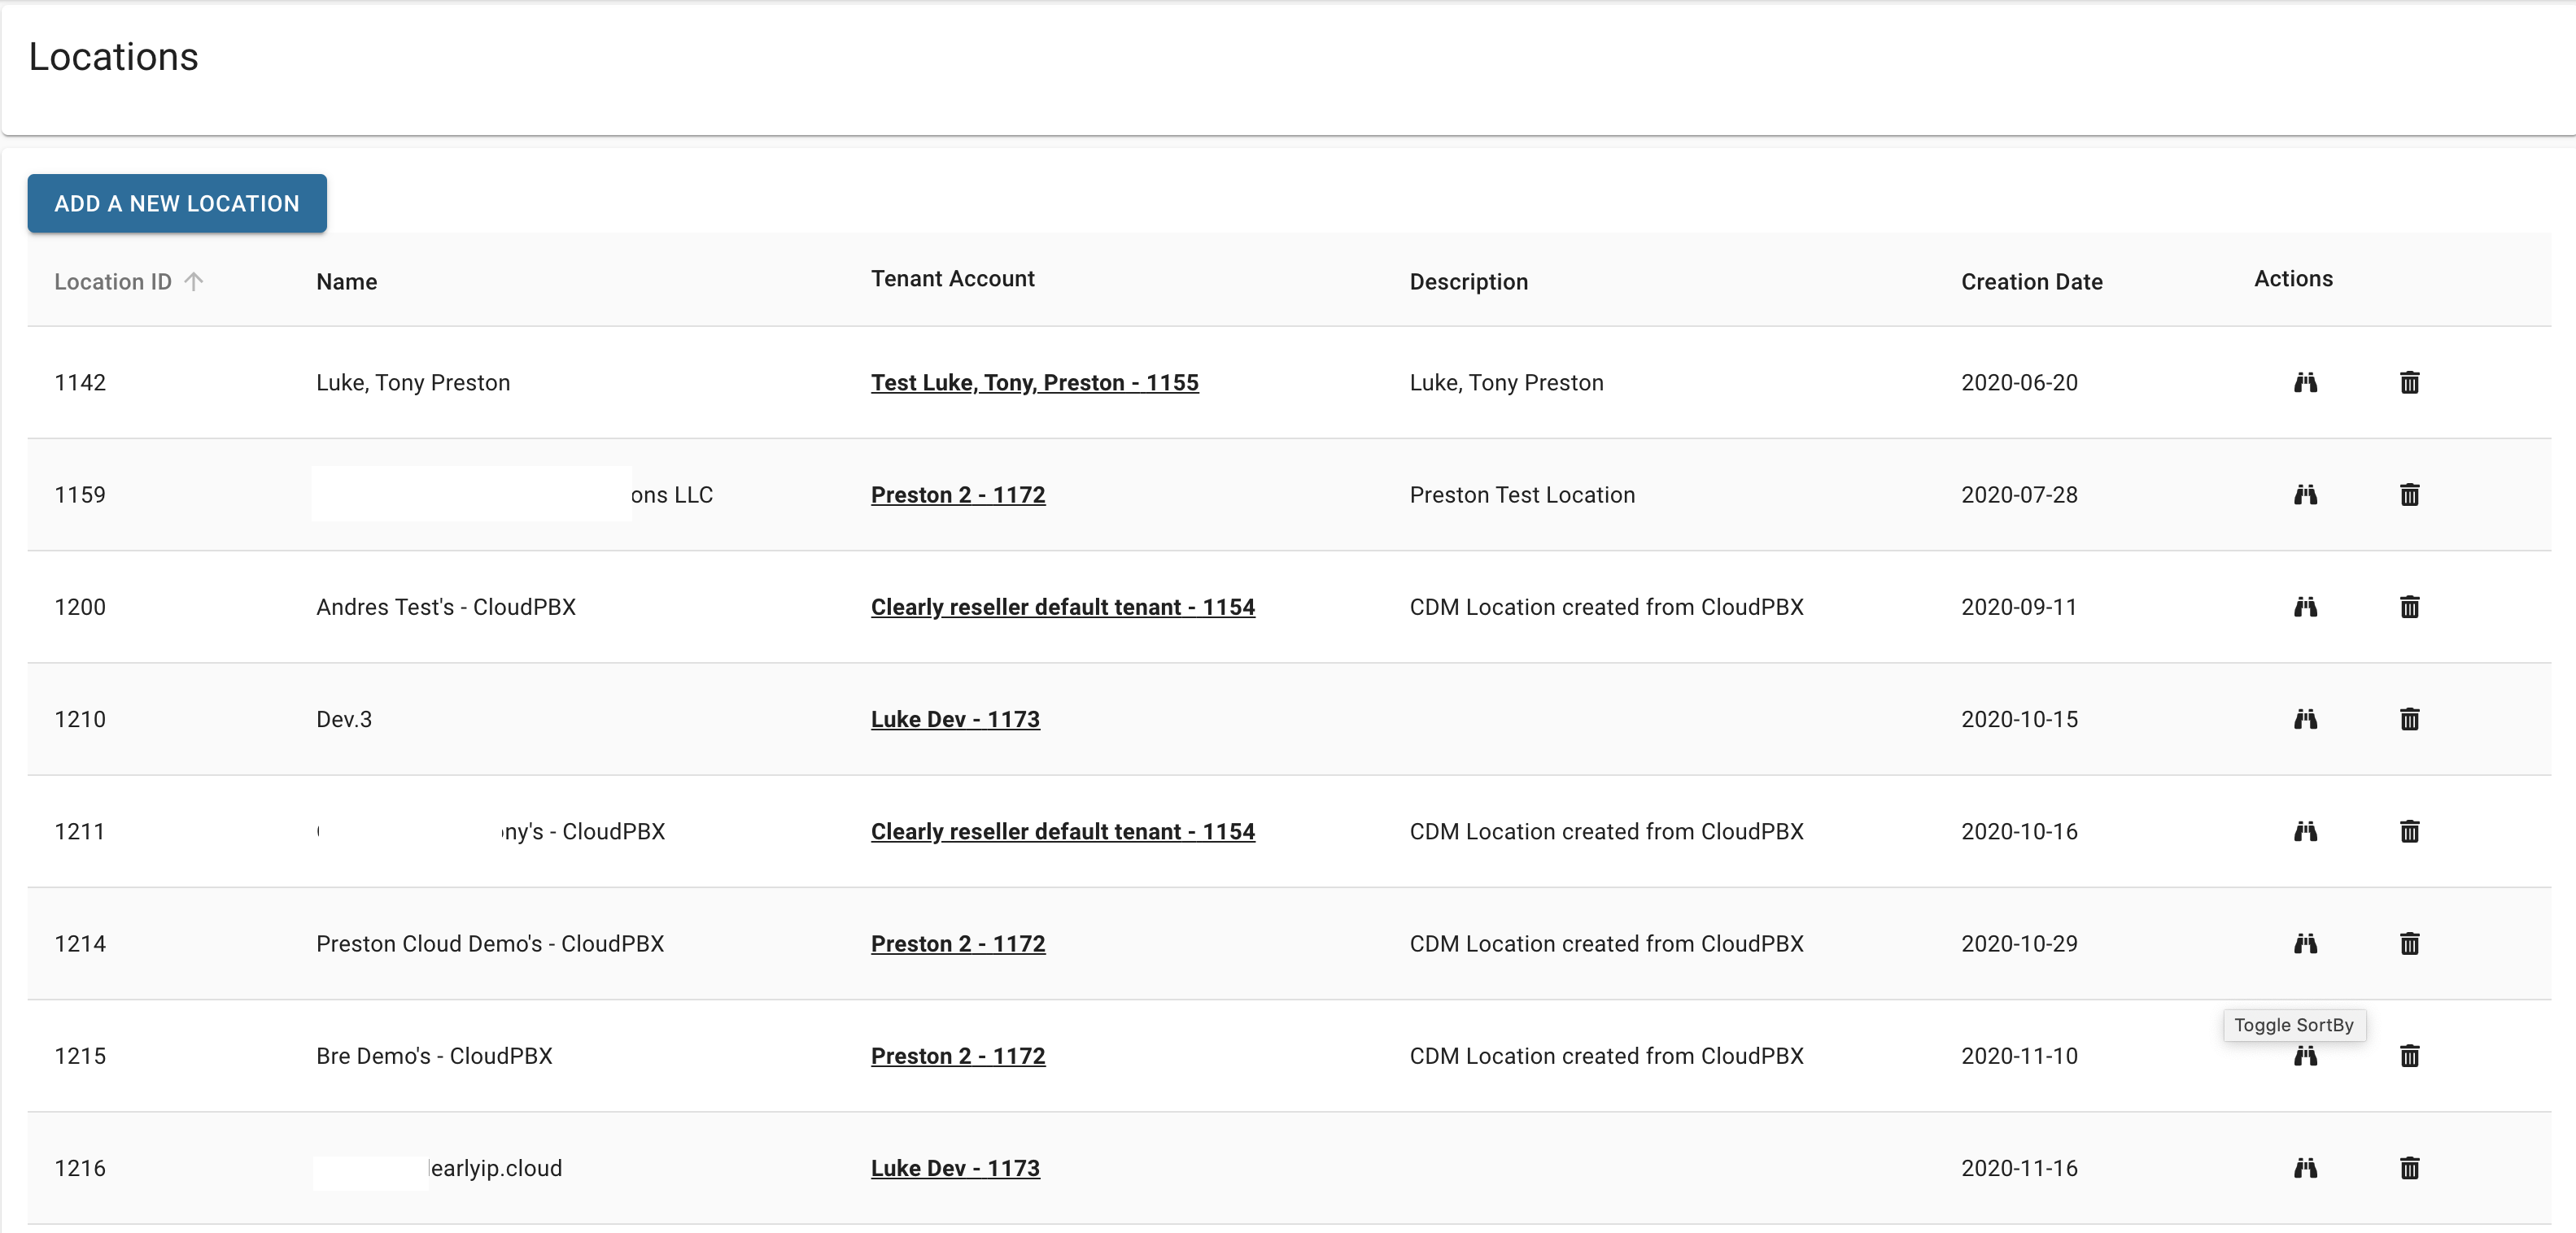
 under the Action column to view and edit the details of the Location
 under the Action column to delete the Location