| | | |
 Uploading .... Uploading ....
OverviewThe following guide should work for all Clearly IP FXS Gateways below;- CX-GW1U24FXS - 24 Port 1U Gateway
- CX-GW1U48FXS - 48 Port 1U Gateway
- CX-GW2U72FXS - 72 Port 2U Gateway
- CX-GW2U96FXS - 96 Port 2U Gateway
- CX-GW8FXS-G2 - 8 Port Gateway
- CX-GW4S4O-G2 - 4 Port FXS and 4 Port FXO Gateway
- CX-GW4-2S - 2 Port FXS Gateway
Power up the ATA on your local network- For a device with FXS ports, you can dial ## by using an analog telephone connected to the FXS port 1 after the equipment is powered on.
- For a device without FXS ports, you can use device IP address obtaining tool called 'Finder' or any network scanner to obtain the IP address.
ConfigurationLogging inNavigate through your web browser to the IP address of the device on the same network where the ATA is connected.- Log into the web GUI. Default Username is "Admin" and the initial password is in a sticker in the bottom of the device for older devices. If the sticker does not list a Password the device will have a default password of "clearly".
- Enter the captcha letters and numbers to access. These are case insensitive
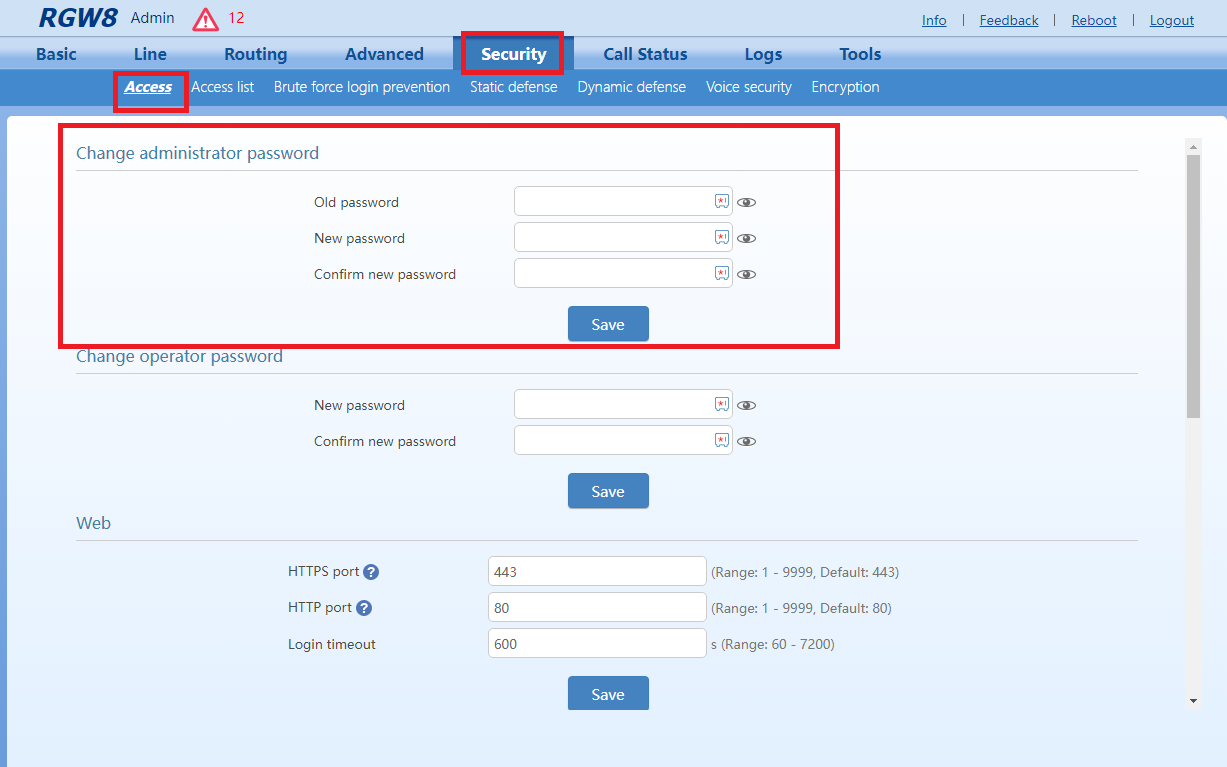
![]() Changing the default password- Navigate to Security > Access
- Enter the current default password and the new password with its confirmation.
- The new password must be from 8 to 16 characters in length, a combination of letters, numbers, and symbols excluding the '&' or the '=' or the '"' symbols.
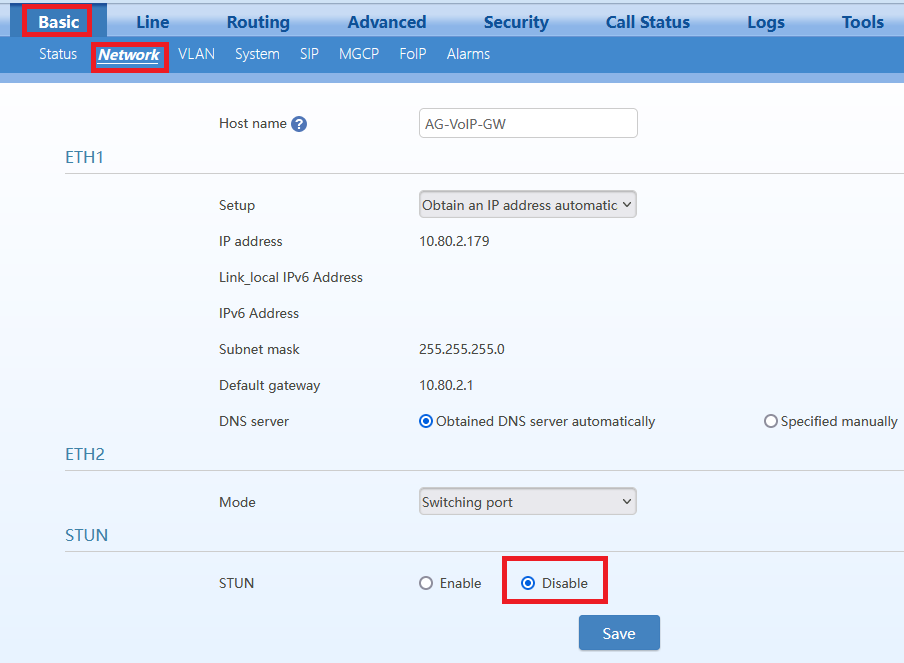
 NetworkIn the menu Basic > Network you can set the following parameters: - Hostname
- IP assignment (Setup): Obtain an IP address automatically or set an static IP.
- Set ETH2 as a switching port or redundant port to ETH1
- STUN (Keep STUN disabled)
Codecs- Navigate to Basic > System
- Under the Codec section move the codecs using the arrows from the Enabled codecs box to the Disabled codecs box so that we just have G.711U/20 picked

- Click on the Save button to have this setting applied.

Entering the FreePBX Server information- We are going to register each port as an extension from FreePBX.
- The first step to take is to enter the FreePBX information what will be used by each port
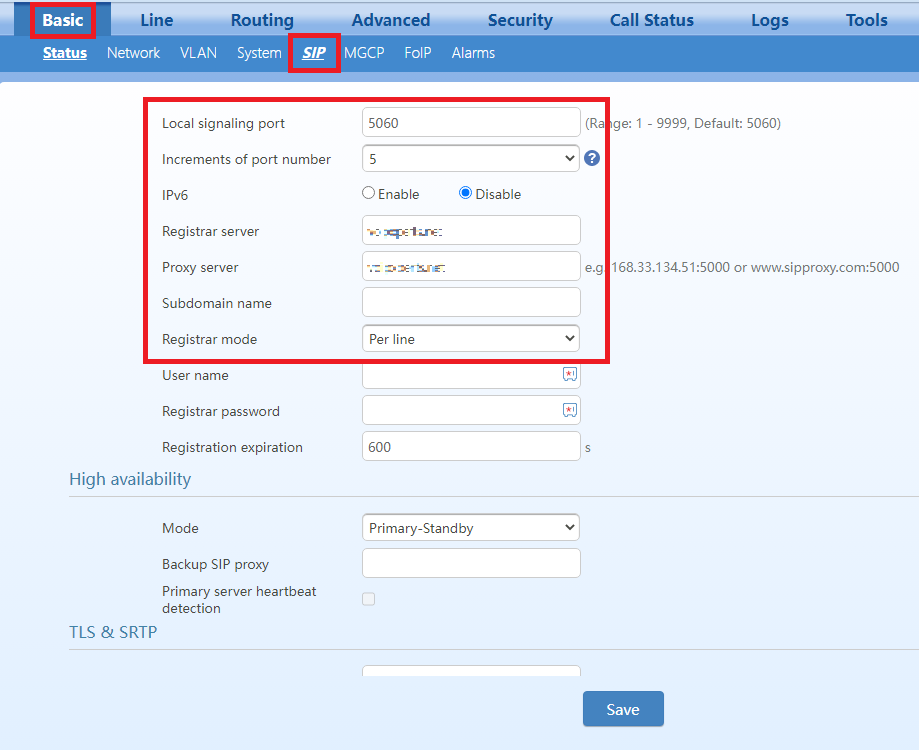
- Navigate to Basic > SIP
- You can change or keep the default value of 5060
- Leave the Increments of port number field to its default value. This value is the increment on the SIP port used when assigning a SIP port to each registration.
- Enter in the Registrar Server field the IP or FQDN of your FreePBX system. If your PBX is not using 5060 for the PJSIP signaling port, you will need to include that.
Example. Your PBX has an IP address of 192.168.0.20 and PJSIP UDP signaling port is bound to 5160. The register server string would be "192.168.0.20:5160" - In the Proxy Server field enter the IP or FQDN and port of your FreePBX system.
- In the Registrar Mode section select 'Per line' from the drop down menu.
Creating the SIP trunk in FreePBX- If the Gateway device has FXO ports, you will need to create a FreePBX trunk
- In FreePBX go to Connectivity > Trunks
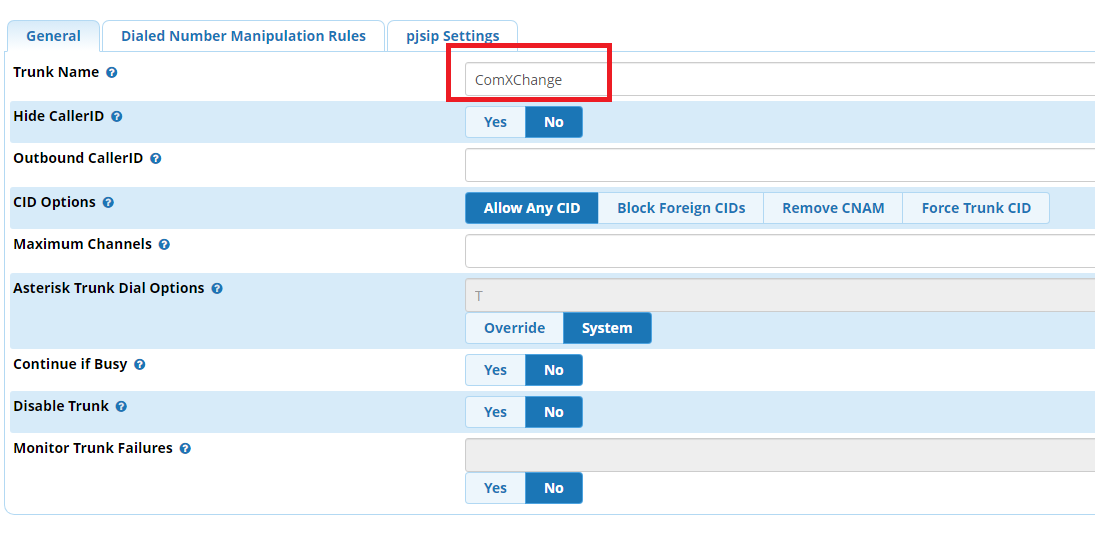
- Click on Add Trunk
- Enter a name for the trunk.
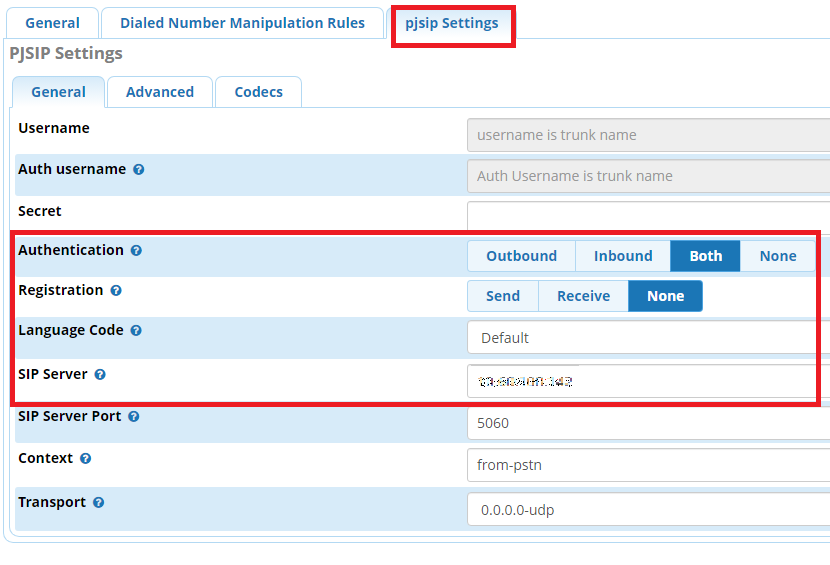
- In the PJSIP Settings tab, set the 'Authentication' to 'Both' and 'Registration' to 'None'.
- In the SIP Server field enter the IP Address of the gateway.
Gathering information from FreePBX- If the Gateway device has FXS ports, they will be registered, one by one, to individual PJSIP extensions in FreePBX
- For this wiki we are assuming that the SIP extensions already exist in FreePBX. If they don't, create PJSIP extensions following the FreePBX documentation.
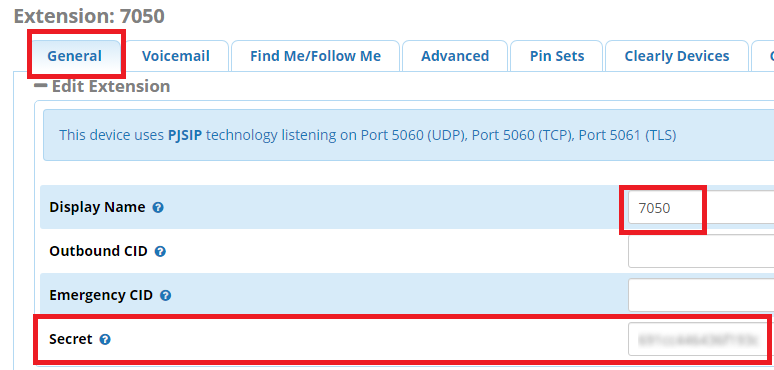
- Click on the "Edit Extension" button on the extension you would like to setup in the gateway. It necessary to obtain the Extension number and the secret (SIP Password) from that extension in the General tab.
- You will need to have this information for all the extensions you would like to setup on your Gateway.
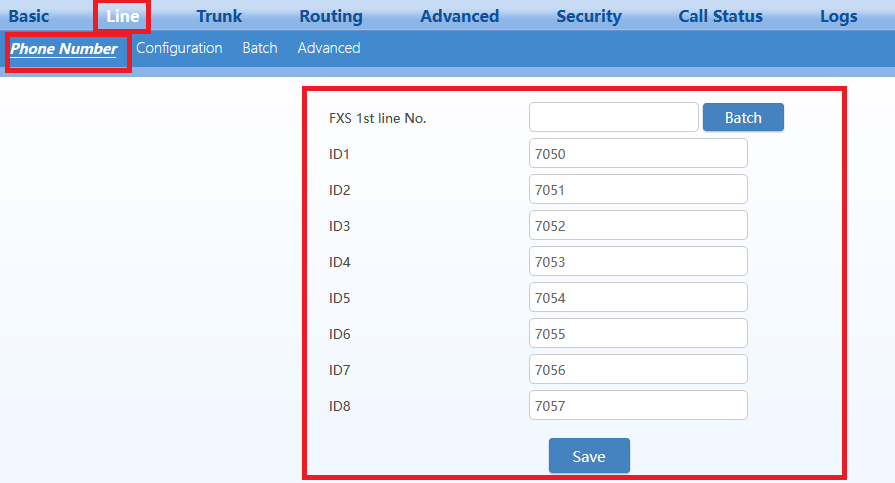
Setting up the Lines.- Go to Line > Phone Number (or Batch Configuration) and enter the PBX extension number corresponding to each of the Gateway lines you would like to use.
- UD1 is FXS Port 1 and ID2 is FXS Port 2 and so forth.
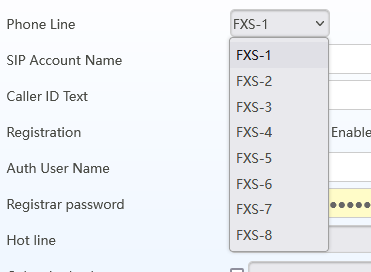
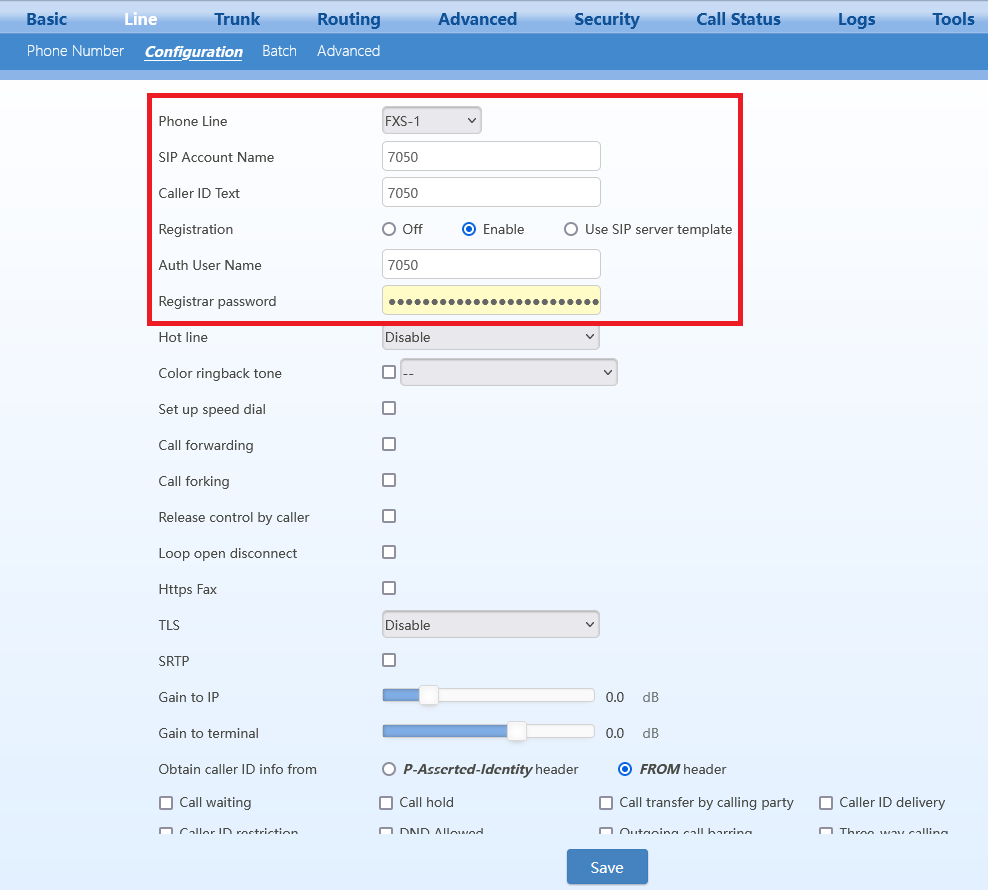
- Browse to Line > Configuration and enter the following information:
- SIP Account Name: This is the extension number coming from FreePBX.
- Caller ID Text: Enter a value for Caller ID name. This could be the extension number or the name of the user.
- Registration: Enable. With this option we are forcing the port to register to FreePBX as an extension.
- Auth Username: Similar to SIP Account this is the extension number from FreePBX.
- Registrar Password: This is the SIP 'secret' entry that comes from FreePBX.
- You may leave the rest of the options in their default values.
-
- This was an example for setting up one line/port, to set the others, just select the line/port you would like to setup from the drop down menu from the Phone Line and repeat the process above.
Hunt Group callingIn the scenario where a port is busy with another call, we would like to route an incoming call to another available port/extension. To achieve this we can use the Gateway's internal routing capabilities.
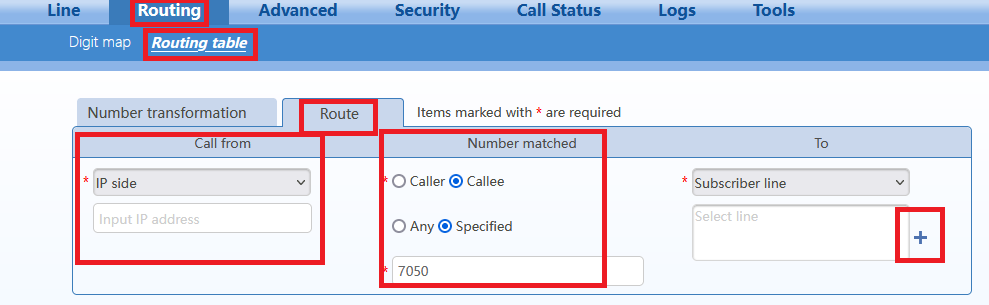
- Navigate to the menu Routing > Routing table.
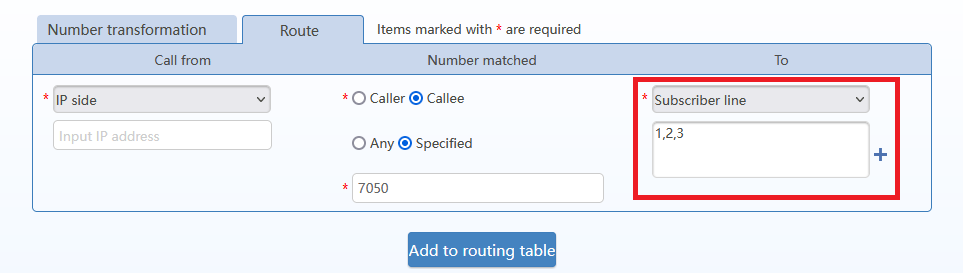
- From the "Call from" field select "IP"
- In the Number Matched menu select "Callee" and select "Specified"
- In the field that has the message grayed out 'Input the prefix or number to be matched' enter the DID you would like to route
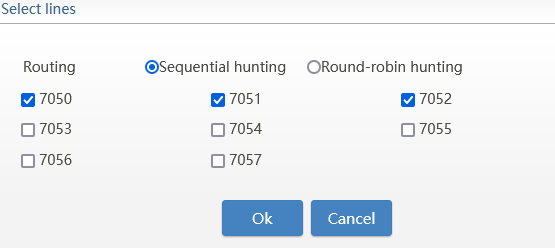
- In the "To" select 'Subscriber line" click on the plus sign to select the ports you would like to use.
- Select the ports and the hunting strategy: Sequential hunting or Round-robin hunting
- Click on OK and the To section will be updated as follows.
- Click on Add to routing table.
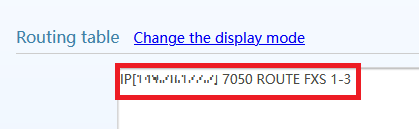
- When done you will see the new rule entered in the routing table.
- Save the changes
- In our example we are routing the any incoming call to the extension 7050 to the FXS ports 1 to 3.
|
|
|
| | | |
|