Overview
The following guide will explain how to connect a ComXchange server to a ClearlyIP PRI Gateway that will connect to a carriers PRI connection
Configuration
Logging In
- Power on the device
- The device should get a dhcp however if it is not pulling an IP address it can be directly accessed at the static IP of 192.168.2.240/16.
- Manually assign your computer to an IP address in the 192.168.2.0/16 network segment on the device being used to access the web GUI
- Using a web browser connect to gateway's default IP address of 192.168.2.240/16
- Enter the default admin password of voip or clearly
- Click on Login
Change IP Address
Navigate to Basic > Network
- Change the Hostname (optional)
- Change to dhcp or choose an new IP address in the ComXchange network
- Leave STUN set to Disable
Reboot the server for the new IP address to take affect, or finish the configuration then reboot.
Set up the connection for PRI Option
DS1 Configuration
Below is a representation of the common ISDN settings that will work with a typical PRI handoff. The actual settings will be determined by the carrier.
Navigate to Basic ISDN configuration
PRI settings
- DS1 Type to T1
- PCM code to ulaw
- Timing source at the default TDM 1
- Note: For some devices such as an NEC Edgemarc you may need to set the timing Source to Local.
- Framing to ESF
- Line code to B8ZS
- Line length at Long haul/0db
- Signal Type ISDN
Trunk Settings for PRI
Navigate to Trunk > Trunk 1
Note: if the gateway is licensed for more ISDN connections there will be more ISDN connections to configure
- Change the Name of the Trunk (optional)
- Set Switch Side to User
- The rest of the settings should remain default
Routing Table for PRI Trunk
Set up routing for calls to be sent to the ISDN
Navigate to Routing > Routing table
Note: It is possible to Manipulate the Inbound and Outbound Called Party Number and Calling Party Number using the routing table. Below are some examples:
Number Manipulation for inbound calls from the IP trunk
Remove all but four digits for a Calling Party Number beginning with 1608773
IP CPN1608773x KEEP -4
remove all but last four digits for the inbound Called Party#
IP X KEEP -4
Replace Inbound called party number with 5555
IP X REPLACE 5555
Replace Inbound called Party Number with last four digits
IP X KEEP -4
Number Manipulation for Outbound calls from the ISDN trunk
Add the digits 1608 to a 7 digit Called Party Number
ISDN xxxxxxx ADD 1608
Add numbers in front of a Calling Party Number
ISDN CPNX Add 1608773
To have some of these options at the same time the routing table would look like this:
IP CPN1608773x KEEP -4
IP X REPLACE 5555
IP X ROUTE ISDN
ISDN xxxxxxx ADD 1608
ISDN CPNX Add 1608773
ISDN xxxxxxx ROUTE IP 1.us-central.clearlyip.com:5060
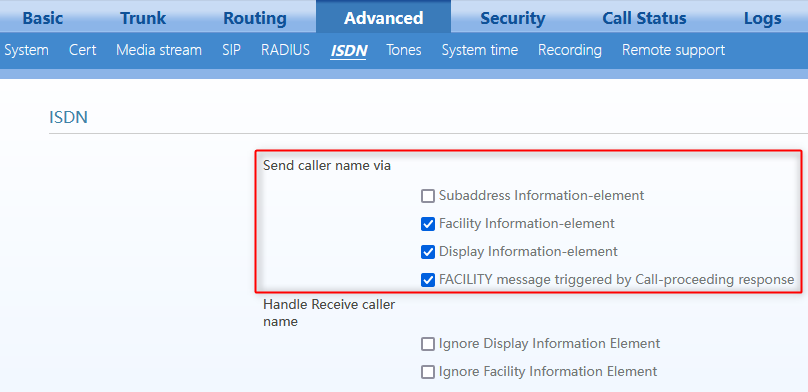
Setup Inbound Caller ID to be passed through the ISDN Trunk
Select Caller ID options over the ISDN
Navigate to Advanced > ISDN
Check the options:
- Facility Information Element
- Display Information Element
- Facility Message triggered by call proceeding response

Set up the connection for CAS Option
DS1 Configuration
Below is a representation of the common settings that will work with a typical CAS handoff. The actual settings will be determined by the carrier.
Navigate to Basic ISDN configuration
Set the fields to:
- DS1 Type to T1
- PCM code to ulaw
- Timing source at the default TDM 1
- Framing to ESF
- Line code to B8ZS
- Line length at Long haul/0db
- Signal Type CAS
CAS SF AMI (this will connect to some devices using D4 AMI such as the Adtran TA900 series)
- DS1 Type to T1
- PCM code to ulaw
- Timing source at the default TDM 1
- Framing to SF
- Line code to AMI
- Line length at Long haul/0db
- Signal Type CAS
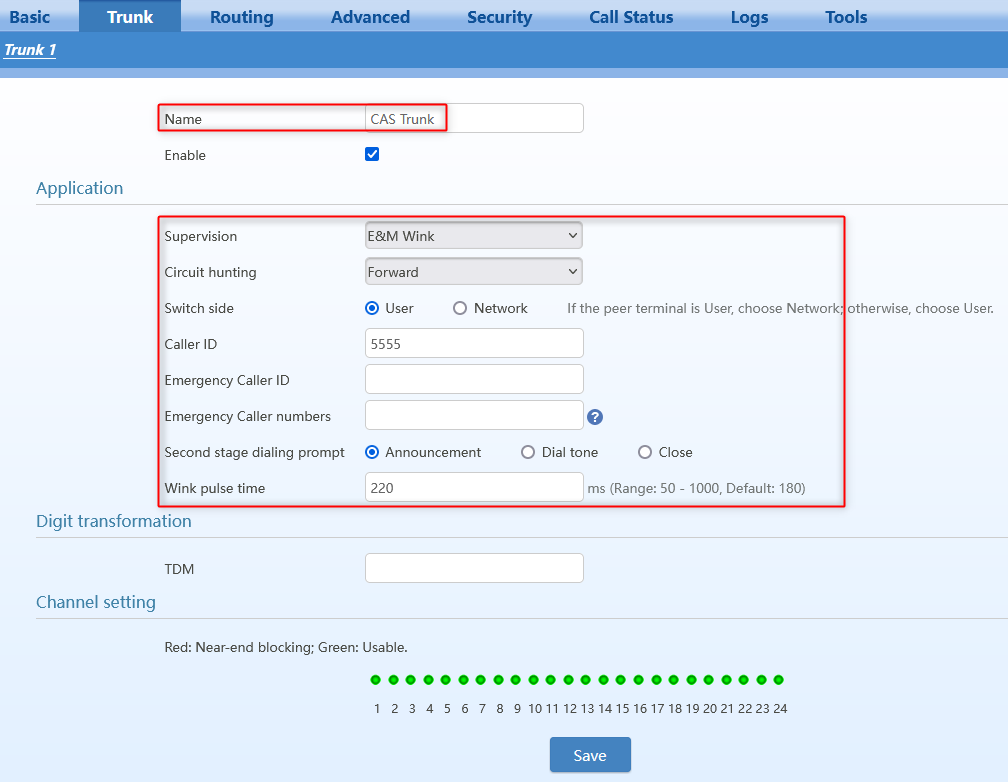
Trunk Settings for CAS
Navigate to Trunk > Trunk 1
Note: if the gateway is licensed for more ISDN connections there will be more ISDN connections to configure
- Change the Name of the Trunk (optional)
- Supervision E&M Wink
- Circuit Hunting set to Forward
- Switch Side set to Network
- Caller ID set to the caller ID of Inbound calls from the CAS Trunk (5555 in this example)
- Second stage dialing prompt set to Announcement
- Wink pulse time set to 220

Routing Table for CAS Trunk
Set up routing for calls to be sent to the CAS Trunk
Navigate to Routing > Routing table
Country/Region Tones
Navigate to Advanced > Tones
- Choose United States in the dropdown
System Time
Set up NTP to sync with the ComXchange server
Navigate to Advanced > System time
- Enter the correct Time Zone
- Enter the IP address of the ComXchange server in the Primary time server field
Enter Gateway SIP Settings and Comxchange Trunk Settings
Gateway SIP Settings
Navigate to Basic > SIP
- Local Signaling port can be left as default
- Enter the <IP address>:5160 of the ComXchange server in the Proxy server field
- Port 5160 will be used with a PJSIP trunk on the ComXchange using the current default pjsip port of 5160. If this port is changed you may need to adjust for that in the gateway.
- SIP Registrar mode can be left at Per Gateway
- Add a user name that and Authentication name that will match the Trunk Name in the ComXchange Trunk
- Add a Registrar password that will match the secret password in the ComXchange trunk
- Leave the TLS and SRTP as default
Codecs and Timers
- Set the Interdigit Timeout to 3
- Enable G.711U/20, G.711A/20, and GSM/20
ComXchange Trunk Settings
The Gateway will register to the ComXchange Trunk with the username and password set in the User name and Registrar password fields set in the gateway as noted above.
Navigate to Core Configuration > Trunk - Add Trunk choose chan_pjsip
In the General settings:
- Fill in the Trunk Name field
- In the example below PRI_GW1 is used
- Change the Outbound CallerID to the Hotel / Property's main phone number
![]() In the pjsip Settings tab, add the following:
In the pjsip Settings tab, add the following:- Secret=somepassword
- Authentication=Both
- Registration=None
- SIP server=192.168.101.19
- Note this needs to point to the IP address of the ISDN PRI Gateway
- SIP Server Port=5060
![]() Reboot the gateway for all of the changes to take affect
Reboot the gateway for all of the changes to take affectTest inbound and outbound calls