Retrieve the IP Address
Power up the ATA on your local network the ComXchange 8 FXO will obtain a DHCP address on the LAN by default - For a device with FXS ports, you can dial ## by using an analog telephone connected to the FXS port 1 after the equipment is powered on.
- For a device without FXS ports, you can look in the DHCP leases tab in the ComXchange System Settings Module for the IP address or use a device IP address obtaining tool called 'Finder' or any network scanner to obtain the IP address.
- If the gateway is unable to obtain an IP address you can connect via the default IP address of 192.168.2.218/16 by manually assigning an IP in the 192.168.2.0/16 network segment on the device being used to access the web GUI
Configuration
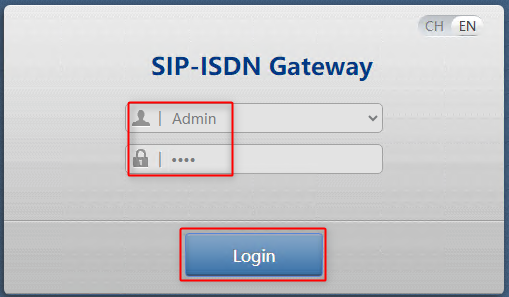
Logging in
Navigate through your web browser to the IP address of the device on the same network where the ATA is connected.
- Log into the web GUI. Default Username is "Admin" and the initial password is in a sticker in the bottom of the device for older devices. If the sticker does not list a Password the device will have a default password of "clearly".
- Enter the captcha letters and numbers to access. These are not case insensitive
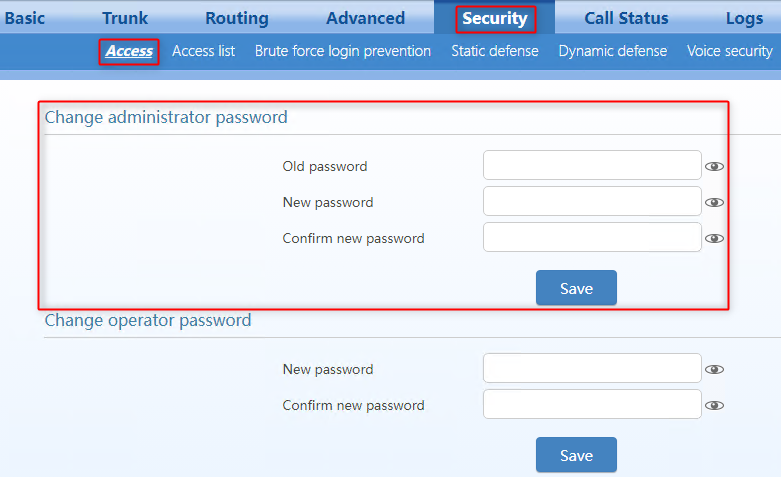
Changing the default password - Navigate to Security > Access
- Enter the current default password and the new password with its confirmation.
- The new password must be from 8 to 16 characters in length, a combination of letters, numbers, and symbols excluding the '&' or the '=' or the '"' symbols.
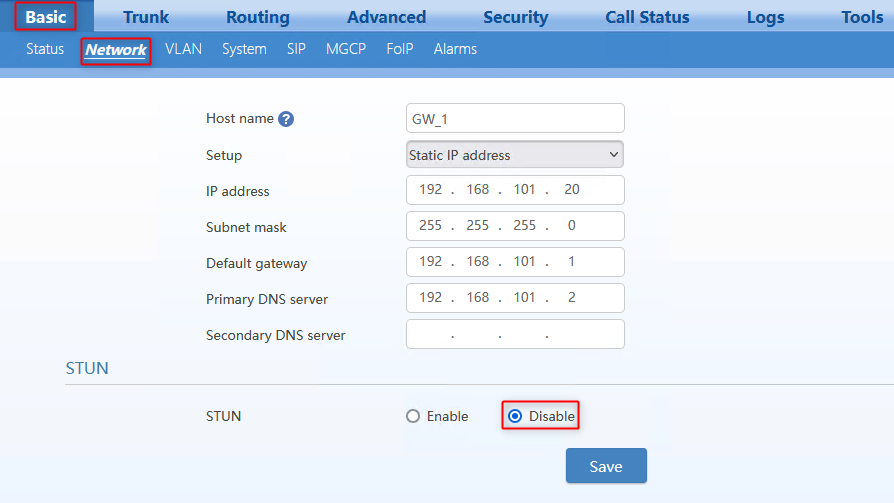
Network
In the menu Basic > Network you can set the following parameters:
- Hostname
- IP assignment (Setup): Obtain an IP address automatically or set a static IP
- If available set ETH2 as a switching port or redundant port to ETH1
- STUN (Keep STUN disabled)
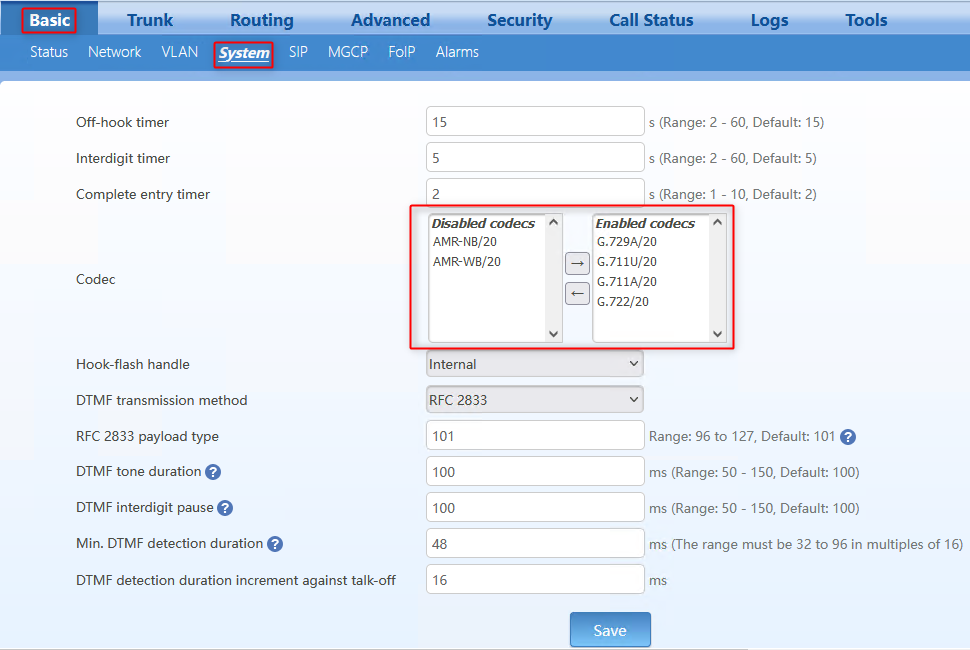
Codecs
Navigate to Basic > System - In the Codec section move the codecs using the arrows from the Enabled codecs box to the Disabled codecs box to have them set as follows:
- G.711U/20
- G711A/20
- G.722/20
- GSM/20
- G.729A/20
Entering Gateway SIP settings and ComXchange Trunk Information
ClearlyIP FXO Registration Per Gateway
Set up the SIP information in the gateway that will connect to the Chansip trunk on the ComXchange server.
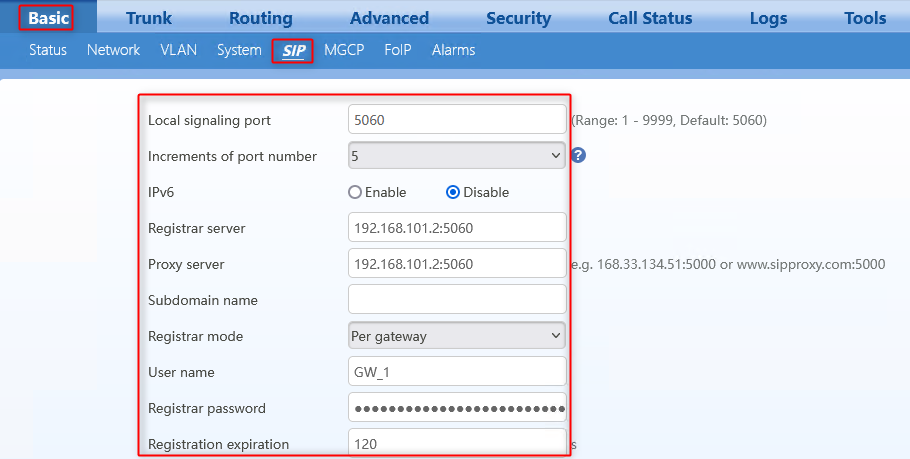
Navigate to Basic > SIP
- Change the Local signaling port or keep the default value of 5060
- Leave the Increments of port number at the default value of 5
- This value is the increment on the Sip port used when assigning registration
- In the Registrar server field enter the IP address of the ComXchange server
- Int the Proxy server field enter the IP of the ComXchange server
- Set Registrar mode to Per gateway
- In the User name field enter a registration username
- In theh example below we will use GW_1. This will match the username and Trunk Name of the ComXchange ChanSIp Trunk - sip Settings
- In the Registrar password field enter a password
- This will match the secret ComXchange ChanSIp Trunk - sip Settings
- Registration expiration can be set to 120
ComXchange Trunk Setup
The Gateway will register to the ComXchange Trunk with the username and password set in the gateway as noted above.
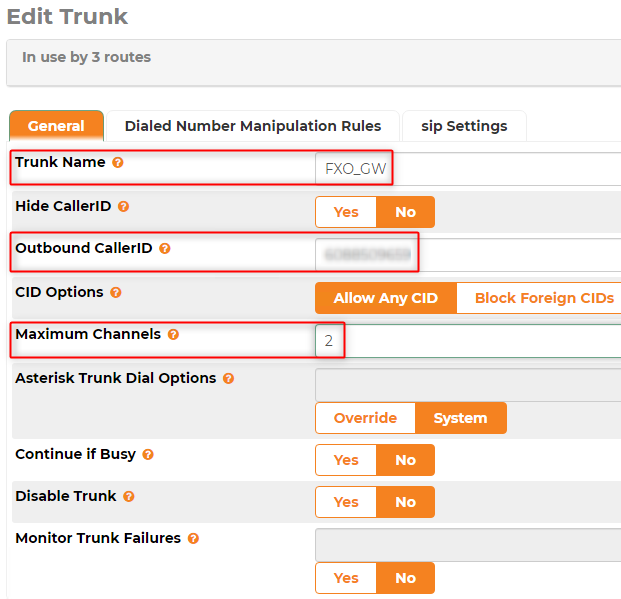
Navigate to Core Configuration > Trunk - Add Trunk choose chan_sip
In the General settings:
- Fill in the Trunk Name field
- In the example below FXO_GW is used
- Change the Outbound CallerID to the Hotel / Property's main phone number
- Set the maximum to either the number of licensed trunks or as many as you have lines for if this is a secondary trunk
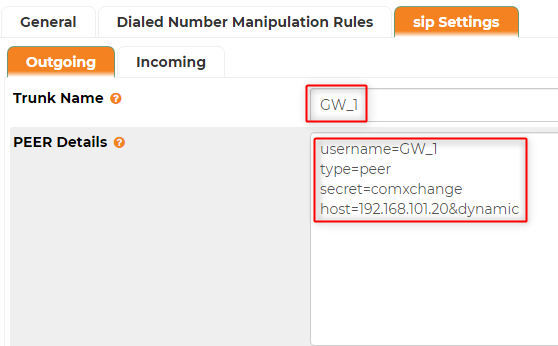
In the sip Settings > Outgoing tab enter the following
- Trunk name
- Peer Details
- username=GW_1
- type=peer
- secret=comxchange
- insecure=invite,port
- host=192.168.101.20&dynamic
Inbound Calls Sent to ComXchange
In this section we will set up the gateway to receive calls from the PSTN
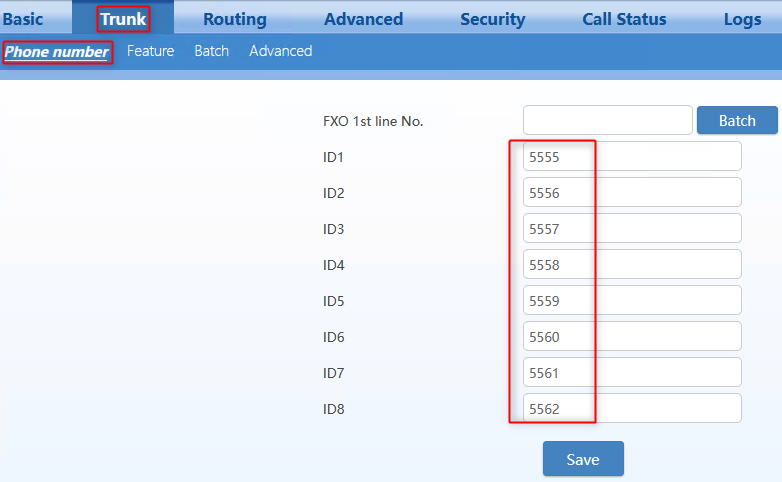
Phone Number
Navigate to Trunk > Phone number
Feature
Below is an example of a ports feature page for each number
Navigate to Trunk > Feature
- Click on the drop down for each Number
- Verify that Phone Number, Display as, and Number are correct
- The rest of the information can be left at default
- Registration is off
- TLS is disabled
- SRTP is unchecked
- Echo Cancellation is checked
- Caller ID detection is checked
ComXchange Inbound Routes
By default the ComXchange has an inbound rule that will send any call to the front desk ring group. You can add a rule that specifies where an inbound phone number from the gateway will route
Navigate to Core Configuration > Inbound Routes
- Verify the Any Any rule to front desk
- Make changes to the destination if needed
- Add any other inbound rules
Outbound Calls from ComXchange
In this section we will setup the gateway to send outbound calls to the PSTN from the ComXchange server
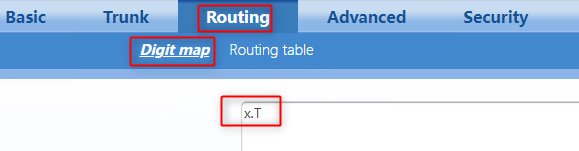
Digit Map
Navigate to Routing > Digit Map
- set x.T in the digit may to the Allow any calls to be sent from the gateway
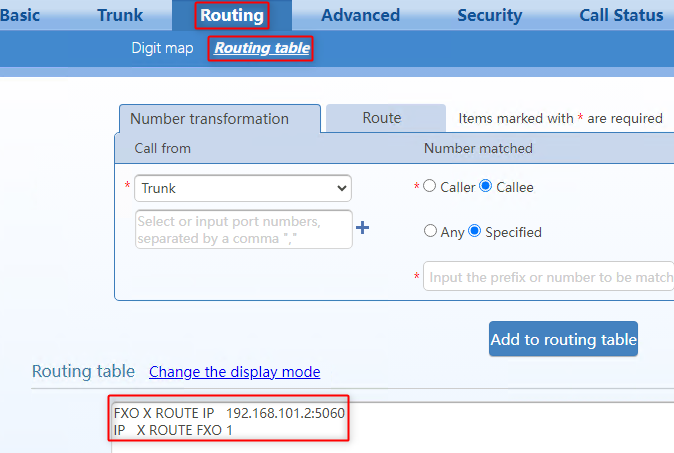
Routing Table
Navigate to Routing > Routing Table
- Add rules to allow any Calls from FXO to route to the ComXchange and any calls from the ComXchange to route to any available FXO lines
- FXO X ROUTE IP 192.168.101.2:5060
- IP X ROUTE FXO
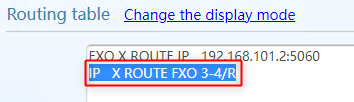
You can be more specific with your routing as well in the below example FXO 3 and 4 are used to route calls from the ComXchange to the carrier
In the Routing table enter the following information
- IP X ROUTE FXO 3-4/R
- This means that any call coming from the IP side (SIP signaling) will be routed to ports 3 and 4 using the 'round robin' distribution method
- If we remove '/R', the calls will be sent to the ports using the 'hunt' method
- Both of these methods are helpful as the Gateway will route the call to the first available port. If port 3 is busy, the call will be sent to port 4
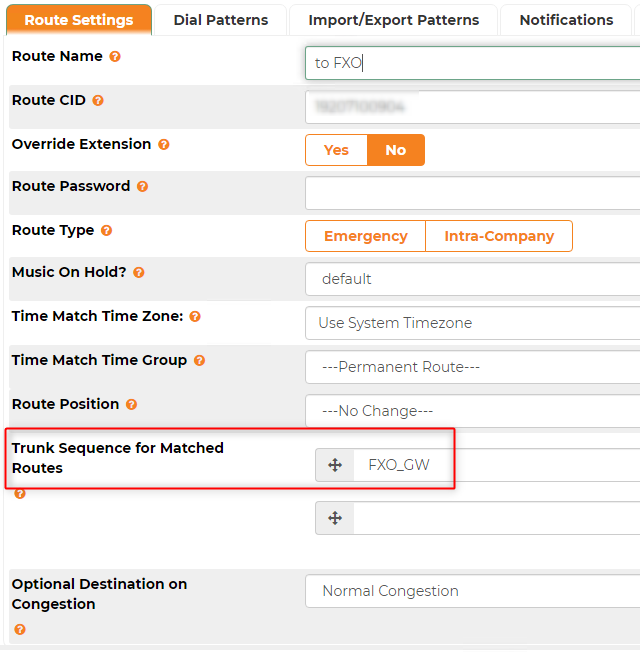
Outbound Route in ComXchange
Set the Trunk sequence for each outbound route that you want to use to send calls to the gateway
Navigate to Core Configuration > Outbound Routes
- Choose or create the route you want to use for the trunk
- In the Trunk Sequence for Matched Routes choose the Trunk you created for the Gateway
- In the example below FXO_GW is used
 Uploading ....